
Product Brochure
Page 2
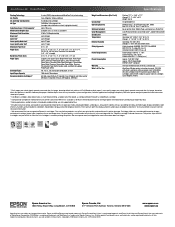
...Windows Vista®, XP, XP Professional x64, 2000 Mac OS® X 10.3.9, 10.4.11 and 10.5.x Epson printer driver, Web to Page, and Epson Easy Photo Print Auto Photo Correction, Epson... Ink Cartridges†† 4-color (CMYK) drop-on-demand MicroPiezo® ink jet technology Cyan, Magenta, Yellow and Black 5 individual ink cartridges DURABrite® Ultra pigment ink... Weight: 8.6 lb. and Canada WorkForce 30 color printer, instructional manual, CD-ROM with full cartridges and part of the ink from the first cartridges is a trademark of Epson America, Inc. Based on system ...
...Windows Vista®, XP, XP Professional x64, 2000 Mac OS® X 10.3.9, 10.4.11 and 10.5.x Epson printer driver, Web to Page, and Epson Easy Photo Print Auto Photo Correction, Epson... Ink Cartridges†† 4-color (CMYK) drop-on-demand MicroPiezo® ink jet technology Cyan, Magenta, Yellow and Black 5 individual ink cartridges DURABrite® Ultra pigment ink... Weight: 8.6 lb. and Canada WorkForce 30 color printer, instructional manual, CD-ROM with full cartridges and part of the ink from the first cartridges is a trademark of Epson America, Inc. Based on system ...
Quick Guide
Page 2
Contents Introduction 3 Loading Paper 4 Using Special Papers 6 Basic Printing 8 Printing in Windows 8 Printing With a Macintosh 10 Selecting the Correct Paper Type 15 Maintaining Your Printer 16 Checking the Print Head Nozzles 16 Cleaning the Print Head 17 Checking the Ink Cartridge Status 18 Replacing Ink Cartridges 19 Solving Problems 24 Checking for Software Updates 24 Error Indicators 25 Problems and Solutions 26 Where To Get Help 28 Notices 29 2 Contents
Contents Introduction 3 Loading Paper 4 Using Special Papers 6 Basic Printing 8 Printing in Windows 8 Printing With a Macintosh 10 Selecting the Correct Paper Type 15 Maintaining Your Printer 16 Checking the Print Head Nozzles 16 Cleaning the Print Head 17 Checking the Ink Cartridge Status 18 Replacing Ink Cartridges 19 Solving Problems 24 Checking for Software Updates 24 Error Indicators 25 Problems and Solutions 26 Where To Get Help 28 Notices 29 2 Contents
Quick Guide
Page 3
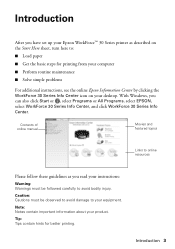
...Windows, you read your instructions: Warning: Warnings must be followed carefully to avoid bodily injury. Tip: Tips contain hints for printing from your computer ■ Perform routine maintenance ■ Solve simple problems For additional instructions, see the online Epson Information Center by clicking the WorkForce 30...Introduction After you have set up your Epson WorkForce™ 30 Series printer as you can also click Start or , select Programs or All Programs, select EPSON, select WorkForce 30 Series Info Center, and click WorkForce 30 Series Info Center. Contents of online ...
...Windows, you read your instructions: Warning: Warnings must be followed carefully to avoid bodily injury. Tip: Tips contain hints for printing from your computer ■ Perform routine maintenance ■ Solve simple problems For additional instructions, see the online Epson Information Center by clicking the WorkForce 30...Introduction After you have set up your Epson WorkForce™ 30 Series printer as you can also click Start or , select Programs or All Programs, select EPSON, select WorkForce 30 Series Info Center, and click WorkForce 30 Series Info Center. Contents of online ...

Quick Guide
Page 8
... Center. Tip: It's a good idea to check for updates to your WorkForce 30 Series software (see a window like this one: Select EPSON WorkForce 30 Series Click here to your document or photo in Windows 1. Open your computer as described on your printer software 8 Basic Printing You see page 24 for printing a document or photo stored on the Start...
... Center. Tip: It's a good idea to check for updates to your WorkForce 30 Series software (see a window like this one: Select EPSON WorkForce 30 Series Click here to your document or photo in Windows 1. Open your computer as described on your printer software 8 Basic Printing You see page 24 for printing a document or photo stored on the Start...
Quick Guide
Page 9
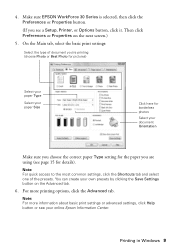
Make sure EPSON WorkForce 30 Series is selected, then click the Preferences or Properties button. (If you are using (see page 15 for the paper you see your online Epson Information Center. You can create your document Orientation Make sure you choose the correct paper Type setting for ...the Advanced tab. For more information about basic print settings or advanced settings, click Help button or see a Setup, Printer, or Options button, click it. Printing in Windows 9 Then click Preferences or Properties on the Advanced tab. 6. Note: For quick access to the most common settings...
Make sure EPSON WorkForce 30 Series is selected, then click the Preferences or Properties button. (If you are using (see page 15 for the paper you see your online Epson Information Center. You can create your document Orientation Make sure you choose the correct paper Type setting for ...the Advanced tab. For more information about basic print settings or advanced settings, click Help button or see a Setup, Printer, or Options button, click it. Printing in Windows 9 Then click Preferences or Properties on the Advanced tab. 6. Note: For quick access to the most common settings...
Quick Guide
Page 10
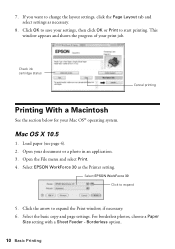
...menu and select Print. 4. Click the arrow to expand 5. Select EPSON WorkForce 30 as necessary. 8. Select the basic copy and page settings. Click OK to save your Mac OS® operating system. 7. Check ink cartridge status Cancel printing Printing With a Macintosh See the section below ...the layout settings, click the Page Layout tab and select settings as the Printer setting. For borderless photos, choose a Paper Size setting with a Sheet Feeder - Select EPSON WorkForce 30 Click to expand the Print window, if necessary. 6. Borderless option. 10 Basic Printing If you want to...
...menu and select Print. 4. Click the arrow to expand 5. Select EPSON WorkForce 30 as necessary. 8. Select the basic copy and page settings. Click OK to save your Mac OS® operating system. 7. Check ink cartridge status Cancel printing Printing With a Macintosh See the section below ...the layout settings, click the Page Layout tab and select settings as the Printer setting. For borderless photos, choose a Paper Size setting with a Sheet Feeder - Select EPSON WorkForce 30 Click to expand the Print window, if necessary. 6. Borderless option. 10 Basic Printing If you want to...
Quick Guide
Page 11
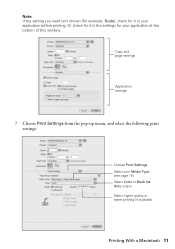
Or check for your application before printing. Copy and page settings Application settings 7. Note: If the setting you want isn't shown (for example, Scale), check for it in the settings for it in your application at the bottom of this window. Choose Print Settings from the pop-up menu, and select the following print settings: Choose Print Settings Select your Media Type (see page 15) Select Color or Black Ink Only output Select higher quality or faster printing (if available) Printing With a Macintosh 11
Or check for your application before printing. Copy and page settings Application settings 7. Note: If the setting you want isn't shown (for example, Scale), check for it in the settings for it in your application at the bottom of this window. Choose Print Settings from the pop-up menu, and select the following print settings: Choose Print Settings Select your Media Type (see page 15) Select Color or Black Ink Only output Select higher quality or faster printing (if available) Printing With a Macintosh 11
Quick Guide
Page 12
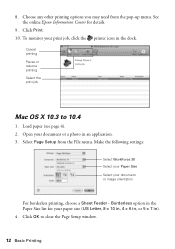
...-up menu. Cancel printing Pause or resume printing Select the print job Mac OS X 10.3 to close the Page Setup window. 12 Basic Printing Click OK to 10.4 1. See the online Epson Information Center for your document or a photo in the dock. Open your paper size (US Letter, 8 × 10 in, 4 ... document or image orientation For borderless printing, choose a Sheet Feeder - Borderless option in the Paper Size list for details. 9. Make the following settings: Select WorkForce 30 Select your Paper Size Select your print job, click the printer icon in an application. 3.
...-up menu. Cancel printing Pause or resume printing Select the print job Mac OS X 10.3 to close the Page Setup window. 12 Basic Printing Click OK to 10.4 1. See the online Epson Information Center for your document or a photo in the dock. Open your paper size (US Letter, 8 × 10 in, 4 ... document or image orientation For borderless printing, choose a Sheet Feeder - Borderless option in the Paper Size list for details. 9. Make the following settings: Select WorkForce 30 Select your Paper Size Select your print job, click the printer icon in an application. 3.
Quick Guide
Page 13
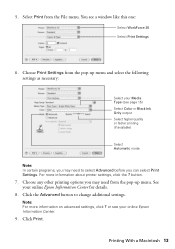
... pop-up menu and select the following settings as necessary: Select your Media Type (see page 15) Select Color or Black Ink Only output Select higher quality or faster printing (if available) Select Automatic mode Note: In certain programs, you may need to...or see a window like this one: Select WorkForce 30 Select Print Settings 6. You see your online Epson Information Center for details. 8. For more information on advanced settings, click ? Click the Advanced button to select Advanced before you may need from the File menu. 5. Note: For more information about printer settings, click ...
... pop-up menu and select the following settings as necessary: Select your Media Type (see page 15) Select Color or Black Ink Only output Select higher quality or faster printing (if available) Select Automatic mode Note: In certain programs, you may need to...or see a window like this one: Select WorkForce 30 Select Print Settings 6. You see your online Epson Information Center for details. 8. For more information on advanced settings, click ? Click the Advanced button to select Advanced before you may need from the File menu. 5. Note: For more information about printer settings, click ...
Quick Guide
Page 14
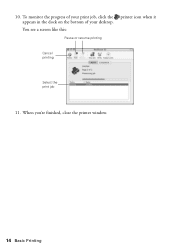
You see a screen like this: Pause or resume printing printer icon when it Cancel printing Select the print job 11. 10. To monitor the progress of your print job, click the appears in the dock on the bottom of your desktop. When you're finished, close the printer window. 14 Basic Printing
You see a screen like this: Pause or resume printing printer icon when it Cancel printing Select the print job 11. 10. To monitor the progress of your print job, click the appears in the dock on the bottom of your desktop. When you're finished, close the printer window. 14 Basic Printing
Quick Guide
Page 18
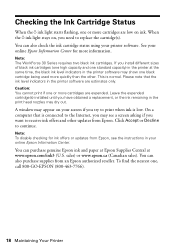
Note: The WorkForce 30 Series requires two black ink cartridges. If you install different sizes of black ink cartridges (one high capacity and one standard capacity) in the print head nozzles may appear on your online Epson Information Center. Leave the expended cartridge(s) installed until you want to continue. You can also check the ink cartridge status...
Note: The WorkForce 30 Series requires two black ink cartridges. If you install different sizes of black ink cartridges (one high capacity and one standard capacity) in the print head nozzles may appear on your online Epson Information Center. Leave the expended cartridge(s) installed until you want to continue. You can also check the ink cartridge status...
Quick Guide
Page 24
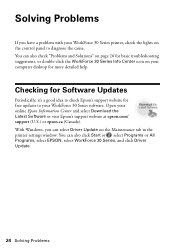
... your WorkForce 30 Series printer, check the lights on the Maintenance tab in the printer settings window. Checking for Software Updates Periodically, it's a good idea to check Epson's support website for more detailed help. Solving Problems If you can also check "Problems and Solutions" on page 26 for basic troubleshooting suggestions, or double-click the WorkForce 30 Series...
... your WorkForce 30 Series printer, check the lights on the Maintenance tab in the printer settings window. Checking for Software Updates Periodically, it's a good idea to check Epson's support website for more detailed help. Solving Problems If you can also check "Problems and Solutions" on page 26 for basic troubleshooting suggestions, or double-click the WorkForce 30 Series...
Start Here
Page 5
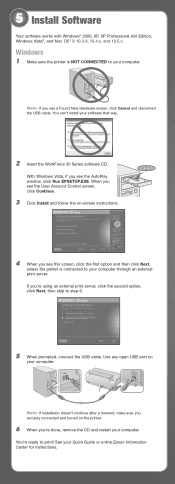
See your software that way. 2 Insert the WorkForce 30 Series software CD. With Windows Vista, if you see the AutoPlay window, click Run EPSETUP.EXE. Use any open USB port on the printer. 6 When you securely connected and turned on your computer. Note: If you see a Found New Hardware screen, click Cancel and disconnect the USB... you 're using an external print server, click the second option, click Next, then skip to print! You can't install your Quick Guide or online Epson Information Center for instructions.
See your software that way. 2 Insert the WorkForce 30 Series software CD. With Windows Vista, if you see the AutoPlay window, click Run EPSETUP.EXE. Use any open USB port on the printer. 6 When you securely connected and turned on your computer. Note: If you see a Found New Hardware screen, click Cancel and disconnect the USB... you 're using an external print server, click the second option, click Next, then skip to print! You can't install your Quick Guide or online Epson Information Center for instructions.

