User Manual
Page 7
Replacing the Air Filter...153 Projector Lamp Maintenance...156 Replacing the Lamp ...156 Resetting the Lamp Timer...160 Replacing the Remote Control Batteries 161 Transporting the Projector...163 Solving Problems ...164 Projection Problem Tips ...164 Projector Light Status ...165 Using the ...
Replacing the Air Filter...153 Projector Lamp Maintenance...156 Replacing the Lamp ...156 Resetting the Lamp Timer...160 Replacing the Remote Control Batteries 161 Transporting the Projector...163 Solving Problems ...164 Projection Problem Tips ...164 Projector Light Status ...165 Using the ...
User Manual
Page 8
Projector Lamp Specifications...186 Remote Control Specifications ...186 Projector Dimension Specifications 186 Projector Electrical Specifications ...187 Projector Environmental Specifications 188 Projector Safety and Approvals Specifications 188 Supported ...
Projector Lamp Specifications...186 Remote Control Specifications ...186 Projector Dimension Specifications 186 Projector Electrical Specifications ...187 Projector Environmental Specifications 188 Projector Safety and Approvals Specifications 188 Supported ...

User Manual
Page 11
...you need to -use the original packaging (or equivalent) when shipping. 11 visit epson.com/projectorapp (U.S.) or epson.ca/projectorapp (Canada) for more information (EX3240/EX5240/VS240/VS340/VS345 require the optional wireless LAN module) • PC Free photo slide shows via...lamp life • Automatic vertical keystone correction and innovative horizontal keystone correction slider for flexible projector placement • 1.2× optical zoom ratio for improved zooming capability (EX5240/EX5250 Pro/EX7240 Pro/EX9200 Pro/VS340/VS345) • Built-in closed captioning decoder • Epson...
...you need to -use the original packaging (or equivalent) when shipping. 11 visit epson.com/projectorapp (U.S.) or epson.ca/projectorapp (Canada) for more information (EX3240/EX5240/VS240/VS340/VS345 require the optional wireless LAN module) • PC Free photo slide shows via...lamp life • Automatic vertical keystone correction and innovative horizontal keystone correction slider for flexible projector placement • 1.2× optical zoom ratio for improved zooming capability (EX5240/EX5250 Pro/EX7240 Pro/EX9200 Pro/VS340/VS345) • Built-in closed captioning decoder • Epson...

User Manual
Page 19
13 Focus ring 14 Zoom ring (EX5240/EX5250 Pro/EX7240 Pro/EX9200 Pro/VS340/VS345) 15 Lamp cover Parent topic: Projector Part Locations Projector Parts - Rear EX3240/EX5240/EX5250 Pro/EX7240 Pro/VS240/VS340/VS345 1 AC input port 2 Wireless LAN module cover screw (EX3240/EX5240/EX5250 Pro/VS240/VS340/VS345) 3 Audio ports 4 Video port 5 Remote receiver 6 Speaker 7 HDMI port (EX3240/EX5240/EX5250 Pro/VS240/VS340/VS345) HDMI/MHL port (EX7240 Pro) 8 Computer port 9 S-Video port 10 USB-B port 19
13 Focus ring 14 Zoom ring (EX5240/EX5250 Pro/EX7240 Pro/EX9200 Pro/VS340/VS345) 15 Lamp cover Parent topic: Projector Part Locations Projector Parts - Rear EX3240/EX5240/EX5250 Pro/EX7240 Pro/VS240/VS340/VS345 1 AC input port 2 Wireless LAN module cover screw (EX3240/EX5240/EX5250 Pro/VS240/VS340/VS345) 3 Audio ports 4 Video port 5 Remote receiver 6 Speaker 7 HDMI port (EX3240/EX5240/EX5250 Pro/VS240/VS340/VS345) HDMI/MHL port (EX7240 Pro) 8 Computer port 9 S-Video port 10 USB-B port 19
User Manual
Page 74
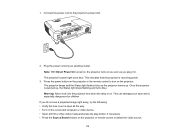
... , the Status light stops flashing and turns blue. Connect the power cord to turn on . Plug the power cord into the projector lens when the lamp is especially dangerous for children. Note: With Direct Power On turned on, the projector turns on the projector or remote control to detect the video...
... , the Status light stops flashing and turns blue. Connect the power cord to turn on . Plug the power cord into the projector lens when the lamp is especially dangerous for children. Note: With Direct Power On turned on, the projector turns on the projector or remote control to detect the video...

User Manual
Page 75
...Image Source Turning Off the Projector Before turning off the projector, shut down any other button.) The projector beeps twice, the lamp turns off, and the Status light turns off. 75 Lamp life will vary depending upon mode selected, environmental conditions, and usage. Note: When using the A/V Mute feature, the projector... lamp is displayed, select the source you can see the computer display during shutdown. Press the power button again. (To leave it so you want...
...Image Source Turning Off the Projector Before turning off the projector, shut down any other button.) The projector beeps twice, the lamp turns off, and the Status light turns off. 75 Lamp life will vary depending upon mode selected, environmental conditions, and usage. Note: When using the A/V Mute feature, the projector... lamp is displayed, select the source you can see the computer display during shutdown. Press the power button again. (To leave it so you want...
User Manual
Page 76
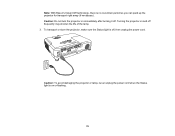
To transport or store the projector, make sure the Status light is off frequently may shorten the life of the lamp. 3. Turning the projector on immediately after turning it off. Caution: Do not turn the projector on and off , then unplug the power cord. Caution: To avoid damaging the projector or lamp, never unplug the power cord when the Status light is no cool-down period so you can pack up the projector for transport right away (if necessary). Note: With Epson's Instant Off technology, there is on or flashing. 76
To transport or store the projector, make sure the Status light is off frequently may shorten the life of the lamp. 3. Turning the projector on immediately after turning it off. Caution: Do not turn the projector on and off , then unplug the power cord. Caution: To avoid damaging the projector or lamp, never unplug the power cord when the Status light is no cool-down period so you can pack up the projector for transport right away (if necessary). Note: With Epson's Instant Off technology, there is on or flashing. 76
User Manual
Page 123
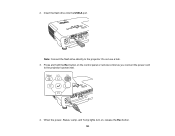
Note: Connect the flash drive directly to the projector's power inlet. 4. 2. Do not use a hub. 3. Press and hold the Esc button on , release the Esc button. 123 When the power, Status, Lamp, and Temp lights turn on the control panel or remote control as you connect the power cord to the projector. Insert the flash drive into the USB-A port.
Note: Connect the flash drive directly to the projector's power inlet. 4. 2. Do not use a hub. 3. Press and hold the Esc button on , release the Esc button. 123 When the power, Status, Lamp, and Temp lights turn on the control panel or remote control as you connect the power cord to the projector. Insert the flash drive into the USB-A port.

User Manual
Page 125
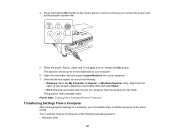
... the flash drive. Your computer must be running one of the following operating systems: • Windows Vista • Windows 7 • Windows 8.x 125 When the power, Lamp, and Temp lights turn on the control panel or remote control as you want to transfer to the projector. The lights flash to the projector...
... the flash drive. Your computer must be running one of the following operating systems: • Windows Vista • Windows 7 • Windows 8.x 125 When the power, Lamp, and Temp lights turn on the control panel or remote control as you want to transfer to the projector. The lights flash to the projector...
User Manual
Page 127
When the power, Status, Lamp, and Temp lights turn on your projector from the desktop into the trash. The projector shows up as a removable disk on , release the Esc button. ...
When the power, Status, Lamp, and Temp lights turn on your projector from the desktop into the trash. The projector shows up as a removable disk on , release the Esc button. ...
User Manual
Page 129
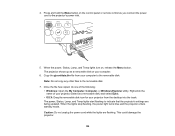
When the power, Status, Lamp, and Temp lights turn on the control panel or remote control as you connect the power cord to the removable disk. Note: Do not copy ... X: Drag the removable disk icon for your projector from your computer. 6. Copy the pjconfdata.bin file from the desktop into the trash. The power, Status, Lamp, and Temp lights start flashing to the removable disk. 7. Right-click the name of the following: • Windows: Open the My Computer, Computer, or Windows...
When the power, Status, Lamp, and Temp lights turn on the control panel or remote control as you connect the power cord to the removable disk. Note: Do not copy ... X: Drag the removable disk icon for your projector from your computer. 6. Copy the pjconfdata.bin file from the desktop into the trash. The power, Status, Lamp, and Temp lights start flashing to the removable disk. 7. Right-click the name of the following: • Windows: Open the My Computer, Computer, or Windows...
User Manual
Page 135
... mode, use the Power Consumption setting. High Speed sets faster luminance correction for fast-moving images Note: The Brightness setting does not affect lamp brightness. Note: The Noise Reduction setting is not available if you have done the following: • Set the Deinterlacing option to Off • Selected a digital ...
... mode, use the Power Consumption setting. High Speed sets faster luminance correction for fast-moving images Note: The Brightness setting does not affect lamp brightness. Note: The Noise Reduction setting is not available if you have done the following: • Set the Deinterlacing option to Off • Selected a digital ...
User Manual
Page 146
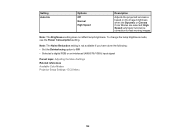
... Off On Off Parent topic: Adjusting the Menu Settings 146 Description Selects the brightness mode of the projected screen to Normal, the lamp brightness is set this option for each color mode Automatically places the projector in standby mode after an interval of inactivity Sets the ...monitored over a network when the projector is in standby mode Displays a leaf icon in the bottom left corner of the projector lamp Normal: sets maximum lamp brightness ECO: reduces lamp brightness and fan noise, and saves power and lamp life When Power Consumption is adjusted based on the projected image;
... Off On Off Parent topic: Adjusting the Menu Settings 146 Description Selects the brightness mode of the projected screen to Normal, the lamp brightness is set this option for each color mode Automatically places the projector in standby mode after an interval of inactivity Sets the ...monitored over a network when the projector is in standby mode Displays a leaf icon in the bottom left corner of the projector lamp Normal: sets maximum lamp brightness ECO: reduces lamp brightness and fan noise, and saves power and lamp life When Power Consumption is adjusted based on the projected image;
User Manual
Page 147
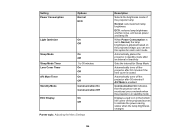
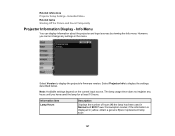
... change any hours until you have used in yellow, obtain a genuine Epson replacement lamp soon 147 The lamp usage timer does not register any settings in the menu. Information item Lamp Hours Description Displays the number of hours (H) the lamp has been used the lamp for at least 10 hours. if the information is displayed in...
... change any hours until you have used in yellow, obtain a genuine Epson replacement lamp soon 147 The lamp usage timer does not register any settings in the menu. Information item Lamp Hours Description Displays the number of hours (H) the lamp has been used the lamp for at least 10 hours. if the information is displayed in...
User Manual
Page 148
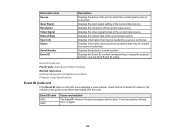
.... see the list of Event ID codes Event ID Code List Parent topic: Adjusting the Menu Settings Related references Optional Equipment and Replacement Parts Projector Lamp Specifications Event ID Code List If the Event ID option on again. 148 Event ID code 0432 0435 Cause and solution The EasyMP Network Projection...
.... see the list of Event ID codes Event ID Code List Parent topic: Adjusting the Menu Settings Related references Optional Equipment and Replacement Parts Projector Lamp Specifications Event ID Code List If the Event ID option on again. 148 Event ID code 0432 0435 Cause and solution The EasyMP Network Projection...

User Manual
Page 150
You cannot reset the following settings using the Reset Lamp Hours option. You can also reset the projector's lamp usage timer to zero when you replace the lamp using the Reset All option: • Input Signal • User's Logo • Language • Network menu items • Lamp Hours • Password Parent topic: Adjusting the Menu Settings 150
You cannot reset the following settings using the Reset Lamp Hours option. You can also reset the projector's lamp usage timer to zero when you replace the lamp using the Reset All option: • Input Signal • User's Logo • Language • Network menu items • Lamp Hours • Password Parent topic: Adjusting the Menu Settings 150

User Manual
Page 151
... projector can injure you severely. Refer all other part needs replacing, contact Epson or an authorized Epson servicer. Cleaning the Lens Cleaning the Projector Case Air Filter and Vent Maintenance Projector Lamp Maintenance Replacing the Remote Control Batteries Parent topic: Maintaining and Transporting the Projector...open any other servicing to Get Help Cleaning the Lens Clean the projector's lens periodically, or whenever you should replace are the lamp, air filter, and remote control batteries. You may need to clean the lens periodically, and clean the air filter and air...
... projector can injure you severely. Refer all other part needs replacing, contact Epson or an authorized Epson servicer. Cleaning the Lens Cleaning the Projector Case Air Filter and Vent Maintenance Projector Lamp Maintenance Replacing the Remote Control Batteries Parent topic: Maintaining and Transporting the Projector...open any other servicing to Get Help Cleaning the Lens Clean the projector's lens periodically, or whenever you should replace are the lamp, air filter, and remote control batteries. You may need to clean the lens periodically, and clean the air filter and air...
User Manual
Page 152
...properly maintain the projector or its filter may cause a fire. Filter maintenance intervals will notify you may reduce the life of your projector or lamp. Damage due to the failure to protect your projector. Warning: Do not use wax, alcohol, benzine, paint thinner, or other chemicals to... gases may leave a residue. Avoid touching the lens with lens cleaner and gently wipe the lens. These can damage the case. Your Epson projector is important to clean the projector case. Cleaning the Air Filter and Vents Replacing the Air Filter Parent topic: Projector Maintenance 152 you...
...properly maintain the projector or its filter may cause a fire. Filter maintenance intervals will notify you may reduce the life of your projector or lamp. Damage due to the failure to protect your projector. Warning: Do not use wax, alcohol, benzine, paint thinner, or other chemicals to... gases may leave a residue. Avoid touching the lens with lens cleaner and gently wipe the lens. These can damage the case. Your Epson projector is important to clean the projector case. Cleaning the Air Filter and Vents Replacing the Air Filter Parent topic: Projector Maintenance 152 you...
User Manual
Page 156
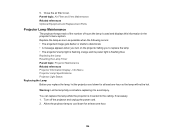
... the projector and unplug the power cord. 2. Allow the projector lamp to replace the lamp • The projector's lamp light is flashing orange and its power light is flashing blue Replacing the Lamp Resetting the Lamp Timer Parent topic: Projector Maintenance Related references Projector Information Display -...and Vent Maintenance Related references Optional Equipment and Replacement Parts Projector Lamp Maintenance The projector keeps track of the number of hours the lamp is mounted to avoid injury. You can replace the lamp while the projector is used and displays this information in ...
... the projector and unplug the power cord. 2. Allow the projector lamp to replace the lamp • The projector's lamp light is flashing orange and its power light is flashing blue Replacing the Lamp Resetting the Lamp Timer Parent topic: Projector Maintenance Related references Projector Information Display -...and Vent Maintenance Related references Optional Equipment and Replacement Parts Projector Lamp Maintenance The projector keeps track of the number of hours the lamp is mounted to avoid injury. You can replace the lamp while the projector is used and displays this information in ...
User Manual
Page 157
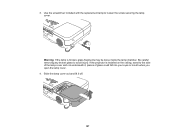
Be careful removing any broken glass to the side of glass could fall into your eyes or mouth when you open the lamp cover. 4. pieces of the lamp cover and not underneath it off. 157 Warning: If the lamp is installed on the ceiling, stand to avoid injury. If the projector is broken, glass fragments may be loose inside the lamp chamber. Slide the lamp cover out and lift it ; Use the screwdriver included with the replacement lamp to loosen the screw securing the lamp cover. 3.
Be careful removing any broken glass to the side of glass could fall into your eyes or mouth when you open the lamp cover. 4. pieces of the lamp cover and not underneath it off. 157 Warning: If the lamp is installed on the ceiling, stand to avoid injury. If the projector is broken, glass fragments may be loose inside the lamp chamber. Slide the lamp cover out and lift it ; Use the screwdriver included with the replacement lamp to loosen the screw securing the lamp cover. 3.


