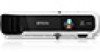
User Manual
Page 4
... Batteries in the Remote Control 46 Opening the Lens Cover ...48 Using the Projector on a Network ...50 Wireless Network Projection ...50 Connecting Directly to a Laptop or Computer 51 Connecting Directly to a Smartphone or Tablet 54... Wireless Network Security Guidelines 57 Installing the Wireless LAN Module 57 Using Quick Wireless Connection (Windows Only 59 Selecting Wireless Network Settings Manually 61 Wireless LAN Menu Settings ...64 Selecting Wireless Network Settings in Windows 65 Selecting Wireless Network Settings in OS X 65 Setting Up Wireless Network Security 65 Wireless ...
... Batteries in the Remote Control 46 Opening the Lens Cover ...48 Using the Projector on a Network ...50 Wireless Network Projection ...50 Connecting Directly to a Laptop or Computer 51 Connecting Directly to a Smartphone or Tablet 54... Wireless Network Security Guidelines 57 Installing the Wireless LAN Module 57 Using Quick Wireless Connection (Windows Only 59 Selecting Wireless Network Settings Manually 61 Wireless LAN Menu Settings ...64 Selecting Wireless Network Settings in Windows 65 Selecting Wireless Network Settings in OS X 65 Setting Up Wireless Network Security 65 Wireless ...

User Manual
Page 5
... with Quick Corner 84 Resizing the Image...86 Focusing the Image Using the Focus Ring 87 Remote Control Operation ...88 Using the Remote Control as a Wireless Mouse 89 Using the Remote Control as a Pointer 90 Selecting an Image Source ...91 Projection Modes ...93 Changing the Projection Mode Using the Remote Control...
... with Quick Corner 84 Resizing the Image...86 Focusing the Image Using the Focus Ring 87 Remote Control Operation ...88 Using the Remote Control as a Wireless Mouse 89 Using the Remote Control as a Pointer 90 Selecting an Image Source ...91 Projection Modes ...93 Changing the Projection Mode Using the Remote Control...

User Manual
Page 10
...setup • Built-in the Documentation Where to learn more about your projector and this manual. Projector Features Notations Used in wireless LAN for Additional Information Projector Part Locations Projector Features Your projector includes these sections to Go for projection, monitoring, and control ... output measured in accordance with ISO 21118. • EX3240/VS240: Native resolution of 800 × 600 pixels (SVGA) • EX5240/EX5250 Pro/VS340: Native resolution of 1024 × 768 pixels (XGA) • EX7240 Pro/VS345: Native resolution of 1280 × 800 pixels (WXGA) •...
...setup • Built-in the Documentation Where to learn more about your projector and this manual. Projector Features Notations Used in wireless LAN for Additional Information Projector Part Locations Projector Features Your projector includes these sections to Go for projection, monitoring, and control ... output measured in accordance with ISO 21118. • EX3240/VS240: Native resolution of 800 × 600 pixels (SVGA) • EX5240/EX5250 Pro/VS340: Native resolution of 1024 × 768 pixels (XGA) • EX7240 Pro/VS345: Native resolution of 1280 × 800 pixels (WXGA) •...

User Manual
Page 11
.../projectorapp (Canada) for more information (EX3240/EX5240/VS240/VS340/VS345 require the optional wireless LAN module) • PC Free photo slide shows via remote network computer (EX5250 Pro) • Projection from iOS or Android devices and free Epson iProjection app; • Wireless LAN module for quick setup and shut down Product Box Contents Additional...
.../projectorapp (Canada) for more information (EX3240/EX5240/VS240/VS340/VS345 require the optional wireless LAN module) • PC Free photo slide shows via remote network computer (EX5250 Pro) • Projection from iOS or Android devices and free Epson iProjection app; • Wireless LAN module for quick setup and shut down Product Box Contents Additional...
User Manual
Page 12
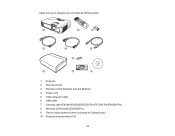
Make sure your projector box included all of these parts: 1 Projector 2 Remote control 3 Remote control batteries (two AA alkaline) 4 Power cord 5 VGA computer cable 6 USB cable 7 Carrying case (EX3240/EX5240/EX5250 Pro/EX7240 Pro/EX9200 Pro) 8 Wireless LAN module (EX5250 Pro) 9 French control panel stickers (included for Canada only) 10 Projector documentation CD 12
Make sure your projector box included all of these parts: 1 Projector 2 Remote control 3 Remote control batteries (two AA alkaline) 4 Power cord 5 VGA computer cable 6 USB cable 7 Carrying case (EX3240/EX5240/EX5250 Pro/EX7240 Pro/EX9200 Pro) 8 Wireless LAN module (EX5250 Pro) 9 French control panel stickers (included for Canada only) 10 Projector documentation CD 12

User Manual
Page 19
13 Focus ring 14 Zoom ring (EX5240/EX5250 Pro/EX7240 Pro/EX9200 Pro/VS340/VS345) 15 Lamp cover Parent topic: Projector Part Locations Projector Parts - Rear EX3240/EX5240/EX5250 Pro/EX7240 Pro/VS240/VS340/VS345 1 AC input port 2 Wireless LAN module cover screw (EX3240/EX5240/EX5250 Pro/VS240/VS340/VS345) 3 Audio ports 4 Video port 5 Remote receiver 6 Speaker 7 HDMI port (EX3240/EX5240/EX5250 Pro/VS240/VS340/VS345) HDMI/MHL port (EX7240 Pro) 8 Computer port 9 S-Video port 10 USB-B port 19
13 Focus ring 14 Zoom ring (EX5240/EX5250 Pro/EX7240 Pro/EX9200 Pro/VS340/VS345) 15 Lamp cover Parent topic: Projector Part Locations Projector Parts - Rear EX3240/EX5240/EX5250 Pro/EX7240 Pro/VS240/VS340/VS345 1 AC input port 2 Wireless LAN module cover screw (EX3240/EX5240/EX5250 Pro/VS240/VS340/VS345) 3 Audio ports 4 Video port 5 Remote receiver 6 Speaker 7 HDMI port (EX3240/EX5240/EX5250 Pro/VS240/VS340/VS345) HDMI/MHL port (EX7240 Pro) 8 Computer port 9 S-Video port 10 USB-B port 19

User Manual
Page 25
...Volume up and down buttons (adjust speaker volume) 19 Pointer button (activates on -screen options and control wireless mouse functions) 10 Enter button (selects options and controls wireless mouse functions) 11 User button (customizable for connected sources) 27 Infrared emitter Parent topic: Projector Part ... button (accesses projector menu system) 9 Arrow buttons (move through on -screen pointer) 20 Esc button (cancels/exits functions and controls wireless mouse functions) 21 ID button (selects projector and remote control ID numbers) 22 Color Mode button (selects display modes) 23 MHL Menu...
...Volume up and down buttons (adjust speaker volume) 19 Pointer button (activates on -screen options and control wireless mouse functions) 10 Enter button (selects options and controls wireless mouse functions) 11 User button (customizable for connected sources) 27 Infrared emitter Parent topic: Projector Part ... button (accesses projector menu system) 9 Arrow buttons (move through on -screen pointer) 20 Esc button (cancels/exits functions and controls wireless mouse functions) 21 ID button (selects projector and remote control ID numbers) 22 Color Mode button (selects display modes) 23 MHL Menu...
User Manual
Page 35
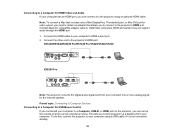
... HDMI cable to the projector using a USB cable, if it to your computer's HDMI output port. 2. EX3240/EX5240/EX5250 Pro/EX7240 Pro/VS240/VS340/VS345 EX9200 Pro Note: The projector converts the digital audio signal sent from your computer to a Computer, USB-B, or HDMI port on the projector,... you connected your computer. Connect the other end to act as a wireless mouse. Parent topic: Connecting to Computer Sources Connecting to a Computer for USB Mouse Control If you can connect it is not connected already. 35...
... HDMI cable to the projector using a USB cable, if it to your computer's HDMI output port. 2. EX3240/EX5240/EX5250 Pro/EX7240 Pro/VS240/VS340/VS345 EX9200 Pro Note: The projector converts the digital audio signal sent from your computer to a Computer, USB-B, or HDMI port on the projector,... you connected your computer. Connect the other end to act as a wireless mouse. Parent topic: Connecting to Computer Sources Connecting to a Computer for USB Mouse Control If you can connect it is not connected already. 35...

User Manual
Page 36
...-B port. 1. If necessary, configure your desktop's speaker or audio-out port. 36 Parent topic: Connecting to Computer Sources Related tasks Using the Remote Control as a Wireless Mouse Connecting to your laptop's headphone or audio-out jack, or your computer to work with one 3.5 mm mini-plug and two RCA plugs). 1. Connect... system. See your computer documentation for Sound If your computer. 3. Connect the audio cable to a Computer for details. EX3240/EX5240/EX5250 Pro/EX7240 Pro/VS240/VS340/VS345 EX9200 Pro 2.
...-B port. 1. If necessary, configure your desktop's speaker or audio-out port. 36 Parent topic: Connecting to Computer Sources Related tasks Using the Remote Control as a Wireless Mouse Connecting to your laptop's headphone or audio-out jack, or your computer to work with one 3.5 mm mini-plug and two RCA plugs). 1. Connect... system. See your computer documentation for Sound If your computer. 3. Connect the audio cable to a Computer for details. EX3240/EX5240/EX5250 Pro/EX7240 Pro/VS240/VS340/VS345 EX9200 Pro 2.
User Manual
Page 50
... Up Monitoring Using SNMP Controlling a Networked Projector Using a Web Browser Wireless Network Projection You can send images to epson.com/support (U.S.) or epson.ca/support (Canada) and select your projector. Note: The wireless LAN module is not included with the wireless LAN module and free Epson iProjection app; Go to your projector through the network. •...
... Up Monitoring Using SNMP Controlling a Networked Projector Using a Web Browser Wireless Network Projection You can send images to epson.com/support (U.S.) or epson.ca/support (Canada) and select your projector. Note: The wireless LAN module is not included with the wireless LAN module and free Epson iProjection app; Go to your projector through the network. •...

User Manual
Page 51
... references Product Box Contents Optional Equipment and Replacement Parts Connecting Directly to a Laptop or Computer You can connect directly to purchase the optional wireless LAN module. 1. Connect the wireless LAN module to the USB-A (flat) port on your projector model, you may need to your computer or laptop. 2. Note: Depending on the...
... references Product Box Contents Optional Equipment and Replacement Parts Connecting Directly to a Laptop or Computer You can connect directly to purchase the optional wireless LAN module. 1. Connect the wireless LAN module to the USB-A (flat) port on your projector model, you may need to your computer or laptop. 2. Note: Depending on the...
User Manual
Page 53
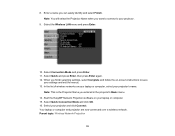
... and select Finish. Your laptop or computer and projector are now connected over a wireless network. 8. Select the Wireless LAN menu and press Enter. 10. Select Connection Mode and press Enter. 11. Parent topic: Wireless Network Projection 53 When you want to connect to save your projector. 9. Select ...Quick Connection Mode and click OK. 16. In the list of wireless networks on -screen instructions to your settings and exit the menus. 13. Enter a name you entered in the projector's Basic menu. ...
... and select Finish. Your laptop or computer and projector are now connected over a wireless network. 8. Select the Wireless LAN menu and press Enter. 10. Select Connection Mode and press Enter. 11. Parent topic: Wireless Network Projection 53 When you want to connect to save your projector. 9. Select ...Quick Connection Mode and click OK. 16. In the list of wireless networks on -screen instructions to your settings and exit the menus. 13. Enter a name you entered in the projector's Basic menu. ...

User Manual
Page 54
.... 3. Download the latest version of Epson iProjection from the App Store or Google Play and install it to connect a single smartphone or tablet to purchase the optional wireless LAN module. 1. Related tasks Installing the Wireless LAN Module Selecting Wireless Network Settings Manually Selecting Wireless Network Settings in Windows Selecting Wireless Network Settings in OS X Connecting Directly...
.... 3. Download the latest version of Epson iProjection from the App Store or Google Play and install it to connect a single smartphone or tablet to purchase the optional wireless LAN module. 1. Related tasks Installing the Wireless LAN Module Selecting Wireless Network Settings Manually Selecting Wireless Network Settings in Windows Selecting Wireless Network Settings in OS X Connecting Directly...
User Manual
Page 55
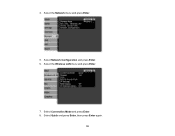
Select Quick and press Enter, then press Enter again. 55 Select Network Configuration and press Enter. 6. Select Connection Mode and press Enter. 8. Select the Wireless LAN menu and press Enter. 7. 4. Select the Network menu and press Enter. 5.
Select Quick and press Enter, then press Enter again. 55 Select Network Configuration and press Enter. 6. Select Connection Mode and press Enter. 8. Select the Wireless LAN menu and press Enter. 7. 4. Select the Network menu and press Enter. 5.

User Manual
Page 56
.... Use the QR code reader feature to your projector with the Epson iProjection app. Visit epson.com/projectorapp (U.S.) or epson.ca/projectorapp (Canada) for information on your smartphone or tablet. 13. Parent topic: Wireless Network Projection Related tasks Installing the Wireless LAN Module Selecting Wireless Network Settings Manually 56 Select Display the QR Code and press... remote control. 11. Your smartphone or tablet is now connected to read the QR code and connect your settings and exit the menus. 10. Open Epson iProjection on controlling your projector.
.... Use the QR code reader feature to your projector with the Epson iProjection app. Visit epson.com/projectorapp (U.S.) or epson.ca/projectorapp (Canada) for information on your smartphone or tablet. 13. Parent topic: Wireless Network Projection Related tasks Installing the Wireless LAN Module Selecting Wireless Network Settings Manually 56 Select Display the QR Code and press... remote control. 11. Your smartphone or tablet is now connected to read the QR code and connect your settings and exit the menus. 10. Open Epson iProjection on controlling your projector.

User Manual
Page 57
...problems such as the following may occur: • Communicated data could be intercepted by a third party who is receiving wireless transmissions without authorization, and who could obtain personal information from these transmissions such as another user and send inappropriate data (... party could cause data loss or system crashes (damage) Parent topic: Wireless Network Projection Installing the Wireless LAN Module To use the projector over a wireless network, install the Epson 802.11b/g/n wireless LAN module in access to an individual or intracompany network without permission, ...
...problems such as the following may occur: • Communicated data could be intercepted by a third party who is receiving wireless transmissions without authorization, and who could obtain personal information from these transmissions such as another user and send inappropriate data (... party could cause data loss or system crashes (damage) Parent topic: Wireless Network Projection Installing the Wireless LAN Module To use the projector over a wireless network, install the Epson 802.11b/g/n wireless LAN module in access to an individual or intracompany network without permission, ...
User Manual
Page 58
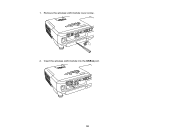
Insert the wireless LAN module into the USB-A port. 58 Remove the wireless LAN module cover screw. 2. 1.
Insert the wireless LAN module into the USB-A port. 58 Remove the wireless LAN module cover screw. 2. 1.
User Manual
Page 59
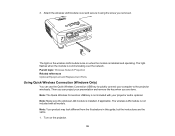
... (Windows Only) You can project your presentation and remove the key when you are the same. 1. Note: The Quick Wireless Connection USB key is optional. Note: Your product may look different from the illustrations in this guide, but the instructions are done. Turn on when... the module is installed, if applicable. Then you removed. The light on the wireless LAN module turns on the projector. 59 The wireless LAN module is communicating over the network. The light flashes when the module is not included with your computer to quickly...
... (Windows Only) You can project your presentation and remove the key when you are the same. 1. Note: The Quick Wireless Connection USB key is optional. Note: Your product may look different from the illustrations in this guide, but the instructions are done. Turn on when... the module is installed, if applicable. Then you removed. The light on the wireless LAN module turns on the projector. 59 The wireless LAN module is communicating over the network. The light flashes when the module is not included with your computer to quickly...
User Manual
Page 60
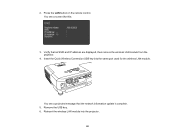
2. Verify that the network information update is complete. 5. You see a screen like this: 3. Reinsert the wireless LAN module into the same port used for the wireless LAN module. Press the LAN button on the remote control. Insert the Quick Wireless Connection USB key into the projector. 60 Remove the USB key. 6. You see a projected message that an SSID and IP address are displayed, then remove the wireless LAN module from the projector. 4.
2. Verify that the network information update is complete. 5. You see a screen like this: 3. Reinsert the wireless LAN module into the same port used for the wireless LAN module. Press the LAN button on the remote control. Insert the Quick Wireless Connection USB key into the projector. 60 Remove the USB key. 6. You see a projected message that an SSID and IP address are displayed, then remove the wireless LAN module from the projector. 4.
User Manual
Page 61
...displayed by the projector. Note: If you see a Windows Firewall message, click Yes to install the Quick Wireless Connection driver. After a few minutes, your wireless LAN connection. Run your computer. 9. Press the Menu button. 61 Follow the on the projector. 2....projector using its menu system. 1. Parent topic: Wireless Network Projection Related references Optional Equipment and Replacement Parts Selecting Wireless Network Settings Manually Before you can project from your wireless network, you finish projecting wirelessly, select the Safely Remove Hardware option in the...
...displayed by the projector. Note: If you see a Windows Firewall message, click Yes to install the Quick Wireless Connection driver. After a few minutes, your wireless LAN connection. Run your computer. 9. Press the Menu button. 61 Follow the on the projector. 2....projector using its menu system. 1. Parent topic: Wireless Network Projection Related references Optional Equipment and Replacement Parts Selecting Wireless Network Settings Manually Before you can project from your wireless network, you finish projecting wirelessly, select the Safely Remove Hardware option in the...


