User Manual
Page 2
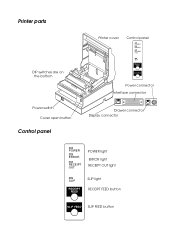
Printer parts DIP switches are on the bottom Power switch Cover open button Control panel Printer cover Control panel POWER ERROR RECEIPT OUT JOURNAL OUT SLIP RECEIPT FEED SLIP FEED Power connector Interface connector 14 1 8 1 25 1 6 2 31 13 Drawer connector Display connector POWER ERROR RECEIPT OUT JOURNAL OUT SLIP POWER light ERROR light RECEIPT OUT light SLIP light RECEIPT FEED RECEIPT FEED button SLIP FEED SLIP FEED button
Printer parts DIP switches are on the bottom Power switch Cover open button Control panel Printer cover Control panel POWER ERROR RECEIPT OUT JOURNAL OUT SLIP RECEIPT FEED SLIP FEED Power connector Interface connector 14 1 8 1 25 1 6 2 31 13 Drawer connector Display connector POWER ERROR RECEIPT OUT JOURNAL OUT SLIP POWER light ERROR light RECEIPT OUT light SLIP light RECEIPT FEED RECEIPT FEED button SLIP FEED SLIP FEED button

User Manual
Page 7
... Character Recognition (MICR) reader (factory installed option) ❏ Direct connection customer displays, DM-D102 and DM-D203 ❏ EPSON power supply unit, PS-170 (not required when the TM-U925 is a high-quality POS printer that can print on the ECS/POS® standard. ❏ ASB (Automatic Status Back) function that automatically transmits changes in printer status. ❏ EPSON® intelligent module connection. ❏ EPSON customer display series connection. ❏ Optional Magnetic Ink Character...
... Character Recognition (MICR) reader (factory installed option) ❏ Direct connection customer displays, DM-D102 and DM-D203 ❏ EPSON power supply unit, PS-170 (not required when the TM-U925 is a high-quality POS printer that can print on the ECS/POS® standard. ❏ ASB (Automatic Status Back) function that automatically transmits changes in printer status. ❏ EPSON® intelligent module connection. ❏ EPSON customer display series connection. ❏ Optional Magnetic Ink Character...

User Manual
Page 9
...the Paper Roll 1-9 Self Test 1-11 Running the self test with roll paper 1-11 Running the self test with slip paper 1-12 Setting the DIP Switches 1-13 DIP switch functions 1-13 Changing the DIP switch settings 1-14 Adjusting the Paper Near End Detector 1-16 Chapter 2 Using the Printer Operating the Control Panel 2-1 Buttons 2-1 Indicator lights 2-2 Slip Paper Handling 2-3 Using the Power Switch Cover 2-5 Using the MICR Reader (Option 2-5 Reading MICR characters on personal checks 2-5 Chapter 3 Troubleshooting Troubleshooting 3-1 General problems 3-1 Printing problems 3-1 Paper...
...the Paper Roll 1-9 Self Test 1-11 Running the self test with roll paper 1-11 Running the self test with slip paper 1-12 Setting the DIP Switches 1-13 DIP switch functions 1-13 Changing the DIP switch settings 1-14 Adjusting the Paper Near End Detector 1-16 Chapter 2 Using the Printer Operating the Control Panel 2-1 Buttons 2-1 Indicator lights 2-2 Slip Paper Handling 2-3 Using the Power Switch Cover 2-5 Using the MICR Reader (Option 2-5 Reading MICR characters on personal checks 2-5 Chapter 3 Troubleshooting Troubleshooting 3-1 General problems 3-1 Printing problems 3-1 Paper...
User Manual
Page 13
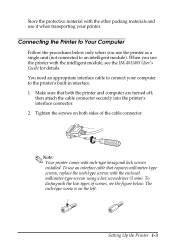
... hexagonal lock screws installed. The inch-type screw is on both the printer and computer are turned off; Store the protective material with the intelligent module, see the figure below only when you use the printer with the other packing materials and use an interface cable that both sides of screws, see the IM-403/405 User's Guide for details. Setting Up the Printer 1-3
... hexagonal lock screws installed. The inch-type screw is on both the printer and computer are turned off; Store the protective material with the intelligent module, see the figure below only when you use the printer with the other packing materials and use an interface cable that both sides of screws, see the IM-403/405 User's Guide for details. Setting Up the Printer 1-3

User Manual
Page 16
...: Make sure that of your electrical outlet. CAUTION: If the power supply's rated voltage and your outlet's voltage do not match, contact your printer. Check the label on the power supply to an intelligent module, the power is used as a single unit, not connected to an intelligent module, use the EPSON PS-170 power supply. See the IM-403/405 User's Guide for...
...: Make sure that of your electrical outlet. CAUTION: If the power supply's rated voltage and your outlet's voltage do not match, contact your printer. Check the label on the power supply to an intelligent module, the power is used as a single unit, not connected to an intelligent module, use the EPSON PS-170 power supply. See the IM-403/405 User's Guide for...
User Manual
Page 19
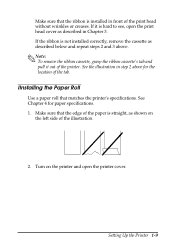
... left side of the illustration. 2. Make sure that the ribbon is installed in step 2 above . If the ribbon is not installed correctly, remove the cassette as described in Chapter 3. Setting Up the Printer 1-9 Make sure that matches the printer's specifications. See the illustration in front of the tab. See Chapter 4 for the location of the print head without wrinkles or creases. IInstalling the Paper Roll Use a paper...
... left side of the illustration. 2. Make sure that the ribbon is installed in step 2 above . If the ribbon is not installed correctly, remove the cassette as described in Chapter 3. Setting Up the Printer 1-9 Make sure that matches the printer's specifications. See the illustration in front of the tab. See Chapter 4 for the location of the print head without wrinkles or creases. IInstalling the Paper Roll Use a paper...

User Manual
Page 21
... printer cover is operating properly. While holding down the paper release lever (marked PRESS) and pull out the paper roll in the direction shown in character set. 4. The self test automatically ends after printing the following: *** completed *** Setting Up the Printer 1-11 Running the self test with either roll paper or slip paper. Note: To remove the paper roll, hold down the RECEIPT FEED button, turn on the printer to continue printing. Paper release lever Self Test...
... printer cover is operating properly. While holding down the paper release lever (marked PRESS) and pull out the paper roll in the direction shown in character set. 4. The self test automatically ends after printing the following: *** completed *** Setting Up the Printer 1-11 Running the self test with either roll paper or slip paper. Note: To remove the paper roll, hold down the RECEIPT FEED button, turn on the printer to continue printing. Paper release lever Self Test...

User Manual
Page 22
... self test. Running the self test with slip paper Note: Be sure to install the paper roll to continue the self test. 1-12 Setting Up the Printer The printer loads the paper automatically, prints the printer settings, and then ejects the paper. (The SLIP light blinks.) 4. Remove the paper from the character table. Press the SLIP FEED button to prevent slip paper jams. 1. Note: If you want to feed slip paper into the printer. Continue to pause the self test manually, press the RECEIPT FEED button...
... self test. Running the self test with slip paper Note: Be sure to install the paper roll to continue the self test. 1-12 Setting Up the Printer The printer loads the paper automatically, prints the printer settings, and then ejects the paper. (The SLIP light blinks.) 4. Remove the paper from the character table. Press the SLIP FEED button to prevent slip paper jams. 1. Note: If you want to feed slip paper into the printer. Continue to pause the self test manually, press the RECEIPT FEED button...

User Manual
Page 24
... 2-7 I/F pin 6 reset signal Enabled Disabled OFF 2-8 I/F pin 25 reset signal Enabled Disabled OFF Notes: 1. Changing the DIP switch settings If you need to make your changes: 1-14 Setting Up the Printer If the DIP switch setting is changed after the printer power is turned on . When pin 25 of the interface connector is used for paper Low roll printing) High OFF 2-5 Handshaking (BUSY condition) Receive buffer-full Off-line or receive buffer-full OFF 2-6 Internal use Fixed - DIP switches excluding switch 2-1 (Auto line feed) and switches 2-7 and 2-8 (interface reset signal...
... 2-7 I/F pin 6 reset signal Enabled Disabled OFF 2-8 I/F pin 25 reset signal Enabled Disabled OFF Notes: 1. Changing the DIP switch settings If you need to make your changes: 1-14 Setting Up the Printer If the DIP switch setting is changed after the printer power is turned on . When pin 25 of the interface connector is used for paper Low roll printing) High OFF 2-5 Handshaking (BUSY condition) Receive buffer-full Off-line or receive buffer-full OFF 2-6 Internal use Fixed - DIP switches excluding switch 2-1 (Auto line feed) and switches 2-7 and 2-8 (interface reset signal...

User Manual
Page 26
.... Replace the DIP switch cover by inserting it upward and sliding it with the screw. Then secure it to the left as shown below to stop printing when the paper is almost gone by software. 1. Software programs can use the ESC c 4 command to adjust the paper near end detector detects when the paper is almost gone. DSW DSW2 1 2 5. If you turn on the printer. Open the printer cover and remove...
.... Replace the DIP switch cover by inserting it upward and sliding it with the screw. Then secure it to the left as shown below to stop printing when the paper is almost gone by software. 1. Software programs can use the ESC c 4 command to adjust the paper near end detector detects when the paper is almost gone. DSW DSW2 1 2 5. If you turn on the printer. Open the printer cover and remove...
User Manual
Page 29
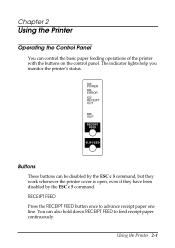
... the printer with the buttons on the control panel. Chapter 2 Using the Printer Operating the Control Panel You can also hold down RECEIPT FEED to advance receipt paper one line. Using the Printer 2-1 The indicator lights help you monitor the printer's status. RECEIPT FEED Press the RECEIPT FEED button once to feed receipt paper continuously. POWER ERROR RECEIPT OUT JOURNAL OUT SLIP RECEIPT FEED SLIP FEED Buttons These buttons can be disabled by the ESC c 5 command, but they work whenever the printer cover...
... the printer with the buttons on the control panel. Chapter 2 Using the Printer Operating the Control Panel You can also hold down RECEIPT FEED to advance receipt paper one line. Using the Printer 2-1 The indicator lights help you monitor the printer's status. RECEIPT FEED Press the RECEIPT FEED button once to feed receipt paper continuously. POWER ERROR RECEIPT OUT JOURNAL OUT SLIP RECEIPT FEED SLIP FEED Buttons These buttons can be disabled by the ESC c 5 command, but they work whenever the printer cover...
User Manual
Page 30
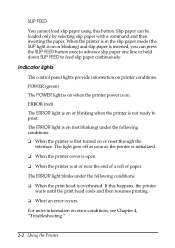
... in the slip paper mode (the SLIP light is on or blinking) and slip paper is first turned on or reset through the interface. The ERROR light blinks under the following conditions: ❏ When the print head is not ready to feed slip paper continuously. Slip paper can press the SLIP FEED button once to advance slip paper one line or hold down SLIP FEED to print. ERROR (red) The ERROR light is on (not...
... in the slip paper mode (the SLIP light is on or blinking) and slip paper is first turned on or reset through the interface. The ERROR light blinks under the following conditions: ❏ When the print head is not ready to feed slip paper continuously. Slip paper can press the SLIP FEED button once to advance slip paper one line or hold down SLIP FEED to print. ERROR (red) The ERROR light is on (not...

User Manual
Page 31
... slip paper mode. See Paper Specifications in the printer even if you insert the slip paper into the inlet as far as a guide. When the SLIP light blinks, insert the slip paper into the slip paper inlet using the right edge of the printer). Send appropriate control commands from the computer to print on the roll paper. Using the Printer 2-3 The RECEIPT OUT light blinks after the self test prints the printer settings on slip paper. 2. Slip Paper Handling Use...
... slip paper mode. See Paper Specifications in the printer even if you insert the slip paper into the inlet as far as a guide. When the SLIP light blinks, insert the slip paper into the slip paper inlet using the right edge of the printer). Send appropriate control commands from the computer to print on the roll paper. Using the Printer 2-3 The RECEIPT OUT light blinks after the self test prints the printer settings on slip paper. 2. Slip Paper Handling Use...
User Manual
Page 37
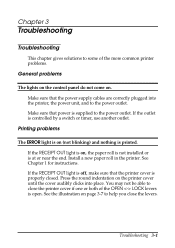
... printed. Install a new paper roll in the printer. Printing problems The ERROR light is on (not blinking) and nothing is controlled by a switch or timer, use another outlet. See Chapter 1 for instructions. Press the round indentation on page 3-7 to help you close the printer cover if one or both of the more common printer problems. General problems The lights on the control panel do not come on , the paper roll is not installed...
... printed. Install a new paper roll in the printer. Printing problems The ERROR light is on (not blinking) and nothing is controlled by a switch or timer, use another outlet. See Chapter 1 for instructions. Press the round indentation on page 3-7 to help you close the printer cover if one or both of the more common printer problems. General problems The lights on the control panel do not come on , the paper roll is not installed...

User Manual
Page 38
... print the printer's interface settings using the self test. The ERROR light is off the printer and check for a paper jam. (See the paper jam description on after about 10 seconds. Check the connection at both the printer and the computer. 2. Make sure that this cable meets the specifications for both ends of the interface cable between the printer and computer. If the self test does not work, contact your dealer or a qualified service person. 3-2 Troubleshooting If the self test works properly, check...
... print the printer's interface settings using the self test. The ERROR light is off the printer and check for a paper jam. (See the paper jam description on after about 10 seconds. Check the connection at both the printer and the computer. 2. Make sure that this cable meets the specifications for both ends of the interface cable between the printer and computer. If the self test does not work, contact your dealer or a qualified service person. 3-2 Troubleshooting If the self test works properly, check...

User Manual
Page 39
... it is printing, but nothing is jammed inside the printer. Replace the ribbon cassette as described in Chapter 1. Stop printing and contact your dealer or a qualified service person. Paper is printed. A line of dots is faint. Turn the printer off and open the printer cover. Remove and reinstall the paper roll as described in the printout. To clear a paper jam, follow the steps below: 1. The ribbon may not be worn out. Troubleshooting 3-3 The...
... it is printing, but nothing is jammed inside the printer. Replace the ribbon cassette as described in Chapter 1. Stop printing and contact your dealer or a qualified service person. Paper is printed. A line of dots is faint. Turn the printer off and open the printer cover. Remove and reinstall the paper roll as described in the printout. To clear a paper jam, follow the steps below: 1. The ribbon may not be worn out. Troubleshooting 3-3 The...

User Manual
Page 44
... set the printer off the hex dump mode. 3-8 Troubleshooting This can be useful in finding software problems. When you make sure that sends data to the printer. Close the cover and turn off the printer or reset it receives in hexadecimal format along with a guide section to help you turn off line so that has no ASCII equivalent. ❏ Control codes are printed in bold for each code that it will print the last line...
... set the printer off the hex dump mode. 3-8 Troubleshooting This can be useful in finding software problems. When you make sure that sends data to the printer. Close the cover and turn off the printer or reset it receives in hexadecimal format along with a guide section to help you turn off line so that has no ASCII equivalent. ❏ Control codes are printed in bold for each code that it will print the last line...
User Manual
Page 45
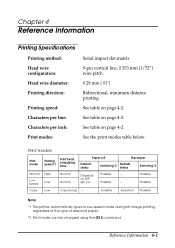
...Printing Specifications Printing method: Head wire configuration: Serial impact dot matrix 9-pin vertical line, 0.353 mm {1/72"} wire pitch Head wire diameter: 0.29 mm {.01"} Printing direction: Bidirectional, minimum distance printing Printing speed: See table on DIP SW 2-4 Possible -- Reference Information 4-1 Print modes Print mode Printing speed*1 Print head energizing time Paper roll Slip paper Default status Switching*2 Default status Switching*2 Normal Low speed High Low Normal Normal Depends Possible -- Possible Selected Possible Note: *1 The printer...
...Printing Specifications Printing method: Head wire configuration: Serial impact dot matrix 9-pin vertical line, 0.353 mm {1/72"} wire pitch Head wire diameter: 0.29 mm {.01"} Printing direction: Bidirectional, minimum distance printing Printing speed: See table on DIP SW 2-4 Possible -- Reference Information 4-1 Print modes Print mode Printing speed*1 Print head energizing time Paper roll Slip paper Default status Switching*2 Default status Switching*2 Normal Low speed High Low Normal Normal Depends Possible -- Possible Selected Possible Note: *1 The printer...

User Manual
Page 48
Prints data and feeds paper. 6 Transmits FF. After printing, ejects paper. Mechanically switches to MICR mode and waits for a personal check to the print starting position. 5 Transmits endorsement printing data. After reading, transmits the reading results. 3 (Transmits FS a 0 H.) (Re-reads the check and transmits the reading result.) 4 Transmits FS a 1. User Operation Printer Operation Transmits FS a 0 1 H. The SLIP light blinks. (Transmits DLE ENQ 3.) (when the check waiting state is removed. 7 Removes the check paper. Loads the check paper to be...
Prints data and feeds paper. 6 Transmits FF. After printing, ejects paper. Mechanically switches to MICR mode and waits for a personal check to the print starting position. 5 Transmits endorsement printing data. After reading, transmits the reading results. 3 (Transmits FS a 0 H.) (Re-reads the check and transmits the reading result.) 4 Transmits FS a 1. User Operation Printer Operation Transmits FS a 0 1 H. The SLIP light blinks. (Transmits DLE ENQ 3.) (when the check waiting state is removed. 7 Removes the check paper. Loads the check paper to be...

User Manual
Page 49
... be loaded correctly before selecting MICR function. Do not pull them upward. Approx. 60.3 ms/line (4.23 mm {1/6 inch} feeding) Approx. 86.36 mm/second {3.4 inches/second} (continuous feeding) Paper roll (single-ply) Reference Information 4-5 Paper Specifications Paper feed method: Paper feed pitch: Paper feed speed: Paper size: Friction feed Default 4.23 mm {1/6 inch} Can be set in the forward direction only. ❏ The paper roll must be set using ESC f. ❏ To check the MICR function status exactly, use...
... be loaded correctly before selecting MICR function. Do not pull them upward. Approx. 60.3 ms/line (4.23 mm {1/6 inch} feeding) Approx. 86.36 mm/second {3.4 inches/second} (continuous feeding) Paper roll (single-ply) Reference Information 4-5 Paper Specifications Paper feed method: Paper feed pitch: Paper feed speed: Paper size: Friction feed Default 4.23 mm {1/6 inch} Can be set in the forward direction only. ❏ The paper roll must be set using ESC f. ❏ To check the MICR function status exactly, use...


