
User Manual
Page 9
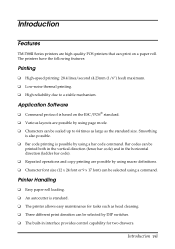
... operations and copy printing are high-quality POS printers that can print on the ESC/POS® standard. ❏ Various layouts are possible by using page mode. ❏ Characters can be selected using a command. Application Software ❏ Command protocol is based on a paper roll. Smoothing is also possible. ❏ Bar code printing is standard. ❏ The printer allows easy maintenance for two drawers. Introduction Features TM-T88II Series printers...
... operations and copy printing are high-quality POS printers that can print on the ESC/POS® standard. ❏ Various layouts are possible by using page mode. ❏ Characters can be selected using a command. Application Software ❏ Command protocol is based on a paper roll. Smoothing is also possible. ❏ Bar code printing is standard. ❏ The printer allows easy maintenance for two drawers. Introduction Features TM-T88II Series printers...

User Manual
Page 10
viii Introduction Options and Accessories ❏ EPSON power supply unit, PS-170. ❏ Affixing tapes (model: DF-10). ❏ RS-485 interface board can be installed as a dealer option. ❏ Wall hanging bracket set (WH-10).
viii Introduction Options and Accessories ❏ EPSON power supply unit, PS-170. ❏ Affixing tapes (model: DF-10). ❏ RS-485 interface board can be installed as a dealer option. ❏ Wall hanging bracket set (WH-10).

User Manual
Page 13
...Connecting the Drawer 1-3 Grounding the Printer 1-5 Connecting the Power Supply 1-5 Installing or Replacing the Paper Roll 1-7 Using the Power Switch Cover 1-10 Self Test 1-10 Running the self test 1-10 Adjustments and Settings 1-12 Chapter 2 Using the Printer Operating the Control Panel 2-1 Control Panel 2-1 Chapter 3 Troubleshooting Troubleshooting 3-1 General problems 3-1 Printing problems 3-1 Cleaning the print head 3-3 Paper handling problems 3-3 Auto cutter problems 3-5 Hexadecimal Dump 3-7 Chapter 4 Reference Information Printing Specifications 4-1 Paper Specifications...
...Connecting the Drawer 1-3 Grounding the Printer 1-5 Connecting the Power Supply 1-5 Installing or Replacing the Paper Roll 1-7 Using the Power Switch Cover 1-10 Self Test 1-10 Running the self test 1-10 Adjustments and Settings 1-12 Chapter 2 Using the Printer Operating the Control Panel 2-1 Control Panel 2-1 Chapter 3 Troubleshooting Troubleshooting 3-1 General problems 3-1 Printing problems 3-1 Cleaning the print head 3-3 Paper handling problems 3-3 Auto cutter problems 3-5 Hexadecimal Dump 3-7 Chapter 4 Reference Information Printing Specifications 4-1 Paper Specifications...

User Manual
Page 28
ERROR This indicates an error. Install a new paper roll, and the printer will continue printing. See Chapter 3 for information on what to do when this light comes on . PAPER OUT This light indicates the near end of the paper roll. Panel lights POWER The POWER light is on whenever the printer is used. 2-2 Using the Printer When the light blinks, it indicates the self-test printing standby state or macro execution standby state when the macro execution command is on .
ERROR This indicates an error. Install a new paper roll, and the printer will continue printing. See Chapter 3 for information on what to do when this light comes on . PAPER OUT This light indicates the near end of the paper roll. Panel lights POWER The POWER light is on whenever the printer is used. 2-2 Using the Printer When the light blinks, it indicates the self-test printing standby state or macro execution standby state when the macro execution command is on .

User Manual
Page 29
... to some printer problems you may have. First, turn off , make sure the printer cover is on . Press the printer cover until the cover audibly clicks into the power outlet. Install a new paper roll. Make sure power is at or near the end. If the PAPER OUT light is printed. The ERROR light is controlled by a switch or timer, use another outlet. If the PAPER OUT light is off the printer and check for instructions. Chapter 3 Troubleshooting Troubleshooting This chapter...
... to some printer problems you may have. First, turn off , make sure the printer cover is on . Press the printer cover until the cover audibly clicks into the power outlet. Install a new paper roll. Make sure power is at or near the end. If the PAPER OUT light is printed. The ERROR light is controlled by a switch or timer, use another outlet. If the PAPER OUT light is off the printer and check for instructions. Chapter 3 Troubleshooting Troubleshooting This chapter...

User Manual
Page 30
... self test instructions in Chapter 1 to check that the printer works properly. If the self test works properly, check the following: 1. Paper dust on after about 10 seconds. Try to run the self test to run the self test. Make sure the printer's DIP switch settings for data transmission are the same as described below: 3-2 Troubleshooting Try cleaning the print head as the computer's. If the print head is still flashing, contact a qualified service...
... self test instructions in Chapter 1 to check that the printer works properly. If the self test works properly, check the following: 1. Paper dust on after about 10 seconds. Try to run the self test to run the self test. Make sure the printer's DIP switch settings for data transmission are the same as described below: 3-2 Troubleshooting Try cleaning the print head as the computer's. If the print head is still flashing, contact a qualified service...
User Manual
Page 45
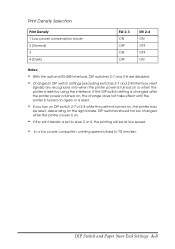
... switches 2-7 and 2-8 are disabled. • Changes in DIP switch settings (excluding switches 2-7 and 2-8 interface reset signals) are recognized only when the printer power is turned on . • If the print density is set to level 3 or 4, the printing will be reset, depending on the signal state. If the DIP switch setting is changed while the printer power is on or when the printer is reset by using the interface. DIP Switch and Paper Near End Settings...
... switches 2-7 and 2-8 are disabled. • Changes in DIP switch settings (excluding switches 2-7 and 2-8 interface reset signals) are recognized only when the printer power is turned on . • If the print density is set to level 3 or 4, the printing will be reset, depending on the signal state. If the DIP switch setting is changed while the printer power is on or when the printer is reset by using the interface. DIP Switch and Paper Near End Settings...

User Manual
Page 46
...; Reading data Reserved (Do not change settings) Fixed to Off Selects print density Refer to table below Reserved (Do not change settings) Fixed to Off I/F pin 31 reset signal (Do not change settings) Fixed to On Print Density Selection Print Density 1 Low power consumption mode 2 (Normal) 3 4 (Dark) SW 2-3 ON OFF ON OFF SW 2-4 ON ON OFF OFF A-4 DIP Switch and Paper Near End Settings Parallel interface specifications Set 1 SW 1-1 1-2 1-3~ 1-8 Function Auto line feed Receive buffer...
...; Reading data Reserved (Do not change settings) Fixed to Off Selects print density Refer to table below Reserved (Do not change settings) Fixed to Off I/F pin 31 reset signal (Do not change settings) Fixed to On Print Density Selection Print Density 1 Low power consumption mode 2 (Normal) 3 4 (Dark) SW 2-3 ON OFF ON OFF SW 2-4 ON ON OFF OFF A-4 DIP Switch and Paper Near End Settings Parallel interface specifications Set 1 SW 1-1 1-2 1-3~ 1-8 Function Auto line feed Receive buffer...
Technical Reference
Page 7
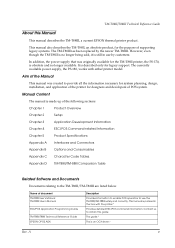
... only for the TM-T88II printer, the PS-170, is made up of document TM-T88II User's Manual TM-T88III User's Manual ESC/POS Application Programming Guide TM-T88II/T88III Technical Reference Guide EPSON OPOS ADK Description Provides information to enable POS operators to the TM-T88II/TM-T88III are listed below. This manual also describes the TM-T88II, an obsolete product, for designers and developers of supporting legacy systems. The TM-T88II has been replaced by customers. In...
... only for the TM-T88II printer, the PS-170, is made up of document TM-T88II User's Manual TM-T88III User's Manual ESC/POS Application Programming Guide TM-T88II/T88III Technical Reference Guide EPSON OPOS ADK Description Provides information to enable POS operators to the TM-T88II/TM-T88III are listed below. This manual also describes the TM-T88II, an obsolete product, for designers and developers of supporting legacy systems. The TM-T88II has been replaced by customers. In...
Technical Reference
Page 9
... and Documents v Chapter 1 Product Overview Product Structure 1-1 Model 1-1 Accessories 1-1 Options 1-1 Consumable products 1-1 TM-T88II/TM-88III Comparison Table 1-2 Part Names and Basic Operation 1-3 Part Names 1-3 Control Panel 1-3 Power Switch 1-4 Connectors 1-5 Handling the Printer 1-5 Installing and Replacing Roll Paper 1-6 Power Switch Cover 1-7 Shipping Procedures 1-8 Chapter 2 Setup Installing the Printer 2-2 Precautions for Horizontal Installation 2-2 Precautions for Wall Installation 2-2 Setting the DIP Switches 2-2 DIP Switch Positions and Steps for Changing DIP...
... and Documents v Chapter 1 Product Overview Product Structure 1-1 Model 1-1 Accessories 1-1 Options 1-1 Consumable products 1-1 TM-T88II/TM-88III Comparison Table 1-2 Part Names and Basic Operation 1-3 Part Names 1-3 Control Panel 1-3 Power Switch 1-4 Connectors 1-5 Handling the Printer 1-5 Installing and Replacing Roll Paper 1-6 Power Switch Cover 1-7 Shipping Procedures 1-8 Chapter 2 Setup Installing the Printer 2-2 Precautions for Horizontal Installation 2-2 Precautions for Wall Installation 2-2 Setting the DIP Switches 2-2 DIP Switch Positions and Steps for Changing DIP...
Technical Reference
Page 10
... Specifications (TM-T88II/TM-T88III 5-7 Appendix A Interfaces and Connectors RS-232 Serial Interface A-1 Interface Board Specifications (RS-232-compliant A-1 Functions of Page 0 in Visual Basic. ESC/POS Commands 3-5 Various Utilities 3-6 Switches and Buttons 3-6 Paper FEED Button 3-6 Panel LEDs and Error Status 3-7 Power LED 3-7 No Roll Paper (PAPER OUT) LED 3-7 Error LED 3-7 Sensors 3-10 Paper Sensors 3-10 Printer Cover Sensor 3-10 Offline 3-11 Busy State 3-11 NVRAM (Non-volatile Memory 3-12 Bar Code Printing 3-12 Operating Mode (Switch Panel Operation 3-13 Self-test Mode...
... Specifications (TM-T88II/TM-T88III 5-7 Appendix A Interfaces and Connectors RS-232 Serial Interface A-1 Interface Board Specifications (RS-232-compliant A-1 Functions of Page 0 in Visual Basic. ESC/POS Commands 3-5 Various Utilities 3-6 Switches and Buttons 3-6 Paper FEED Button 3-6 Panel LEDs and Error Status 3-7 Power LED 3-7 No Roll Paper (PAPER OUT) LED 3-7 Error LED 3-7 Sensors 3-10 Paper Sensors 3-10 Printer Cover Sensor 3-10 Offline 3-11 Busy State 3-11 NVRAM (Non-volatile Memory 3-12 Bar Code Printing 3-12 Operating Mode (Switch Panel Operation 3-13 Self-test Mode...
Technical Reference
Page 14
... ON. (See "DIP Switch Functions" (page 2-3).) Set with the TM-T88III. TM-T88II (legacy model) Approx. 120 mm/s (4.72") maximum Average approx. 1.7 A 2400, 4800, 9600, 19200 4. ❏ Power cable (model: AC-170) (*1) (*1) The power supply unit and power cable may not come packaged with DIP SW2-5 * Cannot be changed. 11 pages including WPC 1252, PC866 [Cyrillic #2], PC852 [Latin2]) 8 pages Also can be used in serial communications (38400 bps, 2400...
... ON. (See "DIP Switch Functions" (page 2-3).) Set with the TM-T88III. TM-T88II (legacy model) Approx. 120 mm/s (4.72") maximum Average approx. 1.7 A 2400, 4800, 9600, 19200 4. ❏ Power cable (model: AC-170) (*1) (*1) The power supply unit and power cable may not come packaged with DIP SW2-5 * Cannot be changed. 11 pages including WPC 1252, PC866 [Cyrillic #2], PC852 [Latin2]) 8 pages Also can be used in serial communications (38400 bps, 2400...
Technical Reference
Page 17
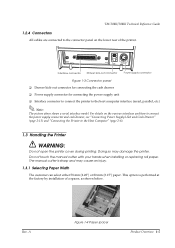
... the manual cutter with your hands when installing or replacing roll paper. Rev. TM-T88II/T88III Technical Reference Guide 1.2.4 Connectors All cables are connected to the Host Computer" (page 2-8). 1.3 Handling the Printer WARNING: Do not open the printer cover during printing. For details on the various interfaces and how to connect the power supply connector and cash drawer, see "Connecting Power Supply Unit and Cash Drawer" (page 2-15) and "Connecting the Printer to...
... the manual cutter with your hands when installing or replacing roll paper. Rev. TM-T88II/T88III Technical Reference Guide 1.2.4 Connectors All cables are connected to the Host Computer" (page 2-8). 1.3 Handling the Printer WARNING: Do not open the printer cover during printing. For details on the various interfaces and how to connect the power supply connector and cash drawer, see "Connecting Power Supply Unit and Cash Drawer" (page 2-15) and "Connecting the Printer to...
Technical Reference
Page 37
...) 2. EPSON OPOS ADK 3. TM-T88II/T88III Technical Reference Guide Chapter 3 Application Development Information This chapter describes how to control the printer and gives information useful for printer application development. 3.1 Introducing the Control Methods The TM printer can be controlled and can be used , the IP setup tool for the TM printer to enable printing from the "Select any of the following features: ❏ Supplies a Windows printer driver for the Ethernet model, USB device driver...
...) 2. EPSON OPOS ADK 3. TM-T88II/T88III Technical Reference Guide Chapter 3 Application Development Information This chapter describes how to control the printer and gives information useful for printer application development. 3.1 Introducing the Control Methods The TM printer can be controlled and can be used , the IP setup tool for the TM printer to enable printing from the "Select any of the following features: ❏ Supplies a Windows printer driver for the Ethernet model, USB device driver...
Technical Reference
Page 39
... details on customer applications. Rev. Use this happens, we recommend using OPOS Control as described by the OLE POS Technology Association. A Application Development Information 3-3 TM-T88II/T88III Technical Reference Guide • EPSON customer display • EPSON cash drawer Note: A separate USB device driver is required for a USB model printer, and a separate IP setup utility is used with parameters, power-on notification, offline buffer clear processing, and so on ) Technology...
... details on customer applications. Rev. Use this happens, we recommend using OPOS Control as described by the OLE POS Technology Association. A Application Development Information 3-3 TM-T88II/T88III Technical Reference Guide • EPSON customer display • EPSON cash drawer Note: A separate USB device driver is required for a USB model printer, and a separate IP setup utility is used with parameters, power-on notification, offline buffer clear processing, and so on ) Technology...
Technical Reference
Page 40
... installed. ❏ OPOS Control for EPSON devices Header files for CO, SO, C++, header files for VB, TLB file of equipment and connection ports and various settings (print wait time, etc.). • TM Flash logo utility Saves a bitmap file to the printer or customer display, for example. • USB device driver This driver is necessary to the state that was active before power off). ❏ Offline buffer clear processing (clears the print buffer contents in offline mode...
... installed. ❏ OPOS Control for EPSON devices Header files for CO, SO, C++, header files for VB, TLB file of equipment and connection ports and various settings (print wait time, etc.). • TM Flash logo utility Saves a bitmap file to the printer or customer display, for example. • USB device driver This driver is necessary to the state that was active before power off). ❏ Offline buffer clear processing (clears the print buffer contents in offline mode...
Technical Reference
Page 42
... can be controlled independently from a host computer. You can disable or enable the paper FEED button. Customers who have purchased the Ethernet model TM printer need this printer, you must change the USB port in the printer driver on the line spacing set an IP address for a 10Base-T/ 100Base-TX Ethernet interface installed in the TM printer. By storing shop logos to NVRAM, the print speed can be increased. 3.1.4.3 USB interface ID code rewrite utility...
... can be controlled independently from a host computer. You can disable or enable the paper FEED button. Customers who have purchased the Ethernet model TM printer need this printer, you must change the USB port in the printer driver on the line spacing set an IP address for a 10Base-T/ 100Base-TX Ethernet interface installed in the TM printer. By storing shop logos to NVRAM, the print speed can be increased. 3.1.4.3 USB interface ID code rewrite utility...
Technical Reference
Page 44
... when the print head cools. Remove the jammed paper or foreign matter in the printer, close the roll paper cover, send the error recover command, or turn the power on again or sending an error recovery command from the driver after a recoverable error occurs, this is no longer possible when automatically recoverable errors occur, they do not represent printer failure. The error recovers automatically when the head temperature returns to...
... when the print head cools. Remove the jammed paper or foreign matter in the printer, close the roll paper cover, send the error recover command, or turn the power on again or sending an error recovery command from the driver after a recoverable error occurs, this is no longer possible when automatically recoverable errors occur, they do not represent printer failure. The error recovers automatically when the head temperature returns to...
Technical Reference
Page 49
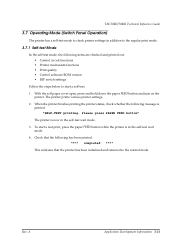
... paper cover open, press and hold down the paper FEED button and turn on the printer. TM-T88II/T88III Technical Reference Guide 3.7 Operating Mode (Switch Panel Operation) The printer has a self-test mode to check printer settings in the self-test wait mode. 4. To start a test print, press the paper FEED button while the printer is in addition to the regular print mode. 3.7.1 Self-test Mode In the self-test mode, the following items are checked and printed out: • Control circuit functions • Printer mechanism functions • Print quality • Control software...
... paper cover open, press and hold down the paper FEED button and turn on the printer. TM-T88II/T88III Technical Reference Guide 3.7 Operating Mode (Switch Panel Operation) The printer has a self-test mode to check printer settings in the self-test wait mode. 4. To start a test print, press the paper FEED button while the printer is in addition to the regular print mode. 3.7.1 Self-test Mode In the self-test mode, the following items are checked and printed out: • Control circuit functions • Printer mechanism functions • Print quality • Control software...
Technical Reference
Page 54
... to make sure the receive buffer is set with the specified printer status. Close the roll paper cover. 3. Data received from then on while holding down the paper FEED button. 2. Note: Do not use the ASB function to check the printer status. With the roll paper cover open, turn the printer off after printing ends. Note: For details on NV graphics and NV bit images, see the "ESC/POS Application Programming Guide...
... to make sure the receive buffer is set with the specified printer status. Close the roll paper cover. 3. Data received from then on while holding down the paper FEED button. 2. Note: Do not use the ASB function to check the printer status. With the roll paper cover open, turn the printer off after printing ends. Note: For details on NV graphics and NV bit images, see the "ESC/POS Application Programming Guide...


