

User Manual
Page 2
... OFF OFF Printer Parts paper roll 1 cover cutter 2 cover 5 control panel 3 power switch 4 cover open lever DIP Switch Tables Serial SW Function ON OFF 1-1 Power switch function Disabled Enabled 1-2 Interface condition selection by DIP switch by memory switch 1-3 Handshaking XON/XOFF DTR/DSR 1-4 Data word length 7 bits 8 bits 1-5 Parity check Enabled Disabled 1-6 Parity selection Even Odd 1-7 Transmission speed (See table below.) 1-8 2-1 Reserved Fixed to Off. Parallel SW Function ON OFF 1-1 Power switch function Disabled Enabled 1-2~ Reserved 1-8 Fixed to...
... OFF OFF Printer Parts paper roll 1 cover cutter 2 cover 5 control panel 3 power switch 4 cover open lever DIP Switch Tables Serial SW Function ON OFF 1-1 Power switch function Disabled Enabled 1-2 Interface condition selection by DIP switch by memory switch 1-3 Handshaking XON/XOFF DTR/DSR 1-4 Data word length 7 bits 8 bits 1-5 Parity check Enabled Disabled 1-6 Parity selection Even Odd 1-7 Transmission speed (See table below.) 1-8 2-1 Reserved Fixed to Off. Parallel SW Function ON OFF 1-1 Power switch function Disabled Enabled 1-2~ Reserved 1-8 Fixed to...

User Manual
Page 3
... frequency energy and, if not installed and used in accordance with Seiko Epson Corporation's operating and maintenance instructions. These limits are applied only to the use of any options or any consumable products other countries. Neither is operated in any means, electronic, mechanical, photocopying, recording, or otherwise, without notice. No part of this book, Seiko Epson Corporation assumes no responsibility for...
... frequency energy and, if not installed and used in accordance with Seiko Epson Corporation's operating and maintenance instructions. These limits are applied only to the use of any options or any consumable products other countries. Neither is operated in any means, electronic, mechanical, photocopying, recording, or otherwise, without notice. No part of this book, Seiko Epson Corporation assumes no responsibility for...
User Manual
Page 4
... improper power source may fall into this product. If water or other than those mentioned in an accessible location. Do not place heavy objects on a firm, stable, horizontal surface. Connection to use may cause equipment damage and burning. WARNING: Shut down your dealer or a SEIKO EPSON service center for advice. Improper repair work can be dangerous. Continued use the specified power...
... improper power source may fall into this product. If water or other than those mentioned in an accessible location. Do not place heavy objects on a firm, stable, horizontal surface. Connection to use may cause equipment damage and burning. WARNING: Shut down your dealer or a SEIKO EPSON service center for advice. Improper repair work can be dangerous. Continued use the specified power...
User Manual
Page 5
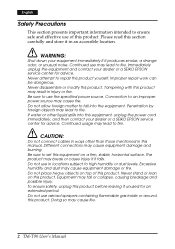
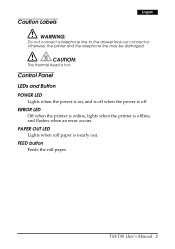
TM-T90 User's Manual 3 FEED button Feeds the roll paper. PAPER OUT LED Lights when roll paper is off when the power is nearly out. otherwise, the printer and the telephone line may be damaged. Control Panel LEDs and Button POWER LED Lights when the power is on, and is off . Caution Labels English WARNING: Do not connect a telephone line to the drawer kick-out connector; ERROR LED Off when the printer is online, lights when the printer is hot. CAUTION: The thermal head is offline, and flashes when an error occurs.
TM-T90 User's Manual 3 FEED button Feeds the roll paper. PAPER OUT LED Lights when roll paper is off when the power is nearly out. otherwise, the printer and the telephone line may be damaged. Control Panel LEDs and Button POWER LED Lights when the power is on, and is off . Caution Labels English WARNING: Do not connect a telephone line to the drawer kick-out connector; ERROR LED Off when the printer is online, lights when the printer is hot. CAUTION: The thermal head is offline, and flashes when an error occurs.
User Manual
Page 6
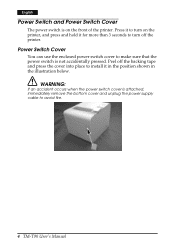
... more than 3 seconds to avoid fire. 4 TM-T90 User's Manual WARNING: If an accident occurs when the power switch cover is attached, immediately remove the bottom cover and unplug the power supply cable to turn on the front of the printer. Peel off the printer. English Power Switch and Power Switch Cover The power switch is not accidentally pressed. Power Switch Cover You can use the enclosed power switch cover to install it in the position shown in...
... more than 3 seconds to avoid fire. 4 TM-T90 User's Manual WARNING: If an accident occurs when the power switch cover is attached, immediately remove the bottom cover and unplug the power supply cable to turn on the front of the printer. Peel off the printer. English Power Switch and Power Switch Cover The power switch is not accidentally pressed. Power Switch Cover You can use the enclosed power switch cover to install it in the position shown in...
User Manual
Page 7
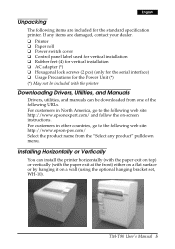
... a flat surface or by hanging it on -screen instructions. English Unpacking The following items are damaged, contact your dealer. ❏ Printer ❏ Paper roll ❏ Power switch cover ❏ Control panel label used for vertical installation ❏ Rubber feet (4) for vertical installation ❏ AC adapter (*) ❏ Hexagonal lock screws (2 pcs) (only for the serial interface) ❏ Usage Precautions for the standard specification printer. TM-T90 User's Manual 5
... a flat surface or by hanging it on -screen instructions. English Unpacking The following items are damaged, contact your dealer. ❏ Printer ❏ Paper roll ❏ Power switch cover ❏ Control panel label used for vertical installation ❏ Rubber feet (4) for vertical installation ❏ AC adapter (*) ❏ Hexagonal lock screws (2 pcs) (only for the serial interface) ❏ Usage Precautions for the standard specification printer. TM-T90 User's Manual 5

User Manual
Page 8
... paper with the WH-10 for instructions. Open the paper roll cover, using the cover open lever. 2. Note: To hang the printer on the wall, see the Wall Hanging Bracket Set Installation Manual provided with the guide, as shown in the illustrations below . 3. Installing the Paper Roll Note: Be sure to use paper rolls that meet the specifications. 1. English When you install the printer vertically, attach the rubber feet and control panel...
... paper with the WH-10 for instructions. Open the paper roll cover, using the cover open lever. 2. Note: To hang the printer on the wall, see the Wall Hanging Bracket Set Installation Manual provided with the guide, as shown in the illustrations below . 3. Installing the Paper Roll Note: Be sure to use paper rolls that meet the specifications. 1. English When you install the printer vertically, attach the rubber feet and control panel...

User Manual
Page 9
... turn the printer off the power and open Turn on . ❏ If the paper roll cover will not open the paper roll cover and check for a paper jam. To remove the cover, use a tool such as a screwdriver, and insert it back on the middle of the cover. Wait for the head to see the section below and push the TM-T90 User's Manual 7 English Note: Be sure to prepare the printer for printing...
... turn the printer off the power and open Turn on . ❏ If the paper roll cover will not open the paper roll cover and check for a paper jam. To remove the cover, use a tool such as a screwdriver, and insert it back on the middle of the cover. Wait for the head to see the section below and push the TM-T90 User's Manual 7 English Note: Be sure to prepare the printer for printing...
User Manual
Page 10
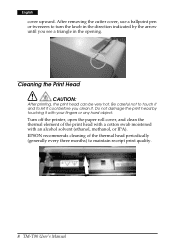
...). Cleaning the Print Head CAUTION: After printing, the print head can be very hot. Do not damage the print head by the arrow until you clean it. EPSON recommends cleaning of the print head with a cotton swab moistened with your fingers or any hard object. Turn off the printer, open the paper roll cover, and clean the thermal element of the thermal head periodically (generally every three months) to maintain receipt print quality. . 8 TM-T90 User's Manual
...). Cleaning the Print Head CAUTION: After printing, the print head can be very hot. Do not damage the print head by the arrow until you clean it. EPSON recommends cleaning of the print head with a cotton swab moistened with your fingers or any hard object. Turn off the printer, open the paper roll cover, and clean the thermal element of the thermal head periodically (generally every three months) to maintain receipt print quality. . 8 TM-T90 User's Manual
User Manual
Page 11
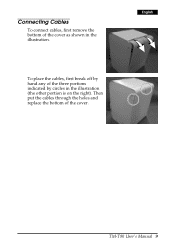
English TM-T90 User's Manual 9 To place the cables, first break off by circles in the illustration. Connecting Cables To connect cables, first remove the bottom of the three portions indicated by hand any of the cover as shown in the illustration (the other portion is on the right). Then put the cables through the holes and replace the bottom of the cover.
English TM-T90 User's Manual 9 To place the cables, first break off by circles in the illustration. Connecting Cables To connect cables, first remove the bottom of the three portions indicated by hand any of the cover as shown in the illustration (the other portion is on the right). Then put the cables through the holes and replace the bottom of the cover.
User Manual
Page 12
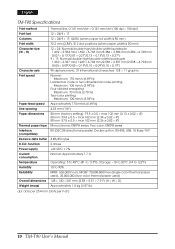
...,000 hours, MCBF: 70,000,000 lines (single-color thermal paper used), 35,000,000 (two-color thermal paper used) Overall dimensions 148 × 140 × 201 mm {5.83 × 5.51 × 7.91"} (H × W × D) Weight (mass) Approximately 1.8 kg {3.97 lb} dpi: dots per 25.4 mm (dots per inch) 10 TM-T90 User's Manual English TM-T9. 0 Specifications Print method Thermal line, 0.141 mm/dot × 0.141 mm...
...,000 hours, MCBF: 70,000,000 lines (single-color thermal paper used), 35,000,000 (two-color thermal paper used) Overall dimensions 148 × 140 × 201 mm {5.83 × 5.51 × 7.91"} (H × W × D) Weight (mass) Approximately 1.8 kg {3.97 lb} dpi: dots per 25.4 mm (dots per inch) 10 TM-T90 User's Manual English TM-T9. 0 Specifications Print method Thermal line, 0.141 mm/dot × 0.141 mm...


