
User Manual
Page 4
... the Printer Software Screens 109 Changing Automatic Update Options 111 Printing with Windows ...79 Selecting Basic Print Settings - OS X 117 Output Resolution Settings - OS X...119 4 Windows 101 Checking Print Status - Windows 105 Editing Print Setting Displays - OS X 112 Advanced Color Settings - Take Up with the Printable Side Out 63 Removing Media from the Optional Auto Take-up Reel 68 Available Epson Papers ...69 Borderless Paper Type Compatibility 78 Printing from a Computer ...79 Printing with OS X ...111 Selecting Basic Print Settings - Windows 87 Paper Source...
... the Printer Software Screens 109 Changing Automatic Update Options 111 Printing with Windows ...79 Selecting Basic Print Settings - OS X 117 Output Resolution Settings - OS X...119 4 Windows 101 Checking Print Status - Windows 105 Editing Print Setting Displays - OS X 112 Advanced Color Settings - Take Up with the Printable Side Out 63 Removing Media from the Optional Auto Take-up Reel 68 Available Epson Papers ...69 Borderless Paper Type Compatibility 78 Printing from a Computer ...79 Printing with OS X ...111 Selecting Basic Print Settings - Windows 87 Paper Source...

User Manual
Page 5
... Printer Status Menu Settings...138 Network Setup Menu Settings ...139 Preferences Menu Settings ...140 Administrator Menu Settings ...140 Replacing Ink Cartridges ...142 Checking Cartridge Status with Windows 142 Checking Cartridge Status with OS X 145 Purchase Epson Ink Cartridges...146 Ink Cartridge and Maintenance Box Part Numbers 146 Removing and Installing Ink Cartridges 148 Replacing Maintenance Boxes...151 Switch Black Ink Type ...153 Switching the Black Ink Type...154 Black Ink Type Media List...154 Adjusting Print Quality...156 Print Head Maintenance...156 Print Head Nozzle Check...
... Printer Status Menu Settings...138 Network Setup Menu Settings ...139 Preferences Menu Settings ...140 Administrator Menu Settings ...140 Replacing Ink Cartridges ...142 Checking Cartridge Status with Windows 142 Checking Cartridge Status with OS X 145 Purchase Epson Ink Cartridges...146 Ink Cartridge and Maintenance Box Part Numbers 146 Removing and Installing Ink Cartridges 148 Replacing Maintenance Boxes...151 Switch Black Ink Type ...153 Switching the Black Ink Type...154 Black Ink Type Media List...154 Adjusting Print Quality...156 Print Head Maintenance...156 Print Head Nozzle Check...
User Manual
Page 6
...Solving Problems ...179 Product Status Messages ...179 Solving Printer Problems...185 Printer Does Not Turn On ...185 LCD Screen Shuts Off ...185 Solving Printing Problems ...185 Nothing Prints ...186 Cannot Print Over a Network...186 Print Head Moves But Nothing Prints 187 Red Light Shines Inside the Printer 187 Solving Paper Problems...187 Paper Feeding Problems...187 Roll Paper Jam Problems ...188 Cut Sheet Paper Jam Problems 194 Paper Does Not Collect in the Basket or is Creased 197 Solving Print Quality Problems ...197 Nozzle Check Pattern Prints Incorrectly 197 Overall Print Quality...
...Solving Problems ...179 Product Status Messages ...179 Solving Printer Problems...185 Printer Does Not Turn On ...185 LCD Screen Shuts Off ...185 Solving Printing Problems ...185 Nothing Prints ...186 Cannot Print Over a Network...186 Print Head Moves But Nothing Prints 187 Red Light Shines Inside the Printer 187 Solving Paper Problems...187 Paper Feeding Problems...187 Roll Paper Jam Problems ...188 Cut Sheet Paper Jam Problems 194 Paper Does Not Collect in the Basket or is Creased 197 Solving Print Quality Problems ...197 Nozzle Check Pattern Prints Incorrectly 197 Overall Print Quality...

User Manual
Page 86
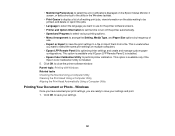
... include faces. Windows 86 If your photo includes a face with an intentional color cast, such as the Mode setting, you can choose from various Scene Correction settings to the Adobe RGB color standard. Off (No Color Adjustment) Turns off color management in your printer software so you may want to turn off . For this setting if your source file was captured in your application software. If you select Custom as a statue...
... include faces. Windows 86 If your photo includes a face with an intentional color cast, such as the Mode setting, you can choose from various Scene Correction settings to the Adobe RGB color standard. Off (No Color Adjustment) Turns off color management in your printer software so you may want to turn off . For this setting if your source file was captured in your application software. If you select Custom as a statue...
User Manual
Page 101
... topic: Printing with Windows Related tasks Checking the Nozzles Using a Computer Utility Cleaning the Print Head Using a Computer Utility Aligning the Print Head Automatically Using a Computer Utility Printing Your Document or Photo - This is useful when you want to use for the printer software screens. • Printer and Option Information to set the time to turn off the printer automatically. • Speed and Progress to select various printing options. • Menu Arrangement to arrange the Setting, Media Type, and Paper Size options by frequency of all waiting print jobs, view...
... topic: Printing with Windows Related tasks Checking the Nozzles Using a Computer Utility Cleaning the Print Head Using a Computer Utility Aligning the Print Head Automatically Using a Computer Utility Printing Your Document or Photo - This is useful when you want to use for the printer software screens. • Printer and Option Information to set the time to turn off the printer automatically. • Speed and Progress to select various printing options. • Menu Arrangement to arrange the Setting, Media Type, and Paper Size options by frequency of all waiting print jobs, view...

User Manual
Page 116
... color controls. • Off (No Color Adjustment): Turns off color management in the printer driver. 13. OS X Print Options - If your paper type does not support this setting if your source file was captured in images. Click the Advanced Color Settings tab to the Adobe RGB color standard. Click the Advanced Color Settings tab to use advanced color controls. • EPSON Standard (sRGB): Increases the contrast in Adobe RGB. Select the Output Resolution setting you want to print black-and-white photos...
... color controls. • Off (No Color Adjustment): Turns off color management in the printer driver. 13. OS X Print Options - If your paper type does not support this setting if your source file was captured in images. Click the Advanced Color Settings tab to the Adobe RGB color standard. Click the Advanced Color Settings tab to use advanced color controls. • EPSON Standard (sRGB): Increases the contrast in Adobe RGB. Select the Output Resolution setting you want to print black-and-white photos...
User Manual
Page 138
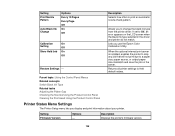
...use the Epson Color Calibration Utility. Returns all printer settings to print an automatic nozzle check pattern. Setting Print Nozzle Pattern Auto Black Ink Change Options Every 10 Pages Every Page Off On Off Calibration On Setting Off Store Held Job On Off Restore Settings - Parent topic: Using the Control Panel Menus Related concepts Switch Black Ink Type Related tasks Adjusting the Platen Gap Checking the Nozzles Using the Product Control Panel Cleaning the Print Head Using the Product Control Panel Printer Status Menu Settings The Printer Setup menu lets you display and print...
...use the Epson Color Calibration Utility. Returns all printer settings to print an automatic nozzle check pattern. Setting Print Nozzle Pattern Auto Black Ink Change Options Every 10 Pages Every Page Off On Off Calibration On Setting Off Store Held Job On Off Restore Settings - Parent topic: Using the Control Panel Menus Related concepts Switch Black Ink Type Related tasks Adjusting the Platen Gap Checking the Nozzles Using the Product Control Panel Cleaning the Print Head Using the Product Control Panel Printer Status Menu Settings The Printer Setup menu lets you display and print...
User Manual
Page 156
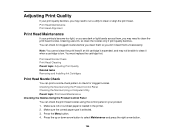
... print a nozzle check pattern to select Maintenance and press the right arrow button. 156 You can check the print head nozzles using the control panel on your product. 1. Adjusting Print Quality If your print quality declines, you may need to clean the print head nozzles. Checking the Nozzles Using the Product Control Panel Checking the Nozzles Using a Computer Utility Parent topic: Print Head Maintenance Checking the Nozzles Using the Product Control Panel You can check for clogged nozzles. Press the Menu button. 4. You must replace the cartridge first. Make sure roll or cut...
... print a nozzle check pattern to select Maintenance and press the right arrow button. 156 You can check the print head nozzles using the control panel on your product. 1. Adjusting Print Quality If your print quality declines, you may need to clean the print head nozzles. Checking the Nozzles Using the Product Control Panel Checking the Nozzles Using a Computer Utility Parent topic: Print Head Maintenance Checking the Nozzles Using the Product Control Panel You can check for clogged nozzles. Press the Menu button. 4. You must replace the cartridge first. Make sure roll or cut...

User Manual
Page 180
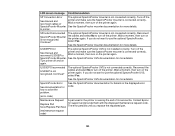
... have loaded paper in a supported width, set to Standard. • Run a nozzle check and make sure the print head nozzles are using poster board or a cut it . • If you are using scissors or another manual cutter. Paper Eject Error Check the following : • Make sure you that you are not clogged. Paper Cut Error Remove uncut paper. Paper Size Error The loaded paper is not skewed. Paper Sensor Error The loaded paper is not detected correctly by the printer. Cut the edge of paper. • If you are using roll paper, remove and...
... have loaded paper in a supported width, set to Standard. • Run a nozzle check and make sure the print head nozzles are using poster board or a cut it . • If you are using scissors or another manual cutter. Paper Eject Error Check the following : • Make sure you that you are not clogged. Paper Cut Error Remove uncut paper. Paper Size Error The loaded paper is not skewed. Paper Sensor Error The loaded paper is not detected correctly by the printer. Cut the edge of paper. • If you are using roll paper, remove and...
User Manual
Page 183
... installed correctly. Wait a moment, then turn on the displayed error code. (error code) Maintenance Request A part used in the printer is nearing the end of printer and make sure the SpectroProofer mounter is connected correctly. Continue? Wait a moment, then turn on the printer again. See the SpectroProofer documentation for details on the printer again. Contact Epson Replace Part Soon/Replace Part Now for more details. See the SpectroProofer UVS documentation for support and provide them with the displayed maintenance...
... installed correctly. Wait a moment, then turn on the displayed error code. (error code) Maintenance Request A part used in the printer is nearing the end of printer and make sure the SpectroProofer mounter is connected correctly. Continue? Wait a moment, then turn on the printer again. See the SpectroProofer documentation for details on the printer again. Contact Epson Replace Part Soon/Replace Part Now for more details. See the SpectroProofer UVS documentation for support and provide them with the displayed maintenance...
User Manual
Page 198
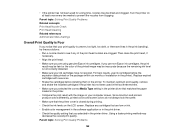
... months. • Make sure you selected the correct Media Type setting in the printer driver that matches the paper loaded in the printer. • Compare the print result with new ones. • Shake the cartridges before the expiration date printed on the LCD screen. Then clean the print head, if necessary. • Align the print head. • Make sure you use ink cartridges before installing them in the printer). Parent topic: Solving Print Quality Problems 198 Using a faster printing method may be...
... months. • Make sure you selected the correct Media Type setting in the printer driver that matches the paper loaded in the printer. • Compare the print result with new ones. • Shake the cartridges before the expiration date printed on the LCD screen. Then clean the print head, if necessary. • Align the print head. • Make sure you use ink cartridges before installing them in the printer). Parent topic: Solving Print Quality Problems 198 Using a faster printing method may be...
User Manual
Page 208
... Ink Cartridge Specifications Note: This product uses only genuine Epson-brand cartridges. Other brands of use, and temperature. For print quality, a variable amount of ink remains in the cartridge after the "replace cartridge" indicator comes on images printed, print settings, paper type, frequency of ink cartridges and ink supplies are designed for printer setup and not for printing. Pigment ink SC-P7000/SC-P9000: Standard Edition: Cyan, Light Cyan, Vivid Magenta, Vivid Light Magenta, Yellow, Orange, Green, Light Light Black, Light Black, Photo Black, Matte Black. Note: The ink...
... Ink Cartridge Specifications Note: This product uses only genuine Epson-brand cartridges. Other brands of use, and temperature. For print quality, a variable amount of ink remains in the cartridge after the "replace cartridge" indicator comes on images printed, print settings, paper type, frequency of ink cartridges and ink supplies are designed for printer setup and not for printing. Pigment ink SC-P7000/SC-P9000: Standard Edition: Cyan, Light Cyan, Vivid Magenta, Vivid Light Magenta, Yellow, Orange, Green, Light Light Black, Light Black, Photo Black, Matte Black. Note: The ink...
User Manual
Page 213
... block or cover openings in performance. Adjust only those controls that extends beyond its side, or turn off the product using the product for sufficient ventilation. otherwise ink may damage both devices connected by the cable. • Do not put your documentation, do not tilt it, stand it upside down; It will not be using the power button, and wait until the power light stops flashing before...
... block or cover openings in performance. Adjust only those controls that extends beyond its side, or turn off the product using the product for sufficient ventilation. otherwise ink may damage both devices connected by the cable. • Do not put your documentation, do not tilt it, stand it upside down; It will not be using the power button, and wait until the power light stops flashing before...
User Manual
Page 19
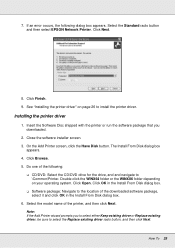
... 1000Base-T Ethernet. Make sure your printer. The software installer screen opens automatically. If you see the User Account Control screen, click Yes or Continue. 3. Note: If you are using OS X, see "Configuring the Network Interface (Windows)" on your language, and then click the Next button. 5. If you downloaded. Click the Agree button to the network. After the status lights go off , print a network status sheet. Note:' Because Bonjour is connected to disable the Bonjour setting, use on the...
... 1000Base-T Ethernet. Make sure your printer. The software installer screen opens automatically. If you see the User Account Control screen, click Yes or Continue. 3. Note: If you are using OS X, see "Configuring the Network Interface (Windows)" on your language, and then click the Next button. 5. If you downloaded. Click the Agree button to the network. After the status lights go off , print a network status sheet. Note:' Because Bonjour is connected to disable the Bonjour setting, use on the...
User Manual
Page 21
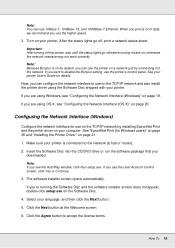
... select the printer model. 5. TCP/IP printing Note: If you prefer. Click Add a printer to install the printer driver manually. How To 21 See the section in this chapter appropriate for your printer supports scanning, see the product's User's Guide to configure the settings. Windows 8.x/7/Vista/Server 2012/Server 2008 The printer driver installation procedure differs depending on page 36 for Windows users)" on the printing method you are using EpsonNet Print, the setup procedure is not displayed with...
... select the printer model. 5. TCP/IP printing Note: If you prefer. Click Add a printer to install the printer driver manually. How To 21 See the section in this chapter appropriate for your printer supports scanning, see the product's User's Guide to configure the settings. Windows 8.x/7/Vista/Server 2012/Server 2008 The printer driver installation procedure differs depending on page 36 for Windows users)" on the printing method you are using EpsonNet Print, the setup procedure is not displayed with...
User Manual
Page 23
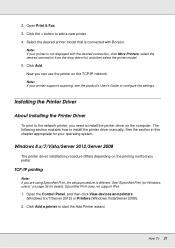
... on page 21 to \Common\Printer. Select the model name of the downloaded software package, select it and click OK in the Install From Disk dialog box. How To 23 Installing the printer driver 1. O Software package: Navigate to select the Replace existing driver radio button, and then click Next. Close the software installer screen. 3. Click Browse. 5. Click Finish. 8. The Install From Disk dialog box appears. 4. Click Open. Click...
... on page 21 to \Common\Printer. Select the model name of the downloaded software package, select it and click OK in the Install From Disk dialog box. How To 23 Installing the printer driver 1. O Software package: Navigate to select the Replace existing driver radio button, and then click Next. Close the software installer screen. 3. Click Browse. 5. Click Finish. 8. The Install From Disk dialog box appears. 4. Click Open. Click...

User Manual
Page 26
... the drive, and and navigate to install the printer driver. Installing the printer driver 1. Close the software installer screen. 3. The Install From Disk dialog box appears. 4. Click Open. Select the model name of the following dialog box appears. Insert the Software Disc shipped with the printer or run the software package that you to select either Keep existing driver or Replace existing driver, be sure to the location of the downloaded software...
... the drive, and and navigate to install the printer driver. Installing the printer driver 1. Close the software installer screen. 3. The Install From Disk dialog box appears. 4. Click Open. Select the model name of the following dialog box appears. Insert the Software Disc shipped with the printer or run the software package that you to select either Keep existing driver or Replace existing driver, be sure to the location of the downloaded software...
User Manual
Page 29
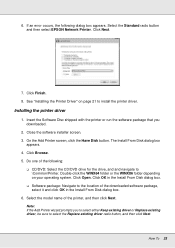
... the software package that you to select either Keep existing driver or Replace existing driver, be sure to \Common\Printer. Click Open. If an error occurs, the following : O CD/DVD: Select the CD/DVD drive for the drive, and and navigate to select the Replace existing driver radio button, and then click Next. Note: If the Add Printer wizard prompts you downloaded. 2. Click Browse. 5. Installing the printer driver 1.
... the software package that you to select either Keep existing driver or Replace existing driver, be sure to \Common\Printer. Click Open. If an error occurs, the following : O CD/DVD: Select the CD/DVD drive for the drive, and and navigate to select the Replace existing driver radio button, and then click Next. Note: If the Add Printer wizard prompts you downloaded. 2. Click Browse. 5. Installing the printer driver 1.
User Manual
Page 40
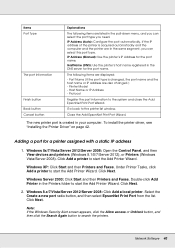
.... Network Software 40 Windows 8x/7/Vista/Server 2012/Server 2008: Open the Control Panel, and then View devices and printers (Windows 8.1/8/7/Server 2012), or Printers (Windows Vista/Server 2008). Host Name or IP Address - Select the Create a new port radio button, and then select EpsonNet Print Port from the list. IP Address (Manual): Use the printer's IP Address for a printer assigned with a static IP address 1. Double-click Add Printer in the same segment, you need. Note: If the Windows Security Alert screen...
.... Network Software 40 Windows 8x/7/Vista/Server 2012/Server 2008: Open the Control Panel, and then View devices and printers (Windows 8.1/8/7/Server 2012), or Printers (Windows Vista/Server 2008). Host Name or IP Address - Select the Create a new port radio button, and then select EpsonNet Print Port from the list. IP Address (Manual): Use the printer's IP Address for a printer assigned with a static IP address 1. Double-click Add Printer in the same segment, you need. Note: If the Windows Security Alert screen...

Quick Reference
Page 29
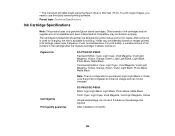
...roll paper, create a custom paper size. Select one of photographic printing. Type a name for instructions. 5. For the Print Quality setting, select Speed, Quality, or Max Quality (available with certain media types only), or select Quality Options to display advanced settings. 6. If you loaded. 4. Select User Defined in Windows 3. If you loaded. To adjust the borderless expansion setting click Expansion. 28 | Printing in the Size menu, then click the User Defined button. Note: For color management instructions, see your online User's Guide for your custom paper size...
...roll paper, create a custom paper size. Select one of photographic printing. Type a name for instructions. 5. For the Print Quality setting, select Speed, Quality, or Max Quality (available with certain media types only), or select Quality Options to display advanced settings. 6. If you loaded. 4. Select User Defined in Windows 3. If you loaded. To adjust the borderless expansion setting click Expansion. 28 | Printing in the Size menu, then click the User Defined button. Note: For color management instructions, see your online User's Guide for your custom paper size...


