
Technical Brief (Multimedia Projectors)
Page 5
... logo Versatility-Flexible installation EPSON PowerLite projectors can be installed in a variety of ways: Front projection Rear projection Ceiling mount Ceiling mount LL L L LLL Many EPSON projectors can be installed outside of the presentation room or in P Preset - Volume + Remote Control Infrared Receiver Connecting Block EPSON Projector Typical installation out of presentation room EPSON Sales Training EPSON and EPSON Stylus are registered...
... logo Versatility-Flexible installation EPSON PowerLite projectors can be installed in a variety of ways: Front projection Rear projection Ceiling mount Ceiling mount LL L L LLL Many EPSON projectors can be installed outside of the presentation room or in P Preset - Volume + Remote Control Infrared Receiver Connecting Block EPSON Projector Typical installation out of presentation room EPSON Sales Training EPSON and EPSON Stylus are registered...

Installation Guide - ELPMBUNI Universal Mount Assembly
Page 2
... in the completion of Contents Warranty ...- 3 Contact Premier Mounts ...- 3 Warning Statements ...- 4 Parts List ...- 5 Installation Tools ...- 5 ELPMBUNI Universal Mount Assembly ...- 6 Projector Preparation ...- 7 Securing the Bracket to the Projector ...- 9 Leveling the Mounting bracket ...- 14 Securing the Upper Assembly Ceiling Plate...- 15 Low-Profile Installation ...- 16 Securing the Projector to mounts, adapters, display equipment or personal injury. ELPMBUNI Table of...
... in the completion of Contents Warranty ...- 3 Contact Premier Mounts ...- 3 Warning Statements ...- 4 Parts List ...- 5 Installation Tools ...- 5 ELPMBUNI Universal Mount Assembly ...- 6 Projector Preparation ...- 7 Securing the Bracket to the Projector ...- 9 Leveling the Mounting bracket ...- 14 Securing the Upper Assembly Ceiling Plate...- 15 Low-Profile Installation ...- 16 Securing the Projector to mounts, adapters, display equipment or personal injury. ELPMBUNI Table of...

Installation Guide - ELPMBUNI Universal Mount Assembly
Page 3
... PERSONAL INJURY. THE INSTALLATION INSTRUCTIONS MUST BE READ TO PREVENT PERSONAL INJURY AND PROPERTY DAMAGE. Contact Premier Mounts with any surface other source of the projector. Warning and Caution statements. At least two qualified people should perform the installation procedure. Injury and/or...: wooden studs, solid-flat concrete, and reinforced metal studs. Safety precautions must be disconnected from dropping or mishandling the projector. When mounting to a ceiling that the power plug is commercially available). Page - 4 - Installation Manual Do not install near heater,...
... PERSONAL INJURY. THE INSTALLATION INSTRUCTIONS MUST BE READ TO PREVENT PERSONAL INJURY AND PROPERTY DAMAGE. Contact Premier Mounts with any surface other source of the projector. Warning and Caution statements. At least two qualified people should perform the installation procedure. Injury and/or...: wooden studs, solid-flat concrete, and reinforced metal studs. Safety precautions must be disconnected from dropping or mishandling the projector. When mounting to a ceiling that the power plug is commercially available). Page - 4 - Installation Manual Do not install near heater,...

Installation Guide - ELPMBUNI Universal Mount Assembly
Page 4
Make sure that none of these parts are parts missing and/or damaged, please stop the installation and contact Premier Mounts (800-368-9700). Please see the following hardware is included in the hardware pack but is shipped with the M3 x ... 12mm Security Head Screws (Qty 4) Portable Drill Pencil Level (Supplied) Stud Finder (Commercially Available) M5 Allen Wrench NOTE: Mounting screws will vary by projector. Installation Manual Page - 5 - Upper Assembly (Qty 1) Mounting Bracket (Qty 1) Plastic Barrel Caps (Qty 4) M3 Flat Washers (Qty 4) Note: Must be used with all proper installation...
Make sure that none of these parts are parts missing and/or damaged, please stop the installation and contact Premier Mounts (800-368-9700). Please see the following hardware is included in the hardware pack but is shipped with the M3 x ... 12mm Security Head Screws (Qty 4) Portable Drill Pencil Level (Supplied) Stud Finder (Commercially Available) M5 Allen Wrench NOTE: Mounting screws will vary by projector. Installation Manual Page - 5 - Upper Assembly (Qty 1) Mounting Bracket (Qty 1) Plastic Barrel Caps (Qty 4) M3 Flat Washers (Qty 4) Note: Must be used with all proper installation...

Installation Guide - ELPMBUNI Universal Mount Assembly
Page 5
... A NOTE: The four (2-piece) leg assemblies can be used as single leg or any combination C of your projector for filter and lamp access. K M J L J L Installation Manual ELPMBUNI Universal Mount Assembly A Single Wooden Stud Mounting Points B Solid Structure Mounting Points C Ceiling Plate D Allen Wrench E Height Adjustment Screws F Tension Knobs G Safety Knob H Security Screws I Leveling Barrels J Universal...
... A NOTE: The four (2-piece) leg assemblies can be used as single leg or any combination C of your projector for filter and lamp access. K M J L J L Installation Manual ELPMBUNI Universal Mount Assembly A Single Wooden Stud Mounting Points B Solid Structure Mounting Points C Ceiling Plate D Allen Wrench E Height Adjustment Screws F Tension Knobs G Safety Knob H Security Screws I Leveling Barrels J Universal...

Installation Guide - ELPMBUNI Universal Mount Assembly
Page 6
...by qualified personnel as (distance from the screen to the lens of the projector, top of mounting points and screw thread (pitch) size. 3. Identify the number of the lens placement to the projector. Adherence to these recommendations during your final image on a smooth flat surface.... 2. HANDLE WITH CARE AT ALL TIMES. CAUTION: THE PROJECTOR IS FRAGILE; NOTE: Review the projectors manufacture's operation manual and refer to . Most projectors have either three or four mounting points and are M4 in the installation instructions must be adhered to the ...
...by qualified personnel as (distance from the screen to the lens of the projector, top of mounting points and screw thread (pitch) size. 3. Identify the number of the lens placement to the projector. Adherence to these recommendations during your final image on a smooth flat surface.... 2. HANDLE WITH CARE AT ALL TIMES. CAUTION: THE PROJECTOR IS FRAGILE; NOTE: Review the projectors manufacture's operation manual and refer to . Most projectors have either three or four mounting points and are M4 in the installation instructions must be adhered to the ...

Installation Guide - ELPMBUNI Universal Mount Assembly
Page 7
Figure 2 Tri-Lock Opening Rotate 180° To Unlock Tension Knobs Upper Assembly Safety Knob Figure 3 Figure 4 Page - 8 - Installation Manual ELPMBUNI 4. Separate the upper assembly from the projector mounting bracket by slightly loosening the two tension knurl knobs to be rotated 180° apart and separate. Next loosen the safety screw knurl knob far enough to allow the two parts to create free play between the bracket tri-lock assembly and the upper section tri-lock assembly points. 5.
Figure 2 Tri-Lock Opening Rotate 180° To Unlock Tension Knobs Upper Assembly Safety Knob Figure 3 Figure 4 Page - 8 - Installation Manual ELPMBUNI 4. Separate the upper assembly from the projector mounting bracket by slightly loosening the two tension knurl knobs to be rotated 180° apart and separate. Next loosen the safety screw knurl knob far enough to allow the two parts to create free play between the bracket tri-lock assembly and the upper section tri-lock assembly points. 5.

Installation Guide - ELPMBUNI Universal Mount Assembly
Page 8
... and leg assembly screws must be loose in order to adjust the height of the projector as shown for a better overall fit to your projector requires M3 mounting hardware. Using a Phillips screwdriver, loosely secure the screws to the mounting points. Insert the M3 x 16 Phillips screws with the M3 flat washers (supplied). FIGURE 6 Two...
... and leg assembly screws must be loose in order to adjust the height of the projector as shown for a better overall fit to your projector requires M3 mounting hardware. Using a Phillips screwdriver, loosely secure the screws to the mounting points. Insert the M3 x 16 Phillips screws with the M3 flat washers (supplied). FIGURE 6 Two...

Installation Guide - ELPMBUNI Universal Mount Assembly
Page 9
PowerLite 830p, 835p Hardware: M4 x 12mm (Qty 4) Installation Manual ELPMBUNI NOTE: If your projector model is not shown, when arranging the leg combination, simply ensure access to filters and lamp housings when aligning brackets. PowerLite S3, S4, 62C, 76C, 82C, Hardware: M4 x 12mm (Qty 3) Page - 10 - This mount works with all sub-25 pound projectors.
PowerLite 830p, 835p Hardware: M4 x 12mm (Qty 4) Installation Manual ELPMBUNI NOTE: If your projector model is not shown, when arranging the leg combination, simply ensure access to filters and lamp housings when aligning brackets. PowerLite S3, S4, 62C, 76C, 82C, Hardware: M4 x 12mm (Qty 3) Page - 10 - This mount works with all sub-25 pound projectors.

Installation Guide - ELPMBUNI Universal Mount Assembly
Page 13
... in damaging the threads in the projector. Installation Manual ELPMBUNI Leveling the Mounting bracket 1. Allen Wrench Level Inverted Projector DOWN UP Adjusting the Mount Figure 8 Leveling Barrels Page - 14 - When the position desired is achieved tighten the mounting hardware to do not over-tighten the mounting hardware. Failure to the projector then tighten the hex head leg...
... in damaging the threads in the projector. Installation Manual ELPMBUNI Leveling the Mounting bracket 1. Allen Wrench Level Inverted Projector DOWN UP Adjusting the Mount Figure 8 Leveling Barrels Page - 14 - When the position desired is achieved tighten the mounting hardware to do not over-tighten the mounting hardware. Failure to the projector then tighten the hex head leg...

Installation Guide - ELPMBUNI Universal Mount Assembly
Page 14
...placement of the center of the projector. NOTE: Make sure to measure from the front of the lens to the center of the screen). 3. Ceiling Structure Ceiling Wood Stud Wood Screws Upper Assembly Installation Manual Knurl Knobs (3ea) Figure 9 Secure the ceiling mount to the edge of the screen... of the lens as close to a point centered horizontally on your screen and projector, make sure the mounting location will safely support the weight of the upper assembly. It is recommended from the center of the mounting bracket to the front edge of the lens to the ceiling or wall. 5....
...placement of the center of the projector. NOTE: Make sure to measure from the front of the lens to the center of the screen). 3. Ceiling Structure Ceiling Wood Stud Wood Screws Upper Assembly Installation Manual Knurl Knobs (3ea) Figure 9 Secure the ceiling mount to the edge of the screen... of the lens as close to a point centered horizontally on your screen and projector, make sure the mounting location will safely support the weight of the upper assembly. It is recommended from the center of the mounting bracket to the front edge of the lens to the ceiling or wall. 5....
Installation Guide - ELPMBUNI Universal Mount Assembly
Page 15
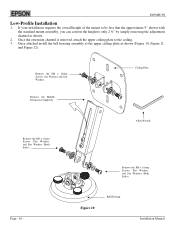
... adjustment channel as shown (Figure 10, Figure 11, and Figure 12). If your installation requires the overall height of the mount to be less that the approximate 9" shown with the standard mount assembly, you can convert the height to the ceiling. 3. Figure 10 Bell Housing Installation Manual Once attached install the bell...
... adjustment channel as shown (Figure 10, Figure 11, and Figure 12). If your installation requires the overall height of the mount to be less that the approximate 9" shown with the standard mount assembly, you can convert the height to the ceiling. 3. Figure 10 Bell Housing Installation Manual Once attached install the bell...

Installation Guide - ELPMBUNI Universal Mount Assembly
Page 17
... universal bracket to the tri-lock, then rotate the projector 180° Universal Mount Page - 18 - The alignment slot must be in the base of the upper assembly. 3. Once inserted rotate the projector and mounting bracket 180° and secure the rear safety knob first...Knobs Figure 13 Tri-Lock Opening Alignment Slot Projector Mount Installation Manual ELPMBUNI Securing the Projector to the upper assembly. Tighten the remaining two tension knurl knobs until the mount becomes rigid. 5. Carefully lift the projector and insert the mounting bracket mating special tri-lock cutout into ...
... universal bracket to the tri-lock, then rotate the projector 180° Universal Mount Page - 18 - The alignment slot must be in the base of the upper assembly. 3. Once inserted rotate the projector and mounting bracket 180° and secure the rear safety knob first...Knobs Figure 13 Tri-Lock Opening Alignment Slot Projector Mount Installation Manual ELPMBUNI Securing the Projector to the upper assembly. Tighten the remaining two tension knurl knobs until the mount becomes rigid. 5. Carefully lift the projector and insert the mounting bracket mating special tri-lock cutout into ...

Installation Guide - ELPMBUNI Universal Mount Assembly
Page 18
To adjust the tilt angle of the projector, slightly loosen the side M8 screws and tilt to the desired angle to the desired angle then firmly tighten the two M8 roll adjustment screws (... can be adjusted by slightly loosening the two 8mm height adjustment screws and raising or lowering the projector (Figure 14). 3. With the projector secured in the mount and power on the screen, slightly loosen the front and rear M8 screws and adjust to the screen and firmly tighten the two M8 tilt ...
To adjust the tilt angle of the projector, slightly loosen the side M8 screws and tilt to the desired angle to the desired angle then firmly tighten the two M8 roll adjustment screws (... can be adjusted by slightly loosening the two 8mm height adjustment screws and raising or lowering the projector (Figure 14). 3. With the projector secured in the mount and power on the screen, slightly loosen the front and rear M8 screws and adjust to the screen and firmly tighten the two M8 tilt ...
Product Information Guide
Page 1
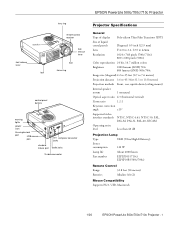
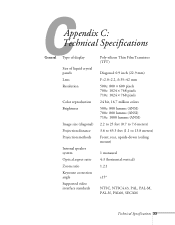
EPSON PowerLite 500c/700c/710c Projector speaker foot release lever foot lens ring remote control receiver foot release lever foot focus ring control panel buttons warning lights power inlet Kensington lock port USB mouse port A/V computer connector jacks standard mouse port audio jacks S-video connector Projector...(ANSI) 710c 800 lumens (ANSI) 500c/700c Image size (diagonal) 2.2 to 25 feet (0.7 to 7.6 meters) Projection distance 3.6 to 45.3 feet (1.1 to 13.8 meters) Projection methods Front, rear, upside-down (ceiling mount) Internal speaker system 1 monaural Optical aspect ...
EPSON PowerLite 500c/700c/710c Projector speaker foot release lever foot lens ring remote control receiver foot release lever foot focus ring control panel buttons warning lights power inlet Kensington lock port USB mouse port A/V computer connector jacks standard mouse port audio jacks S-video connector Projector...(ANSI) 710c 800 lumens (ANSI) 500c/700c Image size (diagonal) 2.2 to 25 feet (0.7 to 7.6 meters) Projection distance 3.6 to 45.3 feet (1.1 to 13.8 meters) Projection methods Front, rear, upside-down (ceiling mount) Internal speaker system 1 monaural Optical aspect ...

Product Information Guide
Page 7
... Parts Price Lists EPSON PowerLite 500c/700c/710c User's Guide EPSON PowerLite 500c/700c/710c Quick Setup sheet EPSON PowerLite 500c/700c/710c Start Here folder SM-EMP500 PL-EMP500, PL-EMP700, PL-EMP710 1/00 EPSON PowerLite 500c/700c/710c Projector - 7 Snap the cover back into position. Remove the two mounting screws on the lamp. Then tighten the screw. EPSON PowerLite 500c/700c/710c Projector 7. Make sure it...
... Parts Price Lists EPSON PowerLite 500c/700c/710c User's Guide EPSON PowerLite 500c/700c/710c Quick Setup sheet EPSON PowerLite 500c/700c/710c Start Here folder SM-EMP500 PL-EMP500, PL-EMP700, PL-EMP710 1/00 EPSON PowerLite 500c/700c/710c Projector - 7 Snap the cover back into position. Remove the two mounting screws on the lamp. Then tighten the screw. EPSON PowerLite 500c/700c/710c Projector 7. Make sure it...
User Manual
Page 30
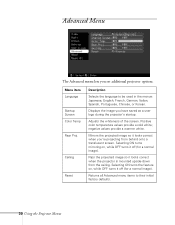
...screen. Positive color temperature values provide a cold white; Ceiling Reset Description Selects the language to their initial factory defaults. 30 Using the Projector Menus Returns all Advanced menu items to be used in the menus: Japanese, English, French, German, Italian, Spanish, Portuguese, Chinese,... Proj. Advanced Menu The Advanced menu lets you have saved as a user logo during the projector's startup. Mirrors the projected image so it looks correct when the projector is mounted upside-down from behind onto a translucent screen. Selecting ON turns the feature on , while ...
...screen. Positive color temperature values provide a cold white; Ceiling Reset Description Selects the language to their initial factory defaults. 30 Using the Projector Menus Returns all Advanced menu items to be used in the menus: Japanese, English, French, German, Italian, Spanish, Portuguese, Chinese,... Proj. Advanced Menu The Advanced menu lets you have saved as a user logo during the projector's startup. Mirrors the projected image so it looks correct when the projector is mounted upside-down from behind onto a translucent screen. Selecting ON turns the feature on , while ...
User Manual
Page 33
... (TFT) Diagonal: 0.9 inch (22.9 mm) F=2.0-2.2, f=35-42 mm 500c: 800 × 600 pixels 700c: 1024 × 768 pixels 710c: 1024 × 768 pixels 24 bit, 16.7 million colors 500c: 800 lumens (ANSI) 700c: 800 lumens (ANSI) 710c: 1000 lumens (ANSI) 2.2 to 25 feet (0.7 to 7.6 meters) 3.6 to... 45.3 feet (1.1 to 13.8 meters) Front, rear, upside-down (ceiling mount) 1 monaural 4:3 (horizontal:vertical) 1.2:1 ±15° NTSC, NTSC4.43, ...
... (TFT) Diagonal: 0.9 inch (22.9 mm) F=2.0-2.2, f=35-42 mm 500c: 800 × 600 pixels 700c: 1024 × 768 pixels 710c: 1024 × 768 pixels 24 bit, 16.7 million colors 500c: 800 lumens (ANSI) 700c: 800 lumens (ANSI) 710c: 1000 lumens (ANSI) 2.2 to 25 feet (0.7 to 7.6 meters) 3.6 to... 45.3 feet (1.1 to 13.8 meters) Front, rear, upside-down (ceiling mount) 1 monaural 4:3 (horizontal:vertical) 1.2:1 ±15° NTSC, NTSC4.43, ...
User Manual
Page 106
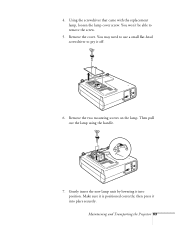
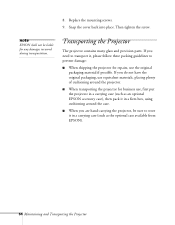
Using the screwdriver that came with the replacement lamp, loosen the lamp cover screw. Then pull out the lamp using the handle. 7. You may need to use a small flat-head screwdriver to remove the screw. 5. Gently insert the new lamp unit by lowering it off. 6. Maintaining and Transporting the Projector 63 Make sure it is positioned correctly, then press it into position. You won't be able to pry it into place securely. Remove the two mounting screws on the lamp. Remove the cover. 4.
Using the screwdriver that came with the replacement lamp, loosen the lamp cover screw. Then pull out the lamp using the handle. 7. You may need to use a small flat-head screwdriver to remove the screw. 5. Gently insert the new lamp unit by lowering it off. 6. Maintaining and Transporting the Projector 63 Make sure it is positioned correctly, then press it into position. You won't be able to pry it into place securely. Remove the two mounting screws on the lamp. Remove the cover. 4.
User Manual
Page 107
.... s When you are hand-carrying the projector, be liable for business use, first put the projector in a carrying case (such as an optional EPSON accessory case), then pack it in a firm box, using cushioning around the projector. Then tighten the screw. Replace the mounting screws. 9. Transporting the Projector The projector contains many glass and precision parts. If...
.... s When you are hand-carrying the projector, be liable for business use, first put the projector in a carrying case (such as an optional EPSON accessory case), then pack it in a firm box, using cushioning around the projector. Then tighten the screw. Replace the mounting screws. 9. Transporting the Projector The projector contains many glass and precision parts. If...

