Product Information Guide
Page 1
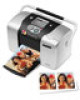
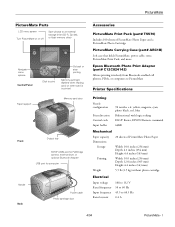
... Pack (part# T5570) Includes 100 sheets of PicureMate Photo Paper and a PictureMate Photo Cartridge PictureMate Carrying Case (part# ARC1B) Soft case that holds PictureMate, power cable, extra PictureMate Print Pack, and more Epson Bluetooth Photo Print Adapter (part# C12C824142) Allows printing wirelessly from Bluetooth-enabled cell phones, PDAs, or computers to PictureMate Printer Specifications Printing Nozzle configuration Print direction Control code...
... Pack (part# T5570) Includes 100 sheets of PicureMate Photo Paper and a PictureMate Photo Cartridge PictureMate Carrying Case (part# ARC1B) Soft case that holds PictureMate, power cable, extra PictureMate Print Pack, and more Epson Bluetooth Photo Print Adapter (part# C12C824142) Allows printing wirelessly from Bluetooth-enabled cell phones, PDAs, or computers to PictureMate Printer Specifications Printing Nozzle configuration Print direction Control code...

Product Information Guide
Page 2
... Colors Cartridge life Storage temperature Transit temperature Freezing temperature* Dimensions Black, Cyan, Magenta, Yellow, Red, and Blue 2 years from these steps to load PictureMate Photo Paper. PictureMate Power consumption Approx. 13 W Approx. 4 W in standby mode Environmental Temperature Operation 50 to 95 °F (10 to 35 °C) Storage* −4 to 104 °F (−...
... Colors Cartridge life Storage temperature Transit temperature Freezing temperature* Dimensions Black, Cyan, Magenta, Yellow, Red, and Blue 2 years from these steps to load PictureMate Photo Paper. PictureMate Power consumption Approx. 13 W Approx. 4 W in standby mode Environmental Temperature Operation 50 to 95 °F (10 to 35 °C) Storage* −4 to 104 °F (−...
Product Information Guide
Page 7
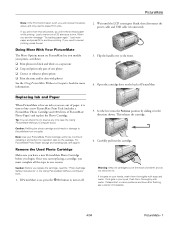
... start replacing a cartridge, you need to the front. 4. Warning: Keep ink cartridges out of the reach of PictureMate Photo Paper) and replace the Photo Cartridge. Remove the Used Photo Cartridge Make sure you begin. Caution: Refilling the photo cartridge could result in the direction shown. Set the lever into the Release position by sliding it and...
... start replacing a cartridge, you need to the front. 4. Warning: Keep ink cartridges out of the reach of PictureMate Photo Paper) and replace the Photo Cartridge. Remove the Used Photo Cartridge Make sure you begin. Caution: Refilling the photo cartridge could result in the direction shown. Set the lever into the Release position by sliding it and...

Product Information Guide
Page 8
..., or you 're using it, normal printing may be possible. 3. Turn PictureMate back on PictureMate Photo Paper will look great for years. Unwrap the cartridge. Reconnect the power cord. Store Unused Paper Return unused paper to the back. Cleaning the Print Head If your PictureMate's print head nozzles may not be clogged. If you are missing colors...
..., or you 're using it, normal printing may be possible. 3. Turn PictureMate back on PictureMate Photo Paper will look great for years. Unwrap the cartridge. Reconnect the power cord. Store Unused Paper Return unused paper to the back. Cleaning the Print Head If your PictureMate's print head nozzles may not be clogged. If you are missing colors...

Product Information Guide
Page 9
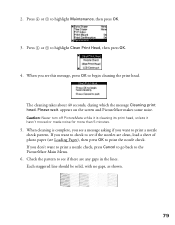
.... 4. Press or to highlight the number for the best pattern (1 to the PictureMate Main Menu. When cleaning is the straightest. (You may need to use a magnifying glass.) Example of photo paper (see which the message Cleaning print head. Press or to highlight Maintenance, then press... OK. 2. appears on the screen. 4/04 PictureMate - 9 The Main Menu appears on the screen. 5. Press or to ...
.... 4. Press or to highlight the number for the best pattern (1 to the PictureMate Main Menu. When cleaning is the straightest. (You may need to use a magnifying glass.) Example of photo paper (see which the message Cleaning print head. Press or to highlight Maintenance, then press... OK. 2. appears on the screen. 4/04 PictureMate - 9 The Main Menu appears on the screen. 5. Press or to ...
Start Here Card
Page 3
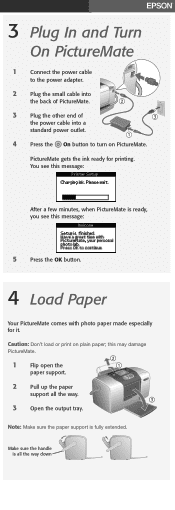
this message: 5 Press the OK button. 4 Load Paper Your PictureMate comes with photo paper made especially for printing. 3 Plug In and Turn On PictureMate 1 Connect the power cable to the power adapter. 2 Plug the small cable into the back of PictureMate. 3 Plug the other end of the power cable into a standard power outlet. 4 Press the On button...
this message: 5 Press the OK button. 4 Load Paper Your PictureMate comes with photo paper made especially for printing. 3 Plug In and Turn On PictureMate 1 Connect the power cable to the power adapter. 2 Plug the small cable into the back of PictureMate. 3 Plug the other end of the power cable into a standard power outlet. 4 Press the On button...
User's Guide
Page 8
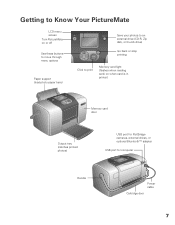
on or off Use these buttons to move through menu options Paper support (load photo paper here) Save your photos to an external drive (CD-R, Zip disk, or thumb drive) Go back or stop printing Click to Know Your PictureMate LCD menu screen Turn PictureMate on when card is in printer) Memory card door Output tray (catches printed photos) USB port for PictBridge cameras, external drives, or optional BluetoothTM adapter USB port for computer Handle Power cable Cartridge door 7 Getting to print Memory card light (flashes when reading card;
on or off Use these buttons to move through menu options Paper support (load photo paper here) Save your photos to an external drive (CD-R, Zip disk, or thumb drive) Go back or stop printing Click to Know Your PictureMate LCD menu screen Turn PictureMate on when card is in printer) Memory card door Output tray (catches printed photos) USB port for PictBridge cameras, external drives, or optional BluetoothTM adapter USB port for computer Handle Power cable Cartridge door 7 Getting to print Memory card light (flashes when reading card;

User's Guide
Page 9
...up . Place your PictureMate Photo Paper against the right edge, with the glossy side up paper support Move handle all the way down Open output tray Note: Keep the PictureMate handle to the back, under the paper feeder and all the way down, to allow paper to prevent smearing. ...Open the output tray. Open the paper support. 3. Make sure paper is time to PictureMate. Caution: Don't load plain paper, this may cause damage to load more than 20 photos, PictureMate will prompt you are printing more paper. Pull up to feed through...
...up . Place your PictureMate Photo Paper against the right edge, with the glossy side up paper support Move handle all the way down Open output tray Note: Keep the PictureMate handle to the back, under the paper feeder and all the way down, to allow paper to prevent smearing. ...Open the output tray. Open the paper support. 3. Make sure paper is time to PictureMate. Caution: Don't load plain paper, this may cause damage to load more than 20 photos, PictureMate will prompt you are printing more paper. Pull up to feed through...
User's Guide
Page 10
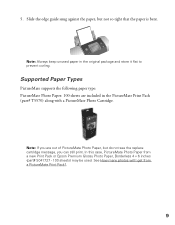
... keep unused paper in the PictureMate Print Pack (part# T5570) along with a PictureMate Photo Cartridge. Supported Paper Types PictureMate supports the following paper type: PictureMate Photo Paper: 100 sheets are out of PictureMate Photo Paper, but not so tight that the paper is bent. In this case, PictureMate Photo Paper from a PictureMate Print Pack?. 9 See How many photos will I get from a new Print Pack or Epson Premium Glossy Photo Paper, Borderless 4 ×...
... keep unused paper in the PictureMate Print Pack (part# T5570) along with a PictureMate Photo Cartridge. Supported Paper Types PictureMate supports the following paper type: PictureMate Photo Paper: 100 sheets are out of PictureMate Photo Paper, but not so tight that the paper is bent. In this case, PictureMate Photo Paper from a PictureMate Print Pack?. 9 See How many photos will I get from a new Print Pack or Epson Premium Glossy Photo Paper, Borderless 4 ×...

User's Guide
Page 32
..., do not stack them in a new folder. When your card or drive. Press OK. If you save on PictureMate Photo Paper are saved in glass frames or photo albums. ■ Keep prints out of the photo. ■ If you need to the same disk or drive until it is named 002, etc. The first folder...
..., do not stack them in a new folder. When your card or drive. Press OK. If you save on PictureMate Photo Paper are saved in glass frames or photo albums. ■ Keep prints out of the photo. ■ If you need to the same disk or drive until it is named 002, etc. The first folder...
User's Guide
Page 66
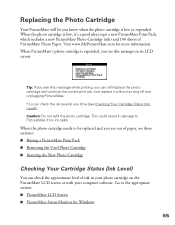
... still replace the photo cartridge and continue the current print job. Replacing the Photo Cartridge Your PictureMate will let you are out of paper, see these sections: ■ Buying a PictureMate Print Pack ■ Removing the Used Photo Cartridge ■ Inserting the New Photo Cartridge Checking Your Cartridge Status (Ink Level) You can check the approximate level of PictureMate Photo Paper.
... still replace the photo cartridge and continue the current print job. Replacing the Photo Cartridge Your PictureMate will let you are out of paper, see these sections: ■ Buying a PictureMate Print Pack ■ Removing the Used Photo Cartridge ■ Inserting the New Photo Cartridge Checking Your Cartridge Status (Ink Level) You can check the approximate level of PictureMate Photo Paper.
User's Guide
Page 71
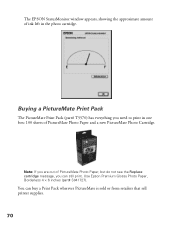
... are out of PictureMate Photo Paper and a new PictureMate Photo Cartridge. The EPSON StatusMonitor window appears, showing the approximate amount of ink left in one box: 100 sheets of PictureMate Photo Paper, but do not see the Replace cartridge message, you can buy a Print Pack wherever PictureMate is sold or from retailers that sell printer supplies. 70 Buying a PictureMate Print Pack The...
... are out of PictureMate Photo Paper and a new PictureMate Photo Cartridge. The EPSON StatusMonitor window appears, showing the approximate amount of ink left in one box: 100 sheets of PictureMate Photo Paper, but do not see the Replace cartridge message, you can buy a Print Pack wherever PictureMate is sold or from retailers that sell printer supplies. 70 Buying a PictureMate Print Pack The...
User's Guide
Page 80
...check to begin cleaning the print head. Caution: Never turn off PictureMate while it hasn't moved or made noise for more than 5 minutes. 5. If you see this message, press OK to see if the nozzles are clean, load a sheet of photo paper (see if there are any gaps in the lines. Each staggered... line should be solid, with no gaps, as shown. 79 Press or to highlight Maintenance, then press OK. 3. When you see a message asking if you don't want to the PictureMate Main Menu. 6. Press or ...
...check to begin cleaning the print head. Caution: Never turn off PictureMate while it hasn't moved or made noise for more than 5 minutes. 5. If you see this message, press OK to see if the nozzles are clean, load a sheet of photo paper (see if there are any gaps in the lines. Each staggered... line should be solid, with no gaps, as shown. 79 Press or to highlight Maintenance, then press OK. 3. When you see a message asking if you don't want to the PictureMate Main Menu. 6. Press or ...

User's Guide
Page 81
Press or to align the print head. 1. Aligning the Print Head Directly From PictureMate If you have moved PictureMate and the print quality is loaded (see Loading Paper). 2. Press or to clean the print head again. If there are no gaps, press Cancel to go back to soften-and then try ...Problems. You can also turn PictureMate off and wait overnight-this allows any gaps (as it was before-for example, if you see misaligned vertical lines or dark or light horizontal banding-you need to highlight Maintenance, then press OK. 4. Make sure a sheet of photo paper is not the same as ...
Press or to align the print head. 1. Aligning the Print Head Directly From PictureMate If you have moved PictureMate and the print quality is loaded (see Loading Paper). 2. Press or to clean the print head again. If there are no gaps, press Cancel to go back to soften-and then try ...Problems. You can also turn PictureMate off and wait overnight-this allows any gaps (as it was before-for example, if you see misaligned vertical lines or dark or light horizontal banding-you need to highlight Maintenance, then press OK. 4. Make sure a sheet of photo paper is not the same as ...

User's Guide
Page 82
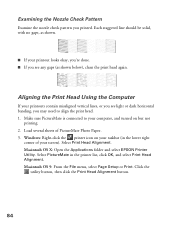
... the printer icon on but not printing. 2. Press OK to use a magnifying glass.) Example of your computer and clean the print head, if necessary. 1. Checking the Print Quality Using the Computer You can check PictureMate's print quality from your screen). Make sure a sheet of photo paper is ...loaded (see the next message. 6. Make sure PictureMate is the straightest. (You may need to exit the alignment screen. Select Nozzle ...
... the printer icon on but not printing. 2. Press OK to use a magnifying glass.) Example of your computer and clean the print head, if necessary. 1. Checking the Print Quality Using the Computer You can check PictureMate's print quality from your screen). Make sure a sheet of photo paper is ...loaded (see the next message. 6. Make sure PictureMate is the straightest. (You may need to exit the alignment screen. Select Nozzle ...
User's Guide
Page 85
...you see light or dark horizontal banding, you printed. Select Print Head Alignment. Macintosh OS X: Open the Applications folder and select EPSON Printer Utility. Macintosh OS 9: From the File menu, select Page Setup or Print. Examining the Nozzle Check Pattern Examine the nozzle check...on your taskbar (in the printer list, click OK, and select Print Head Alignment. Load several sheets of your screen). Click the utility button, then click the Print Head Alignment button. 84 Select PictureMate in the lower right corner of PictureMate Photo Paper. 3. Each staggered line should...
...you see light or dark horizontal banding, you printed. Select Print Head Alignment. Macintosh OS X: Open the Applications folder and select EPSON Printer Utility. Macintosh OS 9: From the File menu, select Page Setup or Print. Examining the Nozzle Check Pattern Examine the nozzle check...on your taskbar (in the printer list, click OK, and select Print Head Alignment. Load several sheets of your screen). Click the utility button, then click the Print Head Alignment button. 84 Select PictureMate in the lower right corner of PictureMate Photo Paper. 3. Each staggered line should...

User's Guide
Page 94
... faint or has gaps in a smaller size; see Aligning the Print Head Directly From PictureMate or Aligning the Print Head Using the Computer for instructions. 93 Your photo is blurry or smeared. ■ Use PictureMate Photo Paper from PictureMate or Cleaning the Print Head Using the Computer for instructions. ■ You may need alignment; see Aligning...
... faint or has gaps in a smaller size; see Aligning the Print Head Directly From PictureMate or Aligning the Print Head Using the Computer for instructions. 93 Your photo is blurry or smeared. ■ Use PictureMate Photo Paper from PictureMate or Cleaning the Print Head Using the Computer for instructions. ■ You may need alignment; see Aligning...

User's Guide
Page 99
...PictureMate Print Pack with PictureMate Photo Paper and a photo cartridge, and other PictureMate accessories from the Epson Store at (800) 873-7766 or visit www.epsonstore.com (U.S. sales only). This may need to uninstall and then reinstall your operating system, for dealer referral. In Windows 98 or Me, click EPSON USB Printer... 9 Note: Do not turn off or disconnect PictureMate while you want to step 9. 6. Follow the steps in the program list and click the Add/Remove button (Change/Remove button on your EPSON PictureMate printer icon is selected and click OK. Double-click ...
...PictureMate Print Pack with PictureMate Photo Paper and a photo cartridge, and other PictureMate accessories from the Epson Store at (800) 873-7766 or visit www.epsonstore.com (U.S. sales only). This may need to uninstall and then reinstall your operating system, for dealer referral. In Windows 98 or Me, click EPSON USB Printer... 9 Note: Do not turn off or disconnect PictureMate while you want to step 9. 6. Follow the steps in the program list and click the Add/Remove button (Change/Remove button on your EPSON PictureMate printer icon is selected and click OK. Double-click ...
User's Guide
Page 117
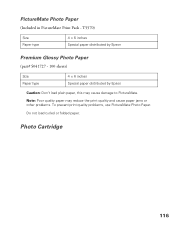
Do not load curled or folded paper. Note: Poor quality paper may cause damage to PictureMate. PictureMate Photo Paper (Included in PictureMate Print Pack - T5570) Size Paper type 4 × 6 inches Special paper distributed by Epson Premium Glossy Photo Paper (part# S041727 - 100 sheets) Size Paper type 4 × 6 inches Special paper distributed by Epson Caution: Don't load plain paper, this may reduce the print quality and cause paper jams or other problems. To prevent print quality problems, use PictureMate Photo Paper. Photo Cartridge 116
Do not load curled or folded paper. Note: Poor quality paper may cause damage to PictureMate. PictureMate Photo Paper (Included in PictureMate Print Pack - T5570) Size Paper type 4 × 6 inches Special paper distributed by Epson Premium Glossy Photo Paper (part# S041727 - 100 sheets) Size Paper type 4 × 6 inches Special paper distributed by Epson Caution: Don't load plain paper, this may reduce the print quality and cause paper jams or other problems. To prevent print quality problems, use PictureMate Photo Paper. Photo Cartridge 116
User's Guide
Page 124
... both the PictureMate Photo Cartridge and paper with a PictureMate Photo Cartridge. You can still be replaced with a new one within 6 months of installation. The PictureMate Photo Cartridge will print about 100 borderless 4 × 6 color photos. Actual yields will vary based on test printing with paper from another PictureMate Print Pack or Epson Premium Glossy Photo Paper in less than 100 photos with a new PictureMate Print...
... both the PictureMate Photo Cartridge and paper with a PictureMate Photo Cartridge. You can still be replaced with a new one within 6 months of installation. The PictureMate Photo Cartridge will print about 100 borderless 4 × 6 color photos. Actual yields will vary based on test printing with paper from another PictureMate Print Pack or Epson Premium Glossy Photo Paper in less than 100 photos with a new PictureMate Print...


