User Manual
Page 3
... Perfection V800 Photo/V850 Pro User's Guide 7 Scanner Basics...8 Scanner Parts Locations ...8 Scanner Parts...8 Scanner Buttons and Lights...11 Changing the Power Off Setting ...11 Placing Originals on the Scanner ...13 Placing Originals on the Scanner Glass 13 Placing Thick Documents...16 Placing Film or Slides on the Scanner ...from the Start Button 40 Changing Default Start Button Settings 41 Starting a Scan Using the Epson Scan Icon 43 Starting a Scan from a Scanning Program 45 Selecting Epson Scan Settings ...47 Scan Modes...47 Selecting the Scan Mode...48 Scanning in Full Auto Mode...
... Perfection V800 Photo/V850 Pro User's Guide 7 Scanner Basics...8 Scanner Parts Locations ...8 Scanner Parts...8 Scanner Buttons and Lights...11 Changing the Power Off Setting ...11 Placing Originals on the Scanner ...13 Placing Originals on the Scanner Glass 13 Placing Thick Documents...16 Placing Film or Slides on the Scanner ...from the Start Button 40 Changing Default Start Button Settings 41 Starting a Scan Using the Epson Scan Icon 43 Starting a Scan from a Scanning Program 45 Selecting Epson Scan Settings ...47 Scan Modes...47 Selecting the Scan Mode...48 Scanning in Full Auto Mode...
User Manual
Page 4
... 68 Scanning Special Projects...69 Restoring Photo Colors as You Scan 69 Removing Dust and Scratch Marks Using DIGITAL ICE Technology 70 DIGITAL ICE Technology Specifications 71 Scanning to PDF Settings 76 Using the Scanner as Expected 86 Scanning Software Does Not Operate Correctly 86 Cannot Start Epson Scan ...87 Scanning is Slow...
... 68 Scanning Special Projects...69 Restoring Photo Colors as You Scan 69 Removing Dust and Scratch Marks Using DIGITAL ICE Technology 70 DIGITAL ICE Technology Specifications 71 Scanning to PDF Settings 76 Using the Scanner as Expected 86 Scanning Software Does Not Operate Correctly 86 Cannot Start Epson Scan ...87 Scanning is Slow...
User Manual
Page 5
... - OS X 94 Where to Uninstall Your Scanner Software 93 Uninstalling Scanner Software - Straight Lines in an Image Appear Crooked 89 Image is Distorted or Blurry ...89 Image Colors are Patchy at the Edges 90 Image is ... Interface Specifications...99 Safety and Approvals Specifications 100 Notices ...101 Important Safety Instructions...101 Restrictions on Copying ...102 Default Delay Times for Power Management for Epson Products 103 Trademarks ...103 Copyright Notice...104 libTIFF Software Acknowledgment 104 5
... - OS X 94 Where to Uninstall Your Scanner Software 93 Uninstalling Scanner Software - Straight Lines in an Image Appear Crooked 89 Image is Distorted or Blurry ...89 Image Colors are Patchy at the Edges 90 Image is ... Interface Specifications...99 Safety and Approvals Specifications 100 Notices ...101 Important Safety Instructions...101 Restrictions on Copying ...102 Default Delay Times for Power Management for Epson Products 103 Trademarks ...103 Copyright Notice...104 libTIFF Software Acknowledgment 104 5
User Manual
Page 8
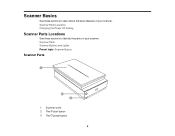
Scanner Parts Locations Changing the Power Off Setting Scanner Parts Locations See these sections to identify the parts on your scanner. Scanner Parts Scanner Buttons and Lights Parent topic: Scanner Basics Scanner Parts 1 Scanner cover 2 The start button 3 The power button 8 Scanner Basics See these sections to learn about the basic features of your scanner.
Scanner Parts Locations Changing the Power Off Setting Scanner Parts Locations See these sections to identify the parts on your scanner. Scanner Parts Scanner Buttons and Lights Parent topic: Scanner Basics Scanner Parts 1 Scanner cover 2 The start button 3 The power button 8 Scanner Basics See these sections to learn about the basic features of your scanner.
User Manual
Page 11
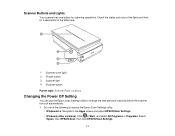
...; Windows 8.x: Navigate to the Apps screen and select EPSON Scan Settings. • Windows (other versions): Click or Start, and select All Programs or Programs. Select Epson, then EPSON Scan, then click EPSON Scan Settings. 11 Scanner Buttons and Lights Your scanner has one of inactivity before the scanner turns off automatically. 1. Check the status and color of...
...; Windows 8.x: Navigate to the Apps screen and select EPSON Scan Settings. • Windows (other versions): Click or Start, and select All Programs or Programs. Select Epson, then EPSON Scan, then click EPSON Scan Settings. 11 Scanner Buttons and Lights Your scanner has one of inactivity before the scanner turns off automatically. 1. Check the status and color of...
User Manual
Page 12
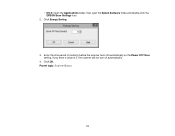
Click OK. If you enter a value of inactivity before the scanner turns off automatically. 4. Parent topic: Scanner Basics 12 Enter the time period of 0, the scanner will not turn off automatically as the Power Off Timer setting. • OS X: Open the Applications folder, then open the Epson Software folder and double-click the EPSON Scan Settings icon. 2. Click Energy Saving. 3.
Click OK. If you enter a value of inactivity before the scanner turns off automatically. 4. Parent topic: Scanner Basics 12 Enter the time period of 0, the scanner will not turn off automatically as the Power Off Timer setting. • OS X: Open the Applications folder, then open the Epson Software folder and double-click the EPSON Scan Settings icon. 2. Click Energy Saving. 3.

User Manual
Page 13
Do not leave photos on the scanner glass. Caution: Do not place anything on top of your originals on the scanner. Placing Originals on the Scanner Glass Placing Thick Documents Placing Film or Slides on the Scanner Placing Originals on the Scanner Glass You can place originals directly on the scanner glass for an extended period, or they...
Do not leave photos on the scanner glass. Caution: Do not place anything on top of your originals on the scanner. Placing Originals on the Scanner Glass Placing Thick Documents Placing Film or Slides on the Scanner Placing Originals on the Scanner Glass You can place originals directly on the scanner glass for an extended period, or they...
User Manual
Page 14
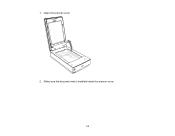
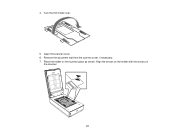
1. Open the scanner cover. 2. Make sure the document mat is installed inside the scanner cover. 14
1. Open the scanner cover. 2. Make sure the document mat is installed inside the scanner cover. 14
User Manual
Page 15
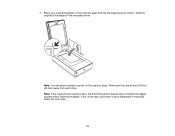
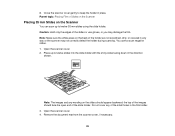
If this is the case, scan each other. Slide the original to the edges of the indicated corner. Note: If the originals have white borders, the Auto Recognition feature may not detect the edges properly when scanning multiples. Place your original facedown on the scanner glass. Note: You can place multiple originals on the scanner glass with the top edge facing as shown. Make sure they are at least 0.8 inch (20 mm) away from each original separately or manually select the scan area. 15 3.
If this is the case, scan each other. Slide the original to the edges of the indicated corner. Note: If the originals have white borders, the Auto Recognition feature may not detect the edges properly when scanning multiples. Place your original facedown on the scanner glass. Note: You can place multiple originals on the scanner glass with the top edge facing as shown. Make sure they are at least 0.8 inch (20 mm) away from each original separately or manually select the scan area. 15 3.
User Manual
Page 16
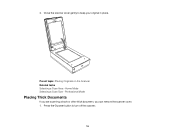
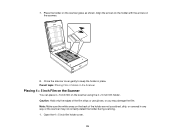
Close the scanner cover gently to turn off the scanner. 16 Press the power button to keep your original in place. 4. Professional Mode Placing Thick Documents If you are scanning a book or other thick document, you can remove the scanner cover. 1. Parent topic: Placing Originals on the Scanner Related tasks Selecting a Scan Area - Home Mode Selecting a Scan Size -
Close the scanner cover gently to turn off the scanner. 16 Press the power button to keep your original in place. 4. Professional Mode Placing Thick Documents If you are scanning a book or other thick document, you can remove the scanner cover. 1. Parent topic: Placing Originals on the Scanner Related tasks Selecting a Scan Area - Home Mode Selecting a Scan Size -
User Manual
Page 17
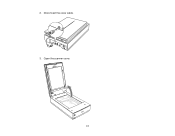
Disconnect the cover cable. 3. Open the scanner cover. 17 2.
Disconnect the cover cable. 3. Open the scanner cover. 17 2.
User Manual
Page 18
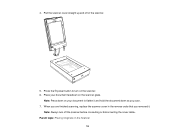
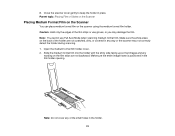
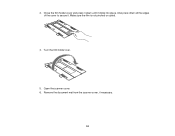
Parent topic: Placing Originals on the scanner. 6. Place your document to turn off of the scanner. 5. Press the power button to flatten it and hold the document down on your document facedown on the scanner glass. Note: Press down as you removed it. Note: Always turn on the Scanner 18 Pull the scanner cover straight up and off the scanner before connecting or disconnecting the cover cable. When you are finished scanning, replace the scanner cover in the reverse order that you scan. 7. 4.
Parent topic: Placing Originals on the scanner. 6. Place your document to turn off of the scanner. 5. Press the power button to flatten it and hold the document down on your document facedown on the scanner glass. Note: Press down as you removed it. Note: Always turn on the Scanner 18 Pull the scanner cover straight up and off the scanner before connecting or disconnecting the cover cable. When you are finished scanning, replace the scanner cover in the reverse order that you scan. 7. 4.
User Manual
Page 19
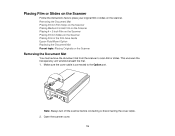
... mm Film Strips on the Scanner Placing Medium Format Film on the Scanner Placing 4 × 5 inch Film on the Scanner Placing 35 mm Slides on the Scanner Placing Film in the Film Area Guide Epson Fluid Mount Option Replacing the Document Mat Parent topic: Placing Originals on the scanner. Open the scanner cover. 19 Note: Always turn...
... mm Film Strips on the Scanner Placing Medium Format Film on the Scanner Placing 4 × 5 inch Film on the Scanner Placing 35 mm Slides on the Scanner Placing Film in the Film Area Guide Epson Fluid Mount Option Replacing the Document Mat Parent topic: Placing Originals on the scanner. Open the scanner cover. 19 Note: Always turn...
User Manual
Page 20
... transportation lock is unlocked. 4. Note: Make sure the white areas on the scanner using the 35 mm film strip holder. Parent topic: Placing Film or Slides on the Scanner Related tasks Cleaning Your Scanner Placing 35 mm Film Strips on the Scanner You can place 35 mm film strips on the back of the... film strips or use gloves, or you may not correctly detect the holder during scanning. 1. 3. Slide the document mat out from inside the scanner cover. Caution: Hold only the edges of the holder are not scratched, dirty, or covered in any way or the...
... transportation lock is unlocked. 4. Note: Make sure the white areas on the scanner using the 35 mm film strip holder. Parent topic: Placing Film or Slides on the Scanner Related tasks Cleaning Your Scanner Placing 35 mm Film Strips on the Scanner You can place 35 mm film strips on the back of the... film strips or use gloves, or you may not correctly detect the holder during scanning. 1. 3. Slide the document mat out from inside the scanner cover. Caution: Hold only the edges of the holder are not scratched, dirty, or covered in any way or the...
User Manual
Page 22
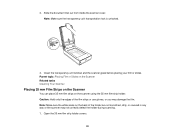
Open the scanner cover. 6. Place the holder on the scanner. 22 4. Remove the document mat from the scanner cover, if necessary. 7. Align the arrows on the holder with the arrows on the scanner glass as shown. Turn the film holder over. 5.
Open the scanner cover. 6. Place the holder on the scanner. 22 4. Remove the document mat from the scanner cover, if necessary. 7. Align the arrows on the holder with the arrows on the scanner glass as shown. Turn the film holder over. 5.
User Manual
Page 23
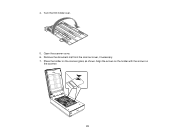
... holder cover. 2. Note: Do not cover any of the small holes in place. Close the scanner cover gently to keep the holder in the holder. 23 Note: You cannot use gloves, or ... covered in the film holder opening. Parent topic: Placing Film or Slides on the Scanner Placing Medium Format Film on the Scanner You can place medium format film on the back of the film strips or use ...Full Auto Mode when scanning medium format film. Make sure the white areas on the scanner using the medium format film holder. 8. Caution: Hold only the edges of the holder are not backward...
... holder cover. 2. Note: Do not cover any of the small holes in place. Close the scanner cover gently to keep the holder in the holder. 23 Note: You cannot use gloves, or ... covered in the film holder opening. Parent topic: Placing Film or Slides on the Scanner Placing Medium Format Film on the Scanner You can place medium format film on the back of the film strips or use ...Full Auto Mode when scanning medium format film. Make sure the white areas on the scanner using the medium format film holder. 8. Caution: Hold only the edges of the holder are not backward...
User Manual
Page 24
Close the film holder cover and press it down all the edges of the cover to secure it clicks into place. Also press down until it . Remove the document mat from the scanner cover, if necessary. 24 Make sure the film is not pinched or curled. 4. Turn the film holder over. 5. Open the scanner cover. 6. 3.
Close the film holder cover and press it down all the edges of the cover to secure it clicks into place. Also press down until it . Remove the document mat from the scanner cover, if necessary. 24 Make sure the film is not pinched or curled. 4. Turn the film holder over. 5. Open the scanner cover. 6. 3.
User Manual
Page 25
Parent topic: Placing Film or Slides on the Scanner Placing 4 × 5 inch Film on the Scanner You can place 4 × 5 inch film on the scanner. 8. 7. Note: Make sure the white areas on the scanner glass as shown. Caution: Hold only the edges of the holder are not scratched, dirty, or covered in place. Align... the arrows on the holder with the arrows on the scanner using the 4 × 5 inch film holder. Place the holder on the back of the film strips or use gloves, or you may not correctly...
Parent topic: Placing Film or Slides on the Scanner Placing 4 × 5 inch Film on the Scanner You can place 4 × 5 inch film on the scanner. 8. 7. Note: Make sure the white areas on the scanner glass as shown. Caution: Hold only the edges of the holder are not scratched, dirty, or covered in place. Align... the arrows on the holder with the arrows on the scanner using the 4 × 5 inch film holder. Place the holder on the back of the film strips or use gloves, or you may not correctly...
User Manual
Page 27
Place the holder on the scanner. 27 Align the arrows on the holder with the arrows on the scanner glass as shown. Open the scanner cover. 6. Turn the film holder over. 5. Remove the document mat from the scanner cover, if necessary. 7. 4.
Place the holder on the scanner. 27 Align the arrows on the holder with the arrows on the scanner glass as shown. Open the scanner cover. 6. Turn the film holder over. 5. Remove the document mat from the scanner cover, if necessary. 7. 4.
User Manual
Page 28
... negative slides. 1. the top of the small holes in place. Remove the document mat from the scanner cover, if necessary. 28 Open the scanner cover. 2. Open the scanner cover. 4. Note: Make sure the white areas on the Scanner You can scan up to twelve slides into the slide holder with the shiny sides facing... down in any way or the scanner may damage the film. Note: The images and any of the images should appear backward; Place up to keep the holder in the film holder. 3. ...
... negative slides. 1. the top of the small holes in place. Remove the document mat from the scanner cover, if necessary. 28 Open the scanner cover. 2. Open the scanner cover. 4. Note: Make sure the white areas on the Scanner You can scan up to twelve slides into the slide holder with the shiny sides facing... down in any way or the scanner may damage the film. Note: The images and any of the images should appear backward; Place up to keep the holder in the film holder. 3. ...


