

Product Information Guide
Page 6
...font you change it is attached to eject the sheet. Error Indicators You can easily tear off your dealer. n Paper Out ••• n Pause ••• ••• f Paper Out ••• n Pause ••• ••• Problem Solution The printer... but not loaded in font: 1. Hold down the Pause button for several minutes; Then press the Pause button to enter Micro Adjust mode. Epson LX-300+II 7/06 Clear the paper jam. Clear the paper jam. f Paper Out - the printer resumes printing automatically once ...
...font you change it is attached to eject the sheet. Error Indicators You can easily tear off your dealer. n Paper Out ••• n Pause ••• ••• f Paper Out ••• n Pause ••• ••• Problem Solution The printer... but not loaded in font: 1. Hold down the Pause button for several minutes; Then press the Pause button to enter Micro Adjust mode. Epson LX-300+II 7/06 Clear the paper jam. Clear the paper jam. f Paper Out - the printer resumes printing automatically once ...
Product Information Guide
Page 8
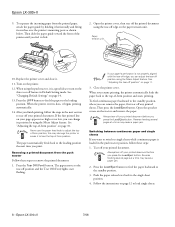
...4. Always tear off your printed document. See "Changing Default Settings" on page 10. See "Adjusting the top-of -form position and starts printing. Never use the paper feed knob to the standby position. 3. Press the Tear Off (Font) button. Press the Load/Eject button to feed...pages at a time may cause a paper jam. 2. Open the printer cover, then tear off any printed sheets. When the printer receives data, it horizontally and fitting its position by holding it begins printing automatically. 14. Epson LX-300+II 9. Then press the Load/Eject button. Push the paper release lever ...
...4. Always tear off your printed document. See "Changing Default Settings" on page 10. See "Adjusting the top-of -form position and starts printing. Never use the paper feed knob to the standby position. 3. Press the Tear Off (Font) button. Press the Load/Eject button to feed...pages at a time may cause a paper jam. 2. Open the printer cover, then tear off any printed sheets. When the printer receives data, it horizontally and fitting its position by holding it begins printing automatically. 14. Epson LX-300+II 9. Then press the Load/Eject button. Push the paper release lever ...

Product Information Guide
Page 11
...position and begins printing. Tear off edge The printer has a minimum and a maximum tearoff position. See "Restoring the printer's default settings" on , the printer automatically advances the paper to the next top-of -form position in effect until you change it receives a full page of -form ...select the appropriate page length for instructions.) 7/06 Epson LX-300+II - 11 The printer advances the paper to the tear-off edge. You may need to flash as the printer enters Micro Adjust mode. 4. Make sure the Tear Off (Font) lights are flashing, the paper is not aligned...
...position and begins printing. Tear off edge The printer has a minimum and a maximum tearoff position. See "Restoring the printer's default settings" on , the printer automatically advances the paper to the next top-of -form position in effect until you change it receives a full page of -form ...select the appropriate page length for instructions.) 7/06 Epson LX-300+II - 11 The printer advances the paper to the tear-off edge. You may need to flash as the printer enters Micro Adjust mode. 4. Make sure the Tear Off (Font) lights are flashing, the paper is not aligned...

Product Information Guide
Page 14
... setting you turn off . 2. Then press the Tear Off (Font) button to change them again or reset the printer's defaults. The printer enters Default Setting mode and prints instructions for changing the settings. 7. Hold down the Load/Eject, LF/FF, and Pause buttons while you want . 4. Epson LX-300+II 7/06 Your new settings remain in inches: 3, 3.5, 4, 5.5, 6, 7, 8, 8.5, 11, 70...
... setting you turn off . 2. Then press the Tear Off (Font) button to change them again or reset the printer's defaults. The printer enters Default Setting mode and prints instructions for changing the settings. 7. Hold down the Load/Eject, LF/FF, and Pause buttons while you want . 4. Epson LX-300+II 7/06 Your new settings remain in inches: 3, 3.5, 4, 5.5, 6, 7, 8, 8.5, 11, 70...
Product Information Guide
Page 15
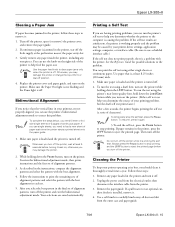
...printer begins printing the self test (a series of alignment patterns. 3. To run the test using the printer's near letter-quality font, hold down the Load/Eject button while you determine whether the printer...If you may damage the printer or change the top-of alignment patterns, turn on the printer. To temporarily stop printing. Cleaning the Printer To keep your printer driver settings, application settings,... guide. 7/06 Epson LX-300+II - 15 If the self test results are having printing problems, you may damage the printer. 2. Then turn off the printer. Always press the...
...printer begins printing the self test (a series of alignment patterns. 3. To run the test using the printer's near letter-quality font, hold down the Load/Eject button while you determine whether the printer...If you may damage the printer or change the top-of alignment patterns, turn on the printer. To temporarily stop printing. Cleaning the Printer To keep your printer driver settings, application settings,... guide. 7/06 Epson LX-300+II - 15 If the self test results are having printing problems, you may damage the printer. 2. Then turn off the printer. Always press the...

Reference Guide
Page 4
... CD-ROM 57 Canceling Printing 58 Uninstalling the Printer Software 59 Uninstalling the printer driver and EPSON Status Monitor 3 59 Chapter 3 Using the Control Panel Control Panel Buttons and Lights 63 Selecting a built-in font 65 Changing the Default Settings 67 Using Default Setting mode 72 Restoring the printer's default settings 73 Chapter 4 Maintenance and Troubleshooting...
... CD-ROM 57 Canceling Printing 58 Uninstalling the Printer Software 59 Uninstalling the printer driver and EPSON Status Monitor 3 59 Chapter 3 Using the Control Panel Control Panel Buttons and Lights 63 Selecting a built-in font 65 Changing the Default Settings 67 Using Default Setting mode 72 Restoring the printer's default settings 73 Chapter 4 Maintenance and Troubleshooting...
Reference Guide
Page 63
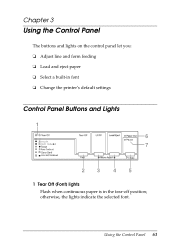
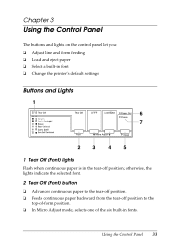
Using the Control Panel 63 Chapter 3 Using the Control Panel The buttons and lights on the control panel let you: ❏ Adjust line and form feeding ❏ Load and eject paper ❏ Select a built-in font ❏ Change the printer's default settings Control Panel Buttons and Lights 1 6 7 23 45 1 Tear Off (Font) lights Flash when continuous paper is in the tear-off position; otherwise, the lights indicate the selected font.
Using the Control Panel 63 Chapter 3 Using the Control Panel The buttons and lights on the control panel let you: ❏ Adjust line and form feeding ❏ Load and eject paper ❏ Select a built-in font ❏ Change the printer's default settings Control Panel Buttons and Lights 1 6 7 23 45 1 Tear Off (Font) lights Flash when continuous paper is in the tear-off position; otherwise, the lights indicate the selected font.
Reference Guide
Page 66
...Panel Press the Tear Off (Font) button repeatedly to cycle through the fonts, and stop when the lights on but not printing. For best results, use the control panel to select a built-in your application to select a font. Make sure the printer is , wait until you change it stops. 2. Note: ...Settings you make in font: 1. The Pause light begins to enter Micro Adjust mode. Follow these steps to use your application...
...Panel Press the Tear Off (Font) button repeatedly to cycle through the fonts, and stop when the lights on but not printing. For best results, use the control panel to select a built-in your application to select a font. Make sure the printer is , wait until you change it stops. 2. Note: ...Settings you make in font: 1. The Pause light begins to enter Micro Adjust mode. Follow these steps to use your application...
Reference Guide
Page 73
... Setting mode and prints instructions for changing the settings. 7. Press the Tear Off (Font) button to print a list of all correct, turn off the printer to scroll through the options for the selected setting until you see the one you change them again or reset the printer's defaults. The printer prints instructions for selecting the language...
... Setting mode and prints instructions for changing the settings. 7. Press the Tear Off (Font) button to print a list of all correct, turn off the printer to scroll through the options for the selected setting until you see the one you change them again or reset the printer's defaults. The printer prints instructions for selecting the language...
Reference Guide
Page 126
... B Baud rate, 67, 70 Bidirectional mode, 67, 71 printing, 69 Built-in fonts, 65 to 66, 113 to 114 Buttons, control panel, 63 to 66 Buzzer, 68, 72 C Canceling printing, 58 to 59 Changing default settings, 67 to 73 printer driver settings, 38 to 39 Character sets, international, 114 table, 68, 71, 114... Electronic specifications, 113 to 114 Envelopes, 29 to 30, 32, 117 Environmental specifications, 115 EPSON, help, 96 to 97 EPSON Status Monitor 3, 33, 41 to 44, 59 to 61 Error lights, 77 to 78 ESC/P, 33, 122 to 124 F Feeding method, 112 Fonts, built-in, 65 to 66, 113 to 114 126 Index
... B Baud rate, 67, 70 Bidirectional mode, 67, 71 printing, 69 Built-in fonts, 65 to 66, 113 to 114 Buttons, control panel, 63 to 66 Buzzer, 68, 72 C Canceling printing, 58 to 59 Changing default settings, 67 to 73 printer driver settings, 38 to 39 Character sets, international, 114 table, 68, 71, 114... Electronic specifications, 113 to 114 Envelopes, 29 to 30, 32, 117 Environmental specifications, 115 EPSON, help, 96 to 97 EPSON Status Monitor 3, 33, 41 to 44, 59 to 61 Error lights, 77 to 78 ESC/P, 33, 122 to 124 F Feeding method, 112 Fonts, built-in, 65 to 66, 113 to 114 126 Index
User's Guide
Page 4
3 Using the Control Panel Buttons and Lights 33 Selecting a Built-in Font 35 Changing the Printer's Default Settings 36 Using Default Setting mode 37 4 Troubleshooting Using the Error Indicators 39 Clearing a Paper Jam 41 Printing a Self Test 41 Where To Get Help 43 Purchase supplies and accessories 43 5 Product Information Safety Information 45 Hot Parts Caution Symbol 45 Important Safety Instructions 45 FCC Compliance Statement for United States Users 46 WARNING 47 For Canadian users 47 Declaration of Conformity 47 Epson America, Inc., Limited Warranty 48 4 Contents
3 Using the Control Panel Buttons and Lights 33 Selecting a Built-in Font 35 Changing the Printer's Default Settings 36 Using Default Setting mode 37 4 Troubleshooting Using the Error Indicators 39 Clearing a Paper Jam 41 Printing a Self Test 41 Where To Get Help 43 Purchase supplies and accessories 43 5 Product Information Safety Information 45 Hot Parts Caution Symbol 45 Important Safety Instructions 45 FCC Compliance Statement for United States Users 46 WARNING 47 For Canadian users 47 Declaration of Conformity 47 Epson America, Inc., Limited Warranty 48 4 Contents

User's Guide
Page 18
...knob to remove the printed document: 1. The paper automatically feeds back to the loading position the next time you resume printing, the printer automatically feeds the paper back to tear off edge on page 26. 3. Removing a printed document from the push tractor Follow these steps...If your printed document. See "Adjusting the tear-off the printed document using the Micro Adjust feature. Press the Tear Off (Font) button. Open the printer cover, then tear off position" on the paper tension unit. 14. After you can change its position by using the Micro Adjust feature.
...knob to remove the printed document: 1. The paper automatically feeds back to the loading position the next time you resume printing, the printer automatically feeds the paper back to tear off edge on page 26. 3. Removing a printed document from the push tractor Follow these steps...If your printed document. See "Adjusting the tear-off the printed document using the Micro Adjust feature. Press the Tear Off (Font) button. Open the printer cover, then tear off position" on the paper tension unit. 14. After you can change its position by using the Micro Adjust feature.
User's Guide
Page 25
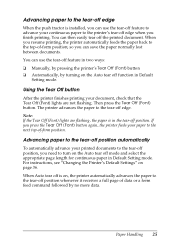
... the appropriate page length for continuous paper in Default Setting mode. For instructions, see "Changing the Printer's Default Settings" on the Auto tear off feature in two ways: ❏ Manually, by pressing the printer's Tear Off (Font) button ❏ Automatically, by no more data. You can use the tear-off ...feature to advance your continuous paper to the printer's tear-off edge when you press the Tear Off (Font) button again, the printer feeds your paper to the next top-of-form position. You can then easily tear off position. ...
... the appropriate page length for continuous paper in Default Setting mode. For instructions, see "Changing the Printer's Default Settings" on the Auto tear off feature in two ways: ❏ Manually, by pressing the printer's Tear Off (Font) button ❏ Automatically, by no more data. You can use the tear-off ...feature to advance your continuous paper to the printer's tear-off edge when you press the Tear Off (Font) button again, the printer feeds your paper to the next top-of-form position. You can then easily tear off position. ...
User's Guide
Page 33
... line and form feeding ❏ Load and eject paper ❏ Select a built-in font ❏ Change the printer's default settings Buttons and Lights 1 Tear Off (Font) lights Flash when continuous paper is in fonts. otherwise, the lights indicate the selected font. 2 Tear Off (Font) button ❏ Advances continuous paper to the tear-off position. ❏ Feeds continuous...
... line and form feeding ❏ Load and eject paper ❏ Select a built-in font ❏ Change the printer's default settings Buttons and Lights 1 Tear Off (Font) lights Flash when continuous paper is in fonts. otherwise, the lights indicate the selected font. 2 Tear Off (Font) button ❏ Advances continuous paper to the tear-off position. ❏ Feeds continuous...
User's Guide
Page 35
... in effect until you want to use the control panel to cycle through the fonts, and stop when the lights on the control panel indicate the font you change it again. Using the Control Panel 35 Make sure that the printer is best to use your application program to use in a document. Hold down...
... in effect until you want to use the control panel to cycle through the fonts, and stop when the lights on the control panel indicate the font you change it again. Using the Control Panel 35 Make sure that the printer is best to use your application program to use in a document. Hold down...

User's Guide
Page 37
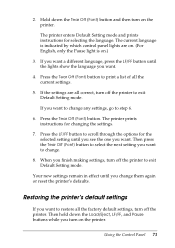
... you see the one you want. If you want to change . 8. Then press the Tear Off (Font) button to select the next setting you want to change any settings, go to restore all the current settings. 5. Restoring the printer's default settings If you 'll need to enter Default Setting... mode. Then hold down the Tear Off (Font) button and then turn on . (For English, only the Pause light is off the printer to exit Default Setting mode. The printer enters Default Setting mode and prints instructions for changing the settings. 7. Using Default Setting mode Follow the...
... you see the one you want. If you want to change . 8. Then press the Tear Off (Font) button to select the next setting you want to change any settings, go to restore all the current settings. 5. Restoring the printer's default settings If you 'll need to enter Default Setting... mode. Then hold down the Tear Off (Font) button and then turn on . (For English, only the Pause light is off the printer to exit Default Setting mode. The printer enters Default Setting mode and prints instructions for changing the settings. 7. Using Default Setting mode Follow the...


