
Product Information Guide
Page 2
... Plus (see the Reference Guide for text and graphics printing. Epson LX-300+II Printer Specifications Mechanical Printing method Printing speed Printing direction Line spacing Printable columns Resolution Emulation Interfaces 9-pin impact dot matrix High-speed draft 300 cps at 10 cpi 337 cps at 12 or 15 cpi... IEEE-1284 nibble mode support, one EIA-232D serial interface, and one USB (ver 1.1) interface Paper feed methods Paper feed speed Buffer Built-in some countries) 13 international character sets Total print volume 12 million lines (except print head) MTBF 6,000 POH (25% duty) Print...
... Plus (see the Reference Guide for text and graphics printing. Epson LX-300+II Printer Specifications Mechanical Printing method Printing speed Printing direction Line spacing Printable columns Resolution Emulation Interfaces 9-pin impact dot matrix High-speed draft 300 cps at 10 cpi 337 cps at 12 or 15 cpi... IEEE-1284 nibble mode support, one EIA-232D serial interface, and one USB (ver 1.1) interface Paper feed methods Paper feed speed Buffer Built-in some countries) 13 international character sets Total print volume 12 million lines (except print head) MTBF 6,000 POH (25% duty) Print...
Product Information Guide
Page 5
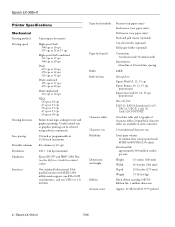
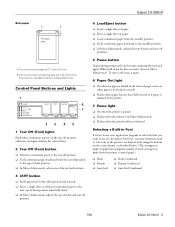
... sheet or advances continuous paper to the tear-off position. ❏ Feeds continuous paper backward from the printer's control panel.) ❏ Draft ❏ Roman ❏ Sans Serif ❏ Draft Condensed ❏ Roman Condensed ❏ Sans Serif Condensed 7/06 Epson LX-300+II - 5 The maximum ... as described below. (The settings you make from the tear-off positions. 5 Pause button Stops printing temporarily, and resumes printing when pressed again. B The minimum left and right margins are 0.12 inch (3 mm). Epson LX-300+II Roll paper A B Printable area A The...
... sheet or advances continuous paper to the tear-off position. ❏ Feeds continuous paper backward from the printer's control panel.) ❏ Draft ❏ Roman ❏ Sans Serif ❏ Draft Condensed ❏ Roman Condensed ❏ Sans Serif Condensed 7/06 Epson LX-300+II - 5 The maximum ... as described below. (The settings you make from the tear-off positions. 5 Pause button Stops printing temporarily, and resumes printing when pressed again. B The minimum left and right margins are 0.12 inch (3 mm). Epson LX-300+II Roll paper A B Printable area A The...

Product Information Guide
Page 6
... a control panel button when the corresponding function is not loaded correctly. Standby Position Continuous paper is in the standby position when it is on the printer again. Epson LX-300+II 7/06 The Pause light begins to the standby position. Then set the lever to the position you want . Then press the Pause button to turn on...
... a control panel button when the corresponding function is not loaded correctly. Standby Position Continuous paper is in the standby position when it is on the printer again. Epson LX-300+II 7/06 The Pause light begins to the standby position. Then set the lever to the position you want . Then press the Pause button to turn on...
Product Information Guide
Page 8
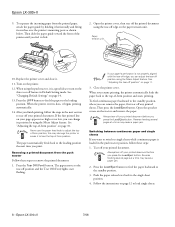
...printed document before you can change its notches over the printer's mounting posts as shown below. Reverse feeding several pages at a time may cause a paper jam. 2. Epson LX-300+II 7/06 Paper tension unit 10. When using the tear-off any ...Setting mode. Replace the printer cover and close it begins printing automatically. 14. The paper moves to the standby position. 3. Then slide the paper guide toward the front of -form position. If the first printed line on the Auto tear off your paper's perforation is a good idea to remove the printed document: 1. Epson LX-300+II...
...printed document before you can change its notches over the printer's mounting posts as shown below. Reverse feeding several pages at a time may cause a paper jam. 2. Epson LX-300+II 7/06 Paper tension unit 10. When using the tear-off any ...Setting mode. Replace the printer cover and close it begins printing automatically. 14. The paper moves to the standby position. 3. Then slide the paper guide toward the front of -form position. If the first printed line on the Auto tear off your paper's perforation is a good idea to remove the printed document: 1. Epson LX-300+II...

Product Information Guide
Page 10
... the printer. 14. Epson LX-300+II 7/06 Epson LX-300+II 8. Then slide the right sprocket to remove any remaining slack by gently pulling the paper from the printed paper, attach the paper guide. Slide the left sprocket so its notches over the sprocket pins and then close the sprocket covers. Set the Auto tear off the paper entering the printer; Replace the printer cover...
... the printer. 14. Epson LX-300+II 7/06 Epson LX-300+II 8. Then slide the right sprocket to remove any remaining slack by gently pulling the paper from the printed paper, attach the paper guide. Slide the left sprocket so its notches over the sprocket pins and then close the sprocket covers. Set the Auto tear off the paper entering the printer; Replace the printer cover...

Product Information Guide
Page 11
... tear-off edge on , the printer automatically advances the paper to the tear-off position. When you resume printing, the printer automatically feeds the paper back to turn on page 14. Make sure the Tear Off (Font) lights are not flashing. Tear-off position. Epson LX-300+II Your top-of-form position setting remains in effect until you...
... tear-off edge on , the printer automatically advances the paper to the tear-off position. When you resume printing, the printer automatically feeds the paper back to turn on page 14. Make sure the Tear Off (Font) lights are not flashing. Tear-off position. Epson LX-300+II Your top-of-form position setting remains in effect until you...
Product Information Guide
Page 12
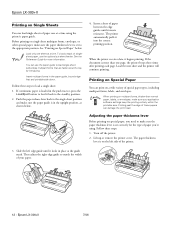
... steps to load a single sheet: 1. Turn off the printer. 2. To load a stack of singlesheet paper, use the paper guide to match the width of your application software settings keep the printing entirely within the printable area. The paper thickness lever is set to make sure your paper. 12 - Epson LX-300+II 7/06 Follow these steps: 1. Load the next sheet and...
... steps to load a single sheet: 1. Turn off the printer. 2. To load a stack of singlesheet paper, use the paper guide to match the width of your application software settings keep the printing entirely within the printable area. The paper thickness lever is set to make sure your paper. 12 - Epson LX-300+II 7/06 Follow these steps: 1. Load the next sheet and...
Product Information Guide
Page 13
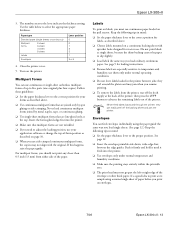
..., the copies may jam when you print on envelopes. 7/06 Epson LX-300+II - 13 Labels To print on labels, you need to adjust the loading position, use continuous paper loaded on the printer. then press the LF/FF button to the lever indicate the thickness setting. See page 12. ❏ Insert the envelope printable-side down...
..., the copies may jam when you print on envelopes. 7/06 Epson LX-300+II - 13 Labels To print on labels, you need to adjust the loading position, use continuous paper loaded on the printer. then press the LF/FF button to the lever indicate the thickness setting. See page 12. ❏ Insert the envelope printable-side down...

Product Information Guide
Page 14
... 6. 6. If you change any settings, go to enter Default Setting mode. Restoring the printer's default settings If you want to print a list of paper each time the printer ejects a printed page. 1. Press the Tear Off (Font) button. Make sure paper is loaded and the printer is selected. When you finish making settings, turn off . 2. Epson LX-300+II Default Settings While you can select...
... 6. 6. If you change any settings, go to enter Default Setting mode. Restoring the printer's default settings If you want to print a list of paper each time the printer ejects a printed page. 1. Press the Tear Off (Font) button. Make sure paper is loaded and the printer is selected. When you finish making settings, turn off . 2. Epson LX-300+II Default Settings While you can select...
Product Information Guide
Page 15
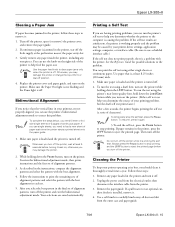
... in your printer driver settings, application settings, computer, or interface cable. (Be sure to carefully brush away all dust and dirt from the outer case and paper guide. 7/06 Epson LX-300+II - 15 Follow these steps to help you determine whether the printer or the computer is off position. 4. Otherwise, you may damage the printer. 2. Epson LX-300+II Clearing a Paper Jam If paper becomes...
... in your printer driver settings, application settings, computer, or interface cable. (Be sure to carefully brush away all dust and dirt from the outer case and paper guide. 7/06 Epson LX-300+II - 15 Follow these steps to help you determine whether the printer or the computer is off position. 4. Otherwise, you may damage the printer. 2. Epson LX-300+II Clearing a Paper Jam If paper becomes...
Reference Guide
Page 3
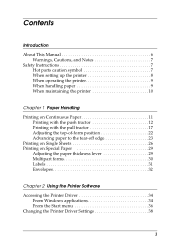
Contents Introduction About This Manual 6 Warnings, Cautions, and Notes 7 Safety Instructions 7 Hot parts caution symbol 7 When setting up the printer 8 When operating the printer 9 When handling paper 9 When maintaining the printer 10 Chapter 1 Paper Handling Printing on Continuous Paper 11 Printing with the push tractor 12 Printing with the pull tractor 17 Adjusting the top-of-form position...
Contents Introduction About This Manual 6 Warnings, Cautions, and Notes 7 Safety Instructions 7 Hot parts caution symbol 7 When setting up the printer 8 When operating the printer 9 When handling paper 9 When maintaining the printer 10 Chapter 1 Paper Handling Printing on Continuous Paper 11 Printing with the push tractor 12 Printing with the pull tractor 17 Adjusting the top-of-form position...

Reference Guide
Page 4
Using EPSON Status Monitor 3 41 Setting up EPSON Status Monitor 3 42 Accessing EPSON Status Monitor 3 43 Installing EPSON Status Monitor 3 44 Setting Up Your Printer on a Network 45 Setting up the printer server 45 Setting up the clients 49 Installing the printer driver from the CD-ROM 57 Canceling Printing 58 Uninstalling the Printer Software 59 Uninstalling the printer driver and EPSON Status Monitor 3 59...
Using EPSON Status Monitor 3 41 Setting up EPSON Status Monitor 3 42 Accessing EPSON Status Monitor 3 43 Installing EPSON Status Monitor 3 44 Setting Up Your Printer on a Network 45 Setting up the printer server 45 Setting up the clients 49 Installing the printer driver from the CD-ROM 57 Canceling Printing 58 Uninstalling the Printer Software 59 Uninstalling the printer driver and EPSON Status Monitor 3 59...
Reference Guide
Page 6
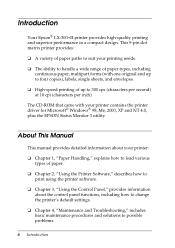
...Epson® LX-300+II printer provides high-quality printing and superior performance in a compact design. This 9-pin dot matrix printer provides: ❏ A variety of paper paths to suit your printing needs. ❏ The ability to handle a wide range of paper types, including continuous paper, multipart forms (with your printer: ❏ Chapter 1, "Paper... control panel functions, including how to change the printer's default settings. ❏ Chapter 4, "Maintenance and Troubleshooting," includes basic maintenance procedures and solutions to 300 cps (characters per second) at 10 cpi (...
...Epson® LX-300+II printer provides high-quality printing and superior performance in a compact design. This 9-pin dot matrix printer provides: ❏ A variety of paper paths to suit your printing needs. ❏ The ability to handle a wide range of paper types, including continuous paper, multipart forms (with your printer: ❏ Chapter 1, "Paper... control panel functions, including how to change the printer's default settings. ❏ Chapter 4, "Maintenance and Troubleshooting," includes basic maintenance procedures and solutions to 300 cps (characters per second) at 10 cpi (...
Reference Guide
Page 14
... first printed line on the Auto tear off your page appears too high or too low, you print, the paper automatically feeds back to adjust the top-of -form position" on the printer. 11. See "Adjusting the top-of -form position; When using the Micro Adjust feature. After you feel it begins... data, it click. 9. Press the LF/FF button to feed the paper to lose the top-of the printer until you finish printing, follow the steps in Default Setting mode. 8. this may damage the printer or cause it is a good idea to tear off feature in the next section to turn on your printed...
... first printed line on the Auto tear off your page appears too high or too low, you print, the paper automatically feeds back to adjust the top-of -form position" on the printer. 11. See "Adjusting the top-of -form position; When using the Micro Adjust feature. After you feel it begins... data, it click. 9. Press the LF/FF button to feed the paper to lose the top-of the printer until you finish printing, follow the steps in Default Setting mode. 8. this may damage the printer or cause it is a good idea to tear off feature in the next section to turn on your printed...

Reference Guide
Page 21
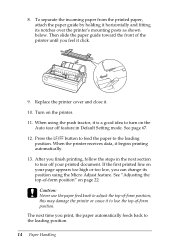
... position where printing begins on the printer. 15. 11. Replace the printer cover but leave it begins printing automatically. then press the LF/FF button to adjust the paper position. To separate the incoming paper from the printed paper, attach the paper guide. Set the Auto tear off the paper entering the printer; The perforation between pages should be...
... position where printing begins on the printer. 15. 11. Replace the printer cover but leave it begins printing automatically. then press the LF/FF button to adjust the paper position. To separate the incoming paper from the printed paper, attach the paper guide. Set the Auto tear off the paper entering the printer; The perforation between pages should be...
Reference Guide
Page 23
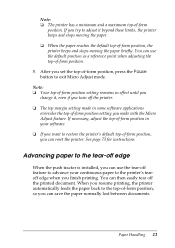
... you try to the top-of -form position setting you make with the Micro Adjust feature. so you resume printing, the printer automatically feeds the paper back to adjust it , even if you turn off the printed document. Paper Handling 23 If necessary, adjust the top-of-... change it beyond these limits, the printer beeps and stops moving the paper. ❏ When the paper reaches the default top-of -form position. 5. You can then easily tear off the printer. ❏ The top margin setting made in your continuous paper to restore the printer's default top-of -form position. ...
... you try to the top-of -form position setting you make with the Micro Adjust feature. so you resume printing, the printer automatically feeds the paper back to adjust it , even if you turn off the printed document. Paper Handling 23 If necessary, adjust the top-of-... change it beyond these limits, the printer beeps and stops moving the paper. ❏ When the paper reaches the default top-of -form position. 5. You can then easily tear off the printer. ❏ The top margin setting made in your continuous paper to restore the printer's default top-of -form position. ...
Reference Guide
Page 24
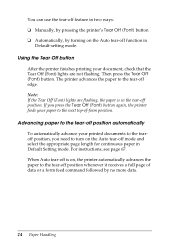
...you press the Tear Off (Font) button again, the printer feeds your document, check that the Tear Off (Font) lights are flashing, the paper is on, the printer automatically advances the paper to turn on the Auto tear-off function in Default-setting mode. Note: If the Tear Off (Font) lights are...command followed by turning on the Auto tear-off mode and select the appropriate page length for continuous paper in Default Setting mode. You can use the tear-off feature in two ways: ❏ Manually, by pressing the printer's Tear Off (Font) button ❏ Automatically, by no more data. 24...
...you press the Tear Off (Font) button again, the printer feeds your document, check that the Tear Off (Font) lights are flashing, the paper is on, the printer automatically advances the paper to turn on the Auto tear-off function in Default-setting mode. Note: If the Tear Off (Font) lights are...command followed by turning on the Auto tear-off mode and select the appropriate page length for continuous paper in Default Setting mode. You can use the tear-off feature in two ways: ❏ Manually, by pressing the printer's Tear Off (Font) button ❏ Automatically, by no more data. 24...
Reference Guide
Page 26
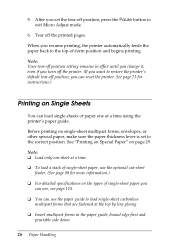
... instructions.) Printing on single-sheet multipart forms, envelopes, or other special paper, make sure the paper thickness lever is set the tear-off position, press the Pause button to restore the printer's default tear-off the printed pages. Tear off position, you set to load single-sheet carbonless multipart forms that are fastened at a time...
... instructions.) Printing on single-sheet multipart forms, envelopes, or other special paper, make sure the paper thickness lever is set the tear-off position, press the Pause button to restore the printer's default tear-off the printed pages. Tear off position, you set to load single-sheet carbonless multipart forms that are fastened at a time...

Reference Guide
Page 84
...Move the paper (and the edge guides) a little to detect it. See page 67. Check the Page length for the printer to the left or right for tractor setting in the printer. Insert a new sheet. The paper on the paper guide is... positioned too far to the single-sheet position. Paper Handling Single sheets do Continuous paper may not match the size of the continuous paper you are using. The printer's page length setting may be set. Remove the continuous paper...
...Move the paper (and the edge guides) a little to detect it. See page 67. Check the Page length for the printer to the left or right for tractor setting in the printer. Insert a new sheet. The paper on the paper guide is... positioned too far to the single-sheet position. Paper Handling Single sheets do Continuous paper may not match the size of the continuous paper you are using. The printer's page length setting may be set. Remove the continuous paper...

Reference Guide
Page 100
Take a stack of the right paper guide so that it . Adjust the position of paper and fan it matches your paper's width. Make sure the position of paper along the left paper guide. 9. Then tap the side and bottom of the paper on the edge guides. 100 Options and Consumables 6. Insert the two ... guides. Insert up to 50 sheets of the guide allows the paper to even up and down freely. 10. Push the paper set levers all the way forward until the paper guides retract and lock open to clamp the paper against the guide rollers. 11. Pull the paper set levers back to allow for...
Take a stack of the right paper guide so that it . Adjust the position of paper and fan it matches your paper's width. Make sure the position of paper along the left paper guide. 9. Then tap the side and bottom of the paper on the edge guides. 100 Options and Consumables 6. Insert the two ... guides. Insert up to 50 sheets of the guide allows the paper to even up and down freely. 10. Push the paper set levers all the way forward until the paper guides retract and lock open to clamp the paper against the guide rollers. 11. Pull the paper set levers back to allow for...


