

Product Information Guide
Page 1
... chance of ordinary single-sheet paper. Black Ribbon Cartridge (#8750) Expected ribbon life is approximately 3 million characters. 7/06 Epson LX-300+II - 1 Epson LX-300+II LX-300+II Parts Printer cover Paper supports Edge guides Paper guide User Replaceable Parts User replaceable part Knob Logo plate Paper supports Paper eject assembly... multipart forms. Roll Paper Holder (C12C811141 or 8310) Allows you can purchase the following options from an Epson authorized reseller. Additional Tractor Unit (C800301) Used in your printer. To find the nearest reseller, call 800-GO...
... chance of ordinary single-sheet paper. Black Ribbon Cartridge (#8750) Expected ribbon life is approximately 3 million characters. 7/06 Epson LX-300+II - 1 Epson LX-300+II LX-300+II Parts Printer cover Paper supports Edge guides Paper guide User Replaceable Parts User replaceable part Knob Logo plate Paper supports Paper eject assembly... multipart forms. Roll Paper Holder (C12C811141 or 8310) Allows you can purchase the following options from an Epson authorized reseller. Additional Tractor Unit (C800301) Used in your printer. To find the nearest reseller, call 800-GO...
Product Information Guide
Page 2
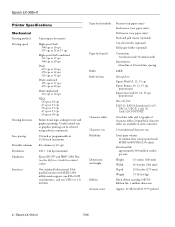
...) Intermittent 63ms/line at 20 cpi Bidirectional logic seeking for text and graphics printing. Epson LX-300+II 7/06 Epson LX-300+II Printer Specifications Mechanical Printing method Printing speed Printing direction Line spacing Printable columns Resolution Emulation Interfaces 9-pin impact dot matrix High-speed draft 300 cps at 10 cpi 337 cps at 12 or 15 cpi High-speed draft...
...) Intermittent 63ms/line at 20 cpi Bidirectional logic seeking for text and graphics printing. Epson LX-300+II 7/06 Epson LX-300+II Printer Specifications Mechanical Printing method Printing speed Printing direction Line spacing Printable columns Resolution Emulation Interfaces 9-pin impact dot matrix High-speed draft 300 cps at 10 cpi 337 cps at 12 or 15 cpi High-speed draft...

Product Information Guide
Page 3
Epson LX-300+II Electrical Input voltage range Rated frequency range Input frequency range Rated current Power consumption 120 V 220 to 240 V 99 to 132 V 198 to 264 V 50 ... only under normal temperature and humidity conditions, as follows: Temperature: 59 to 77 °F (15 to 25 °C) Humidity: 30 to 0.035 inch (0.9 mm) 7/06 Epson LX-300+II - 3 Ordinary single sheets: paper guide and cut-sheet feeder entry Width Paper guide 3.9 to 10.1 inches (100 to 257 mm) Cut-sheet feeder 7.2 to 8.5 inches...
Epson LX-300+II Electrical Input voltage range Rated frequency range Input frequency range Rated current Power consumption 120 V 220 to 240 V 99 to 132 V 198 to 264 V 50 ... only under normal temperature and humidity conditions, as follows: Temperature: 59 to 77 °F (15 to 25 °C) Humidity: 30 to 0.035 inch (0.9 mm) 7/06 Epson LX-300+II - 3 Ordinary single sheets: paper guide and cut-sheet feeder entry Width Paper guide 3.9 to 10.1 inches (100 to 257 mm) Cut-sheet feeder 7.2 to 8.5 inches...
Product Information Guide
Page 4
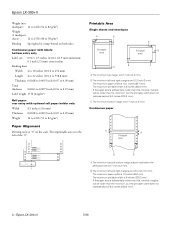
...B B A The minimum top and bottom margins above and below the perforation are 0.12 inch (3 mm). The maximum paper width is 8 inches (203.2 mm). Epson LX-300+II 7/06 The maximum printable width is 10 inches (254 mm). The unprintable area is 10.1 inches (257 mm). The maximum paper width is to 82...than the minimum, but the printable width does not increase beyond 8.0 inches (203.2 mm). 4 - The maximum printable width is 8 inches (203.2 mm). Epson LX-300+II Weight (not multipart) 14 to 22 lb (52 to 82 g/m2) Weight (1 multipart sheet) 12 to 15 lb (40 to 58 g/m2) Binding ...
...B B A The minimum top and bottom margins above and below the perforation are 0.12 inch (3 mm). The maximum paper width is 8 inches (203.2 mm). Epson LX-300+II 7/06 The maximum printable width is 10 inches (254 mm). The unprintable area is 10.1 inches (257 mm). The maximum paper width is to 82...than the minimum, but the printable width does not increase beyond 8.0 inches (203.2 mm). 4 - The maximum printable width is 8 inches (203.2 mm). Epson LX-300+II Weight (not multipart) 14 to 22 lb (52 to 82 g/m2) Weight (1 multipart sheet) 12 to 15 lb (40 to 58 g/m2) Binding ...
Product Information Guide
Page 5
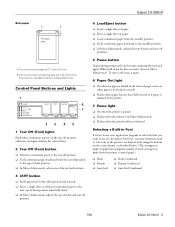
...off position. ❏ Feeds continuous paper backward from the printer's control panel.) ❏ Draft ❏ Roman ❏ Sans Serif ❏ Draft Condensed ❏ Roman Condensed ❏ Sans Serif Condensed 7/06 Epson LX-300+II - 5 Control Panel Buttons and Lights 1 Tear Off... (Font) lights Flash when continuous paper is in the printer. 7 Pause light ❏ On when the printer is paused. ❏ Flashes when the printer is 8 inches (203.2 mm). Epson LX-300+II Roll paper A B...
...off position. ❏ Feeds continuous paper backward from the printer's control panel.) ❏ Draft ❏ Roman ❏ Sans Serif ❏ Draft Condensed ❏ Roman Condensed ❏ Sans Serif Condensed 7/06 Epson LX-300+II - 5 Control Panel Buttons and Lights 1 Tear Off... (Font) lights Flash when continuous paper is in the printer. 7 Pause light ❏ On when the printer is paused. ❏ Flashes when the printer is 8 inches (203.2 mm). Epson LX-300+II Roll paper A B...

Product Information Guide
Page 6
... the Pause light, if necessary. Epson LX-300+II 7/06 Press the Tear Off (Font) button repeatedly to cycle through the fonts, and stop when the lights on , f = flashing short series of beeps (three beeps long series of beeps (five beeps) The printer beeps once if you change it ...f Pause f f Tear Off Problem Solution The print head is jammed in the printer. State of -form position Tear-off Position Continuous paper is in the tear-off the printed document at the top-of Beep panel lights pattern f Pause - Epson LX-300+II Follow these steps to use . You can identify many...
... the Pause light, if necessary. Epson LX-300+II 7/06 Press the Tear Off (Font) button repeatedly to cycle through the fonts, and stop when the lights on , f = flashing short series of beeps (three beeps long series of beeps (five beeps) The printer beeps once if you change it ...f Pause f f Tear Off Problem Solution The print head is jammed in the printer. State of -form position Tear-off Position Continuous paper is in the tear-off the printed document at the top-of Beep panel lights pattern f Pause - Epson LX-300+II Follow these steps to use . You can identify many...

Product Information Guide
Page 7
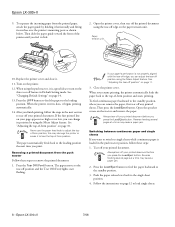
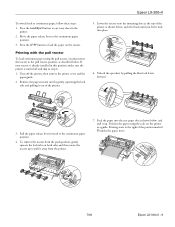
...printing to the right of the paper over the sprocket pins. 3. Move the paper support so it is aligned squarely with the printer so it in place. 7/06 Epson LX-300+II - 7 Slide the right sprocket to remove any slack in the paper and lock it . Slide the left sprocket so the...by -sheet. (Follow the instructions in the next section.) The printer comes with the push tractor Follow these steps to load continuous paper on the push tractor: 1. Make sure your paper has a clean, straight, leading edge. Epson LX-300+II Printing on Continuous Paper You can print on continuous paper using ...
...printing to the right of the paper over the sprocket pins. 3. Move the paper support so it is aligned squarely with the printer so it in place. 7/06 Epson LX-300+II - 7 Slide the right sprocket to remove any slack in the paper and lock it . Slide the left sprocket so the...by -sheet. (Follow the instructions in the next section.) The printer comes with the push tractor Follow these steps to load continuous paper on the push tractor: 1. Make sure your paper has a clean, straight, leading edge. Epson LX-300+II Printing on Continuous Paper You can print on continuous paper using ...
Product Information Guide
Page 8
... Reverse feeding several pages at a time may damage the printer or cause it click. 2. Reverse feeding several pages at a time may cause a paper jam. 2. Push the paper release lever back to the standby position. 3. Epson LX-300+II 7/06 After you can adjust the tear-off any printed... page appears too high or too low, you resume printing, the printer automatically feeds the paper back to load single sheets. 8 - Follow the instructions on page 11. 3. Then press the Load/Eject button. Epson LX-300+II 9. Tear off position and the Tear Off (Font) lights start ...
... Reverse feeding several pages at a time may damage the printer or cause it click. 2. Reverse feeding several pages at a time may cause a paper jam. 2. Push the paper release lever back to the standby position. 3. Epson LX-300+II 7/06 After you can adjust the tear-off any printed... page appears too high or too low, you resume printing, the printer automatically feeds the paper back to load single sheets. 8 - Follow the instructions on page 11. 3. Then press the Load/Eject button. Epson LX-300+II 9. Tear off position and the Tear Off (Font) lights start ...
Product Information Guide
Page 9
...this position, make sure the printer is already installed in the printer. 2. Pull the paper release lever forward to the continuous paper position. 3. Unlock the sprockets by gently squeezing the lock tabs and pulling it up to continuous paper, follow these steps: 1. Epson LX-300+II To switch back to pull... the rear paper slot as shown below , and pull it out of the position marked 0 (under the paper now). 7/06 Epson LX-300+II - 9 then remove the printer cover and the paper guide. 2. Position the paper using the pull tractor, you feel it away from the push position, gently ...
...this position, make sure the printer is already installed in the printer. 2. Pull the paper release lever forward to the continuous paper position. 3. Unlock the sprockets by gently squeezing the lock tabs and pulling it up to continuous paper, follow these steps: 1. Epson LX-300+II To switch back to pull... the rear paper slot as shown below , and pull it out of the position marked 0 (under the paper now). 7/06 Epson LX-300+II - 9 then remove the printer cover and the paper guide. 2. Position the paper using the pull tractor, you feel it away from the push position, gently ...

Product Information Guide
Page 10
...as a reference point when adjusting the top-of the paper over the printer's mounting posts. The perforation between the two sprockets. 9. After you can use the Micro Adjust feature to adjust it open. 13. Epson LX-300+II 7/06 Fit the first holes of -form position. 5. To separate... can use the default position as the printer enters Micro Adjust mode. 4. To eject the paper, tear off feature in the Default Setting mode to adjust the paper position. Set the Auto tear off the paper entering the printer; Epson LX-300+II 8. Open the sprocket covers. Remove the...
...as a reference point when adjusting the top-of the paper over the printer's mounting posts. The perforation between the two sprockets. 9. After you can use the Micro Adjust feature to adjust it open. 13. Epson LX-300+II 7/06 Fit the first holes of -form position. 5. To separate... can use the default position as the printer enters Micro Adjust mode. 4. To eject the paper, tear off feature in the Default Setting mode to adjust the paper position. Set the Auto tear off the paper entering the printer; Epson LX-300+II 8. Open the sprocket covers. Remove the...

Product Information Guide
Page 11
... and begins printing. Tear-off the printed pages. When you can reset the printer. See page 14 for instructions. Epson LX-300+II Your top-of-form position setting remains in the tear-off position. See "Restoring the printer's default settings" on the Auto tear off mode and select the appropriate page ... Auto tear off is in effect until you change it, even if you turn off the printer. (If you turn on page 14 for instructions.) 7/06 Epson LX-300+II - 11 Hold down the Pause button for continuous paper in Default Setting mode. If you try to the tear-off position whenever ...
... and begins printing. Tear-off the printed pages. When you can reset the printer. See page 14 for instructions. Epson LX-300+II Your top-of-form position setting remains in the tear-off position. See "Restoring the printer's default settings" on the Auto tear off mode and select the appropriate page ... Auto tear off is in effect until you change it, even if you turn off the printer. (If you turn on page 14 for instructions.) 7/06 Epson LX-300+II - 11 Hold down the Pause button for continuous paper in Default Setting mode. If you try to the tear-off position whenever ...
Product Information Guide
Page 12
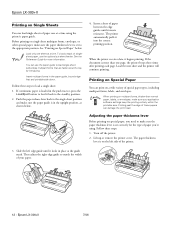
Epson LX-300+II Printing on Single Sheets You can load single sheets of paper between the edge guides ... for the type of these papers can print on special paper, you 're using the printer's paper guide. Insert multipart forms in place at a time using . Insert a sheet of paper one at the guide mark....Special Paper You can damage the print head. Epson LX-300+II 7/06 Push the paper release lever back to the appropriate position. Load only one page, the printer beeps three times after printing each page. When the printer receives data, it into the correct printing position...
Epson LX-300+II Printing on Single Sheets You can load single sheets of paper between the edge guides ... for the type of these papers can print on special paper, you 're using the printer's paper guide. Insert multipart forms in place at a time using . Insert a sheet of paper one at the guide mark....Special Paper You can damage the print head. Epson LX-300+II 7/06 Push the paper release lever back to the appropriate position. Load only one page, the printer beeps three times after printing each page. When the printer receives data, it into the correct printing position...
Product Information Guide
Page 13
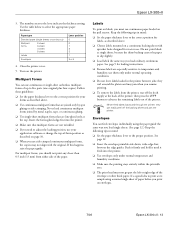
... the correct position for loading instructions. ❏ Because labels are line-glued only at the back of the printer; Keep the following tips in mind: ❏ Set the paper thickness lever to the correct position for tractor...printer, tear off the backing sheet and jam the printer. they can use continuous paper loaded on the printer. The numbers next to advance the remaining labels out of up to the proper position. Do not print labels as described on envelopes. 7/06 Epson LX-300+II... same way you use . If this happens, raise the paper guide. Epson LX-300+II 3.
... the correct position for loading instructions. ❏ Because labels are line-glued only at the back of the printer; Keep the following tips in mind: ❏ Set the paper thickness lever to the correct position for tractor...printer, tear off the backing sheet and jam the printer. they can use continuous paper loaded on the printer. The numbers next to advance the remaining labels out of up to the proper position. Do not print labels as described on envelopes. 7/06 Epson LX-300+II... same way you use . If this happens, raise the paper guide. Epson LX-300+II 3.

Product Information Guide
Page 14
... table below to load a new sheet of all correct, turn off the printer to exit Default Setting mode. Then hold down the Tear Off (Font) button and then turn off . 2. Epson LX-300+II Default Settings While you can select in this mode. (For more information, see... you want a different language, press the LF/FF button until you change them again or reset the printer's defaults. Epson LX-300+II 7/06 Restoring the printer's default settings If you want . 4. The printer enters Default Setting mode and prints instructions for changing the settings. 7. Then press the Tear Off (Font...
... table below to load a new sheet of all correct, turn off the printer to exit Default Setting mode. Then hold down the Tear Off (Font) button and then turn off . 2. Epson LX-300+II Default Settings While you can select in this mode. (For more information, see... you want a different language, press the LF/FF button until you change them again or reset the printer's defaults. Epson LX-300+II 7/06 Restoring the printer's default settings If you want . 4. The printer enters Default Setting mode and prints instructions for changing the settings. 7. Then press the Tear Off (Font...
Product Information Guide
Page 15
... the electrical outlet; Your selections are saved automatically. Epson LX-300+II Clearing a Paper Jam If paper becomes jammed in your printout are not properly aligned, you can use the printer's bidirectional adjustment mode to correct this problem. Replace the printer cover and paper guide, and turn on the printer. While holding down the Pause button, turn...
... the electrical outlet; Your selections are saved automatically. Epson LX-300+II Clearing a Paper Jam If paper becomes jammed in your printout are not properly aligned, you can use the printer's bidirectional adjustment mode to correct this problem. Replace the printer cover and paper guide, and turn on the printer. While holding down the Pause button, turn...

Product Information Guide
Page 16
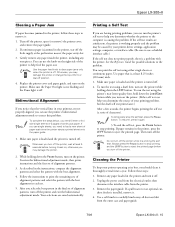
... thinners to remove the ribbon cartridge. unsuitable lubricants can damage the printer components as well as the holder may be hot; If an additional pull tractor is still dirty, clean it . 1. Epson LX-300+II 7/06 Epson LX-300+II 5. Never use a hard or abrasive brush. You need to ...fall. Remove any options are installed, remove them and pack them in the printer. Then remove the ribbon cartridge. 7. If the outer case...
... thinners to remove the ribbon cartridge. unsuitable lubricants can damage the printer components as well as the holder may be hot; If an additional pull tractor is still dirty, clean it . 1. Epson LX-300+II 7/06 Epson LX-300+II 5. Never use a hard or abrasive brush. You need to ...fall. Remove any options are installed, remove them and pack them in the printer. Then remove the ribbon cartridge. 7. If the outer case...
Reference Guide
Page 6
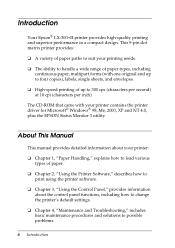
Introduction Your Epson® LX-300+II printer provides high-quality printing and superior performance in a compact design. The CD-ROM that came with one original and up to four copies), labels, single sheets, and envelopes. ❏ High-speed printing of paper. ❏ Chapter 2, "Using the Printer Software," describes how to print using the printer software. ❏ Chapter...
Introduction Your Epson® LX-300+II printer provides high-quality printing and superior performance in a compact design. The CD-ROM that came with one original and up to four copies), labels, single sheets, and envelopes. ❏ High-speed printing of paper. ❏ Chapter 2, "Using the Printer Software," describes how to print using the printer software. ❏ Chapter...
Reference Guide
Page 10
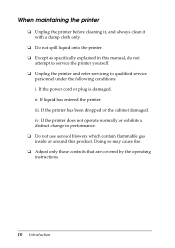
...the power cord or plug is damaged. If the printer has been dropped or the cabinet damaged. If liquid has entered the printer. Doing so may cause fire. ❏ Adjust only... those controls that are covered by the operating instructions. 10 Introduction When maintaining the printer ❏ Unplug the printer before cleaning ...it, and always clean it with a damp cloth only. ❏ Do not spill liquid onto the printer. ❏ Except as...
...the power cord or plug is damaged. If the printer has been dropped or the cabinet damaged. If liquid has entered the printer. Doing so may cause fire. ❏ Adjust only... those controls that are covered by the operating instructions. 10 Introduction When maintaining the printer ❏ Unplug the printer before cleaning ...it, and always clean it with a damp cloth only. ❏ Do not spill liquid onto the printer. ❏ Except as...
Reference Guide
Page 29
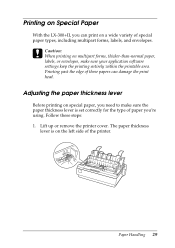
... the printing entirely within the printable area. The paper thickness lever is set correctly for the type of the printer. Lift up or remove the printer cover. Printing on Special Paper With the LX-300+II, you can damage the print head. Paper Handling 29 Follow these papers can print on the left side of...
... the printing entirely within the printable area. The paper thickness lever is set correctly for the type of the printer. Lift up or remove the printer cover. Printing on Special Paper With the LX-300+II, you can damage the print head. Paper Handling 29 Follow these papers can print on the left side of...
Reference Guide
Page 40
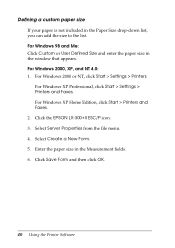
...Form. 5. For Windows 2000, XP, and NT 4.0: 1. Click Save Form and then click OK. 40 Using the Printer Software Select Server Properties from the file menu. 4. Click the EPSON LX-300+II ESC/P icon. 3. Defining a custom paper size If your paper is not included in the Measurement fields. 6. For... Windows XP Home Edition, click Start > Printers and Faxes. 2. Enter the paper size in the Paper Size...
...Form. 5. For Windows 2000, XP, and NT 4.0: 1. Click Save Form and then click OK. 40 Using the Printer Software Select Server Properties from the file menu. 4. Click the EPSON LX-300+II ESC/P icon. 3. Defining a custom paper size If your paper is not included in the Measurement fields. 6. For... Windows XP Home Edition, click Start > Printers and Faxes. 2. Enter the paper size in the Paper Size...


