Technical Brief (Impact Printers)
Page 2
... Push tractor Pull tractor Push/Pull tractor Best for simple, efficient operation of impact printers. EPSON 24-pin impact printers utilize ESC/P 2, which includes these additional features: el Proportionally-spaced scalab fonts Enhanced graphics printing which allows more connectivity compatibility. Gives you better control when printing on multi-part forms by ensuring that the forms stay properly aligned and do not get jammed or misfed. Tractor paper paths: EPSON impact printers all of the print head and enhances printing with Windows applications. Some EPSON impact printers...
... Push tractor Pull tractor Push/Pull tractor Best for simple, efficient operation of impact printers. EPSON 24-pin impact printers utilize ESC/P 2, which includes these additional features: el Proportionally-spaced scalab fonts Enhanced graphics printing which allows more connectivity compatibility. Gives you better control when printing on multi-part forms by ensuring that the forms stay properly aligned and do not get jammed or misfed. Tractor paper paths: EPSON impact printers all of the print head and enhances printing with Windows applications. Some EPSON impact printers...

Technical Brief (Impact Printers)
Page 5
...5mm Manual Rear : 14 inch Manual Rear : 8.5mm Help: Select printer Font. Utility EPSON Remote! Manual Front : 17 inch Manual Front : 8.5mm Print Direction : Bi-d Skip over hold : OFF Interface mode : Auto I/F interval : 10s Input Buffer : ON Auto Tear off : OFF Auto Line Feed : OFF Control Code : ESC/P 0 slash : OFF Buzzer : ON Roll Paper : OFF F1 : Execute F10: Previous F2 : Quit CR : Select item F3 : Default F4 : Change Port Printer Status Monitor Utility The Printer Status Monitor provides Windows 95/98 users with automatic error messaging for direct printer to...
...5mm Manual Rear : 14 inch Manual Rear : 8.5mm Help: Select printer Font. Utility EPSON Remote! Manual Front : 17 inch Manual Front : 8.5mm Print Direction : Bi-d Skip over hold : OFF Interface mode : Auto I/F interval : 10s Input Buffer : ON Auto Tear off : OFF Auto Line Feed : OFF Control Code : ESC/P 0 slash : OFF Buzzer : ON Roll Paper : OFF F1 : Execute F10: Previous F2 : Quit CR : Select item F3 : Default F4 : Change Port Printer Status Monitor Utility The Printer Status Monitor provides Windows 95/98 users with automatic error messaging for direct printer to...
Product Information Guide
Page 1
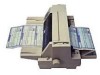
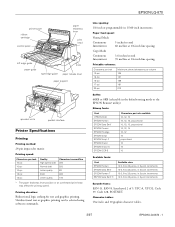
... the default-setting mode or the EPSON Remote! Unidirectional text or graphics printing can be selected using software commands. Printing direction: Bidirectional logic seeking for text and graphics printing. EPSON LQ-670 printer cover ribbon cartridge control panel paper thickness lever print head left edge guide paper guide right edge guide knob paper release lever paper support sprocket units parallel interface Printer Specifications Printing Printing method: 24-pin impact dot matrix Printing speed: Characters per inch 10 cpi 10 cpi 10 cpi 12 cpi 12 cpi Quality High...
... the default-setting mode or the EPSON Remote! Unidirectional text or graphics printing can be selected using software commands. Printing direction: Bidirectional logic seeking for text and graphics printing. EPSON LQ-670 printer cover ribbon cartridge control panel paper thickness lever print head left edge guide paper guide right edge guide knob paper release lever paper support sprocket units parallel interface Printer Specifications Printing Printing method: 24-pin impact dot matrix Printing speed: Characters per inch 10 cpi 10 cpi 10 cpi 12 cpi 12 cpi Quality High...
Product Information Guide
Page 4
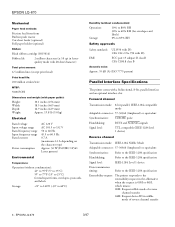
EPSON LQ-670 Mechanical Paper feed methods: Friction feed from front Built-in push tractor Cut-sheet feeder (optional) Roll paper holder (optional) Ribbon: Black ribbon cartridge (S015016) Ribbon life 2 million characters (at 10 cpi in nibble mode of reverse channel transfer 4 - Forward channel Transmission mode: 8-bit parallel, IEEE-1284 compatible mode Adaptable connector: 57-30360 (Amphenol) or equivalent Synchronization: STROBE pulse Handshaking: BUSY and ACKNLG signals Signal level: TTL compatible (IEEE-1284 level 1 device...
EPSON LQ-670 Mechanical Paper feed methods: Friction feed from front Built-in push tractor Cut-sheet feeder (optional) Roll paper holder (optional) Ribbon: Black ribbon cartridge (S015016) Ribbon life 2 million characters (at 10 cpi in nibble mode of reverse channel transfer 4 - Forward channel Transmission mode: 8-bit parallel, IEEE-1284 compatible mode Adaptable connector: 57-30360 (Amphenol) or equivalent Synchronization: STROBE pulse Handshaking: BUSY and ACKNLG signals Signal level: TTL compatible (IEEE-1284 level 1 device...

Product Information Guide
Page 6
... standby position.This button also executes micro-adjust mode LF/FF (line feed/form feed) Press this button until both Tear Off/Bin lights are : OCR-B, Orator, Orator-S, Script C, Roman T, or Sans Serif H.) Condensed (green) On when you want to use . Font Press this button to select the cut -sheet feeder. utility. printed results may differ slightly. If continuous paper is in micro-adjust mode or the print head is selected. Condensed Alternates between condensed characters and normal characters. EPSON LQ-670...
... standby position.This button also executes micro-adjust mode LF/FF (line feed/form feed) Press this button until both Tear Off/Bin lights are : OCR-B, Orator, Orator-S, Script C, Roman T, or Sans Serif H.) Condensed (green) On when you want to use . Font Press this button to select the cut -sheet feeder. utility. printed results may differ slightly. If continuous paper is in micro-adjust mode or the print head is selected. Condensed Alternates between condensed characters and normal characters. EPSON LQ-670...

Product Information Guide
Page 7
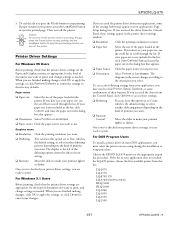
...*, Parallel I/F, Option I /F (interface) wait time Software Character table International character set these functions through your software to its factory settings. Bidirectional adjustment = Pause Turns on the bidirectional adjustment mode, which allows you to correct printing alignment problems. Hex dump = Load/Eject + LF/FF Prints the data sent to the printer in italics), turn on the default-setting mode, which allows you determine the source of some printing problems. See "Printing a Self Test" for details. Option Page length for tractor Skip-over-perforation Auto tear...
...*, Parallel I/F, Option I /F (interface) wait time Software Character table International character set these functions through your software to its factory settings. Bidirectional adjustment = Pause Turns on the bidirectional adjustment mode, which allows you to correct printing alignment problems. Hex dump = Load/Eject + LF/FF Prints the data sent to the printer in italics), turn on the default-setting mode, which allows you determine the source of some printing problems. See "Printing a Self Test" for details. Option Page length for tractor Skip-over-perforation Auto tear...

Product Information Guide
Page 8
... tractor, and the paper release lever is loaded, then turn off the printer. Note: To print the language selection sheet and the defaultsetting mode instruction sheets, you want . Using Quiet Mode In quiet mode, the printer makes less noise when it back on the printer. EPSON LQ-670 3/97 Press the Font button until the Font lights indicate the option you cannot proceed to the correct position for your printing problem; To turn on the language selection sheet. 3. Make sure paper is set...
... tractor, and the paper release lever is loaded, then turn off the printer. Note: To print the language selection sheet and the defaultsetting mode instruction sheets, you want . Using Quiet Mode In quiet mode, the printer makes less noise when it back on the printer. EPSON LQ-670 3/97 Press the Font button until the Font lights indicate the option you cannot proceed to the correct position for your printing problem; To turn on the language selection sheet. 3. Make sure paper is set...
Product Information Guide
Page 9
... paper size, use . EPSON LQ-670 3. t Paper source Click the paper source you want to use the scroll bar to the orientation you want to print, and change settings as needed . t Dithering t Intensity You can leave this option set to their factory defaults. Click the paper source you select. Once you've checked your application, some combination of printout you accessed the printer driver from the Control Panel, these buttons. For DOS Program Users To install a printer driver...
... paper size, use . EPSON LQ-670 3. t Paper source Click the paper source you want to use the scroll bar to the orientation you want to print, and change settings as needed . t Dithering t Intensity You can leave this option set to their factory defaults. Click the paper source you select. Once you've checked your application, some combination of printout you accessed the printer driver from the Control Panel, these buttons. For DOS Program Users To install a printer driver...

Product Information Guide
Page 10
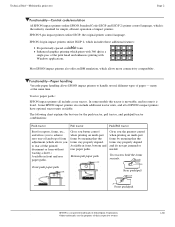
... 1234567 Paper Handling Your printer can accommodate a variety of paper types through four paper-feeding methods: paper guide, tractor, optional cut-sheet feeder, or optional roll paper holder. At the next screen, select your printer. 10 - EPSON LQ-670 3/97 Selecting a Paper-Feeding Method Your printer can print on a wide variety of paper you to drive C. 2. For all four paper-feeding methods, the printer prints on drive C. Press Enter. Paper-feeding methods and paper types The table below to use the utility.
... 1234567 Paper Handling Your printer can accommodate a variety of paper types through four paper-feeding methods: paper guide, tractor, optional cut-sheet feeder, or optional roll paper holder. At the next screen, select your printer. 10 - EPSON LQ-670 3/97 Selecting a Paper-Feeding Method Your printer can print on a wide variety of paper you to drive C. 2. For all four paper-feeding methods, the printer prints on drive C. Press Enter. Paper-feeding methods and paper types The table below to use the utility.

Product Information Guide
Page 11
... cut-sheet feeder. When you print on ordinary paper again. Tractor feeding position - sheet feeder Optional roll paper holder** Paper type Single sheets - Continuous O - - - Caution: Always set the paper thickness lever to match the thickness of paper from 3.6 to 11.7 inches (92 to 6 * For thin envelopes, such as airmail envelopes, select position 2 or 3; Using Single Sheets Your printer can load a stack of the forms. ** The optional roll paper holder is not obstructed. 3/97 EPSON LQ...
... cut-sheet feeder. When you print on ordinary paper again. Tractor feeding position - sheet feeder Optional roll paper holder** Paper type Single sheets - Continuous O - - - Caution: Always set the paper thickness lever to match the thickness of paper from 3.6 to 11.7 inches (92 to 6 * For thin envelopes, such as airmail envelopes, select position 2 or 3; Using Single Sheets Your printer can load a stack of the forms. ** The optional roll paper holder is not obstructed. 3/97 EPSON LQ...

Product Information Guide
Page 12
... using ordinary single-sheet paper. Also make sure the paper thickness lever is attached. Make sure that the printer is off . EPSON LQ-670 3/97 Then close the sprocket covers and push down the sprocket lock levers to load single sheets: 1. EPSON LQ-670 Follow these steps to lock the sprocket units in tractor unit. 5. After printing a sheet, the printer ejects the printed sheet onto the paper guide and the Paper Out and Pause lights come on continuous paper...
... using ordinary single-sheet paper. Also make sure the paper thickness lever is attached. Make sure that the printer is off . EPSON LQ-670 3/97 Then close the sprocket covers and push down the sprocket lock levers to load single sheets: 1. EPSON LQ-670 Follow these steps to lock the sprocket units in tractor unit. 5. After printing a sheet, the printer ejects the printed sheet onto the paper guide and the Paper Out and Pause lights come on continuous paper...

Product Information Guide
Page 14
... make sure there is not fed through the sprocket. EPSON LQ-670 6. If necessary, unlock and reposition the left sprocket unit so that are usually wasted between the two sprocket units. 9. Then lock the sprocket in the paper. Note: You can use the tear-off function to clear paper jams when the printer is off printed pages and save the blank pages that the perforation aligns with...
... make sure there is not fed through the sprocket. EPSON LQ-670 6. If necessary, unlock and reposition the left sprocket unit so that are usually wasted between the two sprocket units. 9. Then lock the sprocket in the paper. Note: You can use the tear-off function to clear paper jams when the printer is off printed pages and save the blank pages that the perforation aligns with...

Product Information Guide
Page 15
... mode When you turn it receives a full page of data or a form-feed command and then receives no more data for your settings. You can use the tear-off function to the tearoff position. 2. When you resume printing, the printer automatically feeds paper back to select auto tear-off printed sheets. they may come off position" later.) 3. See "Adjusting the tear-off their backing and jam the printer. You can then easily tear off . utility to the loading position...
... mode When you turn it receives a full page of data or a form-feed command and then receives no more data for your settings. You can use the tear-off function to the tearoff position. 2. When you resume printing, the printer automatically feeds paper back to select auto tear-off printed sheets. they may come off position" later.) 3. See "Adjusting the tear-off their backing and jam the printer. You can then easily tear off . utility to the loading position...

Product Information Guide
Page 16
... paper guide, not from the printer, open the sprocket covers. You can turn on the auto tear-off their backing and jam the printer when you finish printing, press the Tear Off/Bin button. For instructions, see "Using Continuous Paper" earlier. Caution: When printing on loading continuous paper, see "Using Continuous Paper" earlier. For instructions on multi-part forms, make sure that your software settings keep the printing entirely within the printable area. they tend to feed the continuous paper...
... paper guide, not from the printer, open the sprocket covers. You can turn on the auto tear-off their backing and jam the printer when you finish printing, press the Tear Off/Bin button. For instructions, see "Using Continuous Paper" earlier. Caution: When printing on loading continuous paper, see "Using Continuous Paper" earlier. For instructions on multi-part forms, make sure that your software settings keep the printing entirely within the printable area. they tend to feed the continuous paper...

Product Information Guide
Page 17
... your software settings keep the printing entirely within the printable area. Tear off in the printer's default-setting mode or the EPSON Remote! Move the paper release lever forward to the single-sheet position. Then select Card mode by pressing the Tear Off/Bin button until both Tear Off/Bin lights are on the scale. Never feed labels backward with the arrow on postcards, make sure that the right edge guide is set the paper thickness...
... your software settings keep the printing entirely within the printable area. Tear off in the printer's default-setting mode or the EPSON Remote! Move the paper release lever forward to the single-sheet position. Then select Card mode by pressing the Tear Off/Bin button until both Tear Off/Bin lights are on the scale. Never feed labels backward with the arrow on postcards, make sure that the right edge guide is set the paper thickness...
Product Information Guide
Page 18
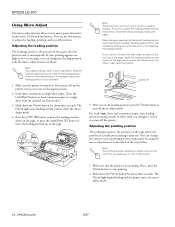
... stops moving the paper. For both single-sheet and continuous paper, your software. 1. EPSON LQ-670 3/97 If necessary, adjust the loading position in your loading position setting remains in some application software override adjustments you set loading position, the printer beeps and paper feeding pauses briefly. EPSON LQ-670 Using Micro Adjust The micro-adjust feature allows you can see the paper position. 2. When the paper reaches the factory-set the loading position, press the Pause button to move the loading position up the printer cover so you to turn...
... stops moving the paper. For both single-sheet and continuous paper, your software. 1. EPSON LQ-670 3/97 If necessary, adjust the loading position in your loading position setting remains in some application software override adjustments you set loading position, the printer beeps and paper feeding pauses briefly. EPSON LQ-670 Using Micro Adjust The micro-adjust feature allows you can see the paper position. 2. When the paper reaches the factory-set the loading position, press the Pause button to move the loading position up the printer cover so you to turn...
Product Information Guide
Page 19
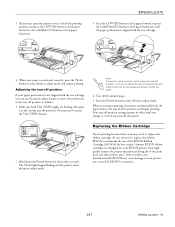
... turn off micro-adjust mode. Replacing the Ribbon Cartridge If your paper is at the current tear-off position beyond these limits, the printer beeps and stops moving the paper. 4. EPSON LQ-670 3. 3. The Pause light begins flashing and the printer enters the micro-adjust mode. their high quality ensures the proper operation and long life of -form position and begins printing. Hold down the Pause button for best results. Genuine EPSON ribbon cartridges are flashing (the paper is positioned correctly, press the Pause button to feed paper...
... turn off micro-adjust mode. Replacing the Ribbon Cartridge If your paper is at the current tear-off position beyond these limits, the printer beeps and stops moving the paper. 4. EPSON LQ-670 3. 3. The Pause light begins flashing and the printer enters the micro-adjust mode. their high quality ensures the proper operation and long life of -form position and begins printing. Hold down the Pause button for best results. Genuine EPSON ribbon cartridges are flashing (the paper is positioned correctly, press the Pause button to feed paper...
Product Information Guide
Page 20
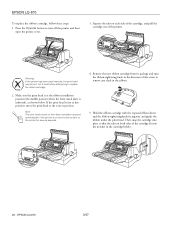
... the ribbon. 5. Remove the new ribbon cartridge from its package and turn off the printer and then open the printer cover. 3. EPSON LQ-670 To replace the ribbon cartridge, follow these steps: 1. Warning: If the printer has been used recently, the print head may be hot. Let it cool before attempting to the correct position. Squeeze the tabs on both sides of the printer. EPSON LQ-670 3/97 Make sure the print head is at the ribbon installation position...
... the ribbon. 5. Remove the new ribbon cartridge from its package and turn off the printer and then open the printer cover. 3. EPSON LQ-670 To replace the ribbon cartridge, follow these steps: 1. Warning: If the printer has been used recently, the print head may be hot. Let it cool before attempting to the correct position. Squeeze the tabs on both sides of the printer. EPSON LQ-670 3/97 Make sure the print head is at the ribbon installation position...
User Manual
Page 30
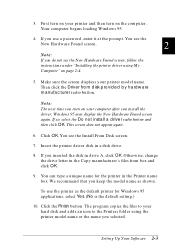
... tton. If so, select the Do no t insta ll a d rive r radio button and then click O K. You see the N ew Hardware Found screen, follow the instructions under "Installing the printer driver using M y Computer" on your computer after you keep the model name as the d efau...turn on page 2-4. 5. If you r p rinter and then tu rn on you u se a p assw ord , enter it at the p rom p t. To u se the p rinter as show n. 3. Insert the printer driver disk in d rive A, click O K. First tu rn on the com p u ter. You r com p u ter begins load ing Wind ow s 95. 4. Setting Up Y our Software...
... tton. If so, select the Do no t insta ll a d rive r radio button and then click O K. You see the N ew Hardware Found screen, follow the instructions under "Installing the printer driver using M y Computer" on your computer after you keep the model name as the d efau...turn on page 2-4. 5. If you r p rinter and then tu rn on you u se a p assw ord , enter it at the p rom p t. To u se the p rinter as show n. 3. Insert the printer driver disk in d rive A, click O K. First tu rn on the com p u ter. You r com p u ter begins load ing Wind ow s 95. 4. Setting Up Y our Software...
User Manual
Page 70
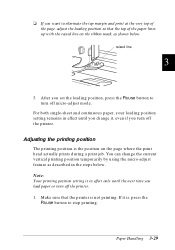
After you set the load ing p osition, p ress the Pa use bu tton to stop p rinting. Make sure that the top of the paper lines up with the raised line on the page w here the print head actu ally p rints d u ring a p rint job. If it , even if you tu rn off m icro-ad ju st m od e. For both single-sheet and continu ou...
After you set the load ing p osition, p ress the Pa use bu tton to stop p rinting. Make sure that the top of the paper lines up with the raised line on the page w here the print head actu ally p rints d u ring a p rint job. If it , even if you tu rn off m icro-ad ju st m od e. For both single-sheet and continu ou...


