User Manual
Page 3
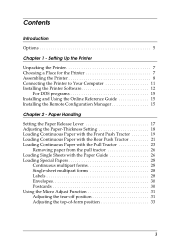
... Options 5 Chapter 1 - Setting Up the Printer Unpacking the Printer 7 Choosing a Place for the Printer 7 Assembling the Printer 8 Connecting the Printer to Your Computer 11 Installing the Printer Software 12 For DOS programs 15 Installing and Using the Online Reference Guide 15 Installing the Remote Configuration Manager 15 Chapter ... Paper with the Pull Tractor 23 Removing paper from the pull tractor 26 Loading Single Sheets with the Paper Guide 26 Loading Special Papers 28 Continuous multipart forms 28 Single-sheet multipart forms 28 Labels 28 Envelopes 30 Postcards...
... Options 5 Chapter 1 - Setting Up the Printer Unpacking the Printer 7 Choosing a Place for the Printer 7 Assembling the Printer 8 Connecting the Printer to Your Computer 11 Installing the Printer Software 12 For DOS programs 15 Installing and Using the Online Reference Guide 15 Installing the Remote Configuration Manager 15 Chapter ... Paper with the Pull Tractor 23 Removing paper from the pull tractor 26 Loading Single Sheets with the Paper Guide 26 Loading Special Papers 28 Continuous multipart forms 28 Single-sheet multipart forms 28 Labels 28 Envelopes 30 Postcards...
User Manual
Page 5
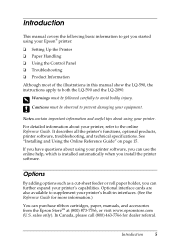
... about using your printer, refer to the online Reference Guide. Options By adding options such as a cut-sheet feeder or roll paper holder, you can further expand your printer. Optional interface cards are also available to supplement your printer's built-in this manual show the LQ-590, the instructions apply to both the LQ-590 and the LQ-2090. Introduction 5 It...
... about using your printer, refer to the online Reference Guide. Options By adding options such as a cut-sheet feeder or roll paper holder, you can further expand your printer. Optional interface cards are also available to supplement your printer's built-in this manual show the LQ-590, the instructions apply to both the LQ-590 and the LQ-2090. Introduction 5 It...
User Manual
Page 11
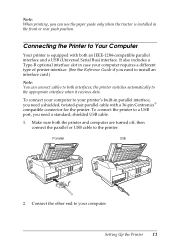
... or USB cable to the appropriate interface when it receives data. To connect the printer to a USB port, you need to install an interface card.) Note: You can use the paper guide only when the tractor is equipped with a 36-pin Centronics® compatible connector for... the printer. It also includes a Type-B optional interface slot in the front or rear push position. Connect the other end to your computer requires a different type of printer interface. (See the Reference Guide if you need a standard, shielded USB cable. 1. Note...
... or USB cable to the appropriate interface when it receives data. To connect the printer to a USB port, you need to install an interface card.) Note: You can use the paper guide only when the tractor is equipped with a 36-pin Centronics® compatible connector for... the printer. It also includes a Type-B optional interface slot in the front or rear push position. Connect the other end to your computer requires a different type of printer interface. (See the Reference Guide if you need a standard, shielded USB cable. 1. Note...
User Manual
Page 12
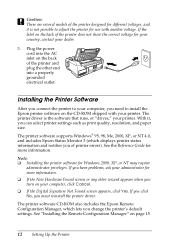
...and includes Epson Status Monitor 3 (which lets you connect the printer to adjust the printer for use with your printer. See "Installing the Remote Configuration Manager" on the back of the printer does not show the correct voltage for your country, contact your printer. See the Reference Guide for Windows ...2000, XP, or NT may require administrator privileges. If you click No, you can select printer settings such as print quality, ...
...and includes Epson Status Monitor 3 (which lets you connect the printer to adjust the printer for use with your printer. See "Installing the Remote Configuration Manager" on the back of the printer does not show the correct voltage for your country, contact your printer. See the Reference Guide for Windows ...2000, XP, or NT may require administrator privileges. If you click No, you can select printer settings such as print quality, ...

User Manual
Page 14
.... Select the appropriate file in the CD-ROM drive and click OK. Then turn to install the Reference Guide and the Remote Configuration Manager utility. 14 Setting Up the Printer Note: If you see page 15 to page 15 and follow the instructions on -screen instructions. 9. Click ...CD-ROM, insert the disk in the folder and click OK. 10. Then click OK and follow any instructions on your printer, then wait for the software to install the Reference Guide and the Remote Configuration Manager utility. 7. 6. When the installation is not accessible, click Cancel and try again. ❏...
.... Select the appropriate file in the CD-ROM drive and click OK. Then turn to install the Reference Guide and the Remote Configuration Manager utility. 14 Setting Up the Printer Note: If you see page 15 to page 15 and follow the instructions on -screen instructions. 9. Click ...CD-ROM, insert the disk in the folder and click OK. 10. Then click OK and follow any instructions on your printer, then wait for the software to install the Reference Guide and the Remote Configuration Manager utility. 7. 6. When the installation is not accessible, click Cancel and try again. ❏...
User Manual
Page 15
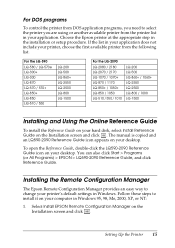
... LQ-590 LQ-580 / LQ-570e LQ-300+ LQ-300 LQ-870 LQ-570 / 570+ LQ-850+ LQ-850 LQ-510 / 550 LQ-200 LQ-500 LQ-860+ LQ-2550 LQ-2500 LQ-800 LQ-1500 For the LQ-2090 LQ-2080 / 2180 LQ-2070 / 2170 LQ-1070 / 1070+ LQ-870 / 1170 LQ-850+ / 1050+ LQ-850 / 1050 LQ-510 / 550 / 1010 LQ-200 LQ-500 LQ-860+ / 1060+ LQ-2550 LQ-2500 LQ-800 / 1000 LQ-1500 Installing and Using the Online Reference Guide...
... LQ-590 LQ-580 / LQ-570e LQ-300+ LQ-300 LQ-870 LQ-570 / 570+ LQ-850+ LQ-850 LQ-510 / 550 LQ-200 LQ-500 LQ-860+ LQ-2550 LQ-2500 LQ-800 LQ-1500 For the LQ-2090 LQ-2080 / 2180 LQ-2070 / 2170 LQ-1070 / 1070+ LQ-870 / 1170 LQ-850+ / 1050+ LQ-850 / 1050 LQ-510 / 550 / 1010 LQ-200 LQ-500 LQ-860+ / 1060+ LQ-2550 LQ-2500 LQ-800 / 1000 LQ-1500 Installing and Using the Online Reference Guide...
User Manual
Page 17
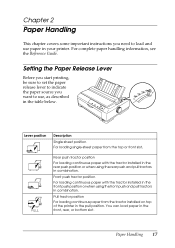
... Lever Before you start printing, be sure to set the paper release lever to indicate the paper source you need to use paper in your printer. Pull tractor position For loading continuous paper from the top or front slot. You can load paper in the front, rear, or bottom slot. ...tractor installed in the front push position or when using the rear push and pull tractors in combination. For complete paper handling information, see the Reference Guide. Chapter 2 Paper Handling This chapter covers some important instructions you want to load and use , as described in the table below.
... Lever Before you start printing, be sure to set the paper release lever to indicate the paper source you need to use paper in your printer. Pull tractor position For loading continuous paper from the top or front slot. You can load paper in the front, rear, or bottom slot. ...tractor installed in the front push position or when using the rear push and pull tractors in combination. For complete paper handling information, see the Reference Guide. Chapter 2 Paper Handling This chapter covers some important instructions you want to load and use , as described in the table below.
User Manual
Page 26
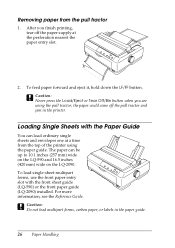
...the paper could come off the paper supply at a time from the pull tractor 1. For more information, see the Reference Guide. Loading Single Sheets with the front sheet guide (LQ-590) or the front paper guide (LQ-2090) installed. To feed paper forward and eject it, hold down the LF/FF button. To load single-sheet... be up to 10.1 inches (257 mm) wide on the LQ-590 and 16.5 inches (420 mm) wide on the LQ-2090. After you are using the paper guide. c Caution: Do not load multipart forms, carbon paper, or labels in the printer. The paper can load ordinary single sheets and envelopes one at...
...the paper could come off the paper supply at a time from the pull tractor 1. For more information, see the Reference Guide. Loading Single Sheets with the front sheet guide (LQ-590) or the front paper guide (LQ-2090) installed. To feed paper forward and eject it, hold down the LF/FF button. To load single-sheet... be up to 10.1 inches (257 mm) wide on the LQ-590 and 16.5 inches (420 mm) wide on the LQ-2090. After you are using the paper guide. c Caution: Do not load multipart forms, carbon paper, or labels in the printer. The paper can load ordinary single sheets and envelopes one at...
User Manual
Page 28
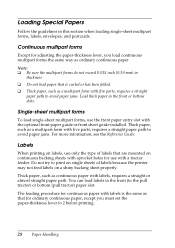
...set the paper-thickness lever to avoid paper jams. Load thick paper in the front (to avoid paper jams. For more information, see the Reference Guide. You can load labels in the front or bottom slots. The loading procedure for use with five parts, requires a straight paper path to... load single-sheet multipart forms, use only the type of labels because the printer may not feed labels on continuous backing sheets with sprocket holes for continuous paper with the optional front paper guide or front sheet guide installed. Thick paper, such as a multipart form with labels, requires a...
...set the paper-thickness lever to avoid paper jams. Load thick paper in the front (to avoid paper jams. For more information, see the Reference Guide. You can load labels in the front or bottom slots. The loading procedure for use with five parts, requires a straight paper path to... load single-sheet multipart forms, use only the type of labels because the printer may not feed labels on continuous backing sheets with sprocket holes for continuous paper with the optional front paper guide or front sheet guide installed. Thick paper, such as a multipart form with labels, requires a...
User Manual
Page 30
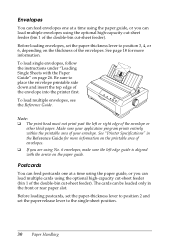
... "Printer Specifications" in the front or rear paper slot. Before loading postcards, set the paper-thickness lever to position 2 and set the paper-thickness lever to position 3, 4, or 6, depending on the paper guide. To load multiple envelopes, see the Reference Guide. Postcards You can feed postcards one at a time using the paper guide, .... Make sure your envelope. Be sure to the single-sheet position. 30 Paper Handling The cards can be loaded only in the Reference Guide for more information on page 26. Note: ❏ The print head must not print past the left edge...
... "Printer Specifications" in the front or rear paper slot. Before loading postcards, set the paper-thickness lever to position 2 and set the paper-thickness lever to position 3, 4, or 6, depending on the paper guide. To load multiple envelopes, see the Reference Guide. Postcards You can feed postcards one at a time using the paper guide, .... Make sure your envelope. Be sure to the single-sheet position. 30 Paper Handling The cards can be loaded only in the Reference Guide for more information on page 26. Note: ❏ The print head must not print past the left edge...

User Manual
Page 31
...10063; When loading A6 size cards, always load them in 1/180-inch (0.141 mm) increments to the tear-off the printer. To load multiple cards, see the Reference Guide. Your tear-off position setting remains in effect until you change it to adjust the tear-off position If your paper's perforation... is on page 26. this may damage the printer or cause it , even if you are loading postcards long edge ...
...10063; When loading A6 size cards, always load them in 1/180-inch (0.141 mm) increments to the tear-off the printer. To load multiple cards, see the Reference Guide. Your tear-off position setting remains in effect until you change it to adjust the tear-off position If your paper's perforation... is on page 26. this may damage the printer or cause it , even if you are loading postcards long edge ...
User Manual
Page 38
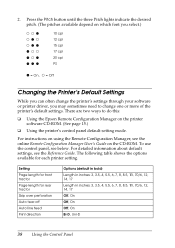
... sometimes need to do this: ❏ Using the Epson Remote Configuration Manager on the CD-ROM. Setting Page length for front tractor Page length for each printer setting. For instructions on using the Remote Configuration Manager, see the online Remote Configuration Manager User's Guide on the printer software CD-ROM. (See page 15.) ❏...: 3, 3.5, 4, 5.5, 6, 7, 8, 8.5, 11, 70/6, 12, 14, 17 Off, On Off, On Off, On Bi-D, Uni-D 38 Using the Control Panel To use the control panel, see the Reference Guide. 2.
... sometimes need to do this: ❏ Using the Epson Remote Configuration Manager on the CD-ROM. Setting Page length for front tractor Page length for each printer setting. For instructions on using the Remote Configuration Manager, see the online Remote Configuration Manager User's Guide on the printer software CD-ROM. (See page 15.) ❏...: 3, 3.5, 4, 5.5, 6, 7, 8, 8.5, 11, 70/6, 12, 14, 17 Off, On Off, On Off, On Bi-D, Uni-D 38 Using the Control Panel To use the control panel, see the Reference Guide. 2.
User Manual
Page 41
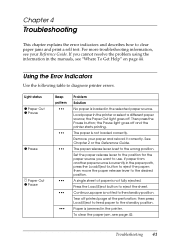
... Out O Pause O Pause F Paper Out O Pause Beep pattern ••• Problem Solution No paper is jammed in the printer. Then press the Pause button; Remove your Reference Guide. See Chapter 2 or the Reference Guide. Set the paper release lever to eject the paper; Paper is loaded in the paper path, press the Load/Eject...
... Out O Pause O Pause F Paper Out O Pause Beep pattern ••• Problem Solution No paper is jammed in the printer. Then press the Pause button; Remove your Reference Guide. See Chapter 2 or the Reference Guide. Set the paper release lever to eject the paper; Paper is loaded in the paper path, press the Load/Eject...
User Manual
Page 43
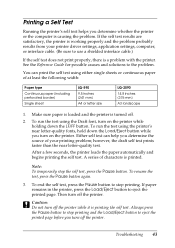
...least the following width: Paper type Continuous paper (including perforated border) Single sheet LQ-590 9.5 inches (241 mm) A4 or letter size LQ-2090 14.8 inches (376 mm) A3 landscape 1. If paper remains in the printer, press the Load/Eject button to stop the self test, press the Pause button... end the self test, press the Pause button to eject the printed page. Printing a Self Test Running the printer's self test helps you determine whether the printer or the computer is printed. See the Reference Guide for possible causes and solutions to the problem. To run the test using the...
...least the following width: Paper type Continuous paper (including perforated border) Single sheet LQ-590 9.5 inches (241 mm) A4 or letter size LQ-2090 14.8 inches (376 mm) A3 landscape 1. If paper remains in the printer, press the Load/Eject button to stop the self test, press the Pause button... end the self test, press the Pause button to eject the printed page. Printing a Self Test Running the printer's self test helps you determine whether the printer or the computer is printed. See the Reference Guide for possible causes and solutions to the problem. To run the test using the...

