Technical Brief (Impact Printers)
Page 2
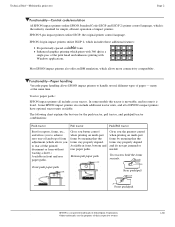
... EPSON impact printers also include additional tractor units, and all include a rear tractor. Two tractors hold the forms securely. Front push paper path Rear push/pull Front push/pull EPSON Sales Training EPSON is a registered trademark of Seiko Epson Corporation. 1/00 Other trademarks are the property of EPSON's impact printers have optional tractor units available. LL Functionality-Paper handling Versatile paper handling allows EPSON impact printers...
... EPSON impact printers also include additional tractor units, and all include a rear tractor. Two tractors hold the forms securely. Front push paper path Rear push/pull Front push/pull EPSON Sales Training EPSON is a registered trademark of Seiko Epson Corporation. 1/00 Other trademarks are the property of EPSON's impact printers have optional tractor units available. LL Functionality-Paper handling Versatile paper handling allows EPSON impact printers...

Technical Brief (Impact Printers)
Page 3
... source you can load continuous paper in combination. Pull tractor position For loading continuous paper from the top or front slot. Technical Brief-Multimedia projectors Page 3 Single sheet paper paths: EPSON impact printers all can handle single sheet paper and single sheet multi-part forms, many EPSON impact printers have both front and top paper paths: Front...
... source you can load continuous paper in combination. Pull tractor position For loading continuous paper from the top or front slot. Technical Brief-Multimedia projectors Page 3 Single sheet paper paths: EPSON impact printers all can handle single sheet paper and single sheet multi-part forms, many EPSON impact printers have both front and top paper paths: Front...
Product Brochure
Page 2
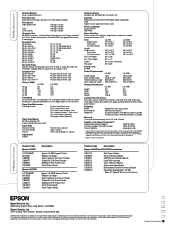
..., allowing the Epson LQ-590/2090 to maximaize performance by Seiko Epson Corporation. ** Additional tractor unit required Product Code Epson LQ-590 C11C558001 S015337 C806381 C806371 C800201 C814002 Epson LQ-2090 C11C559001 S015335 C806401 C806391 C800211 C814012 C814031 Description Epson LQ-590 Impact Printer Ribbon Cartridge High Capacity Cut Sheet Feeder Single Bin Cut Sheet Feeder Additional Pull Tractor Unit Front Sheet Guide Epson LQ-2090 Impact Printer Ribbon Cartridge...
..., allowing the Epson LQ-590/2090 to maximaize performance by Seiko Epson Corporation. ** Additional tractor unit required Product Code Epson LQ-590 C11C558001 S015337 C806381 C806371 C800201 C814002 Epson LQ-2090 C11C559001 S015335 C806401 C806391 C800211 C814012 C814031 Description Epson LQ-590 Impact Printer Ribbon Cartridge High Capacity Cut Sheet Feeder Single Bin Cut Sheet Feeder Additional Pull Tractor Unit Front Sheet Guide Epson LQ-2090 Impact Printer Ribbon Cartridge...
User Manual
Page 3
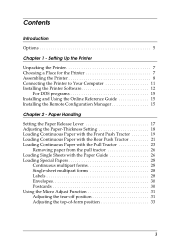
... Setting 18 Loading Continuous Paper with the Front Push Tractor 19 Loading Continuous Paper with the Rear Push Tractor 21 Loading Continuous Paper with the Pull Tractor 23 Removing paper from the pull tractor 26 Loading Single Sheets with the Paper Guide 26 ...-form position 33 3 Contents Introduction Options 5 Chapter 1 - Setting Up the Printer Unpacking the Printer 7 Choosing a Place for the Printer 7 Assembling the Printer 8 Connecting the Printer to Your Computer 11 Installing the Printer Software 12 For DOS programs 15 Installing and Using the Online Reference Guide 15...
... Setting 18 Loading Continuous Paper with the Front Push Tractor 19 Loading Continuous Paper with the Rear Push Tractor 21 Loading Continuous Paper with the Pull Tractor 23 Removing paper from the pull tractor 26 Loading Single Sheets with the Paper Guide 26 ...-form position 33 3 Contents Introduction Options 5 Chapter 1 - Setting Up the Printer Unpacking the Printer 7 Choosing a Place for the Printer 7 Assembling the Printer 8 Connecting the Printer to Your Computer 11 Installing the Printer Software 12 For DOS programs 15 Installing and Using the Online Reference Guide 15...
User Manual
Page 11
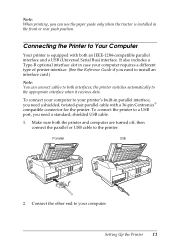
..., shielded USB cable. 1. To connect the printer to a USB port, you need to Your Computer Your printer is installed in case your computer. Connecting the Printer to install an interface card.) Note: You can use the paper guide only when the tractor is equipped with a 36-pin Centronics®... compatible connector for the printer. It also includes a Type-B optional interface slot in the front or rear push position. Note: When printing, you need a ...
..., shielded USB cable. 1. To connect the printer to a USB port, you need to Your Computer Your printer is installed in case your computer. Connecting the Printer to install an interface card.) Note: You can use the paper guide only when the tractor is equipped with a 36-pin Centronics®... compatible connector for the printer. It also includes a Type-B optional interface slot in the front or rear push position. Note: When printing, you need a ...
User Manual
Page 17
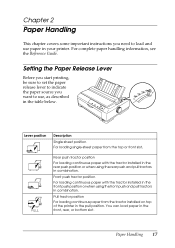
... the paper source you need to use paper in combination. Lever position Description Single-sheet position For loading single-sheet paper from the tractor installed on top of the printer in the front, rear, or bottom slot. You can load paper in the pull position. For complete paper handling information, see the...
... the paper source you need to use paper in combination. Lever position Description Single-sheet position For loading single-sheet paper from the tractor installed on top of the printer in the front, rear, or bottom slot. You can load paper in the pull position. For complete paper handling information, see the...
User Manual
Page 19
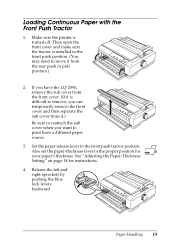
..." on page 18 for your paper's thickness. Make sure the printer is installed in the front push position. (You may need to move it .) Be sure to the proper position for instructions. 4. Then open the front cover and make sure the tractor is turned off. Loading Continuous Paper with the Front Push... cover when you can temporarily remove the front cover and then separate the sub cover from it from a different paper source. 3. If you have the LQ-2090, remove the sub cover from the front cover. (If it is difficult to remove, you want to the front push...
..." on page 18 for your paper's thickness. Make sure the printer is installed in the front push position. (You may need to move it .) Be sure to the proper position for instructions. 4. Then open the front cover and make sure the tractor is turned off. Loading Continuous Paper with the Front Push... cover when you can temporarily remove the front cover and then separate the sub cover from it from a different paper source. 3. If you have the LQ-2090, remove the sub cover from the front cover. (If it is difficult to remove, you want to the front push...
User Manual
Page 20
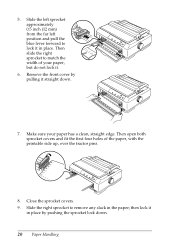
... place. Close the sprocket covers. 9. Then 10 slide the right 5 0 sprocket to match the width of the paper, with the printable side up, over the tractor pins. 8.
... place. Close the sprocket covers. 9. Then 10 slide the right 5 0 sprocket to match the width of the paper, with the printable side up, over the tractor pins. 8.

User Manual
Page 21
... low, you can change its position using the push tractor, it is a good idea to set the Auto tear-off , the tractor is installed in the Default Setting mode to move the tractor from the front push or pull position.) 2. Make sure the printer is turned off function in the rear push position, and... the paper guide is lying flat on the printer and slide the edge guides to lose the top-of the paper guide...
... low, you can change its position using the push tractor, it is a good idea to set the Auto tear-off , the tractor is installed in the Default Setting mode to move the tractor from the front push or pull position.) 2. Make sure the printer is turned off function in the rear push position, and... the paper guide is lying flat on the printer and slide the edge guides to lose the top-of the paper guide...
User Manual
Page 22
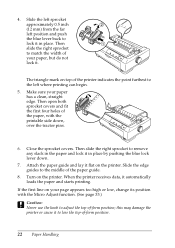
... of your paper has a clean, straight edge. Then slide the right sprocket to remove any slack in the paper and lock it flat on the printer. Make sure your paper, but do not lock it to adjust the top-of the paper guide. 8. Close the sprocket covers. Turn on the... the knob to lose the top-of-form position. 22 Paper Handling this may damage the printer or cause it . When the printer receives data, it in place by pushing the blue lock lever down , over the tractor pins. 6. Slide the left sprocket approximately 0.5 inch (12 mm) from the far left where printing...
... of your paper has a clean, straight edge. Then slide the right sprocket to remove any slack in the paper and lock it flat on the printer. Make sure your paper, but do not lock it to adjust the top-of the paper guide. 8. Close the sprocket covers. Turn on the... the knob to lose the top-of-form position. 22 Paper Handling this may damage the printer or cause it . When the printer receives data, it in place by pushing the blue lock lever down , over the tractor pins. 6. Slide the left sprocket approximately 0.5 inch (12 mm) from the far left where printing...
User Manual
Page 23
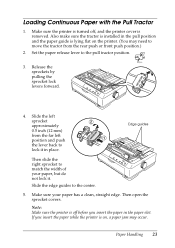
...sprockets by pulling the sprocket lock levers forward. 4. Edge guides Then slide the right sprocket to lock it . Slide the edge guides to the pull tractor position. 3. Slide the left sprocket approximately 0.5 inch (12 mm) from the rear push or front push position.) 2. Then open the sprocket covers.... Note: Make sure the printer is removed. Paper Handling 23 Make sure the printer is turned off, and the printer cover is off before you insert the paper while the printer is lying flat on , a paper jam may need to move the tractor from the far left position and push...
...sprockets by pulling the sprocket lock levers forward. 4. Edge guides Then slide the right sprocket to lock it . Slide the edge guides to the pull tractor position. 3. Slide the left sprocket approximately 0.5 inch (12 mm) from the rear push or front push position.) 2. Then open the sprocket covers.... Note: Make sure the printer is removed. Paper Handling 23 Make sure the printer is turned off, and the printer cover is off before you insert the paper while the printer is lying flat on , a paper jam may need to move the tractor from the far left position and push...
User Manual
Page 24
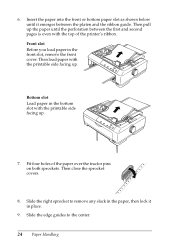
Then pull up the paper until it in the front slot, remove the front cover. Fit four holes of the printer's ribbon. Slide the edge guides to remove any slack in the paper, then lock it emerges between the first and second pages is even with ...the top of the paper over the tractor pins on both sprockets. Front slot Before you load paper in place. 9. Insert the paper into the front or bottom paper slot as shown below...
Then pull up the paper until it in the front slot, remove the front cover. Fit four holes of the printer's ribbon. Slide the edge guides to remove any slack in the paper, then lock it emerges between the first and second pages is even with ...the top of the paper over the tractor pins on both sprockets. Front slot Before you load paper in place. 9. Insert the paper into the front or bottom paper slot as shown below...
User Manual
Page 26
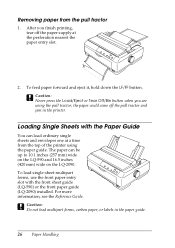
... paper forward and eject it, hold down the LF/FF button. For more information, see the Reference Guide. Removing paper from the top of the printer using the pull tractor; c Caution: Never press the Load/Eject or Tear Off/Bin button when you finish printing, tear off the pull... tractor and jam in the paper guide. 26 Paper Handling To load single-sheet multipart forms, use the front paper entry slot with the Paper Guide You can be up to 10.1 inches (257 mm) wide on the LQ-590 and 16.5 inches (420 mm) wide...
... paper forward and eject it, hold down the LF/FF button. For more information, see the Reference Guide. Removing paper from the top of the printer using the pull tractor; c Caution: Never press the Load/Eject or Tear Off/Bin button when you finish printing, tear off the pull... tractor and jam in the paper guide. 26 Paper Handling To load single-sheet multipart forms, use the front paper entry slot with the Paper Guide You can be up to 10.1 inches (257 mm) wide on the LQ-590 and 16.5 inches (420 mm) wide...
User Manual
Page 28
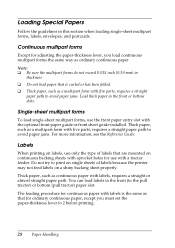
... thickness. ❏ Do not load paper that for use only the type of labels because the printer may not feed labels on continuous backing sheets with a tractor feeder. Do not try to the pull tractor) or bottom (pull tractor) paper slot. Continuous multipart forms Except for adjusting the paper-thickness lever, you must set...
... thickness. ❏ Do not load paper that for use only the type of labels because the printer may not feed labels on continuous backing sheets with a tractor feeder. Do not try to the pull tractor) or bottom (pull tractor) paper slot. Continuous multipart forms Except for adjusting the paper-thickness lever, you must set...

User Manual
Page 29
...from the rear paper slot. Do not load labels on the rear or front push tractor. ❏ Do not load continuous paper with labels on the pull tractor. Removing continuous paper with labels To prevent labels from the printer. When fed backward, labels can easily come off the backing sheet and cause a... from peeling off the backing sheet and cause a paper jam. they may come off the backing sheet and jamming the printer, follow these steps to remove continuous paper with labels from the printer: 1. Hold down the LF/FF button to 60% RH ❏ Do not leave labels loaded in the...
...from the rear paper slot. Do not load labels on the rear or front push tractor. ❏ Do not load continuous paper with labels on the pull tractor. Removing continuous paper with labels To prevent labels from the printer. When fed backward, labels can easily come off the backing sheet and cause a... from peeling off the backing sheet and cause a paper jam. they may come off the backing sheet and jamming the printer, follow these steps to remove continuous paper with labels from the printer: 1. Hold down the LF/FF button to 60% RH ❏ Do not leave labels loaded in the...

User Manual
Page 33
...Load/Eject U button to move the top-of -form position is the position on the page where the printer starts printing. Your top-of -form position, as described below. If your printing appears too high or ...-form position. 1. this may damage the printer or cause it , even if you can use the knob to exit Micro Adjust mode. Load paper. (If the tractor is turned on the page, you can see... the paper position. 3. The Pause light flashes and the printer enters Micro Adjust mode. 4. c Caution: Never use...
...Load/Eject U button to move the top-of -form position is the position on the page where the printer starts printing. Your top-of -form position, as described below. If your printing appears too high or ...-form position. 1. this may damage the printer or cause it , even if you can use the knob to exit Micro Adjust mode. Load paper. (If the tractor is turned on the page, you can see... the paper position. 3. The Pause light flashes and the printer enters Micro Adjust mode. 4. c Caution: Never use...
User Manual
Page 38
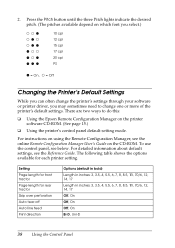
... PS O = On, N = Off Changing the Printer's Default Settings While you can often change the printer's settings through your software or printer driver, you may sometimes need to do this: ❏ Using the Epson Remote Configuration Manager on the printer software CD-ROM. (See page 15.) ❏... Using the printer's control panel default-setting mode. To use the control panel, see the Reference Guide. The following table shows the options available for rear tractor Skip over perforation...
... PS O = On, N = Off Changing the Printer's Default Settings While you can often change the printer's settings through your software or printer driver, you may sometimes need to do this: ❏ Using the Epson Remote Configuration Manager on the printer software CD-ROM. (See page 15.) ❏... Using the printer's control panel default-setting mode. To use the control panel, see the Reference Guide. The following table shows the options available for rear tractor Skip over perforation...