
Technical Brief (Impact Printers)
Page 5
... : Roman Pitch : 10CPI Print Quality : LQ Character Table : PC 437 Continuous Rear : 11 inch Continuous Rear : 8.5mm Continuous Front : 7 inch Continuous Front : 8.5mm CutSheetFeeder 1 : 11 inch CutSheetFeeder 1 : 8.5mm CutSheetFeeder 2 : 11 inch CutSheetFeeder 2 : 8.5mm Manual Rear : 14 inch Manual Rear : 8.5mm Help: Select printer Font. EPSON Sales Training EPSON is the DOS-based printer setup utility that allows you...
... : Roman Pitch : 10CPI Print Quality : LQ Character Table : PC 437 Continuous Rear : 11 inch Continuous Rear : 8.5mm Continuous Front : 7 inch Continuous Front : 8.5mm CutSheetFeeder 1 : 11 inch CutSheetFeeder 1 : 8.5mm CutSheetFeeder 2 : 11 inch CutSheetFeeder 2 : 8.5mm Manual Rear : 14 inch Manual Rear : 8.5mm Help: Select printer Font. EPSON Sales Training EPSON is the DOS-based printer setup utility that allows you...
Product Information Guide
Page 3
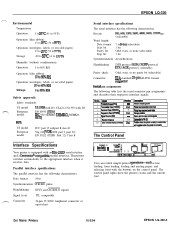
...EPSON LQ-300 Serial interface specifications The serial interface has the following table lists the serial connector pin assignments and describes their respective interface signals. ~PlnNaIsgml 1 Rateah hIld (ffi) 2 TmmiIWData(TXCWD). 3 Fbaiuadoeb(Fu(DIRD) 4 4 fh-bS@nd(RTSIRS) 7 srpnrl-W90) 11 ihrseohamd 20 ~~T~~~IARu~(DTRER) !- The control panel lights show the printer..., female COMector Serial pin assignments The following characteristics. Dot Matrix Printers 10/2/94 EPSON LQ-300-3 out In out - The printer switches automatically to 80% RH Operation (film ribbon): lOtow%RH...
...EPSON LQ-300 Serial interface specifications The serial interface has the following table lists the serial connector pin assignments and describes their respective interface signals. ~PlnNaIsgml 1 Rateah hIld (ffi) 2 TmmiIWData(TXCWD). 3 Fbaiuadoeb(Fu(DIRD) 4 4 fh-bS@nd(RTSIRS) 7 srpnrl-W90) 11 ihrseohamd 20 ~~T~~~IARu~(DTRER) !- The control panel lights show the printer..., female COMector Serial pin assignments The following characteristics. Dot Matrix Printers 10/2/94 EPSON LQ-300-3 out In out - The printer switches automatically to 80% RH Operation (film ribbon): lOtow%RH...
Product Information Guide
Page 5
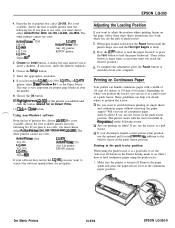
... use continuous paper with the tractor. Dot Matrix Printers 10/2/94 EPSON LQ-300-5 l Incerteinareas,Ulefdlowing~ertaM~,are available only when the interface is available. See your sojbare program to 8.5, 11,12, or 70/6(the length of printer commands used in your program does not provide them...the kind of A4 paper) inches. When the printer receives data, it toon. EPSON LQ-300 Graphic print direction You can easily tear off position where you want the printer to the tear-off the printed pages. The printer usually prints text and graphics bidirectionally for graphics. ...
... use continuous paper with the tractor. Dot Matrix Printers 10/2/94 EPSON LQ-300-5 l Incerteinareas,Ulefdlowing~ertaM~,are available only when the interface is available. See your sojbare program to 8.5, 11,12, or 70/6(the length of printer commands used in your program does not provide them...the kind of A4 paper) inches. When the printer receives data, it toon. EPSON LQ-300 Graphic print direction You can easily tear off position where you want the printer to the tear-off the printed pages. The printer usually prints text and graphics bidirectionally for graphics. ...

Product Information Guide
Page 6
... Table B 0 0 EXT/ACK Table E c izs ij 0 -tareply TableE 4 0=on and Font 2 is off the printer. The printer beeps twice each selection. EPSON LQ-300-6 10/2/94 Dot Matrix Printers Press LF/R to Table B. Press the Font button now to print help text that list all of paper. When you reach... languae of languages from which you enter Table H. the Pause button once. The printer beeps twice and enters a submenu table for that you want to change, or skip to step 11 to exit the Printer Setting mode. lO.ReFt steps 6 through the se&ngs in effect until Font...
... Table B 0 0 EXT/ACK Table E c izs ij 0 -tareply TableE 4 0=on and Font 2 is off the printer. The printer beeps twice each selection. EPSON LQ-300-6 10/2/94 Dot Matrix Printers Press LF/R to Table B. Press the Font button now to print help text that list all of paper. When you reach... languae of languages from which you enter Table H. the Pause button once. The printer beeps twice and enters a submenu table for that you want to change, or skip to step 11 to exit the Printer Setting mode. lO.ReFt steps 6 through the se&ngs in effect until Font...
Product Information Guide
Page 9
..., LQ-150, LQ-860, LQ-2!550. Adjusting the Loading Position If you want to use color. If you plan to adjust the position where printing begins on where you position the tractor, you added) and click the button labeled Set As Default Printer. 11 .... does not list the LQ-300, you may instruct you must choose either ActionPrinter 3260, LQ-150, LQ-860, LQ-2550. Will you want to switch between printing on labels? EPSON LQ-300 ,f---Y 4. ActionPrinter~ 3260 LQ-150 w-860 LQ-2550 LQ-570+ Stylus &IO@ LQ-870 ActionPrinter 3250 Any LQ printer EPSON printer 5. A dialog box ...
..., LQ-150, LQ-860, LQ-2!550. Adjusting the Loading Position If you want to use color. If you plan to adjust the position where printing begins on where you position the tractor, you added) and click the button labeled Set As Default Printer. 11 .... does not list the LQ-300, you may instruct you must choose either ActionPrinter 3260, LQ-150, LQ-860, LQ-2550. Will you want to switch between printing on labels? EPSON LQ-300 ,f---Y 4. ActionPrinter~ 3260 LQ-150 w-860 LQ-2550 LQ-570+ Stylus &IO@ LQ-870 ActionPrinter 3250 Any LQ printer EPSON printer 5. A dialog box ...
Product Information Guide
Page 11
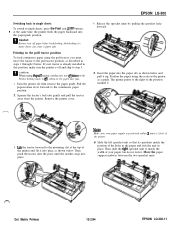
...pull tractor position; back-feeding too many sheets can cause a paper jam. a caution: When using the scale on the printer as a guide. Dot Matrix Printers 10/2/94 EPSON LQ-300-11 Pull the paper-release lever forward to the right of the position marked 0. 3. Then push the tractor onto the posts... sure your paper supply is already installed in steps 1 through 3 below. EPSON LQ-300 Switching back to single sheets To switch to single sheets, press the Font and LF/FF buttons ' at the top of the printer and tilt it into place as shown below. as shown below and pull ...
...pull tractor position; back-feeding too many sheets can cause a paper jam. a caution: When using the scale on the printer as a guide. Dot Matrix Printers 10/2/94 EPSON LQ-300-11 Pull the paper-release lever forward to the right of the position marked 0. 3. Then push the tractor onto the posts... sure your paper supply is already installed in steps 1 through 3 below. EPSON LQ-300 Switching back to single sheets To switch to single sheets, press the Font and LF/FF buttons ' at the top of the printer and tilt it into place as shown below. as shown below and pull ...
Product Information Guide
Page 12
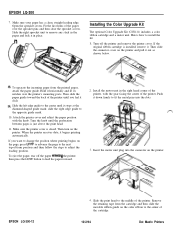
... the paper and lock it down firmly to the next top-of the printer. slide the right edge guide to change the position where printing begins on the printer. Make sure the printer cover is just above the print head. 11. Then turn on the page, press LF/FF to advance the page to... the paper, tear off the printer and remove the printer cover. Slide the right sprocket unit to remove any slack in the right hand corner of the printer, with the knob. Hold it out as shown below. If you feel it click Slide the left edge guide to the center of the printer. EPSON LQ-300-12 4.
... the paper and lock it down firmly to the next top-of the printer. slide the right edge guide to change the position where printing begins on the printer. Make sure the printer cover is just above the print head. 11. Then turn on the page, press LF/FF to advance the page to... the paper, tear off the printer and remove the printer cover. Slide the right sprocket unit to remove any slack in the right hand corner of the printer, with the knob. Hold it out as shown below. If you feel it click Slide the left edge guide to the center of the printer. EPSON LQ-300-12 4.
User Manual
Page 10
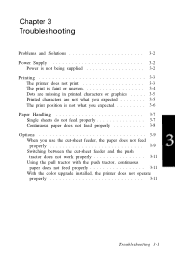
...-Sheet Feeder 2-29 Pull Tractor Unit 2-33 Color Upgrade Kit 2-35 Chapter 3 Troubleshooting Problems and Solutions 3-2 Power Supply 3-2 Power is not being supplied 3-2 Printing 3-3 The printer does not print 3-3 The print is faint or uneven 3-4 Dots are missing in printed characters or graphics 3-5 Printed characters are not what you expected 3-5 The...use the cut-sheet feeder, the paper does not feed properly 3-9 Switching between the cut-sheet feeder and the push tractor does not work properly 3-11 Using the pull tractor with the push tractor, continuous paper does not feed properly...
...-Sheet Feeder 2-29 Pull Tractor Unit 2-33 Color Upgrade Kit 2-35 Chapter 3 Troubleshooting Problems and Solutions 3-2 Power Supply 3-2 Power is not being supplied 3-2 Printing 3-3 The printer does not print 3-3 The print is faint or uneven 3-4 Dots are missing in printed characters or graphics 3-5 Printed characters are not what you expected 3-5 The...use the cut-sheet feeder, the paper does not feed properly 3-9 Switching between the cut-sheet feeder and the push tractor does not work properly 3-11 Using the pull tractor with the push tractor, continuous paper does not feed properly...
User Manual
Page 11
... approvals Interface Specifications Parallel interface Serial interface Command Summary Sending printer commands Using the command summary General operation Paper feeding Page format Print position motion Font selection Font enhancement Spacing Character handling Bit image Graphics Color printing Character Tables A-2 A-2 A-4 A-6 A-7 A-7 A-8 A-8 A-8 A-8 A-10 A-10 A-10 A-11 A-11 A-11 A-12 A-13 A-14 A-15 A-16 A-18 A-19 A-19 A-20...
... approvals Interface Specifications Parallel interface Serial interface Command Summary Sending printer commands Using the command summary General operation Paper feeding Page format Print position motion Font selection Font enhancement Spacing Character handling Bit image Graphics Color printing Character Tables A-2 A-2 A-4 A-6 A-7 A-7 A-8 A-8 A-8 A-8 A-10 A-10 A-10 A-11 A-11 A-11 A-12 A-13 A-14 A-15 A-16 A-18 A-19 A-19 A-20...

User Manual
Page 27
While holding down the LF/FF button, turn on the printer. The beeper sounds three times, indicating the printer is out of your paper. Next, adjust the right edge guide to match the width of paper. 3. Setting Up the Printer 1-11 Slide the left edge guide until it locks in place at the triangular guide mark. 2. Release the button after the Pause light flashes.
While holding down the LF/FF button, turn on the printer. The beeper sounds three times, indicating the printer is out of your paper. Next, adjust the right edge guide to match the width of paper. 3. Setting Up the Printer 1-11 Slide the left edge guide until it locks in place at the triangular guide mark. 2. Release the button after the Pause light flashes.
User Manual
Page 34
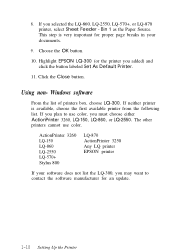
... OK button. 10. Highlight EPSON LQ-300 (or the printer you must choose either ActionPrinter 3260, LQ-150, LQ-860, or LQ-2550. The other printers cannot use color, you added) and click the button labeled Set As Default Printer. 11. This step is available, choose the first available printer from the following list. If neither printer is very important for an...
... OK button. 10. Highlight EPSON LQ-300 (or the printer you must choose either ActionPrinter 3260, LQ-150, LQ-860, or LQ-2550. The other printers cannot use color, you added) and click the button labeled Set As Default Printer. 11. This step is available, choose the first available printer from the following list. If neither printer is very important for an...
User Manual
Page 40
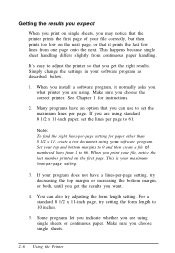
... for instructions. 2. For a standard 8 1/2 x 11-inch page, try adjusting the form length setting. See Chapter 1 for paper other than 8 1/2 x 11, create a test document using your software program. If you choose the correct printer. Some programs let you indicate whether you choose single sheets.... 2-6 Using the Printer Make sure you are using single sheets or continuous paper...
... for instructions. 2. For a standard 8 1/2 x 11-inch page, try adjusting the form length setting. See Chapter 1 for paper other than 8 1/2 x 11, create a test document using your software program. If you choose the correct printer. Some programs let you indicate whether you choose single sheets.... 2-6 Using the Printer Make sure you are using single sheets or continuous paper...
User Manual
Page 50
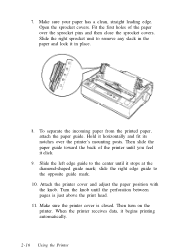
... Make sure the printer cover is just above the print head. 11. Make sure your paper has a clean, straight leading edge. Then slide the paper guide toward the back of the paper over the printer's mounting posts. Then turn on the printer. Fit the first holes of the printer until the perforation ... sprocket pins and then close the sprocket covers. 7. Slide the left edge guide to the opposite guide mark. 10. Attach the printer cover and adjust the paper position with the knob. When the printer receives data, it in the paper and lock it begins printing automatically. 2-16 Using the...
... Make sure the printer cover is just above the print head. 11. Make sure your paper has a clean, straight leading edge. Then slide the paper guide toward the back of the paper over the printer's mounting posts. Then turn on the printer. Fit the first holes of the printer until the perforation ... sprocket pins and then close the sprocket covers. 7. Slide the left edge guide to the opposite guide mark. 10. Attach the printer cover and adjust the paper position with the knob. When the printer receives data, it in the paper and lock it begins printing automatically. 2-16 Using the...
User Manual
Page 56
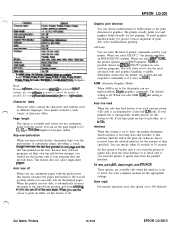
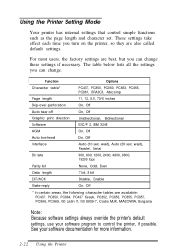
For most users, the factory settings are available: PC437. See your software program to control the printer, if possible. The table below lists all the settings you can change . wait), Parallel, Serial 300, 600, 1200, 2400, 4800, 9600, 19200 bps Parity bit Data length EXT/ACK State reply ...length Skip-over-perforation Auto tear off Graphic print direction Software AGM Auto line feed Options PC437, PC850, PC860, PC863, PC865, PC861, BRASCII, Abicomp 11, 12, 8.5, 70/6 inches On, Off On, Off Unidirectional, Bidirectional ESC/P 2, IBM X24E On, Off On, Off Interface Bit rate Auto ...
For most users, the factory settings are available: PC437. See your software program to control the printer, if possible. The table below lists all the settings you can change . wait), Parallel, Serial 300, 600, 1200, 2400, 4800, 9600, 19200 bps Parity bit Data length EXT/ACK State reply ...length Skip-over-perforation Auto tear off Graphic print direction Software AGM Auto line feed Options PC437, PC850, PC860, PC863, PC865, PC861, BRASCII, Abicomp 11, 12, 8.5, 70/6 inches On, Off On, Off Unidirectional, Bidirectional ESC/P 2, IBM X24E On, Off On, Off Interface Bit rate Auto ...

User Manual
Page 57
...should use this feature advances the paper perforation to Off. You can set the page length to 8 1/2, 11, 12, or 70/6 (the length of the next sheet. When the printer receives data, it automatically reverses the paper to print on the next. Character table Character tables contain the ...tractor. When you can use continuous paper with the push tractor, this feature only if your program does not provide them. Using the Printer 2-23 Your printer includes a wide variety of continuous paper, providing a 1-inch margin between the last line printed on one page and the first line...
...should use this feature advances the paper perforation to Off. You can set the page length to 8 1/2, 11, 12, or 70/6 (the length of the next sheet. When the printer receives data, it automatically reverses the paper to print on the next. Character table Character tables contain the ...tractor. When you can use continuous paper with the push tractor, this feature only if your program does not provide them. Using the Printer 2-23 Your printer includes a wide variety of continuous paper, providing a 1-inch margin between the last line printed on one page and the first line...
User Manual
Page 62
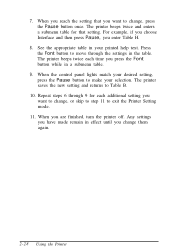
...press Pause, you are finished, turn the printer off. Press the Font button to Table B. 10. See the appropriate table in a submenu table. 9. The printer saves the new setting and returns to move through 9 for that you change , or skip to step 11 to make your selection. When you enter Table... H. 8. The printer beeps twice and enters a submenu table for each time you want to change, press the Pause button once. When the control panel lights...
...press Pause, you are finished, turn the printer off. Press the Font button to Table B. 10. See the appropriate table in a submenu table. 9. The printer saves the new setting and returns to move through 9 for that you change , or skip to step 11 to make your selection. When you enter Table... H. 8. The printer beeps twice and enters a submenu table for each time you want to change, press the Pause button once. When the control panel lights...
User Manual
Page 65
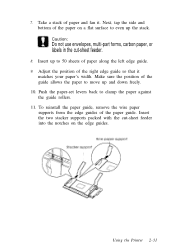
... -sheet feeder into the notches on a flat surface to clamp the paper against the guide rollers. 11. Next, tap the side and bottom of paper and fan it matches your paper's width. Using the Printer 2-31 To reinstall the paper guide, remove the wire paper supports from the edge guides of the...
... -sheet feeder into the notches on a flat surface to clamp the paper against the guide rollers. 11. Next, tap the side and bottom of paper and fan it matches your paper's width. Using the Printer 2-31 To reinstall the paper guide, remove the wire paper supports from the edge guides of the...
User Manual
Page 73
Chapter 3 Troubleshooting Problems and Solutions 3-2 Power Supply 3-2 Power is not being supplied 3-2 Printing 3-3 The printer does not print 3-3 The print is faint or uneven 3-4 Dots are missing in printed characters or graphics . . . . . 3-5 Printed characters are not what you ...cut-sheet feeder, the paper does not feed properly 3-9 Switching between the cut-sheet feeder and the push tractor does not work properly 3-11 Using the pull tractor with the push tractor, continuous paper does not feed properly 3-11 With the color upgrade installed, the printer does not operate properly...
Chapter 3 Troubleshooting Problems and Solutions 3-2 Power Supply 3-2 Power is not being supplied 3-2 Printing 3-3 The printer does not print 3-3 The print is faint or uneven 3-4 Dots are missing in printed characters or graphics . . . . . 3-5 Printed characters are not what you ...cut-sheet feeder, the paper does not feed properly 3-9 Switching between the cut-sheet feeder and the push tractor does not work properly 3-11 Using the pull tractor with the push tractor, continuous paper does not feed properly 3-11 With the color upgrade installed, the printer does not operate properly...

User Manual
Page 83
.... Make sure that the paper guide is crooked or the paper jams. The pull tractor and push tractor sprockets are positioned evenly. Troubleshooting 3-11 Remove slack lengthwise by rotating the knob of the sprockets to load single sheets. The motor in the proper position. With the color upgrade ...installed, the printer does not operate properly The lights on the control panel do not go on page 2-35. When using both are not aligned correctly. The...
.... Make sure that the paper guide is crooked or the paper jams. The pull tractor and push tractor sprockets are positioned evenly. Troubleshooting 3-11 Remove slack lengthwise by rotating the knob of the sprockets to load single sheets. The motor in the proper position. With the color upgrade ...installed, the printer does not operate properly The lights on the control panel do not go on page 2-35. When using both are not aligned correctly. The...

User Manual
Page 85
Appendix Printer Specifications A-2 Printing A-2 Paper A-4 Mechanical A-6 Electrical A-7 Environmental A-7 Safety approvals A-8 Interface Specifications A-8 Parallel interface A-8 Serial interface A-8 Command Summary A-10 Sending printer commands A-10 Using the command summary A-10 General operation A-11 Paper feeding A-11 Page format A-11 Print position motion A-12 Font selection A-13 Font enhancement A-14 Spacing A-15 Character handling A-16 Bit image A-18 Graphics A-19 Color printing A-19 Character Tables A-20 Appendix A-1
Appendix Printer Specifications A-2 Printing A-2 Paper A-4 Mechanical A-6 Electrical A-7 Environmental A-7 Safety approvals A-8 Interface Specifications A-8 Parallel interface A-8 Serial interface A-8 Command Summary A-10 Sending printer commands A-10 Using the command summary A-10 General operation A-11 Paper feeding A-11 Page format A-11 Print position motion A-12 Font selection A-13 Font enhancement A-14 Spacing A-15 Character handling A-16 Bit image A-18 Graphics A-19 Color printing A-19 Character Tables A-20 Appendix A-1

