
Product Information Guide
Page 2
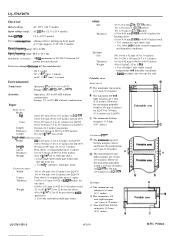
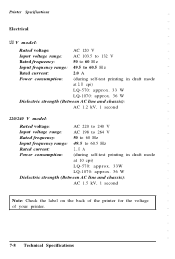
LQ-570/1070 Electrical Rated voltage: Input voltage range: AC 120 V (120 V model) AC lcr3.5 to 132 V (120 V model) Rated cuwen t: 2.0 A (120 V model) Power cunsrrnption: (during self-test printing in draft mode, at 10 cpi) Approx. 33 W (120 V model) Ratedfrequency range: 50 to 60 Hz Inputfrequency range: ..., the maximum printable width is 203 mm (8 inches) for LQ570 or 345 mm (13.6 inches) for LQ1070. Printable area LQ-570/1070-2 8/20/91 24-Pin Printers The minimum left and right margins are 9 mm (0.35 inches). C T h e minimum bottom margin is 203 mm (8 inches) for...
LQ-570/1070 Electrical Rated voltage: Input voltage range: AC 120 V (120 V model) AC lcr3.5 to 132 V (120 V model) Rated cuwen t: 2.0 A (120 V model) Power cunsrrnption: (during self-test printing in draft mode, at 10 cpi) Approx. 33 W (120 V model) Ratedfrequency range: 50 to 60 Hz Inputfrequency range: ..., the maximum printable width is 203 mm (8 inches) for LQ570 or 345 mm (13.6 inches) for LQ1070. Printable area LQ-570/1070-2 8/20/91 24-Pin Printers The minimum left and right margins are 9 mm (0.35 inches). C T h e minimum bottom margin is 203 mm (8 inches) for...
Product Information Guide
Page 3
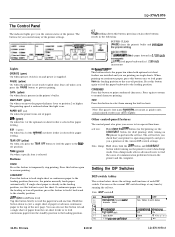
...See Tables 3 and 4 below shows the settings and functions of communication problems between the printer and the computer. PAUSE (yellow) On when the printer is on 24-Pin Printers 8/20/91 LQ-570/1070-3 PAPER OUT (red) On when the printer runs out of the current DIP-switch settings. BIN 2 (green) On when bin 2... can see the current DIP-switch settings at any time by running the self test. Data dump: Hold down the LF/FF button (for LQ printing) or the LOAD/EJECT button (for draft printing) while turning on the printer to select from the cut -sheet feeder is present in l/ 180~inch...
...See Tables 3 and 4 below shows the settings and functions of communication problems between the printer and the computer. PAUSE (yellow) On when the printer is on 24-Pin Printers 8/20/91 LQ-570/1070-3 PAPER OUT (red) On when the printer runs out of the current DIP-switch settings. BIN 2 (green) On when bin 2... can see the current DIP-switch settings at any time by running the self test. Data dump: Hold down the LF/FF button (for LQ printing) or the LOAD/EJECT button (for draft printing) while turning on the printer to select from the cut -sheet feeder is present in l/ 180~inch...
User Manual
Page 14
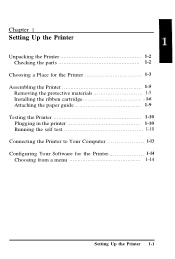
Chapter 1 Setting Up the Printer Unpacking the Printer 1-2 Checking the parts 1-2 Choosing a Place for the Printer 1-3 Assembling the Printer 1-5 Removing the protective materials 1-5 Installing the ribbon cartridge 1-6 Attaching the paper guide 1-9 Testing the Printer 1-10 Plugging in the printer 1-10 Running the self test 1-10 Connecting the Printer to Your Computer 1-13 Configuring Your Software for the Printer 1-14 Choosing from a menu 1-14 Setting Up the Printer 1-1
Chapter 1 Setting Up the Printer Unpacking the Printer 1-2 Checking the parts 1-2 Choosing a Place for the Printer 1-3 Assembling the Printer 1-5 Removing the protective materials 1-5 Installing the ribbon cartridge 1-6 Attaching the paper guide 1-9 Testing the Printer 1-10 Plugging in the printer 1-10 Running the self test 1-10 Connecting the Printer to Your Computer 1-13 Configuring Your Software for the Printer 1-14 Choosing from a menu 1-14 Setting Up the Printer 1-1
User Manual
Page 23
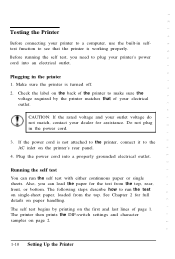
... See Chapter 2 for assistance. Plugging in the power cord. 3. The printer then prints the DIP-switch settings and character samples on paper handling. Running the self test You can load the paper for the test from the top. Also, you need to the AC inlet on the ...and last lines of your electrical outlet. Plug the power cord into an electrical outlet. The self test begins by the printer matches that the printer is turned off. 2. Testing the Printer Before connecting your printer to a computer, use the built-in selftest function to see that of page 1. Before ...
... See Chapter 2 for assistance. Plugging in the power cord. 3. The printer then prints the DIP-switch settings and character samples on paper handling. Running the self test You can load the paper for the test from the top. Also, you need to the AC inlet on the ...and last lines of your electrical outlet. Plug the power cord into an electrical outlet. The self test begins by the printer matches that the printer is turned off. 2. Testing the Printer Before connecting your printer to a computer, use the built-in selftest function to see that of page 1. Before ...
User Manual
Page 24
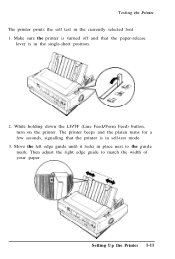
The printer beeps and the platen turns for a few seconds, signalling that the paper-release lever is in the single-sheet position. 2. Move the left edge guide until it locks in the currently selected font. 1. Setting Up the Printer 1-11 While holding down the LF/FF (Line Feed/Form Feed) button, turn on the printer. Make sure the printer is turned off and that the printer is in self-test mode. 3. Then adjust the right edge guide to the guide mark. Testing the Printer The printer prints the self test in place next to match the width of your paper.
The printer beeps and the platen turns for a few seconds, signalling that the paper-release lever is in the single-sheet position. 2. Move the left edge guide until it locks in the currently selected font. 1. Setting Up the Printer 1-11 While holding down the LF/FF (Line Feed/Form Feed) button, turn on the printer. Make sure the printer is turned off and that the printer is in self-test mode. 3. Then adjust the right edge guide to the guide mark. Testing the Printer The printer prints the self test in place next to match the width of your paper.
User Manual
Page 25
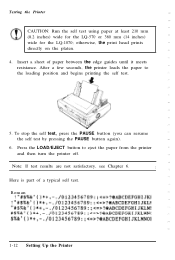
... pressing the PAUSE button again). 6. Roman 1-12 Setting Up the Printer Insert a sheet of a typical self test. Press the LOAD/EJECT button to the loading position and begins printing the self test. 5. Testing the Printer CAUTION: Run the self test using paper at least 210 mm (8.2 inches) wide for the LQ-570 or 360 mm (14 inches) wide for the LQ-1070;
... pressing the PAUSE button again). 6. Roman 1-12 Setting Up the Printer Insert a sheet of a typical self test. Press the LOAD/EJECT button to the loading position and begins printing the self test. 5. Testing the Printer CAUTION: Run the self test using paper at least 210 mm (8.2 inches) wide for the LQ-570 or 360 mm (14 inches) wide for the LQ-1070;
User Manual
Page 26
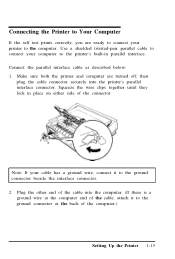
... other end of the computer.) Setting Up the Printer 1-13 Make sure both the printer and computer are ready to connect your cable has a ground wire, connect it to the computer. Connecting the Printer to Your Computer If the self test prints correctly, you are turned off; Note: If... your printer to the ground connector at the back of the cable into the printer's parallel interface connector. Squeeze the wire clips together until ...
... other end of the computer.) Setting Up the Printer 1-13 Make sure both the printer and computer are ready to connect your cable has a ground wire, connect it to the computer. Connecting the Printer to Your Computer If the self test prints correctly, you are turned off; Note: If... your printer to the ground connector at the back of the cable into the printer's parallel interface connector. Squeeze the wire clips together until ...
User Manual
Page 58
...button (for LQ printing) or the LOAD/EJECT button (for more fully explained at the end of communication problems between the printer and the computer. Data dump mode allows advanced users to enter data dump mode. The self test lets you check that your printer is more information. Self test: Hold ...down the LF/FF and LOAD/EJECT buttons while turning on the printer to the two special functions below. The data dump mode is operating...
...button (for LQ printing) or the LOAD/EJECT button (for more fully explained at the end of communication problems between the printer and the computer. Data dump mode allows advanced users to enter data dump mode. The self test lets you check that your printer is more information. Self test: Hold ...down the LF/FF and LOAD/EJECT buttons while turning on the printer to the two special functions below. The data dump mode is operating...
User Manual
Page 60
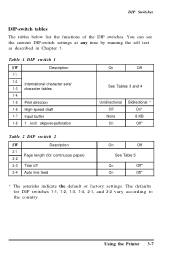
... continuous paper) 2-2 2-3 Tear off 2-4 Auto line feed On Off See Table 5 On Off* On Off* * The asterisks indicate the default or factory settings. Using the Printer 3-7 Table 1 DIP switch 1 SW Description 1-1 1-2 International character sets/ 1-3 character tables 1-4 1-5 Print direction 1-6 High-speed draft 1-7 Input buffer 1-8 1 -inch skipover-perforation On Off See Tables 3 and... tables The tables below list the functions of the DIP switches. You can see the current DIP-switch settings at any time by running the self test as described in Chapter 1.
... continuous paper) 2-2 2-3 Tear off 2-4 Auto line feed On Off See Table 5 On Off* On Off* * The asterisks indicate the default or factory settings. Using the Printer 3-7 Table 1 DIP switch 1 SW Description 1-1 1-2 International character sets/ 1-3 character tables 1-4 1-5 Print direction 1-6 High-speed draft 1-7 Input buffer 1-8 1 -inch skipover-perforation On Off See Tables 3 and... tables The tables below list the functions of the DIP switches. You can see the current DIP-switch settings at any time by running the self test as described in Chapter 1.
User Manual
Page 104
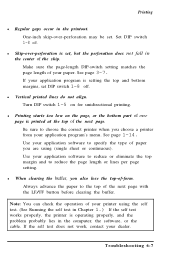
...Printing starts too low on for unidirectional printing. Be sure to the top of paper you are using the self test. (See Running the self test in Chapter 1.) If the self test works properly, the printer is set, but the perforation does not fall in the center of the next page. Printing l Regular... your application program's menu. See page 1-14. Always advance the paper to choose the correct printer when you also lose the top-of your dealer. If the self test does not work, contact your paper. Troubleshooting 6-7 Set DIP switch 1-8 off . Note: You can check the operation...
...Printing starts too low on for unidirectional printing. Be sure to the top of paper you are using the self test. (See Running the self test in Chapter 1.) If the self test works properly, the printer is set, but the perforation does not fall in the center of the next page. Printing l Regular... your application program's menu. See page 1-14. Always advance the paper to choose the correct printer when you also lose the top-of your dealer. If the self test does not work, contact your paper. Troubleshooting 6-7 Set DIP switch 1-8 off . Note: You can check the operation...
User Manual
Page 117
... 60 Hz Input frequency range: 49.5 to 60.5 Hz Rated current: 1.0 A Power consumption: (during self-test printing in draft mode at 10 cpi) LQ-570: approx. 33W LQ-1070: approx. 36 W Dielectric strength (Between AC line and chassis): AC 1.5 kV, 1 second Note: Check the label on the back of the printer for the voltage of your...
... 60 Hz Input frequency range: 49.5 to 60.5 Hz Rated current: 1.0 A Power consumption: (during self-test printing in draft mode at 10 cpi) LQ-570: approx. 33W LQ-1070: approx. 36 W Dielectric strength (Between AC line and chassis): AC 1.5 kV, 1 second Note: Check the label on the back of the printer for the voltage of your...
User Manual
Page 148
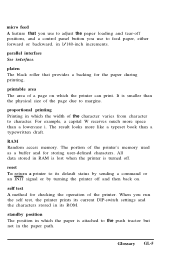
... the character varies from character to adjust the paper loading and tear-off positions, and a control panel button you run the self test, the printer prints its current DIP-switch settings and the characters stored in its default status by sending a command or an INIT signal or... by turning the printer off . For example, a capital W receives much more like a typeset book than a lowercase i. Glossary GL-5 RAM Random access memory. self test A method for storing user-defined characters. standby position The position in which the...
... the character varies from character to adjust the paper loading and tear-off positions, and a control panel button you run the self test, the printer prints its current DIP-switch settings and the characters stored in its default status by sending a command or an INIT signal or... by turning the printer off . For example, a capital W receives much more like a typeset book than a lowercase i. Glossary GL-5 RAM Random access memory. self test A method for storing user-defined characters. standby position The position in which the...

User Manual
Page 152
..., 2-12 R Ribbon cartridge fabric, 1-2, 5-3, 7-7 film, 2, 5-3, 7-7 installing, 1-6 specifications, 7-7 S Safety instructions, v Scalable fonts, 3-19 Self test, 1-10 Single sheets, 2-4-8 Skip-over-perforation, 3-7, 3-11 Special paper, 2-23 Specifications, 7-1 Tractor, 2-9 installing, 2-9-11 position, 2-9 Transporting the printer, 5-4 Troubleshooting, 6-1-12 Typestyles, 3-19 U Unidirectional printing, 3-7, 3-10 Unpacking the printer, 1-2 V Voltage, 1-10 power supply, 1-10 w Weight, 7-6-7, 7-14 T TEAR OFF button, 3-4 light, 3-3 Tear...
..., 2-12 R Ribbon cartridge fabric, 1-2, 5-3, 7-7 film, 2, 5-3, 7-7 installing, 1-6 specifications, 7-7 S Safety instructions, v Scalable fonts, 3-19 Self test, 1-10 Single sheets, 2-4-8 Skip-over-perforation, 3-7, 3-11 Special paper, 2-23 Specifications, 7-1 Tractor, 2-9 installing, 2-9-11 position, 2-9 Transporting the printer, 5-4 Troubleshooting, 6-1-12 Typestyles, 3-19 U Unidirectional printing, 3-7, 3-10 Unpacking the printer, 1-2 V Voltage, 1-10 power supply, 1-10 w Weight, 7-6-7, 7-14 T TEAR OFF button, 3-4 light, 3-3 Tear...


