
Users Guide
Page 3
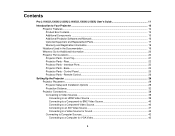
... Go for VGA Video 43 3 Base...24 Projector Parts - Front/Top ...21 Projector Parts - Interface Ports ...23 Projector Parts - Control Panel ...25 Projector Parts - Contents Pro L1100U/L1200U/L1300U/L1405U/L1500U/L1505U User's Guide 11 Introduction to Your Projector ...12 Projector Features...12 Product Box Contents...13 Additional Components ...15 Additional...
... Go for VGA Video 43 3 Base...24 Projector Parts - Front/Top ...21 Projector Parts - Interface Ports ...23 Projector Parts - Control Panel ...25 Projector Parts - Contents Pro L1100U/L1200U/L1300U/L1405U/L1500U/L1505U User's Guide 11 Introduction to Your Projector ...12 Projector Features...12 Product Box Contents...13 Additional Components ...15 Additional...
Users Guide
Page 11
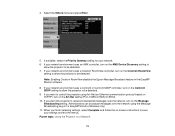
For a printable PDF copy of this guide, click here. 11 Pro L1100U/L1200U/L1300U/L1405U/L1500U/L1505U User's Guide Welcome to the Pro L1100U/L1200U/L1300U/L1405U/L1500U/L1505U User's Guide.
For a printable PDF copy of this guide, click here. 11 Pro L1100U/L1200U/L1300U/L1405U/L1500U/L1505U User's Guide Welcome to the Pro L1100U/L1200U/L1300U/L1405U/L1500U/L1505U User's Guide.
Users Guide
Page 12
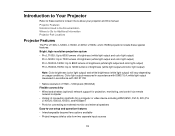
...L1505U: Up to 12000 lumens of connection methods for a computer or video device including HDMI, BNC, DVI-D, SDI (Pro L1405U/L1500U/L1505U), and HDBaseT • Ports for connecting an external monitor and external speakers Easy-to learn more ... × 1200 pixels (WUXGA) Flexible connectivity • Wired and wireless (optional) network support for Additional Information Projector Part Locations Projector Features The Pro L1100U, L1200U, L1300U, L1405U, L1500U, and L1505U projectors include these sections to -use setup and operation features • Interchangeable bayonet lens options ...
...L1505U: Up to 12000 lumens of connection methods for a computer or video device including HDMI, BNC, DVI-D, SDI (Pro L1405U/L1500U/L1505U), and HDBaseT • Ports for connecting an external monitor and external speakers Easy-to learn more ... × 1200 pixels (WUXGA) Flexible connectivity • Wired and wireless (optional) network support for Additional Information Projector Part Locations Projector Features The Pro L1100U, L1200U, L1300U, L1405U, L1500U, and L1505U projectors include these sections to -use setup and operation features • Interchangeable bayonet lens options ...
Users Guide
Page 14
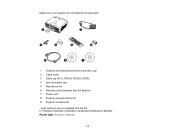
Make sure your projector box included all of these parts: 1 Projector with standard zoom lens and lens cap* 2 Cable cover 3 Cable clip (Pro L1405U/L1500U/L1505U) 4 Lens connector cap 5 Remote control 6 Remote control batteries (two AA alkaline) 7 Power cord 8 Projector documentation CD 9 Projector software CD * Lens and lens cap not included with the Pro L1100UNL/L1200UNL/L1300UNL/L1405UNL/L1500UNL/L1505UNL Parent topic: Projector Features 14
Make sure your projector box included all of these parts: 1 Projector with standard zoom lens and lens cap* 2 Cable cover 3 Cable clip (Pro L1405U/L1500U/L1505U) 4 Lens connector cap 5 Remote control 6 Remote control batteries (two AA alkaline) 7 Power cord 8 Projector documentation CD 9 Projector software CD * Lens and lens cap not included with the Pro L1100UNL/L1200UNL/L1300UNL/L1405UNL/L1500UNL/L1505UNL Parent topic: Projector Features 14

Users Guide
Page 16
...help fast. If you want to Get Help". 16 DVI-D Compatible DVI-D cable HDBaseT Compatible 100Base-TX LAN cable SDI (Pro Compatible BNC video cable L1405U/L1500U/L1505U) Parent topic: Projector Features Related concepts Projector Connections Additional Projector Software and Manuals After... connecting and setting up the projector, install the projector software from Epson or an authorized Epson reseller. For details, see "Where to connect the projector using them. Note: If you can install the projector...
...help fast. If you want to Get Help". 16 DVI-D Compatible DVI-D cable HDBaseT Compatible 100Base-TX LAN cable SDI (Pro Compatible BNC video cable L1405U/L1500U/L1505U) Parent topic: Projector Features Related concepts Projector Connections Additional Projector Software and Manuals After... connecting and setting up the projector, install the projector software from Epson or an authorized Epson reseller. For details, see "Where to connect the projector using them. Note: If you can install the projector...
Users Guide
Page 19
...details, see the warranty that lets you project with your projector. • Tips contain additional projection information. In addition, Epson offers free Extra Care Road Service. Register your documentation: • Warnings must be repaired. Registering also lets you a ...Option or part Middle throw zoom lens #4 (ELPLM11) Long throw zoom lens (ELPLL08) Part number V12H004M0B V12H004L08 1 Standard zoom lens for Pro L1100U/L1200U/L1300U/L1405U. 2 Standard zoom lens for details. Parent topic: Projector Features Notations Used in the Documentation Follow the guidelines in...
...details, see the warranty that lets you project with your projector. • Tips contain additional projection information. In addition, Epson offers free Extra Care Road Service. Register your documentation: • Warnings must be repaired. Registering also lets you a ...Option or part Middle throw zoom lens #4 (ELPLM11) Long throw zoom lens (ELPLL08) Part number V12H004M0B V12H004L08 1 Standard zoom lens for Pro L1100U/L1200U/L1300U/L1405U. 2 Standard zoom lens for details. Parent topic: Projector Features Notations Used in the Documentation Follow the guidelines in...

Users Guide
Page 21
Projector Parts - Front/Top 1 Remote receiver 2 Air intake vents 3 Projection lens 4 Built-in camera 5 Projector status lights 6 Air filter cover/intake vent 7 Speaker (Pro L1100U/L1200U/L1300U) 8 Air filter cover latch 9 Wireless LAN module indicator light 10 Cable cover 11 Lens replacement cover 21
Projector Parts - Front/Top 1 Remote receiver 2 Air intake vents 3 Projection lens 4 Built-in camera 5 Projector status lights 6 Air filter cover/intake vent 7 Speaker (Pro L1100U/L1200U/L1300U) 8 Air filter cover latch 9 Wireless LAN module indicator light 10 Cable cover 11 Lens replacement cover 21
Users Guide
Page 33
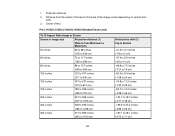
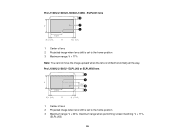
1 Projection distance 2 Distance from the center of the lens to the base of the image (varies depending on vertical lens shift) 3 Center of lens Pro L1100U/L1200U/L1300U/L1405U (Standard Zoom Lens) 16:10 Aspect Ratio Image or Screen Screen or image size Projection distance (1) Wide to Tele (Minimum to ...
1 Projection distance 2 Distance from the center of the lens to the base of the image (varies depending on vertical lens shift) 3 Center of lens Pro L1100U/L1200U/L1300U/L1405U (Standard Zoom Lens) 16:10 Aspect Ratio Image or Screen Screen or image size Projection distance (1) Wide to Tele (Minimum to ...

Users Guide
Page 36
Pro L1500U/L1505U (Standard Zoom Lens) 16:10 Aspect Ratio Image or Screen Screen or image size Projection distance (1) Wide to Tele (Minimum to Maximum) 60 ...
Pro L1500U/L1505U (Standard Zoom Lens) 16:10 Aspect Ratio Image or Screen Screen or image size Projection distance (1) Wide to Tele (Minimum to Maximum) 60 ...
Users Guide
Page 41
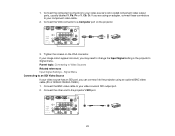
.... 2. Connect the VGA connector to an SDI Video Source If your video source has an SDI port, you are using an optional BNC video cable (Pro L1405U/L1500U/L1505U). 1. Signal Menu Connecting to a Computer port on the VGA connector.
.... 2. Connect the VGA connector to an SDI Video Source If your video source has an SDI port, you are using an optional BNC video cable (Pro L1405U/L1500U/L1505U). 1. Signal Menu Connecting to a Computer port on the VGA connector.

Users Guide
Page 42
... instructions in these sections to connect a computer to your video source has audio output ports (Pro L1100U/L1200U/L1300U). Note: If your projector does not have an internal speaker system (Pro L1405U/L1500U/L1505U), you can play sound by connecting external speakers to the projector. Note: ...If you connected your video source to the projector using for sound. If you connected your video source to the projector's SDI port (Pro L1405U/L1500U/L1505U), audio output is transferred with the video signal; Connect the audio cable to the projector. Parent topic: Connecting to Video...
... instructions in these sections to connect a computer to your video source has audio output ports (Pro L1100U/L1200U/L1300U). Note: If your projector does not have an internal speaker system (Pro L1405U/L1500U/L1505U), you can play sound by connecting external speakers to the projector. Note: ...If you connected your video source to the projector using for sound. If you connected your video source to the projector's SDI port (Pro L1405U/L1500U/L1505U), audio output is transferred with the video signal; Connect the audio cable to the projector. Parent topic: Connecting to Video...

Users Guide
Page 45
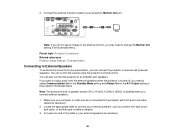
... a Computer for 5 BNC Video You can connect the projector to your projector does not have an internal speaker system (Pro L1405U/L1500U/L1505U), you can play sound through the projector's speaker system (Pro L1100U/L1200U/L1300U). Connect the 5 BNC connectors to the projector's BNC ports. Just connect an optional 3.5 mm stereo mini...
... a Computer for 5 BNC Video You can connect the projector to your projector does not have an internal speaker system (Pro L1405U/L1500U/L1505U), you can play sound through the projector's speaker system (Pro L1100U/L1200U/L1300U). Connect the 5 BNC connectors to the projector's BNC ports. Just connect an optional 3.5 mm stereo mini...
Users Guide
Page 48
.... 48 Note: If you do not see an image on the external monitor, you may need to change the Monitor Out setting in speaker system (Pro L1100U/L11200U/L1300U) is turned off, you connect external speakers. 1. Extended Menu Connecting to external self-powered speakers. You can connect the projector to External...
.... 48 Note: If you do not see an image on the external monitor, you may need to change the Monitor Out setting in speaker system (Pro L1100U/L11200U/L1300U) is turned off, you connect external speakers. 1. Extended Menu Connecting to external self-powered speakers. You can connect the projector to External...

Users Guide
Page 54
Parent topic: Setting Up the Projector Attaching and Removing the Cable Clip You can install the cable clip that came with your projector to provide additional support to the projector. 2. Connect the power cable to the power cable (Pro L1405U/L1500U/L1505U). 1. 3. Tighten both screws and pull the cover off of the cable clip anchor into the cable clip slot near the power inlet. 54 Insert the end of the projector. To remove the cover, loosen both cable cover screws.
Parent topic: Setting Up the Projector Attaching and Removing the Cable Clip You can install the cable clip that came with your projector to provide additional support to the projector. 2. Connect the power cable to the power cable (Pro L1405U/L1500U/L1505U). 1. 3. Tighten both screws and pull the cover off of the cable clip anchor into the cable clip slot near the power inlet. 54 Insert the end of the projector. To remove the cover, loosen both cable cover screws.
Users Guide
Page 73
... follow the on-screen instructions to save your network environment uses a Control4 or Control4 SDDP controller, turn on the Art-Net setting (Pro L1405U/L1500U/L1505U). 10. If your network environment uses an AMX controller, turn on the Crestron RoomView setting to allow the projector to... based on TCP/IP), turn on the Control4 SDDP setting to allow the projector to be detected. Note: Enabling Crestron RoomView disables the Epson Message Broadcast feature in for your network. 6. If you want to be detected. 9. If available, select the Priority Gateway setting for EasyMP...
... follow the on-screen instructions to save your network environment uses a Control4 or Control4 SDDP controller, turn on the Art-Net setting (Pro L1405U/L1500U/L1505U). 10. If your network environment uses an AMX controller, turn on the Crestron RoomView setting to allow the projector to... based on TCP/IP), turn on the Control4 SDDP setting to allow the projector to be detected. Note: Enabling Crestron RoomView disables the Epson Message Broadcast feature in for your network. 6. If you want to be detected. 9. If available, select the Priority Gateway setting for EasyMP...

Users Guide
Page 95
Pro L1100U/L1200U/L1300U/L1405U - ELPLU03, ELPLU04, ELPLW05, ELPLW06, ELPLM08, ELPLM09, ELPLM10, ELPLM11, or ELPLL08 lens 1 Center of the projected image as necessary. maximum range when ...
Pro L1100U/L1200U/L1300U/L1405U - ELPLU03, ELPLU04, ELPLW05, ELPLW06, ELPLM08, ELPLM09, ELPLM10, ELPLM11, or ELPLL08 lens 1 Center of the projected image as necessary. maximum range when ...
Users Guide
Page 96
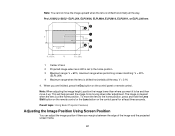
ELPLX01 lens 1 Center of lens 2 Projected image when lens shift is set to the home position 3 Maximum range: V × 17% Note: You cannot move the image upward when the lens is set to the home position 3 Maximum range: V × 24%; ELPLU03 or ELPLW05 lens 1 Center of lens 2 Projected image when lens shift is shifted horizontally all the way. maximum range when performing screen matching: V × 11% (ELPLU03) 96 Pro L1500U/L1505U - Pro L1100U/L1200U/L1300U/L1405U -
ELPLX01 lens 1 Center of lens 2 Projected image when lens shift is set to the home position 3 Maximum range: V × 17% Note: You cannot move the image upward when the lens is set to the home position 3 Maximum range: V × 24%; ELPLU03 or ELPLW05 lens 1 Center of lens 2 Projected image when lens shift is shifted horizontally all the way. maximum range when performing screen matching: V × 11% (ELPLU03) 96 Pro L1500U/L1505U - Pro L1100U/L1200U/L1300U/L1405U -
Users Guide
Page 97
... Screen Position You can adjust the image position if there are finished, press the Esc button on the control panel for at the home position. Pro L1500U/L1505U - The image is clearest when the lens is set to the home position 3 Maximum range: V × 60%; Note: When adjusting the image height...
... Screen Position You can adjust the image position if there are finished, press the Esc button on the control panel for at the home position. Pro L1500U/L1505U - The image is clearest when the lens is set to the home position 3 Maximum range: V × 60%; Note: When adjusting the image height...
Users Guide
Page 119
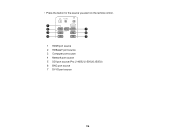
• Press the button for the source you want on the remote control. 1 HDMI port source 2 HDBaseT port source 3 Computer port source 4 Network port source 5 SDI port source (Pro L1405U/L1500U/L1505U) 6 BNC port source 7 DVI-D port source 119
• Press the button for the source you want on the remote control. 1 HDMI port source 2 HDBaseT port source 3 Computer port source 4 Network port source 5 SDI port source (Pro L1405U/L1500U/L1505U) 6 BNC port source 7 DVI-D port source 119
Users Guide
Page 133
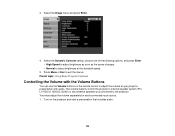
... adjust the volume as the scene changes. • Normal to adjust brightness at the standard speed. 5. The volume buttons control the projector's internal speaker system (Pro L1100U/L11200U/L1300U) or any external speakers you project a presentation with audio. Select the Dynamic Contrast setting, choose one of the following options, and press...
... adjust the volume as the scene changes. • Normal to adjust brightness at the standard speed. 5. The volume buttons control the projector's internal speaker system (Pro L1100U/L11200U/L1300U) or any external speakers you project a presentation with audio. Select the Dynamic Contrast setting, choose one of the following options, and press...


