Users Guide
Page 1
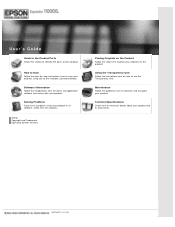
... to scan your product. step instructions here to maintain and transport your originals using your product. Using the Transparency Unit Follow the instructions here on the Product Follow the steps here to use the Transparency Unit. Safety Copyright and Trademarks Operating System Versions Placing Originals on how to place your product and its software...
... to scan your product. step instructions here to maintain and transport your originals using your product. Using the Transparency Unit Follow the instructions here on the Product Follow the steps here to use the Transparency Unit. Safety Copyright and Trademarks Operating System Versions Placing Originals on how to place your product and its software...
Users Guide
Page 5
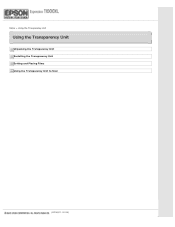
Home > Using the Transparency Unit Using the Transparency Unit Unpacking the Transparency Unit Installing the Transparency Unit Setting and Placing Films Using the Transparency Unit to Scan (NPD4827 - 00 EN)
Home > Using the Transparency Unit Using the Transparency Unit Unpacking the Transparency Unit Installing the Transparency Unit Setting and Placing Films Using the Transparency Unit to Scan (NPD4827 - 00 EN)

Users Guide
Page 14
... guidelines here to Scan Follow the step- How to maintain and transport your originals on the Product Follow the steps here to use the Transparency Unit. Using the Transparency Unit Follow the instructions here on how to place your product. Safety Copyright and Trademarks Operating System Versions Placing Originals on the product. Technical Specifications...
... guidelines here to Scan Follow the step- How to maintain and transport your originals on the Product Follow the steps here to use the Transparency Unit. Using the Transparency Unit Follow the instructions here on how to place your product. Safety Copyright and Trademarks Operating System Versions Placing Originals on the product. Technical Specifications...

Users Guide
Page 18
... Status Light The product is operating normally. An error has occurred. If you cannot scan images, an error may have occurred. Make sure the optional Transparency Unit is completely closed.
... Status Light The product is operating normally. An error has occurred. If you cannot scan images, an error may have occurred. Make sure the optional Transparency Unit is completely closed.

Users Guide
Page 35
... glass side faces up. film holders Unlocking the transportation lock Before you install the Transparency Unit, you want to unlock the transportation lock. Turn the unit so that all the items shown below are included and have not been damaged during...documents. Once you install the Transparency Unit, you can leave it in full color. transparency guide c. Home > Using the Transparency Unit Unpacking the Transparency Unit Unlocking the transportation lock The optional A3 Transparency Unit (B12B813362) makes it counterclockwise one-quarter. Contact Epson Technical Support if any item...
... glass side faces up. film holders Unlocking the transportation lock Before you install the Transparency Unit, you want to unlock the transportation lock. Turn the unit so that all the items shown below are included and have not been damaged during...documents. Once you install the Transparency Unit, you can leave it in full color. transparency guide c. Home > Using the Transparency Unit Unpacking the Transparency Unit Unlocking the transportation lock The optional A3 Transparency Unit (B12B813362) makes it counterclockwise one-quarter. Contact Epson Technical Support if any item...
Users Guide
Page 36
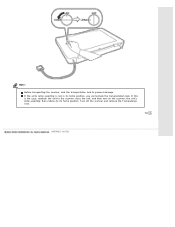
Note: Before transporting the scanner, lock the transportation lock to its home position, you cannot lock the transportation lock. Turn off the scanner and remove the Transparency Unit. Top (NPD4827 - 00 EN) If the unit's lamp assembly is the case, reattach the unit to the scanner, close the unit, and then turn on the scanner; If this is not in its home position. the unit's lamp assembly then returns to prevent damage.
Note: Before transporting the scanner, lock the transportation lock to its home position, you cannot lock the transportation lock. Turn off the scanner and remove the Transparency Unit. Top (NPD4827 - 00 EN) If the unit's lamp assembly is the case, reattach the unit to the scanner, close the unit, and then turn on the scanner; If this is not in its home position. the unit's lamp assembly then returns to prevent damage.
Users Guide
Page 37
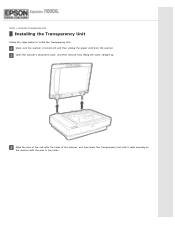
Make sure the scanner is turned off, and then unplug the power cord from the scanner. Align the pins of the unit with the pins in the holes. Open the scanner's document cover, and then remove it rests securely on the scanner with the holes of the scanner, and then lower the Transparency Unit until it by lifting the cover straight up. Home > Using the Transparency Unit Installing the Transparency Unit Follow the steps below to install the Transparency Unit.
Make sure the scanner is turned off, and then unplug the power cord from the scanner. Align the pins of the unit with the pins in the holes. Open the scanner's document cover, and then remove it rests securely on the scanner with the holes of the scanner, and then lower the Transparency Unit until it by lifting the cover straight up. Home > Using the Transparency Unit Installing the Transparency Unit Follow the steps below to install the Transparency Unit.

Users Guide
Page 38
Remove the reflective document mat from the Transparency Unit as shown below . Place the transparency guide on the scanner glass as shown below .
Remove the reflective document mat from the Transparency Unit as shown below . Place the transparency guide on the scanner glass as shown below .
Users Guide
Page 39
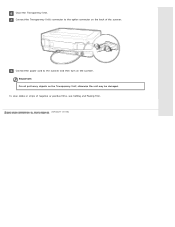
Connect the Transparency Unit's connector to the scanner and then turn on the scanner. otherwise the unit may be damaged. To scan slides or strips of the scanner. Important: Do not put heavy objects on the back of negative or positive films, see Setting and Placing Film. (NPD4827 - 00 EN) Close the Transparency Unit. Connect the power cord to the option connector on the Transparency Unit;
Connect the Transparency Unit's connector to the scanner and then turn on the scanner. otherwise the unit may be damaged. To scan slides or strips of the scanner. Important: Do not put heavy objects on the back of negative or positive films, see Setting and Placing Film. (NPD4827 - 00 EN) Close the Transparency Unit. Connect the power cord to the option connector on the Transparency Unit;
Users Guide
Page 40
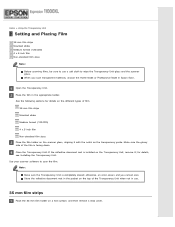
...following sections for details, see Installing the Transparency Unit. Make sure the glossy side of the film is completely closed; Close the Transparency Unit. otherwise, an error occurs and you scan transparent materials, choose the Home Mode or Professional Mode in Epson Scan. for details on the different types... of film. 35 mm film strips Mounted slides Medium format (120/220) 4 x 5 inch film Non-standard film sizes Place the film holder on the transparency guide. Note: Make sure the Transparency Unit is facing down...
...following sections for details, see Installing the Transparency Unit. Make sure the glossy side of the film is completely closed; Close the Transparency Unit. otherwise, an error occurs and you scan transparent materials, choose the Home Mode or Professional Mode in Epson Scan. for details on the different types... of film. 35 mm film strips Mounted slides Medium format (120/220) 4 x 5 inch film Non-standard film sizes Place the film holder on the transparency guide. Note: Make sure the Transparency Unit is facing down...

Users Guide
Page 47
Top Non-standard film sizes Place the film directly on the scanner glass, make sure to set the focus position to 0.0 in the Transparency Unit, remove it. When you place the film directly on the scanner glass, making sure the glossy (smooth) side of the scanner glass cannot be scanned. If the reflective document mat is facing down. Note: An area approximately 17.0 mm (0.7 in) from the horizontal edges and 2.0 mm (0.1 in) from the vertical edges of the film is installed in Epson Scan. Close the Transparency Unit. Top (NPD4827 - 00 EN)
Top Non-standard film sizes Place the film directly on the scanner glass, make sure to set the focus position to 0.0 in the Transparency Unit, remove it. When you place the film directly on the scanner glass, making sure the glossy (smooth) side of the scanner glass cannot be scanned. If the reflective document mat is facing down. Note: An area approximately 17.0 mm (0.7 in) from the horizontal edges and 2.0 mm (0.1 in) from the vertical edges of the film is installed in Epson Scan. Close the Transparency Unit. Top (NPD4827 - 00 EN)
Users Guide
Page 48
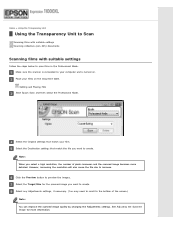
... You can improve the scanned image quality by changing the Adjustments settings. Home > Using the Transparency Unit Using the Transparency Unit to Scan Scanning films with suitable settings Scanning reflective (non-film) documents Scanning films with suitable... settings Follow the steps below to create. Select the Original settings that match the file you want to preview the images. Click the Preview button to create. Setting and Placing Film Start Epson...
... You can improve the scanned image quality by changing the Adjustments settings. Home > Using the Transparency Unit Using the Transparency Unit to Scan Scanning films with suitable settings Scanning reflective (non-film) documents Scanning films with suitable... settings Follow the steps below to create. Select the Original settings that match the file you want to preview the images. Click the Preview button to create. Setting and Placing Film Start Epson...
Users Guide
Page 49
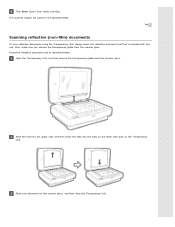
... the Transparency Unit. Place your document on the Transparency Unit. Insert the reflective document mat as described below. Top Scanning reflective (non-film) documents To scan reflective documents using the Transparency Unit, always insert the reflective document mat that is included with this unit. Open the Transparency Unit, and then remove the transparency guide from the scanner glass. Click Scan. Epson...
... the Transparency Unit. Place your document on the Transparency Unit. Insert the reflective document mat as described below. Top Scanning reflective (non-film) documents To scan reflective documents using the Transparency Unit, always insert the reflective document mat that is included with this unit. Open the Transparency Unit, and then remove the transparency guide from the scanner glass. Click Scan. Epson...
Users Guide
Page 58
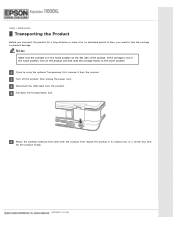
... that came with the product, then repack the product in the home position, turn on the left side of time, you 're using the optional Transparency Unit, remove it from the product. Home > Maintenance Transporting the Product Before you transport the product for a long distance or store it for an extended period...
... that came with the product, then repack the product in the home position, turn on the left side of time, you 're using the optional Transparency Unit, remove it from the product. Home > Maintenance Transporting the Product Before you transport the product for a long distance or store it for an extended period...
Users Guide
Page 59
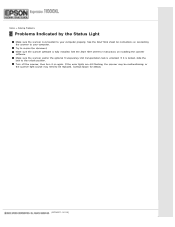
.... If the error lights are still flashing, the scanner may need to rescan the document. Contact Epson for instructions on connecting the scanner to your computer. Make sure the scanner and/or the optional Transparency Unit transportation lock is locked, slide the lock to the unlock position. If it on installing the scanner...
.... If the error lights are still flashing, the scanner may need to rescan the document. Contact Epson for instructions on connecting the scanner to your computer. Make sure the scanner and/or the optional Transparency Unit transportation lock is locked, slide the lock to the unlock position. If it on installing the scanner...
Users Guide
Page 60
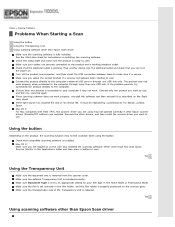
...to the product and a working . Home > Solving Problems Problems When Starting a Scan Using the button Using the Transparency Unit Using scanning software other than Epson Scan driver Make sure the scanning software is working electrical outlet. See the Start Here sheet for your computer it ...to the computer's external USB port or through more than Epson Scan driver Using the button Depending on installing the scanning software. Check that the electrical outlet is fully installed. Top Using the Transparency Unit Make sure the document mat is released. Connect the product ...
...to the product and a working . Home > Solving Problems Problems When Starting a Scan Using the button Using the Transparency Unit Using scanning software other than Epson Scan driver Make sure the scanning software is working electrical outlet. See the Start Here sheet for your computer it ...to the computer's external USB port or through more than Epson Scan driver Using the button Depending on installing the scanning software. Check that the electrical outlet is fully installed. Top Using the Transparency Unit Make sure the document mat is released. Connect the product ...


