

Quick Start
Page 3
...'s Guide. Adjust the image 1 If you don't see your image looks like or , you've placed the projector off projector display and sound Change presentation slides (USB connection only) Access projector menus Choose which source to display Get solutions to common problems Control projector volume Navigate projector menus... You can use the remote control to sharpen the image. 4 EX51/EX71: To reduce or enlarge the image, turn the zoom ring. Place it . You can use the Zoom option in front of the...
...'s Guide. Adjust the image 1 If you don't see your image looks like or , you've placed the projector off projector display and sound Change presentation slides (USB connection only) Access projector menus Choose which source to display Get solutions to common problems Control projector volume Navigate projector menus... You can use the remote control to sharpen the image. 4 EX51/EX71: To reduce or enlarge the image, turn the zoom ring. Place it . You can use the Zoom option in front of the...

User's Guide
Page 5
... 27 Connecting to the USB Port 28 Connecting to the VGA Computer Port 30 Connecting to Video Equipment 31 Connecting an HDMI Video Source (EX51/EX71 only 32 Connecting a Composite Video Source 33 Connecting an S-Video Source 34 Connecting a Component Video Source 35 Connecting an RGB Video Source 36 Playing...
... 27 Connecting to the USB Port 28 Connecting to the VGA Computer Port 30 Connecting to Video Equipment 31 Connecting an HDMI Video Source (EX51/EX71 only 32 Connecting a Composite Video Source 33 Connecting an S-Video Source 34 Connecting a Component Video Source 35 Connecting an RGB Video Source 36 Playing...
User's Guide
Page 6
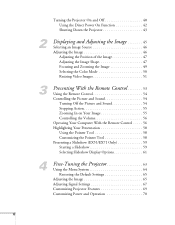
... 50 Resizing Video Images 51 3 Presenting With the Remote Control 53 Using the Remote Control 54 Controlling the Picture and Sound 54 Turning Off the Picture and Sound 54 Stopping Action 55 Zooming In on Your Image 55 Controlling the Volume 56 Operating Your Computer With the Remote Control... . . . . . 56 Highlighting Your Presentation 58 Using the Pointer Tool 58 Customizing the Pointer Tool 58 Presenting a Slideshow (EX51/EX71 Only 59 ...
... 50 Resizing Video Images 51 3 Presenting With the Remote Control 53 Using the Remote Control 54 Controlling the Picture and Sound 54 Turning Off the Picture and Sound 54 Stopping Action 55 Zooming In on Your Image 55 Controlling the Volume 56 Operating Your Computer With the Remote Control... . . . . . 56 Highlighting Your Presentation 58 Using the Pointer Tool 58 Customizing the Pointer Tool 58 Presenting a Slideshow (EX51/EX71 Only 59 ...
User's Guide
Page 7
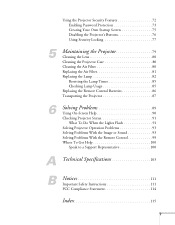
... Help 90 Checking Projector Status 91 What To Do When the Lights Flash 91 Solving Projector Operation Problems 93 Solving Problems With the Image or Sound 93 Solving Problems With the Remote Control 99 Where To Get Help 100 Speak to a Support Representative 100 A Technical Specifications 103 B Notices 111 Important Safety...
... Help 90 Checking Projector Status 91 What To Do When the Lights Flash 91 Solving Projector Operation Problems 93 Solving Problems With the Image or Sound 93 Solving Problems With the Remote Control 99 Where To Get Help 100 Speak to a Support Representative 100 A Technical Specifications 103 B Notices 111 Important Safety...
User's Guide
Page 19
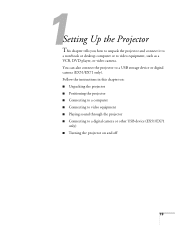
...tells you how to unpack the projector and connect it to a notebook or desktop computer or to a USB storage device or digital camera (EX51/EX71 only). You can also connect the projector to video equipment, such as a VCR, DVD player, or video camera. Follow the instructions in ...this chapter on: ■ Unpacking the projector ■ Positioning the projector ■ Connecting to a computer ■ Connecting to video equipment ■ Playing sound through the projector ■ Connecting to a digital camera or other USB device (EX51/EX71 only) ■ Turning the projector on and off 19
...tells you how to unpack the projector and connect it to a notebook or desktop computer or to a USB storage device or digital camera (EX51/EX71 only). You can also connect the projector to video equipment, such as a VCR, DVD player, or video camera. Follow the instructions in ...this chapter on: ■ Unpacking the projector ■ Positioning the projector ■ Connecting to a computer ■ Connecting to video equipment ■ Playing sound through the projector ■ Connecting to a digital camera or other USB device (EX51/EX71 only) ■ Turning the projector on and off 19
User's Guide
Page 27
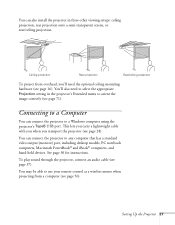
To play sound through the projector, connect an audio cable (see page 56). You'll also need the optional ceiling mounting hardware (see page 16). This lets you ...
To play sound through the projector, connect an audio cable (see page 56). You'll also need the optional ceiling mounting hardware (see page 16). This lets you ...
User's Guide
Page 29
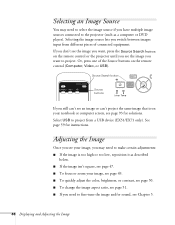
..., you see these instructions only the first time you 've finished making connections, see page 37). If you want to install the Epson USB Display software. You can install it manually. Messages appear on the screen to play sound through the projector (see Chapter 2 for instructions on displaying and adjusting the image. 5.
..., you see these instructions only the first time you 've finished making connections, see page 37). If you want to install the Epson USB Display software. You can install it manually. Messages appear on the screen to play sound through the projector (see Chapter 2 for instructions on displaying and adjusting the image. 5.
User's Guide
Page 30
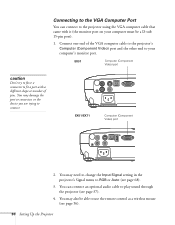
Connecting to the VGA Computer Port You can connect an optional audio cable to play sound through the projector (see page 37). 4. You may need to change the Input Signal setting in the projector's Signal menu to the projector using the ... of the VGA computer cable to the projector's Computer (Component Video) port and the other end to your computer must be able to connect. EX51/EX71 Computer (Component Video) port 2. You can connect to RGB or Auto (see page 56). 30 Setting Up the Projector EX31 Computer (Component Video) port caution...
Connecting to the VGA Computer Port You can connect an optional audio cable to play sound through the projector (see page 37). 4. You may need to change the Input Signal setting in the projector's Signal menu to the projector using the ... of the VGA computer cable to the projector's Computer (Component Video) port and the other end to your computer must be able to connect. EX51/EX71 Computer (Component Video) port 2. You can connect to RGB or Auto (see page 56). 30 Setting Up the Projector EX31 Computer (Component Video) port caution...
User's Guide
Page 31
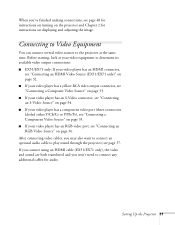
... to the projector at your video equipment to determine its available video output connections: ■ EX51/EX71 only: If your video player has an HDMI connector, see "Connecting an HDMI Video Source (EX51/EX71 only)" on page 32. ■ If your video player has a yellow RCA video output connector... see "Connecting an RGB Video Source" on displaying and adjusting the image. If you connect using an HDMI cable (EX51/EX71 only), the video and sound are both transferred and you may also want to connect an optional audio cable to connect any additional cables for instructions on page...
... to the projector at your video equipment to determine its available video output connections: ■ EX51/EX71 only: If your video player has an HDMI connector, see "Connecting an HDMI Video Source (EX51/EX71 only)" on page 32. ■ If your video player has a yellow RCA video output connector... see "Connecting an RGB Video Source" on displaying and adjusting the image. If you connect using an HDMI cable (EX51/EX71 only), the video and sound are both transferred and you may also want to connect an optional audio cable to connect any additional cables for instructions on page...
User's Guide
Page 32
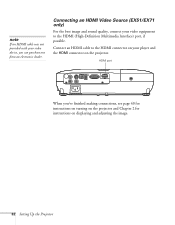
Connecting an HDMI Video Source (EX51/EX71 only) For the best image and sound quality, connect your video equipment to the HDMI connector on your video device, you 've finished making connections, see page 40 for instructions on turning ...
Connecting an HDMI Video Source (EX51/EX71 only) For the best image and sound quality, connect your video equipment to the HDMI connector on your video device, you 've finished making connections, see page 40 for instructions on turning ...
User's Guide
Page 33
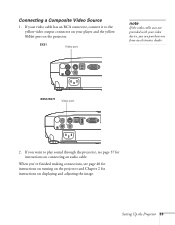
... Source 1. EX51/EX71 Video port 2. When you've finished making connections, see page 37 for instructions on the projector. Setting Up the Projector 33 If your video cable has an RCA connector, connect it to the yellow video output connector on your video device, you want to play sound through the projector...
... Source 1. EX51/EX71 Video port 2. When you've finished making connections, see page 37 for instructions on the projector. Setting Up the Projector 33 If your video cable has an RCA connector, connect it to the yellow video output connector on your video device, you want to play sound through the projector...
User's Guide
Page 34
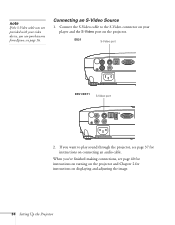
see page 37 for instructions on the projector. EX31 S-Video port EX51/EX71 S-Video port 2. If you 've finished making connections, see page 40 for instructions on turning on the projector and Chapter 2 for instructions on connecting an ...audio cable. When you want to the S-Video connector on your video device, you can purchase one from Epson; Connecting an S-Video Source 1. Connect the S-Video cable to play sound through the projector, see page 16. note If the S-Video cable was not provided with your player and the S-Video...
see page 37 for instructions on the projector. EX31 S-Video port EX51/EX71 S-Video port 2. If you 've finished making connections, see page 40 for instructions on turning on the projector and Chapter 2 for instructions on connecting an ...audio cable. When you want to the S-Video connector on your video device, you can purchase one from Epson; Connecting an S-Video Source 1. Connect the S-Video cable to play sound through the projector, see page 16. note If the S-Video cable was not provided with your player and the S-Video...
User's Guide
Page 35
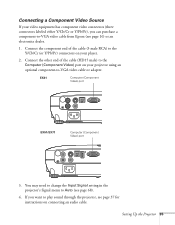
... in the projector's Signal menu to Auto (see page 37 for instructions on your projector using an optional component-to -VGA video cable from Epson (see page 16) or an electronics dealer. 1. If you can purchase a component-to -VGA video cable or adapter. Setting Up the... Projector 35 Connect the component end of the cable (HD15 male) to play sound through the projector, see page 68). 4. EX31 Computer (Component Video) port EX51/EX71 Computer (Component Video) port 3. Connecting a Component Video Source If your player. 2. Connect the other end ...
... in the projector's Signal menu to Auto (see page 37 for instructions on your projector using an optional component-to -VGA video cable from Epson (see page 16) or an electronics dealer. 1. If you can purchase a component-to -VGA video cable or adapter. Setting Up the... Projector 35 Connect the component end of the cable (HD15 male) to play sound through the projector, see page 68). 4. EX31 Computer (Component Video) port EX51/EX71 Computer (Component Video) port 3. Connecting a Component Video Source If your player. 2. Connect the other end ...
User's Guide
Page 36
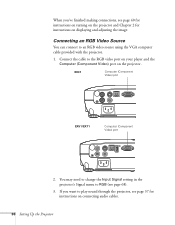
... instructions on connecting audio cables. 36 Setting Up the Projector When you want to play sound through the projector, see page 37 for instructions on displaying and adjusting the image. EX31 Computer (Component Video) port EX51/EX71 Computer (Component Video) port 2. If you 've finished making connections, see page 68). 3. Connect the...
... instructions on connecting audio cables. 36 Setting Up the Projector When you want to play sound through the projector, see page 37 for instructions on displaying and adjusting the image. EX31 Computer (Component Video) port EX51/EX71 Computer (Component Video) port 2. If you 've finished making connections, see page 68). 3. Connect the...
User's Guide
Page 37
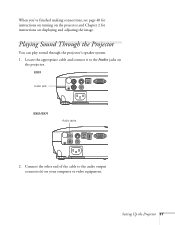
Locate the appropriate cable and connect it to the audio output connector(s) on the projector. Setting Up the Projector 37 EX31 Audio jack EX51/EX71 Audio jacks 2. Connect the other end of the cable to the Audio jacks on your computer or video equipment. Playing Sound Through the Projector You can play sound through the projector's speaker system. 1. When you've finished making connections, see page 40 for instructions on turning on the projector and Chapter 2 for instructions on displaying and adjusting the image.
Locate the appropriate cable and connect it to the audio output connector(s) on the projector. Setting Up the Projector 37 EX31 Audio jack EX51/EX71 Audio jacks 2. Connect the other end of the cable to the Audio jacks on your computer or video equipment. Playing Sound Through the Projector You can play sound through the projector's speaker system. 1. When you've finished making connections, see page 40 for instructions on turning on the projector and Chapter 2 for instructions on displaying and adjusting the image.

User's Guide
Page 38
... jacks on the other end of the audio cable to external speakers. 38 Setting Up the Projector Connecting External Speakers (EX31 Only) You can output sound from the projector to use a standard audio cable with a built-in amplifier. 1. Connect the other end. Audio cable 3. Locate the appropriate cable to your speakers... a special cable or adapter. 2. Connect the stereo mini-jack end of the cable to connect your speakers. The projector's internal speaker system is disabled while sound is output to the Audio Out port on the projector.
... jacks on the other end of the audio cable to external speakers. 38 Setting Up the Projector Connecting External Speakers (EX31 Only) You can output sound from the projector to use a standard audio cable with a built-in amplifier. 1. Connect the other end. Audio cable 3. Locate the appropriate cable to your speakers... a special cable or adapter. 2. Connect the stereo mini-jack end of the cable to connect your speakers. The projector's internal speaker system is disabled while sound is output to the Audio Out port on the projector.
User's Guide
Page 46
... screen, see page 93 for instructions. See page 59 for solutions. Selecting the image source lets you switch between images input from a USB device (EX51/EX71 only). Select USB to project from different pieces of the Source buttons on the remote control or the projector until you see the image you... need to fine-tune the image and/or sound, see Chapter 5. 46 Displaying and Adjusting the Image Selecting an Image Source You may need to make certain adjustments: ■ If the image is on...
... screen, see page 93 for instructions. See page 59 for solutions. Selecting the image source lets you switch between images input from a USB device (EX51/EX71 only). Select USB to project from different pieces of the Source buttons on the remote control or the projector until you see the image you... need to fine-tune the image and/or sound, see Chapter 5. 46 Displaying and Adjusting the Image Selecting an Image Source You may need to make certain adjustments: ■ If the image is on...
User's Guide
Page 53
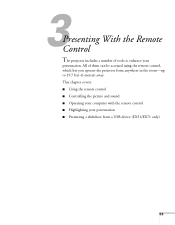
This chapter covers: ■ Using the remote control ■ Controlling the picture and sound ■ Operating your computer with the remote control ■ Highlighting your presentation ■ Presenting a slideshow from anywhere in the room-up to enhance your presentation. All of tools to 19.7 feet (6 meters) away. 3 Presenting With the Remote Control The projector includes a number of them can be accessed using the remote control, which lets you operate the projector from a USB device (EX51/EX71 only) 53
This chapter covers: ■ Using the remote control ■ Controlling the picture and sound ■ Operating your computer with the remote control ■ Highlighting your presentation ■ Presenting a slideshow from anywhere in the room-up to enhance your presentation. All of tools to 19.7 feet (6 meters) away. 3 Presenting With the Remote Control The projector includes a number of them can be accessed using the remote control, which lets you operate the projector from a USB device (EX51/EX71 only) 53
User's Guide
Page 54
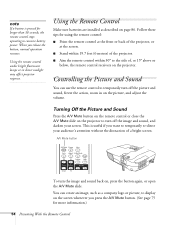
...affect projector response. This is pressed for more information.) 54 Presenting With the Remote Control A/V Mute button To turn off the image and sound, and darken your audience's attention without the distraction of a bright screen. Using the Remote Control Make sure batteries are installed as a ...picture, and adjust the volume. note If a button is useful if you release the button, normal operation resumes. Controlling the Picture and Sound You can create an image, such as described on the projector. Follow these tips for using the remote control: ■ Point the ...
...affect projector response. This is pressed for more information.) 54 Presenting With the Remote Control A/V Mute button To turn off the image and sound, and darken your audience's attention without the distraction of a bright screen. Using the Remote Control Make sure batteries are installed as a ...picture, and adjust the volume. note If a button is useful if you release the button, normal operation resumes. Controlling the Picture and Sound You can create an image, such as described on the projector. Follow these tips for using the remote control: ■ Point the ...

User's Guide
Page 55
Freeze button note The Freeze function pauses the image, not the sound. While the image is closed for instructions. You can also set the Lens Cover Timer setting to automatically turn off the projector after 30 minutes ... (see a crosshair indicating the center of the image using E-Zoom. You see page 67) while you can zoom in area. 2. The image freezes but the sound continues. Continue pressing the E-Zoom + button to enlarge the selected area up to stop the action in your video or computer image. See page 70...
Freeze button note The Freeze function pauses the image, not the sound. While the image is closed for instructions. You can also set the Lens Cover Timer setting to automatically turn off the projector after 30 minutes ... (see a crosshair indicating the center of the image using E-Zoom. You see page 67) while you can zoom in area. 2. The image freezes but the sound continues. Continue pressing the E-Zoom + button to enlarge the selected area up to stop the action in your video or computer image. See page 70...


