Start Here - Installation Guide
Page 4
...; product. Simply add your product is on and touch the screen to download drivers, view videos and manuals, get FAQs, or contact Epson. See the online User's Guide for instructions. • Make sure you select the right network name (SSID). • If your network...Use voice-activated assistants to a voice-activated assistant. Make sure your product to an Epson Connect account, then link the account to print a variety of Google LLC. Call 800-GO-EPSON (800-463-7766). ET-8500/ET-8550 replacement inks Ink family: 552 Black Photo Black Cyan Yellow Magenta Gray Any questions?...
...; product. Simply add your product is on and touch the screen to download drivers, view videos and manuals, get FAQs, or contact Epson. See the online User's Guide for instructions. • Make sure you select the right network name (SSID). • If your network...Use voice-activated assistants to a voice-activated assistant. Make sure your product to an Epson Connect account, then link the account to print a variety of Google LLC. Call 800-GO-EPSON (800-463-7766). ET-8500/ET-8550 replacement inks Ink family: 552 Black Photo Black Cyan Yellow Magenta Gray Any questions?...
Users Guide
Page 41
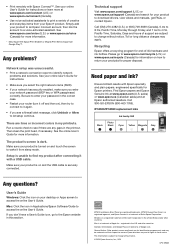
Epson is already installed on a wired network, select Change to Wi-Fi connection and select Yes to enter the name manually. We recommend that you through network setup. You see a screen like this product may cause loss of your network name. 41 To install your ... backing up or recovering data and settings during or after the warranty period. Use the displayed keyboard to enter your wireless network or select Enter Manually to confirm). 5. Select the icon. The installer program guides you make your own backup or print out your product control panel. Select Wi-Fi...
Epson is already installed on a wired network, select Change to Wi-Fi connection and select Yes to enter the name manually. We recommend that you through network setup. You see a screen like this product may cause loss of your network name. 41 To install your ... backing up or recovering data and settings during or after the warranty period. Use the displayed keyboard to enter your wireless network or select Enter Manually to confirm). 5. Select the icon. The installer program guides you make your own backup or print out your product control panel. Select Wi-Fi...
Users Guide
Page 52
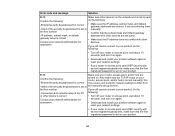
... network administrator for assistance. If it is not one of the following types, change the type of your router or access point is set to Manual, the IP address may be out of range or on again. 52 router/access point or contact your network If your printer may be filtered...
... network administrator for assistance. If it is not one of the following types, change the type of your router or access point is set to Manual, the IP address may be out of range or on again. 52 router/access point or contact your network If your printer may be filtered...

Users Guide
Page 53
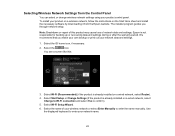
...If not, correct the settings. • If DHCP is available. If you want to use the DHCPassigned address as a static address, set to Manual, check the IP address, subnet mask, and default gateway addresses on the network connection report to see if they are turned Confirm the connection and...10 seconds, and turn it on the network connection report is correct. your network administrator for assistance. If you are trying to connect to Manual, enter the product's IP address as the default gateway. 53 Connection using the EpsonNet Setup is enabled, set the subnet mask to 255.255...
...If not, correct the settings. • If DHCP is available. If you want to use the DHCPassigned address as a static address, set to Manual, check the IP address, subnet mask, and default gateway addresses on the network connection report to see if they are turned Confirm the connection and...10 seconds, and turn it on the network connection report is correct. your network administrator for assistance. If you are trying to connect to Manual, enter the product's IP address as the default gateway. 53 Connection using the EpsonNet Setup is enabled, set the subnet mask to 255.255...
Users Guide
Page 54
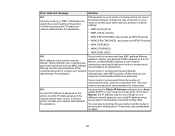
...and/or hub is set to differ from -Index of the security key/password is not set manually; this -Entered security key/password is correct may cause your product's network settings to the manually set up devices. the first number If you still cannot connect to reset your network settings. ...are correct, if you are entering them -Index of the security key/password is set on your product. 54 If you still cannot connect to manually. assistance. the first number • Confirm that the first registered password is correct • Make sure the IP address does not conflict with...
...and/or hub is set to differ from -Index of the security key/password is not set manually; this -Entered security key/password is correct may cause your product's network settings to the manually set up devices. the first number If you still cannot connect to reset your network settings. ...are correct, if you are entering them -Index of the security key/password is set on your product. 54 If you still cannot connect to manually. assistance. the first number • Confirm that the first registered password is correct • Make sure the IP address does not conflict with...
Users Guide
Page 77
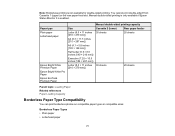
... [140 × 216 mm]) Executive (7.25 × 10.5 inches [184 × 267 mm]) Letter (8.5 × 11 inches [216 × 279 mm]) Manual double-sided printing capacity Cassette 2 (lower) Rear paper feeder 30 sheets 20 sheets 30 sheets 20 sheets Parent topic: Loading Paper Related references Paper Loading...Plain paper • Letterhead paper 77 You cannot print double-sided from Cassette 1 (upper) or the rear paper feed slot. Manual double-sided printing is only available if Epson Status Monitor 3 is not available for double-sided printing. Note: Borderless printing is enabled.
... [140 × 216 mm]) Executive (7.25 × 10.5 inches [184 × 267 mm]) Letter (8.5 × 11 inches [216 × 279 mm]) Manual double-sided printing capacity Cassette 2 (lower) Rear paper feeder 30 sheets 20 sheets 30 sheets 20 sheets Parent topic: Loading Paper Related references Paper Loading...Plain paper • Letterhead paper 77 You cannot print double-sided from Cassette 1 (upper) or the rear paper feed slot. Manual double-sided printing is only available if Epson Status Monitor 3 is not available for double-sided printing. Note: Borderless printing is enabled.
Users Guide
Page 86
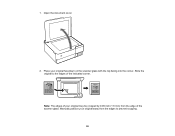
Place your original may be cropped by 0.06 inch (1.5 mm) from the edges to the edges of your original facedown on the scanner glass with the top facing into the corner. Slide the original to prevent cropping. 86 1. Open the document cover. 2. Manually position your original away from the edge of the scanner glass. Note: The edges of the indicated corner.
Place your original may be cropped by 0.06 inch (1.5 mm) from the edges to the edges of your original facedown on the scanner glass with the top facing into the corner. Slide the original to prevent cropping. 86 1. Open the document cover. 2. Manually position your original away from the edge of the scanner glass. Note: The edges of the indicated corner.

Users Guide
Page 104
... to the top or bottom of your print. Windows Header/Footer Settings - Custom Color Correction Options - • Select Custom and click the Advanced button to manually adjust the color correction settings or turn off color management in your printer software. • Select Image Options to access additional settings for all types...
... to the top or bottom of your print. Windows Header/Footer Settings - Custom Color Correction Options - • Select Custom and click the Advanced button to manually adjust the color correction settings or turn off color management in your printer software. • Select Image Options to access additional settings for all types...

Users Guide
Page 117
... . 2. You can check for updates, select a setting in the language you selected the next time you can change how often the software checks for updates manually. The printer software screens appear in the Check every menu. • To disable the automatic update feature, select the Never option. 4. Note: If you choose...
... . 2. You can check for updates, select a setting in the language you selected the next time you can change how often the software checks for updates manually. The printer software screens appear in the Check every menu. • To disable the automatic update feature, select the Never option. 4. Note: If you choose...
Users Guide
Page 156
... Save. See the link below. 156 If you can attach a scanned image to save the file. 4. Parent topic: Scanning a Document or Photo in Epson ScanSmart Attaching a Scan to Email You can select the OCR (Optical Character Recognition) language. • Select the folder on your computer in a variety of...supported. If you will need to save the scanned image in which to an email as necessary. • You can save the scans and manually attach the file to Email only supports 32-bit MAPI-compatible mail apps. Web-based email services such as Outlook Express, Windows Live Mail,...
... Save. See the link below. 156 If you can attach a scanned image to save the file. 4. Parent topic: Scanning a Document or Photo in Epson ScanSmart Attaching a Scan to Email You can select the OCR (Optical Character Recognition) language. • Select the folder on your computer in a variety of...supported. If you will need to save the scanned image in which to an email as necessary. • You can save the scans and manually attach the file to Email only supports 32-bit MAPI-compatible mail apps. Web-based email services such as Outlook Express, Windows Live Mail,...
Users Guide
Page 186
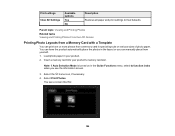
... slot. Insert a memory card into your product. 2. Load photo paper in the layout or you see a screen like this: 186 Select Print Photos. You can manually place them yourself. 1.
... slot. Insert a memory card into your product. 2. Load photo paper in the layout or you see a screen like this: 186 Select Print Photos. You can manually place them yourself. 1.
Users Guide
Page 198
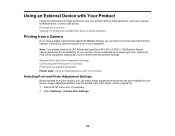
Select Settings > Camera Print Settings. 198 Note: Your photos must be supported, depending on your camera. Epson cannot guarantee the compatibility of your camera and the product settings. Some combinations of the photo, not the original file. 1. Image adjustments ... Product Selecting Print and Photo Adjustment Settings Before printing from your camera, you can make image adjustments and select the print settings for your camera manual to see if it is compatible. Printing from a Camera Viewing or Printing from a USB Flash Drive or External Device Printing from a Camera ...
Select Settings > Camera Print Settings. 198 Note: Your photos must be supported, depending on your camera. Epson cannot guarantee the compatibility of your camera and the product settings. Some combinations of the photo, not the original file. 1. Image adjustments ... Product Selecting Print and Photo Adjustment Settings Before printing from your camera, you can make image adjustments and select the print settings for your camera manual to see if it is compatible. Printing from a Camera Viewing or Printing from a USB Flash Drive or External Device Printing from a Camera ...
Users Guide
Page 265
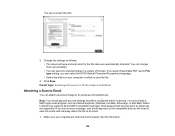
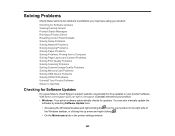
...Device Problems Solving CD/DVD Problems Uninstall Your Product Software Where to Get Help Checking for Software Updates It's a good idea to check Epson's support website occasionally for free updates to problems you may have using your product in the right side of the Windows taskbar, or ... Problems Check these sections for solutions to your product. • Windows: Your printer software automatically checks for updates. You can also manually update the software by selecting Software Update here: • Accessing the Windows Desktop and right-clicking the icon for your product.
...Device Problems Solving CD/DVD Problems Uninstall Your Product Software Where to Get Help Checking for Software Updates It's a good idea to check Epson's support website occasionally for free updates to problems you may have using your product in the right side of the Windows taskbar, or ... Problems Check these sections for solutions to your product. • Windows: Your printer software automatically checks for updates. You can also manually update the software by selecting Software Update here: • Accessing the Windows Desktop and right-clicking the icon for your product.
Users Guide
Page 266
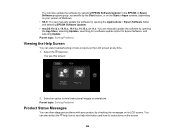
... You can often diagnose problems with your version of Windows. • OS X: You can manually update the software by opening the App Store, selecting Updates, searching for a software update option for Epson Software, and selecting Update. You can view troubleshooting or how-to see this screen: 2.... or Apps screens, depending on your product by opening the Applications > Epson Software folder and selecting EPSON Software Updater. • macOS 10.12.x, 10.13.x, 10.14.x, 10.15.x, or 11.x: You can manually update the software by checking the messages on its LCD screen. Select the...
... You can often diagnose problems with your version of Windows. • OS X: You can manually update the software by opening the App Store, selecting Updates, searching for a software update option for Epson Software, and selecting Update. You can view troubleshooting or how-to see this screen: 2.... or Apps screens, depending on your product by opening the Applications > Epson Software folder and selecting EPSON Software Updater. • macOS 10.12.x, 10.13.x, 10.14.x, 10.15.x, or 11.x: You can manually update the software by checking the messages on its LCD screen. Select the...
Users Guide
Page 272
... Settings. 272 Parent topic: Solving Problems Related concepts Uninstall Your Product Software Print Head Cleaning Power Cleaning Related tasks Loading Paper in this manual. You can reset them all. 1. Check the other solutions in Cassette 2 (Lower Cassette) Aligning the Print Head Using the Product ...Control Panel Resetting Control Panel Defaults If you have a problem. If they do not work, contact Epson. Select the home icon, if necessary. 2. 7. Do one of the following, depending on the product control panel, you may have could ...
... Settings. 272 Parent topic: Solving Problems Related concepts Uninstall Your Product Software Print Head Cleaning Power Cleaning Related tasks Loading Paper in this manual. You can reset them all. 1. Check the other solutions in Cassette 2 (Lower Cassette) Aligning the Print Head Using the Product ...Control Panel Resetting Control Panel Defaults If you have a problem. If they do not work, contact Epson. Select the home icon, if necessary. 2. 7. Do one of the following, depending on the product control panel, you may have could ...
Users Guide
Page 276
... access restrictions are set on the router or access point. Then follow the instructions that came with your product to enter your wireless network name manually. 276 Note: If you are reading these solutions: • If you select one of the WPS options from your computer or another device. • Print...
... access restrictions are set on the router or access point. Then follow the instructions that came with your product to enter your wireless network name manually. 276 Note: If you are reading these solutions: • If you select one of the WPS options from your computer or another device. • Print...

Users Guide
Page 280
... solutions: • Make sure that your product is turned on the product's LCD screen, make sure the product's IP address is set the IP address manually. • Make sure your computer and product are both using the same wireless network. • If network printing is slow, print a network status sheet and...
... solutions: • Make sure that your product is turned on the product's LCD screen, make sure the product's IP address is set the IP address manually. • Make sure your computer and product are both using the same wireless network. • If network printing is slow, print a network status sheet and...
Users Guide
Page 293
... requirements. If it is installed correctly. • Make sure your system meets the requirements for details. Nothing Prints Product Icon Does Not Appear in this manual.
... requirements. If it is installed correctly. • Make sure your system meets the requirements for details. Nothing Prints Product Icon Does Not Appear in this manual.

Users Guide
Page 296
... Settings - Mac Selecting Printing Preferences - Mac Solving Page Layout and Content Problems Check these solutions: • Turn off any mirror or inversion settings in this manual. 2. Right-click the EPAUDF01.AUD file and select Delete. 3. Restart your printing application. 296
... Settings - Mac Selecting Printing Preferences - Mac Solving Page Layout and Content Problems Check these solutions: • Turn off any mirror or inversion settings in this manual. 2. Right-click the EPAUDF01.AUD file and select Delete. 3. Restart your printing application. 296

Users Guide
Page 301
... head, if necessary. • Make sure the paper type setting matches the type of the print head nozzles are different from those covered in this manual. White or Dark Lines in Printout Blurry or Smeared Printout Faint Printout or Printout Has Gaps Grainy Printout Incorrect Colors Parent topic: Solving Problems White...
... head, if necessary. • Make sure the paper type setting matches the type of the print head nozzles are different from those covered in this manual. White or Dark Lines in Printout Blurry or Smeared Printout Faint Printout or Printout Has Gaps Grainy Printout Incorrect Colors Parent topic: Solving Problems White...


