

User Manual
Page 20
... clock to make adjustments to minimize the difference between light and dark areas. Increase the contrast to various computer graphic signals. Adjust this setting to being enabled (turned on the projector must be connected and operating, and the image source on ) or disabled (turned off... Adjusts the difference between light and dark areas. 20 Using the Projector Menus Increase brightness to lighten an image, or decrease it to the projected image. Menu item Position Tracking Sync Brightness Contrast Description Use the Enter button to correct fuzziness or screen flicker. ...
... clock to make adjustments to minimize the difference between light and dark areas. Increase the contrast to various computer graphic signals. Adjust this setting to being enabled (turned on the projector must be connected and operating, and the image source on ) or disabled (turned off... Adjusts the difference between light and dark areas. 20 Using the Projector Menus Increase brightness to lighten an image, or decrease it to the projected image. Menu item Position Tracking Sync Brightness Contrast Description Use the Enter button to correct fuzziness or screen flicker. ...

User Manual
Page 22
... Tint (NTSC only) Sharpness Gamma Mode Reset Description Use the Enter button to their initial factory defaults. 22 Using the Projector Menus Increase the contrast to make adjustments to the projected image. Increase the setting for darker and more red. Adjusts the red-green color balance... difference between light and dark areas. Decrease it for lighter and less opaque colors. Adjusts the projected image for natural coloration. note The projector's image source must be set to Video, and the video source (such as a VCR or camcorder) must actually be connected and operating...
... Tint (NTSC only) Sharpness Gamma Mode Reset Description Use the Enter button to their initial factory defaults. 22 Using the Projector Menus Increase the contrast to make adjustments to the projected image. Increase the setting for darker and more red. Adjusts the red-green color balance... difference between light and dark areas. Decrease it for lighter and less opaque colors. Adjusts the projected image for natural coloration. note The projector's image source must be set to Video, and the video source (such as a VCR or camcorder) must actually be connected and operating...
User Manual
Page 38
... 20, 22 Buttons, remote control, 18 to 19 C Camcorder, adjusting the projected image, 22 CE Marking, 35 Ceiling, hanging the projector from, 30 Color setting, 21, 22 Color Temp setting, 30 Computer connector pin assignments, 37 Computer, adjusting projected image for, 20 Connecting... projector to a desktop Macintosh, 10 to 14 to a desktop PC, 7 to 9 Contrast setting, 20, 22 D DIP switches, 12 Display formats, supported, 35 to 36 Distance from projector to screen, 5 to 6 Drawing tools, 24 E Effect menu, ...
... 20, 22 Buttons, remote control, 18 to 19 C Camcorder, adjusting the projected image, 22 CE Marking, 35 Ceiling, hanging the projector from, 30 Color setting, 21, 22 Color Temp setting, 30 Computer connector pin assignments, 37 Computer, adjusting projected image for, 20 Connecting... projector to a desktop Macintosh, 10 to 14 to a desktop PC, 7 to 9 Contrast setting, 20, 22 D DIP switches, 12 Display formats, supported, 35 to 36 Distance from projector to screen, 5 to 6 Drawing tools, 24 E Effect menu, ...

User Manual
Page 91
... listing, with the Video menu, including: s Image positioning s Brightness s Contrast s Color Balance s Sharpness s Gamma Additional settings are saved automatically. 8. 6. If you 're projecting from a video source, rather than from the projector's help system. Normally you won't need to change these steps to the default... press Enter, select Yes, and then press Enter. 7. Press the Menu button to select the Video menu. 48 Fine-Tuning Your Projector See the User's Guide Supplement for tracking, sync, and auto setup. You can adjust a number of image features with the Video menu...
... listing, with the Video menu, including: s Image positioning s Brightness s Contrast s Color Balance s Sharpness s Gamma Additional settings are saved automatically. 8. 6. If you 're projecting from a video source, rather than from the projector's help system. Normally you won't need to change these steps to the default... press Enter, select Yes, and then press Enter. 7. Press the Menu button to select the Video menu. 48 Fine-Tuning Your Projector See the User's Guide Supplement for tracking, sync, and auto setup. You can adjust a number of image features with the Video menu...
User Manual
Page 92
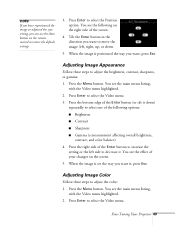
... Press Enter to select the Video menu. You see the following options: s Brightness s Contrast s Sharpness s Gamma (a measurement affecting overall brightness, contrast, and color balance) 4. Press the Menu button. Fine-Tuning Your Projector 49 Press the bottom edge of the Enter button (or tilt it , press Esc. ... steps to decrease it. When the image is positioned the way you want to move the image: left side to adjust the brightness, contrast, sharpness, or gamma: 1. Press the Menu button. Press the right side of the Enter button to increase the setting or the left...
... Press Enter to select the Video menu. You see the following options: s Brightness s Contrast s Sharpness s Gamma (a measurement affecting overall brightness, contrast, and color balance) 4. Press the Menu button. Fine-Tuning Your Projector 49 Press the bottom edge of the Enter button (or tilt it , press Esc. ... steps to decrease it. When the image is positioned the way you want to move the image: left side to adjust the brightness, contrast, sharpness, or gamma: 1. Press the Menu button. Press the right side of the Enter button to increase the setting or the left...
User Manual
Page 113
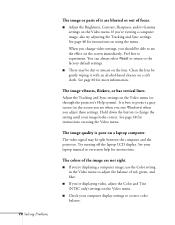
...Video menu to adjust the balance of red, green, and blue. You can always select Reset to return to experiment. Try turning off the laptop LCD display. s If you 're viewing a computer image, also try adjusting the Tracking and Sync settings. Feel free to the factory default settings....the Video menu. It is poor on the Video menu (or through the projector's Help system). s If you're displaying video, adjust the Color and Tint (NTSC only) settings on using the menu. s Adjust the Brightness, Contrast, Sharpness, and/or Gamma settings on the screen immediately. When you change...
...Video menu to adjust the balance of red, green, and blue. You can always select Reset to return to experiment. Try turning off the laptop LCD display. s If you 're viewing a computer image, also try adjusting the Tracking and Sync settings. Feel free to the factory default settings....the Video menu. It is poor on the Video menu (or through the projector's Help system). s If you're displaying video, adjust the Color and Tint (NTSC only) settings on using the menu. s Adjust the Brightness, Contrast, Sharpness, and/or Gamma settings on the screen immediately. When you change...

User Manual
Page 121
... audio, 13, 17 computer, 12, 15 mouse, 14, 17 to 18 Camcorder, connecting, 19 to 20 Case, cleaning, 60 Cleaning air filter, 61 lens, 60 projector, 60 Color adjusting, 49 to 50 problems, 70 Comp button, 34 Computer connecting audio cable, 13, 17, 21 connecting mouse cable, 14, 17 to 18... connecting projector, 12 to 13, 15 to 17 Computer cable, connecting, 12 to 13, 15 to 17 Connecting projector to external speakers, 21 to laptop computer, 12 to 13 to PowerBook, 15 to 17 to video...
... audio, 13, 17 computer, 12, 15 mouse, 14, 17 to 18 Camcorder, connecting, 19 to 20 Case, cleaning, 60 Cleaning air filter, 61 lens, 60 projector, 60 Color adjusting, 49 to 50 problems, 70 Comp button, 34 Computer connecting audio cable, 13, 17, 21 connecting mouse cable, 14, 17 to 18... connecting projector, 12 to 13, 15 to 17 Computer cable, connecting, 12 to 13, 15 to 17 Connecting projector to external speakers, 21 to laptop computer, 12 to 13 to PowerBook, 15 to 17 to video...