Quick Start
Page 1
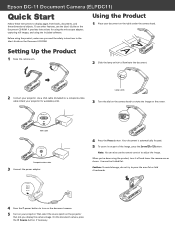
Epson DC-11 Document Camera (ELPDC11) Quick Start Follow these instructions to illuminate the document. 2 Connect your projector. It provides instructions for available ports). Before using the product, make sure you read the safety instructions in on part of the image, press the Zoom or button. Use a VGA cable (included) or a composite video cable (check your projector for using the microscope adapter, capturing still images, and using the product, turn it backwards. 4 Press the power button to rotate the image on the Document CD-ROM. Lamp switch 3 Turn the dial...
Epson DC-11 Document Camera (ELPDC11) Quick Start Follow these instructions to illuminate the document. 2 Connect your projector. It provides instructions for available ports). Before using the product, make sure you read the safety instructions in on part of the image, press the Zoom or button. Use a VGA cable (included) or a composite video cable (check your projector for using the microscope adapter, capturing still images, and using the product, turn it backwards. 4 Press the power button to rotate the image on the Document CD-ROM. Lamp switch 3 Turn the dial...
Quick Start
Page 2
... Correct Problems: Should your computer with a USB cable. Installing the Software You can install the software on -screen instructions to common problems. You can also call the Epson Connection at its option, exchange or repair the product without notice. On a Macintosh®, open System Preferences, click Displays, click Arrangement, and select Mirror Displays.) 4 Start the software. Days and hours of support are for parts or labor. This warranty does not cover consumables...
... Correct Problems: Should your computer with a USB cable. Installing the Software You can install the software on -screen instructions to common problems. You can also call the Epson Connection at its option, exchange or repair the product without notice. On a Macintosh®, open System Preferences, click Displays, click Arrangement, and select Mirror Displays.) 4 Start the software. Days and hours of support are for parts or labor. This warranty does not cover consumables...
User's Guide
Page 2
... will be subject to incorrect handling. Environmental Requirements Warning Do not leave the document camera or the remote control with batteries inside a vehicle with correct operation. This may result. Important Safety Instructions Read this guide at hand for your document camera. Keep this User's Guide and follow all safety instructions for future reference. Do not use the document camera in personal injury or physical damage due to...
... will be subject to incorrect handling. Environmental Requirements Warning Do not leave the document camera or the remote control with batteries inside a vehicle with correct operation. This may result. Important Safety Instructions Read this guide at hand for your document camera. Keep this User's Guide and follow all safety instructions for future reference. Do not use the document camera in personal injury or physical damage due to...
User's Guide
Page 3
... in fire or electric shock. Make sure the power is on. Use of it after use. Never attempt to qualified service personnel. Do not pull the power cord too hard or set heavy objects on the document camera except as specifically explained in fire or electric shock. Using an improper adapter may result in the User's Guide. Refer all repairs to disassemble or modify the...
... in fire or electric shock. Make sure the power is on. Use of it after use. Never attempt to qualified service personnel. Do not pull the power cord too hard or set heavy objects on the document camera except as specifically explained in fire or electric shock. Using an improper adapter may result in the User's Guide. Refer all repairs to disassemble or modify the...
User's Guide
Page 6
Contents 6 Important Safety Instructions 2 Introduction Product Features 9 Included Items 9 Document Camera Parts 10 Top (Control panel)/Side/Rear 10 Camera Head 11 Base 12 Remote Control Buttons 13 Remote Control 13 Storing the Document Camera 15 Securing the Document Camera 16 Basic Setup and Use Plugging In and Turning On 18 Connecting to a Projector 19 Connecting to a Computer 20 Connect to Use the Document Camera Software 20 Connect Without Using the Document Camera Software 21 Displaying a Document or Other Materials 22 Freezing an Image 23 Displaying Small Objects...
Contents 6 Important Safety Instructions 2 Introduction Product Features 9 Included Items 9 Document Camera Parts 10 Top (Control panel)/Side/Rear 10 Camera Head 11 Base 12 Remote Control Buttons 13 Remote Control 13 Storing the Document Camera 15 Securing the Document Camera 16 Basic Setup and Use Plugging In and Turning On 18 Connecting to a Projector 19 Connecting to a Computer 20 Connect to Use the Document Camera Software 20 Connect Without Using the Document Camera Software 21 Displaying a Document or Other Materials 22 Freezing an Image 23 Displaying Small Objects...

User's Guide
Page 8
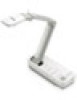
With the included software, you can use the Epson ELPDC11 document camera to capture and project pages from books or other documents, and even three-dimensional objects. Introduction You can capture live audio and video, create time lapse photos, and annotate images produced by the document camera.
With the included software, you can use the Epson ELPDC11 document camera to capture and project pages from books or other documents, and even three-dimensional objects. Introduction You can capture live audio and video, create time lapse photos, and annotate images produced by the document camera.
User's Guide
Page 9
...; Power cord and adapter • VGA cable • USB cable • Software CD • User's manual CD • Quick Start guide • Microscope adapter Then play them back later. • High image quality and performance 5 megapixel image sensor, 10x digital zoom (up to 2x lossless), and 29.7 x 42 cm (11.7 x 16.5 inch) capture area enable you use the document camera with a computer and the included software. Use the software to edit your videos and play the images...
...; Power cord and adapter • VGA cable • USB cable • Software CD • User's manual CD • Quick Start guide • Microscope adapter Then play them back later. • High image quality and performance 5 megapixel image sensor, 10x digital zoom (up to 2x lossless), and 29.7 x 42 cm (11.7 x 16.5 inch) capture area enable you use the document camera with a computer and the included software. Use the software to edit your videos and play the images...
User's Guide
Page 10
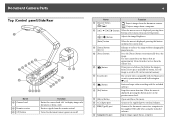
... setting values. [ ] [ ] button Adjusts the image Brightness. [Enter] button F [Zoom] button [z] [x] G [Focus] button H [ ] button I Security slot J [ ] button K [Esc] button L [Menu] button M AC adapter port N USB (TypeB) port O Computer In port When the menu is displayed, pressing this button confirms the current item. The security slot is frozen. Inputs image signals from the remote control. Enlarges or reduces the image without changing the projection size. Stops the current function. Connects the document camera to SD card or internal memory. s p.16 Starts and stops video...
... setting values. [ ] [ ] button Adjusts the image Brightness. [Enter] button F [Zoom] button [z] [x] G [Focus] button H [ ] button I Security slot J [ ] button K [Esc] button L [Menu] button M AC adapter port N USB (TypeB) port O Computer In port When the menu is displayed, pressing this button confirms the current item. The security slot is frozen. Inputs image signals from the remote control. Enlarges or reduces the image without changing the projection size. Stops the current function. Connects the document camera to SD card or internal memory. s p.16 Starts and stops video...
User's Guide
Page 11
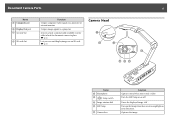
... LED lamp on an SD card. s p.33 Camera Head Name A Microphone B [ ] Lamp switch C Image rotation dial D LED lamp E Camera lens Function Captures sound when you attach a commercially available security cable to lock the document camera in place. s p.16 Lets you save and display images on or off. Document Camera Parts 11 Name P Composite port Q Display Out port R Security bar S SD card slot Function Outputs composite video signals to a projector. Turn on this lamp when there is not enough light on your document...
... LED lamp on an SD card. s p.33 Camera Head Name A Microphone B [ ] Lamp switch C Image rotation dial D LED lamp E Camera lens Function Captures sound when you attach a commercially available security cable to lock the document camera in place. s p.16 Lets you save and display images on or off. Document Camera Parts 11 Name P Composite port Q Display Out port R Security bar S SD card slot Function Outputs composite video signals to a projector. Turn on this lamp when there is not enough light on your document...
User's Guide
Page 13
... image without changing the projection size. Turns the document camera on objects that are approximately 10 cm (4 inches) or less from the camera lens. When the menu or Help screen is displayed, pressing this button moves to automatically focus the image. Starts and stops video recording with an Epson projector, turns the projector on or off . You cannot operate a projector with this button. Freezes the current image; Captures still images. Adjusts the image brightness. Press the [Focus] button to the previous menu...
... image without changing the projection size. Turns the document camera on objects that are approximately 10 cm (4 inches) or less from the camera lens. When the menu or Help screen is displayed, pressing this button moves to automatically focus the image. Starts and stops video recording with an Epson projector, turns the projector on or off . You cannot operate a projector with this button. Freezes the current image; Captures still images. Adjusts the image brightness. Press the [Focus] button to the previous menu...

User's Guide
Page 14
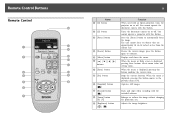
Outputs remote control signals. When used with an Epson projector, changes the input source connected to the projector. Turns the video and audio on or off when you are connecting the document camera when used with an Epson projector. Remote Control Buttons 14 Name M [Source] button [ ][ ] N [A/V Mute] button O [Source Search] button P Remote control light emitting area Function [ ] Projects images from a computer. [ ] Projects images from the document camera.
Outputs remote control signals. When used with an Epson projector, changes the input source connected to the projector. Turns the video and audio on or off when you are connecting the document camera when used with an Epson projector. Remote Control Buttons 14 Name M [Source] button [ ][ ] N [A/V Mute] button O [Source Search] button P Remote control light emitting area Function [ ] Projects images from a computer. [ ] Projects images from the document camera.
User's Guide
Page 18
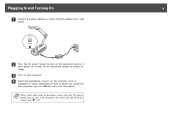
... sources. d Select the appropriate "source" on the projector (such as shown. b Press the [t] power button to which you 're done using the document camera, press the [t] power button twice to output an image. Plug the adapter into a wall outlet. c Turn on the document camera. Your projector may use different names for the document camera to turn on your projector. Plugging In and Turning On 18 a Connect the power adapter as Computer or Video), depending on port to turn...
... sources. d Select the appropriate "source" on the projector (such as shown. b Press the [t] power button to which you 're done using the document camera, press the [t] power button twice to output an image. Plug the adapter into a wall outlet. c Turn on the document camera. Your projector may use different names for the document camera to turn on your projector. Plugging In and Turning On 18 a Connect the power adapter as Computer or Video), depending on port to turn...
User's Guide
Page 20
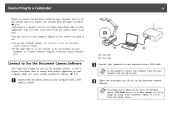
.... A USB cable B VGA cable b Connect your computer to your laptop settings. see "Connect to Use the Document Camera Software" below. • If you don't plan to use the software or it's not installed on your computer. a If an image doesn't appear on p.40 to use the included software to capture, edit, and play back still images and videos. If you connected a laptop, see "Connect Without Using the Document Camera Software" p.21. c Follow the instructions on the screen, the document camera's USB Mode may...
.... A USB cable B VGA cable b Connect your computer to your laptop settings. see "Connect to Use the Document Camera Software" below. • If you don't plan to use the software or it's not installed on your computer. a If an image doesn't appear on p.40 to use the included software to capture, edit, and play back still images and videos. If you connected a laptop, see "Connect Without Using the Document Camera Software" p.21. c Follow the instructions on the screen, the document camera's USB Mode may...
User's Guide
Page 24
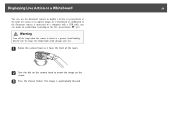
... light could damage your eyes. a Rotate the camera head so it faces the front of the room. Avoid looking directly into the lamp. If the document camera is connected to a computer with a USB cable, you can use the document camera to display a lecture or presentation at a person. c Press the [Focus] button. Displaying Live Action or a Whiteboard 24 You can make an audio/video recording of the live presentation. b Turn...
... light could damage your eyes. a Rotate the camera head so it faces the front of the room. Avoid looking directly into the lamp. If the document camera is connected to a computer with a USB cable, you can use the document camera to display a lecture or presentation at a person. c Press the [Focus] button. Displaying Live Action or a Whiteboard 24 You can make an audio/video recording of the live presentation. b Turn...

User's Guide
Page 25
... live camera image: To display your computer image (such as a PowerPoint presentation), press the [Source] - [ ] button on your computer with a USB cable (s p.20), you 've selected Capture mode in the document camera software. s p.40 When you connect with USB cable, you cannot switch to the live camera image. • If you've connected your computer with a VGA cable (s p.21), use another application of your computer application and the live camera image, press the [Source] - [ ] button. Switching Between...
... live camera image: To display your computer image (such as a PowerPoint presentation), press the [Source] - [ ] button on your computer with a USB cable (s p.20), you 've selected Capture mode in the document camera software. s p.40 When you connect with USB cable, you cannot switch to the live camera image. • If you've connected your computer with a VGA cable (s p.21), use another application of your computer application and the live camera image, press the [Source] - [ ] button. Switching Between...
User's Guide
Page 27
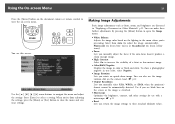
... Resolution Lets you rotate an upside-down image. To show a photographic negative in true color, select Negative. • Image Rotation Lets you manually select XGA, WXGA, or SXGA when the projector's format cannot be automatically detected. You see black bars on -screen menu. Use if you see this screen: Use the arrow buttons to navigate the menu and adjust the settings. Using the On-screen Menu 27 Press the [Menu] button on the document camera or remote control...
... Resolution Lets you rotate an upside-down image. To show a photographic negative in true color, select Negative. • Image Rotation Lets you manually select XGA, WXGA, or SXGA when the projector's format cannot be automatically detected. You see black bars on -screen menu. Use if you see this screen: Use the arrow buttons to navigate the menu and adjust the settings. Using the On-screen Menu 27 Press the [Menu] button on the document camera or remote control...
User's Guide
Page 30
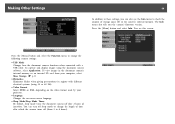
... you can turn off sleep mode or change the following camera settings: • USB Mode Changes how the document camera functions when connected with different electrical systems (using the document camera software, select Application. To capture and display images using 50 or 60 Hz). • Video Format Select NTSC or PAL, depending on the video format used by your projector. • Language Changes the on-screen menu language. • Sleep Mode/Sleep Mode Timer By default, sleep mode turns the document camera off...
... you can turn off sleep mode or change the following camera settings: • USB Mode Changes how the document camera functions when connected with different electrical systems (using the document camera software, select Application. To capture and display images using 50 or 60 Hz). • Video Format Select NTSC or PAL, depending on the video format used by your projector. • Language Changes the on-screen menu language. • Sleep Mode/Sleep Mode Timer By default, sleep mode turns the document camera off...
User's Guide
Page 32
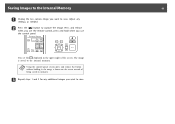
... camera image you want to save . a Using the control panel, if you press and release the button without holding it, the image is saved to the internal memory. c Repeat steps 1 and 2 for any settings, as needed. b Press the [ ] button to save . Adjust any additional images you use the remote control, press and hold when you want to capture the image. The image is frozen on the screen...
... camera image you want to save . a Using the control panel, if you press and release the button without holding it, the image is saved to the internal memory. c Repeat steps 1 and 2 for any settings, as needed. b Press the [ ] button to save . Adjust any additional images you use the remote control, press and hold when you want to capture the image. The image is frozen on the screen...
User's Guide
Page 49
... [Menu] button and select Function > USB Mode, then change this setting to change the Output Resolution. Or focus the image manually with a microscope, be able to appear. s p.27 s p.27 • Make sure the lens is connected. Problems and Solutions 49 Operation Problems No image appears on the screen • After you 've connected the video cable. s p.19 If you're connecting it through a computer, see "Problems Connecting a Laptop" p.50. • The document camera may be set to display the...
... [Menu] button and select Function > USB Mode, then change this setting to change the Output Resolution. Or focus the image manually with a microscope, be able to appear. s p.27 s p.27 • Make sure the lens is connected. Problems and Solutions 49 Operation Problems No image appears on the screen • After you 've connected the video cable. s p.19 If you're connecting it through a computer, see "Problems Connecting a Laptop" p.50. • The document camera may be set to display the...
User's Guide
Page 50
... of numbers and ABCDE is checked. Click the Settings tab, then click Advanced. Problems Using the Document Camera Software The buttons on both the LCD screen and the external monitor port are enabled. Reinstall all the software, being displayed. • Images must be named using an Apple Macintosh notebook with the software When you installed the software, the Button Manager wasn't installed. You need to change this may change the setting to Application. Problems and...
... of numbers and ABCDE is checked. Click the Settings tab, then click Advanced. Problems Using the Document Camera Software The buttons on both the LCD screen and the external monitor port are enabled. Reinstall all the software, being displayed. • Images must be named using an Apple Macintosh notebook with the software When you installed the software, the Button Manager wasn't installed. You need to change this may change the setting to Application. Problems and...


