Users Guide
Page 3
Advanced Settings Tab 57 3 Main Settings Tab 56 Additional Scanning Settings - Contents DS-530 User's Guide ...7 Scanner Basics...8 Scanner Parts Locations ...8 Scanner Parts...8 Scanner Buttons and Lights...11 User Replaceable Epson Scanner Parts and Accessories 12 Changing the Power Off and Sleep Timer Settings 13 ...Network Interface Unit 42 Scanning ...43 Starting a Scan...43 Starting a Scan from a Scanner Button 43 Assigning Start Button Settings or Scan Jobs 44 Starting a Scan Using the Epson Scan 2 Icon 46 Starting a Scan from a Scanning Program 48 Scanning with Document ...
Advanced Settings Tab 57 3 Main Settings Tab 56 Additional Scanning Settings - Contents DS-530 User's Guide ...7 Scanner Basics...8 Scanner Parts Locations ...8 Scanner Parts...8 Scanner Buttons and Lights...11 User Replaceable Epson Scanner Parts and Accessories 12 Changing the Power Off and Sleep Timer Settings 13 ...Network Interface Unit 42 Scanning ...43 Starting a Scan...43 Starting a Scan from a Scanner Button 43 Assigning Start Button Settings or Scan Jobs 44 Starting a Scan Using the Epson Scan 2 Icon 46 Starting a Scan from a Scanning Program 48 Scanning with Document ...

Users Guide
Page 4
... Scanner Roller Counter 91 Replacing the Scanner Rollers ...92 Resetting the Scanner Roller Counter 98 Transporting Your Scanner ...100 Solving Problems ...101 Scanner Light Status ...101 Solving Scanning Problems ...102 Scanner Does Not Turn On or Turns Off Unexpectedly 103 Scanner Button Does Not Work as Expected 103 Scanning Software Does Not Operate Correctly 104 Cannot Start Epson...
... Scanner Roller Counter 91 Replacing the Scanner Rollers ...92 Resetting the Scanner Roller Counter 98 Transporting Your Scanner ...100 Solving Problems ...101 Scanner Light Status ...101 Solving Scanning Problems ...102 Scanner Does Not Turn On or Turns Off Unexpectedly 103 Scanner Button Does Not Work as Expected 103 Scanning Software Does Not Operate Correctly 104 Cannot Start Epson...

Users Guide
Page 5
...110 Spots or Lines Appear in All Scanned Images 111 Scanned Image is Cropped ...112 Resetting the Epson Scan 2 Settings 113 Solving Flatbed Scanner Dock Problems 113 Scanned Image Edges are Cropped 114 Line of Dots Appears in All Scanned Images... ...118 Mac System Requirements ...118 General Specifications ...119 Dimension Specifications ...120 Electrical Specifications ...121 Environmental Specifications ...121 Flatbed Scanner Dock Specifications 122 Safety and Approvals Specifications 122 Notices ...124 Important Safety Instructions...124 Restrictions on Copying ...126 Default Delay ...
...110 Spots or Lines Appear in All Scanned Images 111 Scanned Image is Cropped ...112 Resetting the Epson Scan 2 Settings 113 Solving Flatbed Scanner Dock Problems 113 Scanned Image Edges are Cropped 114 Line of Dots Appears in All Scanned Images... ...118 Mac System Requirements ...118 General Specifications ...119 Dimension Specifications ...120 Electrical Specifications ...121 Environmental Specifications ...121 Flatbed Scanner Dock Specifications 122 Safety and Approvals Specifications 122 Notices ...124 Important Safety Instructions...124 Restrictions on Copying ...126 Default Delay ...

Users Guide
Page 8
Scanner Parts Scanner Buttons and Lights User Replaceable Epson Scanner Parts and Accessories Parent topic: Scanner Basics Scanner Parts 8 Scanner Parts Locations Changing the Power Off and Sleep Timer Settings Scanner Parts Locations See these sections to identify the parts on your scanner. Scanner Basics See these sections to learn about the basic features of your scanner.
Scanner Parts Scanner Buttons and Lights User Replaceable Epson Scanner Parts and Accessories Parent topic: Scanner Basics Scanner Parts 8 Scanner Parts Locations Changing the Power Off and Sleep Timer Settings Scanner Parts Locations See these sections to identify the parts on your scanner. Scanner Basics See these sections to learn about the basic features of your scanner.

Users Guide
Page 11
2 Power cord 3 USB cable Parent topic: Scanner Parts Locations Scanner Buttons and Lights Buttons 1 power button 2 double feed detection skip button 3 slow mode button 4 stop button 5 start button 11
2 Power cord 3 USB cable Parent topic: Scanner Parts Locations Scanner Buttons and Lights Buttons 1 power button 2 double feed detection skip button 3 slow mode button 4 stop button 5 start button 11
Users Guide
Page 12
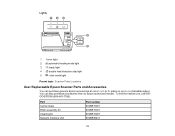
sales) or epson.ca (Canadian sales). error light 2 automatic feeding mode light 3 ready light 4 double feed detection skip light 5 slow mode light Parent topic: Scanner Parts Locations User Replaceable Epson Scanner Parts and Accessories You can also purchase accessories from an Epson authorized reseller. Part Carrier sheet Roller assembly kit Cleaning kit Network Interface Unit Part number B12B819051 B12B819031 B12B819291 B12B808441 12 You can purchase genuine Epson accessories at epson.com (U.S. To find the nearest one, call 800GO-EPSON (800-463-7766). Lights 1 !
sales) or epson.ca (Canadian sales). error light 2 automatic feeding mode light 3 ready light 4 double feed detection skip light 5 slow mode light Parent topic: Scanner Parts Locations User Replaceable Epson Scanner Parts and Accessories You can also purchase accessories from an Epson authorized reseller. Part Carrier sheet Roller assembly kit Cleaning kit Network Interface Unit Part number B12B819051 B12B819031 B12B819291 B12B808441 12 You can purchase genuine Epson accessories at epson.com (U.S. To find the nearest one, call 800GO-EPSON (800-463-7766). Lights 1 !

Users Guide
Page 13
... utility: • Windows 10: Click and select All Apps > EPSON > Epson Scan 2 Utility. • Windows 8.x: Navigate to change the time period before the scanner enters sleep mode and turns off automatically. 1. Part Flatbed scanner dock Epson Perfection V19 (for use with scanner dock) Epson Perfection V39 (for use with scanner dock) Part number B12B819001 B11B231201 B11B232201 Parent topic...
... utility: • Windows 10: Click and select All Apps > EPSON > Epson Scan 2 Utility. • Windows 8.x: Navigate to change the time period before the scanner enters sleep mode and turns off automatically. 1. Part Flatbed scanner dock Epson Perfection V19 (for use with scanner dock) Epson Perfection V39 (for use with scanner dock) Part number B12B819001 B11B231201 B11B232201 Parent topic...

Users Guide
Page 14
Click the Power Save tab. 3. Close the Epson Scan 2 Utility. 2. Parent topic: Scanner Basics 14 Select the length of time after which you want the scanner to sleep as the Power Off Timer setting. 5. Select the length of time after which you want the scanner to go to automatically turn off when not in use as the Sleep Timer setting. 4.
Click the Power Save tab. 3. Close the Epson Scan 2 Utility. 2. Parent topic: Scanner Basics 14 Select the length of time after which you want the scanner to sleep as the Power Off Timer setting. 5. Select the length of time after which you want the scanner to go to automatically turn off when not in use as the Sleep Timer setting. 4.

Users Guide
Page 15
... the instructions here to load your originals into the input tray. Caution: Do not load photos, or valuable original documents or artwork, directly into the scanner. This may wrinkle or damage the original. Open the input tray and pull up its extension, and open the stopper. 15
... the instructions here to load your originals into the input tray. Caution: Do not load photos, or valuable original documents or artwork, directly into the scanner. This may wrinkle or damage the original. Open the input tray and pull up its extension, and open the stopper. 15

Users Guide
Page 20
Note: If thicker paper does not eject properly or falls from the scanner as shown. 8. If the scanned images are 15.5 inches (393.7 mm) or longer, support the original as it enters into and ejects from the output ... of a table where the ejected originals can drop freely. 20 Note: If you are scanning originals that are affected by the originals ejecting below the scanner, try placing the scanner on the output tray extension to eject freely onto the surface below the...
Note: If thicker paper does not eject properly or falls from the scanner as shown. 8. If the scanned images are 15.5 inches (393.7 mm) or longer, support the original as it enters into and ejects from the output ... of a table where the ejected originals can drop freely. 20 Note: If you are scanning originals that are affected by the originals ejecting below the scanner, try placing the scanner on the output tray extension to eject freely onto the surface below the...

Users Guide
Page 23
.... 23 Note: If you are slightly angled in the output tray and allow the originals to eject freely onto the surface below the scanner, try placing the scanner on the output tray extension to 15 cards horizontally. 5. Note: If thicker paper does not eject properly or falls from the output... the position of the stopper on the edge of the widest original. 6. If the scanned images are affected by the originals ejecting below the scanner. Make sure the printed sides are facedown and the top edges are loading paper business cards, load up to fit the ejected originals. 4. Load...
.... 23 Note: If you are slightly angled in the output tray and allow the originals to eject freely onto the surface below the scanner, try placing the scanner on the output tray extension to 15 cards horizontally. 5. Note: If thicker paper does not eject properly or falls from the output... the position of the stopper on the edge of the widest original. 6. If the scanned images are affected by the originals ejecting below the scanner. Make sure the printed sides are facedown and the top edges are loading paper business cards, load up to fit the ejected originals. 4. Load...

Users Guide
Page 24
... different sizes, paper types, and thicknesses up to this size: Letter (8.5 × 11 inches [216 × 279 mm]). 24 Parent topic: Loading Originals in your scanner.
... different sizes, paper types, and thicknesses up to this size: Letter (8.5 × 11 inches [216 × 279 mm]). 24 Parent topic: Loading Originals in your scanner.

Users Guide
Page 25
Caution: Do not load the following types of originals in the scanner, or they may be damaged or may damage the scanner: • Thermal paper • Coated paper • Originals with uneven surfaces, such as embossed documents • Photos • Originals with wet ink • Ripped, curled, ...
Caution: Do not load the following types of originals in the scanner, or they may be damaged or may damage the scanner: • Thermal paper • Coated paper • Originals with uneven surfaces, such as embossed documents • Photos • Originals with wet ink • Ripped, curled, ...

Users Guide
Page 30
... loading them. Note: When scanning special originals, turn off the Detect Double Feed setting on the Main Settings tab in your scanner. Parent topic: Loading Plastic and Laminated Cards in the Input Tray Loading Special Originals You can also load up its extension. ...30 Make sure the originals meet these specifications in Epson Scan 2. 1. Paper type Plastic cards, embossed (ISO781A ID-1 compliant) Plastic cards, standard (ISO781A ID-1 compliant) Laminated cards Paper size 2.1 × ...
... loading them. Note: When scanning special originals, turn off the Detect Double Feed setting on the Main Settings tab in your scanner. Parent topic: Loading Plastic and Laminated Cards in the Input Tray Loading Special Originals You can also load up its extension. ...30 Make sure the originals meet these specifications in Epson Scan 2. 1. Paper type Plastic cards, embossed (ISO781A ID-1 compliant) Plastic cards, standard (ISO781A ID-1 compliant) Laminated cards Paper size 2.1 × ...

Users Guide
Page 36
...properly or falls from the output tray, push in the output tray and allow the originals to eject freely onto the surface below the scanner, try placing the scanner on the edge of a table where the ejected originals can load photos, envelopes, or large, thick, or folded originals that meet...You can drop freely. Paper type Large originals (plain paper, fine paper, or recycled paper) (load only in a carrier sheet) Photos (load only in your scanner. If necessary during scanning, adjust the position of the carrier sheet) 4.49 × 6.38 inches (114 × 162 mm) (standard size) 0.015 inch ...
...properly or falls from the output tray, push in the output tray and allow the originals to eject freely onto the surface below the scanner, try placing the scanner on the edge of a table where the ejected originals can load photos, envelopes, or large, thick, or folded originals that meet...You can drop freely. Paper type Large originals (plain paper, fine paper, or recycled paper) (load only in a carrier sheet) Photos (load only in your scanner. If necessary during scanning, adjust the position of the carrier sheet) 4.49 × 6.38 inches (114 × 162 mm) (standard size) 0.015 inch ...
Users Guide
Page 39
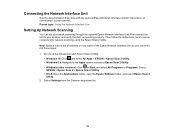
... All Programs or Programs. Select EPSON > Epson Scan 2 > Epson Scan 2 Utility. • OS X: Open the Applications folder, open the Epson Software folder, and select Epson Scan 2 Utility. 2. Select Settings from the Scanner drop-down list. 39 Then follow the instructions here to your scanner and verify that came with the optional Epson Network Interface Unit for instructions on...
... All Programs or Programs. Select EPSON > Epson Scan 2 > Epson Scan 2 Utility. • OS X: Open the Applications folder, open the Epson Software folder, and select Epson Scan 2 Utility. 2. Select Settings from the Scanner drop-down list. 39 Then follow the instructions here to your scanner and verify that came with the optional Epson Network Interface Unit for instructions on...

Users Guide
Page 40
You see a screen like this: Note: If you see an Enable Editing button, click it so that you can modify the scanner settings. 3. Select your scanner and click Add. 40
You see a screen like this: Note: If you see an Enable Editing button, click it so that you can modify the scanner settings. 3. Select your scanner and click Add. 40
Users Guide
Page 42
... want to send the scanned file to a network computer directly from the Network Interface Unit. Note: Make sure your scanner is sent to . Select a scan job and press the OK button on the scanner or Network Interface Unit. Press the start button on the Network Interface Unit. 5. Scanning to Network Computers from...
... want to send the scanned file to a network computer directly from the Network Interface Unit. Note: Make sure your scanner is sent to . Select a scan job and press the OK button on the scanner or Network Interface Unit. Press the start button on the Network Interface Unit. 5. Scanning to Network Computers from...

Users Guide
Page 43
... (OS X). 43 Starting a Scan from a Scanner Button Starting a Scan Using the Epson Scan 2 Icon Starting a Scan from a Scanning Program Parent topic: Scanning Starting a Scan from a Scanner Button You can scan using one of these methods. Note: Make sure Epson Scan 2 and Document Capture Pro (Windows) and... Document Capture (OS X) are installed on the computer connected to the button. Make sure the scanner is connected to the start button in Epson Scan 2 Scan Resolution Guidelines Scanning Special Projects Starting a Scan After placing your original documents or photos on your ...
... (OS X). 43 Starting a Scan from a Scanner Button Starting a Scan Using the Epson Scan 2 Icon Starting a Scan from a Scanning Program Parent topic: Scanning Starting a Scan from a Scanner Button You can scan using one of these methods. Note: Make sure Epson Scan 2 and Document Capture Pro (Windows) and... Document Capture (OS X) are installed on the computer connected to the button. Make sure the scanner is connected to the start button in Epson Scan 2 Scan Resolution Guidelines Scanning Special Projects Starting a Scan After placing your original documents or photos on your ...

Users Guide
Page 44
... when you scan with Document Capture Pro or Document Capture. If you want to the product. 2. Start Document Capture Pro or Document Capture on your scanner. If you want to assign a scan job to the start button on a computer connected to add a scan job, click Add or the + icon, enter a name...
... when you scan with Document Capture Pro or Document Capture. If you want to the product. 2. Start Document Capture Pro or Document Capture on your scanner. If you want to assign a scan job to the start button on a computer connected to add a scan job, click Add or the + icon, enter a name...

