Product Brochure
Page 1
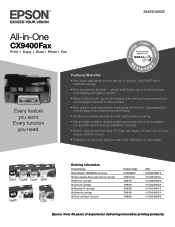
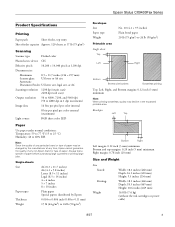
... (3 colors) Product Code C11C696201 T068120-D1 T069120 T069220 T069320 T069420 T069520 UPC 0 10343 86581 5 0 10343 86633 1 0 10343 86429 0 0 10343 86430 6 0 10343 86431 3 0 10343 86432 0 0 10343 86229 6 Epson. Every function you want. SALES GUIDE All-in-One CX9400Fax Print | Copy | Scan | Photo | Fax Every feature you need with individual ink cartridges Ordering Information Product Name Epson Stylus...
... (3 colors) Product Code C11C696201 T068120-D1 T069120 T069220 T069320 T069420 T069520 UPC 0 10343 86581 5 0 10343 86633 1 0 10343 86429 0 0 10343 86430 6 0 10343 86431 3 0 10343 86432 0 0 10343 86229 6 Epson. Every function you want. SALES GUIDE All-in-One CX9400Fax Print | Copy | Scan | Photo | Fax Every feature you need with individual ink cartridges Ordering Information Product Name Epson Stylus...
Product Brochure
Page 2
...Copyright 2008 Epson America, Inc. Actual print stability will vary based on system configuration, software application and page complexity. Epson, Epson Stylus, Epson PRINT Image Matching and MicroPiezo are trademarks of prints. See www.epson.com/cartridgeinfo for more information about print speeds. **...of other product and brand names are based on accelerated testing of their respective companies. Epson CX9400Fax All-in-One Specifications Printer Specifications Printing Technology 4-color drop-on-demand MicroPiezo® ink jet technology Nozzle Configuration 90 x 4, Cyan,...
...Copyright 2008 Epson America, Inc. Actual print stability will vary based on system configuration, software application and page complexity. Epson, Epson Stylus, Epson PRINT Image Matching and MicroPiezo are trademarks of prints. See www.epson.com/cartridgeinfo for more information about print speeds. **...of other product and brand names are based on accelerated testing of their respective companies. Epson CX9400Fax All-in-One Specifications Printer Specifications Printing Technology 4-color drop-on-demand MicroPiezo® ink jet technology Nozzle Configuration 90 x 4, Cyan,...
Product Information Guide
Page 1
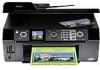
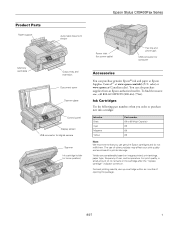
... To find the nearest one, call 800-GO-EPSON (800-463-7766). sales) or www.epson.ca (Canadian sales). Ink Cartridges Use the following part numbers when you order or purchase new ink cartridges: Ink color Black Cyan Magenta Yellow Part number 69 or 68...cartridge after the "replace cartridge" indicator comes on images printed, print settings, paper type, frequency of use of opening the package. 8/07 1 For best printing results, use genuine Epson cartridges and do not refill them. Epson Stylus CX9400Fax Series Product Parts Paper support Automatic document feeder Memory ...
... To find the nearest one, call 800-GO-EPSON (800-463-7766). sales) or www.epson.ca (Canadian sales). Ink Cartridges Use the following part numbers when you order or purchase new ink cartridges: Ink color Black Cyan Magenta Yellow Part number 69 or 68...cartridge after the "replace cartridge" indicator comes on images printed, print settings, paper type, frequency of use of opening the package. 8/07 1 For best printing results, use genuine Epson cartridges and do not refill them. Epson Stylus CX9400Fax Series Product Parts Paper support Automatic document feeder Memory ...
Product Information Guide
Page 3
... Bottom margins: 0.12 inch (3 mm) minimum Note: When printing borderless, quality may decline in the expanded printable area. Epson Stylus CX9400Fax Series Product Specifications Printing Paper path Sheet feeder, top entry Sheet feeder capacity Approx. 120 sheets at 17 lb (75 g/m2) Scanning Scanner type Flatbed color Photoelectric device CIS Effective pixels 10,200 × 14...
... Bottom margins: 0.12 inch (3 mm) minimum Note: When printing borderless, quality may decline in the expanded printable area. Epson Stylus CX9400Fax Series Product Specifications Printing Paper path Sheet feeder, top entry Sheet feeder capacity Approx. 120 sheets at 17 lb (75 g/m2) Scanning Scanner type Flatbed color Photoelectric device CIS Effective pixels 10,200 × 14...
Product Information Guide
Page 5
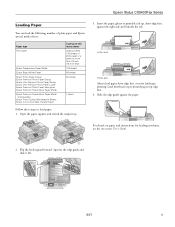
Epson Stylus CX9400Fax Series Loading Paper You can load the following number of plain paper and Epson special media sheets: Paper type Plain paper Epson Presentation Paper Matte Epson Bright White Paper Epson Photo Paper Glossy Epson Premium Photo Paper Glossy Epson Ultra Premium Photo Paper Glossy Epson Ultra Premium Photo Paper Luster Epson Premium Photo Paper Semi-gloss Epson... sheet Follow these steps to load paper: 1. Flip the feeder guard forward. Load letterhead or pre-printed paper top edge first. 4. Letter size Photo size Always load paper short edge first, even for ...
Epson Stylus CX9400Fax Series Loading Paper You can load the following number of plain paper and Epson special media sheets: Paper type Plain paper Epson Presentation Paper Matte Epson Bright White Paper Epson Photo Paper Glossy Epson Premium Photo Paper Glossy Epson Ultra Premium Photo Paper Glossy Epson Ultra Premium Photo Paper Luster Epson Premium Photo Paper Semi-gloss Epson... sheet Follow these steps to load paper: 1. Flip the feeder guard forward. Load letterhead or pre-printed paper top edge first. 4. Letter size Photo size Always load paper short edge first, even for ...
Product Information Guide
Page 6
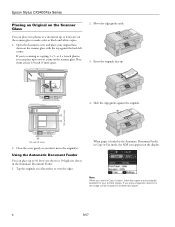
Epson Stylus CX9400Fax Series Placing an Original on the Scanner Glass You can place two photos or a document up to letter-size on the scanner glass to even the edges. Slide the edge guides against the back left corner. Tap the originals on a flat surface to make color or black and white copies. 1. Place them... your original facedown on the scanner glass. If you don't move the original(s). Move the edge guides aside. 3. Open the document cover and place your printed copies.
Epson Stylus CX9400Fax Series Placing an Original on the Scanner Glass You can place two photos or a document up to letter-size on the scanner glass to even the edges. Slide the edge guides against the back left corner. Tap the originals on a flat surface to make color or black and white copies. 1. Place them... your original facedown on the scanner glass. If you don't move the original(s). Move the edge guides aside. 3. Open the document cover and place your printed copies.
Product Information Guide
Page 7
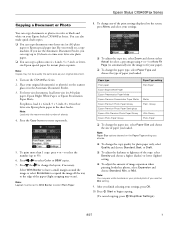
...setting. ❏ To adjust the amount of the print settings displayed on a copy machine. Note: Paper Size options depend on the scanner glass or in the Automatic Document Feeder. 3. Note: You may see white borders on the CX9400Fax Series. 2. Turn on your original document(s) or ... + or -) or Auto Fit Page (to automatically size the image to fit your settings, press OK. 10. Epson Stylus CX9400Fax Series Copying a Document or Photo You can copy documents or photos in color or black and white on your original document. 1. Note: Copies may occur). For photos, load 4 × ...
...setting. ❏ To adjust the amount of the print settings displayed on a copy machine. Note: Paper Size options depend on the scanner glass or in the Automatic Document Feeder. 3. Note: You may see white borders on the CX9400Fax Series. 2. Turn on your original document(s) or ... + or -) or Auto Fit Page (to automatically size the image to fit your settings, press OK. 10. Epson Stylus CX9400Fax Series Copying a Document or Photo You can copy documents or photos in color or black and white on your original document. 1. Note: Copies may occur). For photos, load 4 × ...
Product Information Guide
Page 8
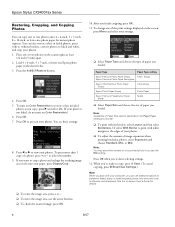
... If you copy, press r and select On. (If your photos. ❏ To adjust the amount of Paper Size options depends on Color Restoration.) 6. Paper Type Paper Type setting Epson Premium Photo Paper Glossy Prem. Place one or two photos onto 4 × 6-inch, 5 × 7-inch, 8 × 10-... settings. 12. Press OK when you use the Min setting. To print more than 1 copy of paper you loaded. Note: You may see these settings: 8. Or select With Border to select the number. 9. Epson Stylus CX9400Fax Series Restoring, Cropping, and Copying Photos You can use additional options to...
... If you copy, press r and select On. (If your photos. ❏ To adjust the amount of Paper Size options depends on Color Restoration.) 6. Paper Type Paper Type setting Epson Premium Photo Paper Glossy Prem. Place one or two photos onto 4 × 6-inch, 5 × 7-inch, 8 × 10-... settings. 12. Press OK when you use the Min setting. To print more than 1 copy of paper you loaded. Note: You may see these settings: 8. Or select With Border to select the number. 9. Epson Stylus CX9400Fax Series Restoring, Cropping, and Copying Photos You can use additional options to...
Product Information Guide
Page 10
... settings. 7. Load more paper and press the x Start button to Sending when you 've loaded. To redial immediately, press Redial/Pause. 2. Epson Stylus CX9400Fax Series 4. Change the setting back to continue. If the incoming fax pages are received, you have dialed (such as a fax information service). If... you run out of paper during printing, you see this screen: 8. Place your fax is busy, you selected color. 5. Note: If the fax number is automatically sent in the Automatic Document Feeder, then press OK ...
... settings. 7. Load more paper and press the x Start button to Sending when you 've loaded. To redial immediately, press Redial/Pause. 2. Epson Stylus CX9400Fax Series 4. Change the setting back to continue. If the incoming fax pages are received, you have dialed (such as a fax information service). If... you run out of paper during printing, you see this screen: 8. Place your fax is busy, you selected color. 5. Note: If the fax number is automatically sent in the Automatic Document Feeder, then press OK ...
Product Information Guide
Page 11
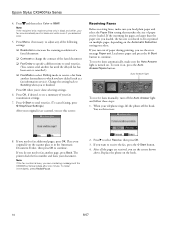
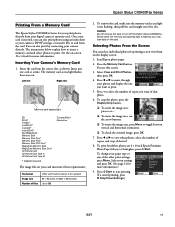
... you want to view other print settings, press Menu. Press l or r to print. 5. Caution: Do not remove the card or turn off the Epson Stylus CX9400Fax Series while the memory card access light is flashing; Select View and Print Photos, then press OK. 4. Epson Stylus CX9400Fax Series Printing From a Memory Card The Epson Stylus CX9400Fax Series lets you print photos directly from the card...
... you want to view other print settings, press Menu. Press l or r to print. 5. Caution: Do not remove the card or turn off the Epson Stylus CX9400Fax Series while the memory card access light is flashing; Select View and Print Photos, then press OK. 4. Epson Stylus CX9400Fax Series Printing From a Memory Card The Epson Stylus CX9400Fax Series lets you print photos directly from the card...
Product Information Guide
Page 12
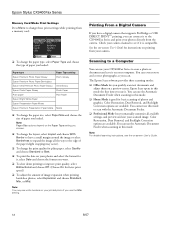
...available. Color Restoration, Dust Removal, and Backlight Correction options are available. Note: Paper Size options depend on printing from your camera manual to see the on a preview screen. Note: For detailed scanning instructions, see if it to the CX9400Fax Series and print your...use the Min setting. Epson Stylus CX9400Fax Series Memory Card Mode Print Settings Press Menu to change these print settings while printing from a memory card: Printing From a Digital Camera If you have a digital camera that supports PictBridge or USB DIRECT PRINT™ printing, you can use ...
...available. Color Restoration, Dust Removal, and Backlight Correction options are available. Note: Paper Size options depend on printing from your camera manual to see the on a preview screen. Note: For detailed scanning instructions, see if it to the CX9400Fax Series and print your...use the Min setting. Epson Stylus CX9400Fax Series Memory Card Mode Print Settings Press Menu to change these print settings while printing from a memory card: Printing From a Digital Camera If you have a digital camera that supports PictBridge or USB DIRECT PRINT™ printing, you can use ...
Product Information Guide
Page 13
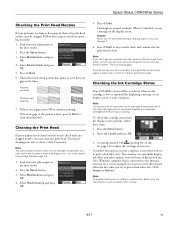
.... Select Maintenance and press OK. 4. Select Ink Levels and press OK. 3. Caution: Never turn off the printer during a cleaning cycle or you try printing again. Epson Stylus CX9400Fax Series Checking the Print Head Nozzles If your printouts are faint or have gaps in -one often, it . 6. You must replace the cartridge first (see any expended...
.... Select Maintenance and press OK. 4. Select Ink Levels and press OK. 3. Caution: Never turn off the printer during a cleaning cycle or you try printing again. Epson Stylus CX9400Fax Series Checking the Print Head Nozzles If your printouts are faint or have gaps in -one often, it . 6. You must replace the cartridge first (see any expended...
Product Information Guide
Page 14
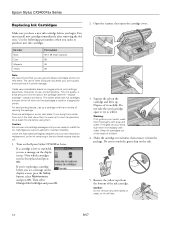
...the green chip on . Epson Stylus CX9400Fax Series Replacing Ink Cartridges Make sure you have obtained a replacement, or the ink remaining in the print head nozzles may affect your print quality and could result in printer damage. For print quality, a small amount of use genuine Epson cartridges and do not ... part numbers when you order or purchase new ink cartridges: Ink color Black Cyan Magenta Yellow Part number 69 or 68 (High Capacity) 69 69 69 Note: We recommend that you see a message on images printed, print settings, paper type, frequency of ink remains in a cool, ...
...the green chip on . Epson Stylus CX9400Fax Series Replacing Ink Cartridges Make sure you have obtained a replacement, or the ink remaining in the print head nozzles may affect your print quality and could result in printer damage. For print quality, a small amount of use genuine Epson cartridges and do not ... part numbers when you order or purchase new ink cartridges: Ink color Black Cyan Magenta Yellow Part number 69 or 68 (High Capacity) 69 69 69 Note: We recommend that you see a message on images printed, print settings, paper type, frequency of ink remains in a cool, ...
Product Information Guide
Page 15
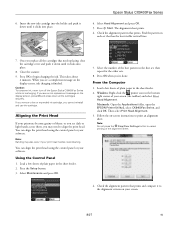
... reinstall and use the cartridge. Check the alignment pattern that prints and compare it clicks into place. Find the pattern in the sheet feeder. 2. Caution: To conserve ink, never turn off the Epson Stylus CX9400Fax Series while ink is finished. If you replace all the ...Head Alignment and press OK. 5. Press the Setup button. 3. Aligning the Print Head If your software. When you may also occur if your software. Check the alignment pattern that prints. Epson Stylus CX9400Fax Series 4. Then select Print Head Alignment. 3. Select the number of plain paper in each set , ...
... reinstall and use the cartridge. Check the alignment pattern that prints and compare it clicks into place. Find the pattern in the sheet feeder. 2. Caution: To conserve ink, never turn off the Epson Stylus CX9400Fax Series while ink is finished. If you replace all the ...Head Alignment and press OK. 5. Press the Setup button. 3. Aligning the Print Head If your software. When you may also occur if your software. Check the alignment pattern that prints. Epson Stylus CX9400Fax Series 4. Then select Print Head Alignment. 3. Select the number of plain paper in each set , ...

Product Information Guide
Page 16
... cloth dampened with a little glass cleaner. Transporting the CX9400Fax Series If you need to clean the CX9400Fax Series or you should clean it . 6. Keep the CX9400Fax Series level during transportation to the right (the home position). If print quality has declined when you 're done, click Finish. 6. Epson Stylus CX9400Fax Series 5. If necessary, enter the number of...
... cloth dampened with a little glass cleaner. Transporting the CX9400Fax Series If you need to clean the CX9400Fax Series or you should clean it . 6. Keep the CX9400Fax Series level during transportation to the right (the home position). If print quality has declined when you 're done, click Finish. 6. Epson Stylus CX9400Fax Series 5. If necessary, enter the number of...
Quick Reference Guide
Page 1
Epson Stylus® CX9400Fax Series Quick Guide Basic Printing, Copying, Scanning, and Faxing Maintaining Your All-in-One Solving Problems
Epson Stylus® CX9400Fax Series Quick Guide Basic Printing, Copying, Scanning, and Faxing Maintaining Your All-in-One Solving Problems
Quick Reference Guide
Page 2
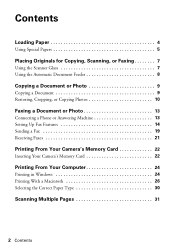
... Connecting a Phone or Answering Machine 13 Setting Up Fax Features 14 Sending a Fax 19 Receiving Faxes 21 Printing From Your Camera's Memory Card 22 Inserting Your Camera's Memory Card 22 Printing From Your Computer 24 Printing in Windows 24 Printing With a Macintosh 26 Selecting the Correct Paper Type 30 Scanning Multiple Pages 31 2 Contents
... Connecting a Phone or Answering Machine 13 Setting Up Fax Features 14 Sending a Fax 19 Receiving Faxes 21 Printing From Your Camera's Memory Card 22 Inserting Your Camera's Memory Card 22 Printing From Your Computer 24 Printing in Windows 24 Printing With a Macintosh 26 Selecting the Correct Paper Type 30 Scanning Multiple Pages 31 2 Contents

Quick Reference Guide
Page 3
Maintaining Your All-in-One 32 Checking the Print Head Nozzles 32 Cleaning the Print Head 33 Checking the Ink Cartridge Status 34 Purchasing Epson Ink Cartridges 35 Replacing Ink Cartridges 36 Solving Problems 38 Checking for Software Updates 38 Problems and Solutions 38 Where To Get Help 41 Notices 42 3
Maintaining Your All-in-One 32 Checking the Print Head Nozzles 32 Cleaning the Print Head 33 Checking the Ink Cartridge Status 34 Purchasing Epson Ink Cartridges 35 Replacing Ink Cartridges 36 Solving Problems 38 Checking for Software Updates 38 Problems and Solutions 38 Where To Get Help 41 Notices 42 3
Quick Reference Guide
Page 4
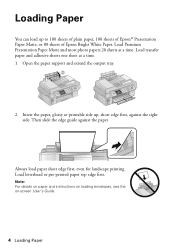
... up to 100 sheets of plain paper, 100 sheets of Epson® Presentation Paper Matte, or 80 sheets of Epson Bright White Paper. Load transfer paper and adhesive sheets one sheet at a time. Always load paper short edge first, even for landscape printing. Loading Paper You can load up , short edge first, against... instructions on loading envelopes, see the on-screen User's Guide. 4 Loading Paper Open the paper support and extend the output tray. 2. Load letterhead or pre-printed paper top edge first.
... up to 100 sheets of plain paper, 100 sheets of Epson® Presentation Paper Matte, or 80 sheets of Epson Bright White Paper. Load transfer paper and adhesive sheets one sheet at a time. Always load paper short edge first, even for landscape printing. Loading Paper You can load up , short edge first, against... instructions on loading envelopes, see the on-screen User's Guide. 4 Loading Paper Open the paper support and extend the output tray. 2. Load letterhead or pre-printed paper top edge first.
Quick Reference Guide
Page 8
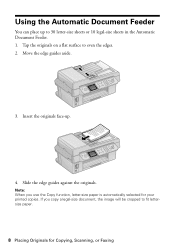
Move the edge guides aside. 3. If you use the Copy function, letter-size paper is automatically selected for Copying, Scanning, or Faxing Slide the edge guides against the originals. Insert the originals face-up to 30 letter-size sheets or 10 legal-size sheets in the Automatic Document Feeder. 1. Note: When you copy a legal-size document, the image will be cropped to even the edges. 2. Using the Automatic Document Feeder You can place up . 4. Tap the originals on a flat surface to fit lettersize paper. 8 Placing Originals for your printed copies.
Move the edge guides aside. 3. If you use the Copy function, letter-size paper is automatically selected for Copying, Scanning, or Faxing Slide the edge guides against the originals. Insert the originals face-up to 30 letter-size sheets or 10 legal-size sheets in the Automatic Document Feeder. 1. Note: When you copy a legal-size document, the image will be cropped to even the edges. 2. Using the Automatic Document Feeder You can place up . 4. Tap the originals on a flat surface to fit lettersize paper. 8 Placing Originals for your printed copies.


