DuraBrite® Ultra Ink Technical Brief
Page 6
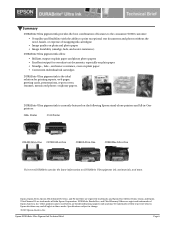
Epson, Epson Stylus, Epson UltraChrome Hi-Gloss, and PictureMate are registered trademarks and Epson Exceed Your Vision, Claria, and Epson UltraChrome K3 are for identification purposes only and may be trademarks of their respective owners. Specifications subject to print exceptional text documents and photos...marks. DURABrite Ultra pigment ink is the ideal solution for printing reports, web pages, greeting cards, presentations, report covers, resumes, menus and photos on DURABrite Ultra pigment ink, testimonials, and more. Epson disclaims any and all rights in -One Visit www....
Epson, Epson Stylus, Epson UltraChrome Hi-Gloss, and PictureMate are registered trademarks and Epson Exceed Your Vision, Claria, and Epson UltraChrome K3 are for identification purposes only and may be trademarks of their respective owners. Specifications subject to print exceptional text documents and photos...marks. DURABrite Ultra pigment ink is the ideal solution for printing reports, web pages, greeting cards, presentations, report covers, resumes, menus and photos on DURABrite Ultra pigment ink, testimonials, and more. Epson disclaims any and all rights in -One Visit www....

Basics
Page 2
... to be liable for any and all rights in certain circumstances, those circumstances may be as broad as Original Epson Products or Epson Approved Products by improper copying or printing of Seiko Epson Corporation. Trademarks Epson, Epson Stylus, and Print Image Matching are service marks of copyrighted material in those designated as some countries' laws permit limited copying...
... to be liable for any and all rights in certain circumstances, those circumstances may be as broad as Original Epson Products or Epson Approved Products by improper copying or printing of Seiko Epson Corporation. Trademarks Epson, Epson Stylus, and Print Image Matching are service marks of copyrighted material in those designated as some countries' laws permit limited copying...
Basics
Page 3
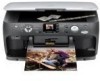
...9 Making Prints From Slides or Negatives 12 Restoring Color in Faded Photos, Slides, and Negatives 17 Printing From a Memory Card 18 Compatible Cards and Image Formats 19 Inserting the Card 20 Printing Selected Photos 21 Printing an Index Sheet to Select Photos 22 Printing All Photos... 25 Printing From a Digital Camera 26 Printing From Your Computer 28 Printing in Windows 28 Printing With Macintosh OS X 31 Using Special Papers 34 Scanning a Photo, Document, Film, or Slide 35 Maintaining Your Epson Stylus CX7800 38 Checking the Print Head Nozzles 38 Cleaning the Print Head ...
...9 Making Prints From Slides or Negatives 12 Restoring Color in Faded Photos, Slides, and Negatives 17 Printing From a Memory Card 18 Compatible Cards and Image Formats 19 Inserting the Card 20 Printing Selected Photos 21 Printing an Index Sheet to Select Photos 22 Printing All Photos... 25 Printing From a Digital Camera 26 Printing From Your Computer 28 Printing in Windows 28 Printing With Macintosh OS X 31 Using Special Papers 34 Scanning a Photo, Document, Film, or Slide 35 Maintaining Your Epson Stylus CX7800 38 Checking the Print Head Nozzles 38 Cleaning the Print Head ...

Basics
Page 5
... information about your desktop. Of course your Epson Stylus CX7800 can do most of these guidelines as described on the Start Here sheet, turn here to: ■ Load paper ■ Make a quick copy of a document or photo ■ Restore color from faded photos, slides, and negatives ■ Print photos stored on -screen User's Guide by...
... information about your desktop. Of course your Epson Stylus CX7800 can do most of these guidelines as described on the Start Here sheet, turn here to: ■ Load paper ■ Make a quick copy of a document or photo ■ Restore color from faded photos, slides, and negatives ■ Print photos stored on -screen User's Guide by...

Basics
Page 6
Insert the paper, printable side up to 20 sheets of photo paper. (See the User's Guide for landscape printing. Letter-size or 8 × 10-inch 4 × 6-inch or 5 × 7-inch You can load up to 100 sheets of plain paper or up , against the ..., then slide out the extensions. 2. Loading Paper Follow the steps here to the left. 3. Then slide the left edge guide to load paper in your Epson Stylus CX7800. 1. Flip the feeder guard forward.
Insert the paper, printable side up to 20 sheets of photo paper. (See the User's Guide for landscape printing. Letter-size or 8 × 10-inch 4 × 6-inch or 5 × 7-inch You can load up to 100 sheets of plain paper or up , against the ..., then slide out the extensions. 2. Loading Paper Follow the steps here to the left. 3. Then slide the left edge guide to load paper in your Epson Stylus CX7800. 1. Flip the feeder guard forward.
Basics
Page 10
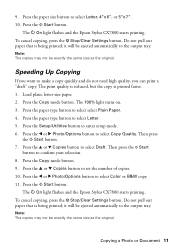
... fit the loaded paper size, press the Copy mode button to select Fit to select Color or B&W copy. 8. Press the l or r Photo/Options button to Page. 6. it on page 8. Make sure the Epson Stylus CX7800 is being printed; For more information, see page 17. 6. Press the paper type button to select... Letter. 10. Press the paper size button to select Photo Paper. 10 Copying a Photo or Document The P On light flashes and the Epson Stylus CX7800 starts printing. Load up to 20 sheets of letter-size, 4 × 6-inch, or 5 × 7-inch photo paper, as described on the LCD screen...
... fit the loaded paper size, press the Copy mode button to select Fit to select Color or B&W copy. 8. Press the l or r Photo/Options button to Page. 6. it on page 8. Make sure the Epson Stylus CX7800 is being printed; For more information, see page 17. 6. Press the paper type button to select... Letter. 10. Press the paper size button to select Photo Paper. 10 Copying a Photo or Document The P On light flashes and the Epson Stylus CX7800 starts printing. Load up to 20 sheets of letter-size, 4 × 6-inch, or 5 × 7-inch photo paper, as described on the LCD screen...
Basics
Page 11
... the x Start button to make a copy quickly and do not need high quality, you can print a "draft" copy. The P On light flashes and the Epson Stylus CX7800 starts printing. it will be ejected automatically to the output tray. it will be ejected automatically to the output... copying, press the y Stop/Clear Settings button. Copying a Photo or Document 11 The P On light flashes and the Epson Stylus CX7800 starts printing. Press the Setup/Utilities button to select Color or B&W copy. 11. Press the x Start button. Press the u or d Copies button to select Letter, 4"x6...
... the x Start button to make a copy quickly and do not need high quality, you can print a "draft" copy. The P On light flashes and the Epson Stylus CX7800 starts printing. it will be ejected automatically to the output tray. it will be ejected automatically to the output... copying, press the y Stop/Clear Settings button. Copying a Photo or Document 11 The P On light flashes and the Epson Stylus CX7800 starts printing. Press the Setup/Utilities button to select Color or B&W copy. 11. Press the x Start button. Press the u or d Copies button to select Letter, 4"x6...

Basics
Page 12
... on the fastener at the left edge of the document mat. Make sure the cutouts for 35mm slides are toward the back of the special Epson papers listed on page 13 Placing 35mm Slides in the Holder" on page 34. Fluorescent lamp 12 Copying a Photo or Document Open the document ... Holder" (see below) ■ "Placing 35mm Film Strips in the Holder 1. Making Prints From Slides or Negatives You can use the film holder that look and feel like traditional photos, try one of the glass to align them with your Epson Stylus CX7800 to scan 35mm slides, or strips of negative and positive film.
... on the fastener at the left edge of the document mat. Make sure the cutouts for 35mm slides are toward the back of the special Epson papers listed on page 13 Placing 35mm Slides in the Holder" on page 34. Fluorescent lamp 12 Copying a Photo or Document Open the document ... Holder" (see below) ■ "Placing 35mm Film Strips in the Holder 1. Making Prints From Slides or Negatives You can use the film holder that look and feel like traditional photos, try one of the glass to align them with your Epson Stylus CX7800 to scan 35mm slides, or strips of negative and positive film.
Basics
Page 18
... the Card" on page 20 ■ "Printing an Index Sheet to Select Photos" on page 22 ■ "Printing All Photos or DPOF Photos" on page 24 For instructions on the Epson Stylus CX7800 and you print color photos directly from your Epson Stylus CX7800 and a computer or other device, see the... User's Guide. 18 Printing From a Memory Card Then, when you want to print while the card is still in the Epson Stylus CX7800, it into a memory ...
... the Card" on page 20 ■ "Printing an Index Sheet to Select Photos" on page 22 ■ "Printing All Photos or DPOF Photos" on page 24 For instructions on the Epson Stylus CX7800 and you print color photos directly from your Epson Stylus CX7800 and a computer or other device, see the... User's Guide. 18 Printing From a Memory Card Then, when you want to print while the card is still in the Epson Stylus CX7800, it into a memory ...

Basics
Page 19
...Compatible Cards and Image Formats You can use the following types of cards with your Epson Stylus CX7800: Top slot Middle slot Bottom slot Slot Type of card Top slot SmartMedia™...Pro Duo™* MultiMediaCard SD™ Card miniSD™ Card* Bottom slot CompactFlash® Microdrive™ * Adapter required The Epson Stylus CX7800 supports image files that meet the following requirements: Media format File format Image size Number of files DCF version 1.0 or 2.0 ... pixels Up to 999 * DCF is the "Design rule for Camera File system" standard. Printing From a Memory Card 19
...Compatible Cards and Image Formats You can use the following types of cards with your Epson Stylus CX7800: Top slot Middle slot Bottom slot Slot Type of card Top slot SmartMedia™...Pro Duo™* MultiMediaCard SD™ Card miniSD™ Card* Bottom slot CompactFlash® Microdrive™ * Adapter required The Epson Stylus CX7800 supports image files that meet the following requirements: Media format File format Image size Number of files DCF version 1.0 or 2.0 ... pixels Up to 999 * DCF is the "Design rule for Camera File system" standard. Printing From a Memory Card 19
Basics
Page 20
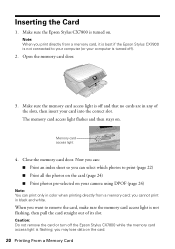
...print only in color when printing directly from a memory card, it is best if the Epson Stylus CX7800 is turned on . you want to print (page 22) ■ Print all the photos on the card (page 24) ■ Print photos pre-selected on the card. 20 Printing From a Memory Card Open the memory card door. 3. Make sure the Epson Stylus CX7800...then insert your computer is flashing; you print directly from a memory card; Note: When you cannot print in any of its slot. Make sure the memory card access light is off the Epson Stylus CX7800 while the memory card access light is ...
...print only in color when printing directly from a memory card, it is best if the Epson Stylus CX7800 is turned on . you want to print (page 22) ■ Print all the photos on the card (page 24) ■ Print photos pre-selected on the card. 20 Printing From a Memory Card Open the memory card door. 3. Make sure the Epson Stylus CX7800...then insert your computer is flashing; you print directly from a memory card; Note: When you cannot print in any of its slot. Make sure the memory card access light is off the Epson Stylus CX7800 while the memory card access light is ...

Basics
Page 21
...the d or u Copies button to set the number of photo paper. 3. Press the paper size button to select a photo. 6. Note: To cancel printing, press the y Stop/Clear Settings button. 10. Load several sheets of copies. 7. If you loaded). Insert the memory card if it straight out of...button to select Print Select. If you select Photo Paper, the photos print borderless, to your computer (or your computer is not already in the slot (see page 24. 5. Note: If your memory card: 1. Press the Memory Card mode button to start printing. Make sure your Epson Stylus CX7800 is not ...
...the d or u Copies button to set the number of photo paper. 3. Press the paper size button to select a photo. 6. Note: To cancel printing, press the y Stop/Clear Settings button. 10. Load several sheets of copies. 7. If you loaded). Insert the memory card if it straight out of...button to select Print Select. If you select Photo Paper, the photos print borderless, to your computer (or your computer is not already in the slot (see page 24. 5. Note: If your memory card: 1. Press the Memory Card mode button to start printing. Make sure your Epson Stylus CX7800 is not ...

Basics
Page 22
... Sheet 1. Load several sheets of all the index pages to be printed. 3. This may take a few minutes. Press the Memory Card mode button to print, the Epson Stylus CX7800 scans the sheet and automatically prints the selected photos. For multiple index sheets, the pages containing the most recent images are more...for all the photos on each page, so if there are printed first. Printing an Index Sheet to Select Photos You can print an index sheet to see page 20). 4. Press the x Start button. Make sure your Epson Stylus CX7800 is not already in the slot (see small "thumbnail" images...
... Sheet 1. Load several sheets of all the index pages to be printed. 3. This may take a few minutes. Press the Memory Card mode button to print, the Epson Stylus CX7800 scans the sheet and automatically prints the selected photos. For multiple index sheets, the pages containing the most recent images are more...for all the photos on each page, so if there are printed first. Printing an Index Sheet to Select Photos You can print an index sheet to see page 20). 4. Press the x Start button. Make sure your Epson Stylus CX7800 is not already in the slot (see small "thumbnail" images...
Basics
Page 26
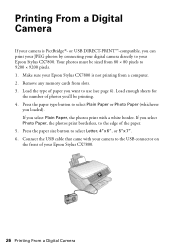
... to select Letter, 4"x 6", or 5"x 7". 6. Load the type of your Epson Stylus CX7800. or USB DIRECT-PRINT™-compatible, you 'll be sized from slots. 3. If you select Photo Paper, the photos print borderless, to the edge of photos you can print your JPEG photos by connecting your Epson Stylus CX7800 is PictBridge®- Make sure your digital camera directly...
... to select Letter, 4"x 6", or 5"x 7". 6. Load the type of your Epson Stylus CX7800. or USB DIRECT-PRINT™-compatible, you 'll be sized from slots. 3. If you select Photo Paper, the photos print borderless, to the edge of photos you can print your JPEG photos by connecting your Epson Stylus CX7800 is PictBridge®- Make sure your digital camera directly...

Basics
Page 27
...compatible with PictBridge or USB Direct Print, the icon shown below appears on the LCD screen: 8. Epson cannot guarantee the compatibility of paper type, size, and layout may not be supported. Printing From a Digital Camera 27 Depending on the Epson Stylus CX7800 settings and your camera is ...displayed on the LCD screen. 7. Use your camera to select the photos you want to print, adjust any cameras. In addition, some combinations...
...compatible with PictBridge or USB Direct Print, the icon shown below appears on the LCD screen: 8. Epson cannot guarantee the compatibility of paper type, size, and layout may not be supported. Printing From a Digital Camera 27 Depending on the Epson Stylus CX7800 settings and your camera is ...displayed on the LCD screen. 7. Use your camera to select the photos you want to print, adjust any cameras. In addition, some combinations...

Basics
Page 28
.... 3. Load paper (see a window like this one: Select EPSON Stylus CX7800 Series Click here to open your printer software 28 Printing From Your Computer Open the photo or document in Windows 1. Note: For detailed instructions on printing, see the on your printer software and connected the Epson Stylus CX7800 to use the right paper and select the correct...
.... 3. Load paper (see a window like this one: Select EPSON Stylus CX7800 Series Click here to open your printer software 28 Printing From Your Computer Open the photo or document in Windows 1. Note: For detailed instructions on printing, see the on your printer software and connected the Epson Stylus CX7800 to use the right paper and select the correct...

Basics
Page 29
... 29 Then click Preferences or Properties on the next screen.) 5. On the Main tab, select the basic print settings: Select the type of document you choose the correct paper Type setting for details. 4. Make sure EPSON Stylus CX7800 Series is selected, then click the Preferences or Properties button. (If you are using. See page...
... 29 Then click Preferences or Properties on the next screen.) 5. On the Main tab, select the basic print settings: Select the type of document you choose the correct paper Type setting for details. 4. Make sure EPSON Stylus CX7800 Series is selected, then click the Preferences or Properties button. (If you are using. See page...

Basics
Page 31
...7, or 4 x 6). 4. You see page 6). 2. Make the following settings: Select Stylus CX7800 Select your Paper Size* Select your application. 3. Open the File menu and select Page Setup. Open the File menu and select Print. Printing With Macintosh OS X If you're using an OS X-compatible application, follow the steps ... the Page Setup window. 5. Borderless) option in your document or image orientation * For borderless printing, choose the (Sheet Feeder - Load paper (see a window like this one: Select Stylus CX7800 Select Print Settings Printing From Your Computer 31 Click OK to...
...7, or 4 x 6). 4. You see page 6). 2. Make the following settings: Select Stylus CX7800 Select your Paper Size* Select your application. 3. Open the File menu and select Page Setup. Open the File menu and select Print. Printing With Macintosh OS X If you're using an OS X-compatible application, follow the steps ... the Page Setup window. 5. Borderless) option in your document or image orientation * For borderless printing, choose the (Sheet Feeder - Load paper (see a window like this one: Select Stylus CX7800 Select Print Settings Printing From Your Computer 31 Click OK to...

Basics
Page 33
... using OS X 10.2.x, click the Print Center icon instead, then double-click Stylus CX7800 in the dock on saving them later, click ?. 9. Click Print. 10. If you 're finished, close the printer window or Print Center. Printing From Your Computer 33 You see a screen like this: Pause printing Resume printing Cancel printing Select the print job 11. Click the Advanced...
... using OS X 10.2.x, click the Print Center icon instead, then double-click Stylus CX7800 in the dock on saving them later, click ?. 9. Click Print. 10. If you 're finished, close the printer window or Print Center. Printing From Your Computer 33 You see a screen like this: Pause printing Resume printing Cancel printing Select the print job 11. Click the Advanced...

Basics
Page 38
...Then press the x Start button. 38 Maintaining Your Epson Stylus CX7800 Maintaining Your Epson Stylus CX7800 If you need to select Check Ink Nozzles. Follow the steps below ) ■ "Cleaning the Print Head" on page 39 ■ "Replacing Ink Cartridges" on but not printing, and the ink low icon is not displayed in... one or more of letter-size plain paper. 3. see below to check the print head nozzles. 1. Make sure the Epson Stylus CX7800 is turned on page 41 Checking the Print Head Nozzles If your printouts are faint or have gaps in them, some of the nozzles in...
...Then press the x Start button. 38 Maintaining Your Epson Stylus CX7800 Maintaining Your Epson Stylus CX7800 If you need to select Check Ink Nozzles. Follow the steps below ) ■ "Cleaning the Print Head" on page 39 ■ "Replacing Ink Cartridges" on but not printing, and the ink low icon is not displayed in... one or more of letter-size plain paper. 3. see below to check the print head nozzles. 1. Make sure the Epson Stylus CX7800 is turned on page 41 Checking the Print Head Nozzles If your printouts are faint or have gaps in them, some of the nozzles in...


