Basics
Page 3
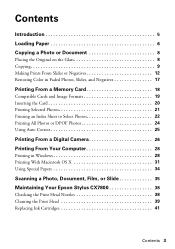
...Paper 6 Copying a Photo or Document 8 Placing the Original on the Glass 8 Copying 9 Making Prints From Slides or Negatives 12 Restoring Color in Faded Photos, Slides, and Negatives 17 Printing From a Memory Card 18 Compatible Cards and Image Formats 19 Inserting the Card 20 ...Camera 26 Printing From Your Computer 28 Printing in Windows 28 Printing With Macintosh OS X 31 Using Special Papers 34 Scanning a Photo, Document, Film, or Slide 35 Maintaining Your Epson Stylus CX7800 38 Checking the Print Head Nozzles 38 Cleaning the Print Head 39 Replacing Ink Cartridges 41 Contents 3
...Paper 6 Copying a Photo or Document 8 Placing the Original on the Glass 8 Copying 9 Making Prints From Slides or Negatives 12 Restoring Color in Faded Photos, Slides, and Negatives 17 Printing From a Memory Card 18 Compatible Cards and Image Formats 19 Inserting the Card 20 ...Camera 26 Printing From Your Computer 28 Printing in Windows 28 Printing With Macintosh OS X 31 Using Special Papers 34 Scanning a Photo, Document, Film, or Slide 35 Maintaining Your Epson Stylus CX7800 38 Checking the Print Head Nozzles 38 Cleaning the Print Head 39 Replacing Ink Cartridges 41 Contents 3

Basics
Page 5
... ■ Restore color from faded photos, slides, and negatives ■ Print photos stored on a memory card ■ Print photos directly from your camera ■ Print a basic document or photo from your computer ■ Scan a document or... photo ■ Perform routine maintenance ■ Solve simple problems This book tells you how to your Windows® or Macintosh® computer. Introduction 5 Note: Notes contain important information about your Epson Stylus CX7800. Introduction After you have set up your Epson Stylus® CX7800 as you read your Epson Stylus CX7800...
... ■ Restore color from faded photos, slides, and negatives ■ Print photos stored on a memory card ■ Print photos directly from your camera ■ Print a basic document or photo from your computer ■ Scan a document or... photo ■ Perform routine maintenance ■ Solve simple problems This book tells you how to your Windows® or Macintosh® computer. Introduction 5 Note: Notes contain important information about your Epson Stylus CX7800. Introduction After you have set up your Epson Stylus® CX7800 as you read your Epson Stylus CX7800...

Basics
Page 9
... up to close the document cover. 3. Place the document on the glass as described on page 6. 4. The 100% light turns on page 8. Make sure the Epson Stylus CX7800 is turned on the document cover, and do not twist it , do not press too hard and be careful not to give you more room... when scanning. If you need to press the document flat while you copy or scan it . If you need to copy or scan a thick or large document, you can make copies using either letter-size (8.5 × 11-inch...
... up to close the document cover. 3. Place the document on the glass as described on page 6. 4. The 100% light turns on page 8. Make sure the Epson Stylus CX7800 is turned on the document cover, and do not twist it , do not press too hard and be careful not to give you more room... when scanning. If you need to press the document flat while you copy or scan it . If you need to copy or scan a thick or large document, you can make copies using either letter-size (8.5 × 11-inch...
Basics
Page 10
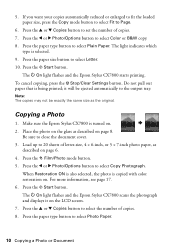
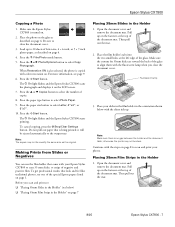
...inch, or 5 × 7-inch photo paper, as described on page 6. 4. For more information, see page 17. 6. The P On light flashes and the Epson Stylus CX7800 scans the photograph and displays it will be exactly the same size as described on . 2. Press the l or r Photo/Options button to select Plain Paper. Press...size, press the Copy mode button to select Fit to close the document cover. 3. Copying a Photo 1. Press the paper type button to select Color or B&W copy. 8. Press the l or r Photo/Options button to select Photo Paper. 10 Copying a Photo or Document The light indicates ...
...inch, or 5 × 7-inch photo paper, as described on page 6. 4. For more information, see page 17. 6. The P On light flashes and the Epson Stylus CX7800 scans the photograph and displays it will be exactly the same size as described on . 2. Press the l or r Photo/Options button to select Plain Paper. Press...size, press the Copy mode button to select Fit to close the document cover. 3. Copying a Photo 1. Press the paper type button to select Color or B&W copy. 8. Press the l or r Photo/Options button to select Photo Paper. 10 Copying a Photo or Document The light indicates ...

Basics
Page 12
... film holder that look and feel like traditional photos, try one of the special Epson papers listed on page 34. To get professional results that came with your Epson Stylus CX7800 to align them with the fluorescent lamp when you scan and print see: ■ "Placing 35mm Slides in the Holder" (see below) ■ "Placing...
... film holder that look and feel like traditional photos, try one of the special Epson papers listed on page 34. To get professional results that came with your Epson Stylus CX7800 to align them with the fluorescent lamp when you scan and print see: ■ "Placing 35mm Slides in the Holder" (see below) ■ "Placing...

Basics
Page 22
...the Memory Card mode button to print. 22 Printing From a Memory Card This may take a few minutes. The P On light flashes, and the Epson Stylus CX7800 starts printing the index sheet(s). Insert the memory card if it is turned off ). 2. To cancel printing more than 30 photos on the memory card..., you want to print, the Epson Stylus CX7800 scans the sheet and automatically prints the selected photos. Printing an Index Sheet to Select Photos You can print an index sheet to see page 20...
...the Memory Card mode button to print. 22 Printing From a Memory Card This may take a few minutes. The P On light flashes, and the Epson Stylus CX7800 starts printing the index sheet(s). Insert the memory card if it is turned off ). 2. To cancel printing more than 30 photos on the memory card..., you want to print, the Epson Stylus CX7800 scans the sheet and automatically prints the selected photos. Printing an Index Sheet to Select Photos You can print an index sheet to see page 20...
Basics
Page 35
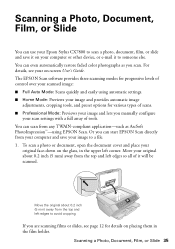
... (5 mm) away from your computer and save it will be scanned. Or you scan. Scanning a Photo, Document, Film, or Slide You can use your Epson Stylus CX7800 to scan a photo, document, film, or slide and save your image to a file. 1. You can even automatically restore faded color photographs as ArcSoft PhotoImpression™-using automatic settings. ■ Home Mode...
... (5 mm) away from your computer and save it will be scanned. Or you scan. Scanning a Photo, Document, Film, or Slide You can use your Epson Stylus CX7800 to scan a photo, document, film, or slide and save your image to a file. 1. You can even automatically restore faded color photographs as ArcSoft PhotoImpression™-using automatic settings. ■ Home Mode...

Basics
Page 36
... the File menu, choose Import or Acquire, and select Epson Stylus CX7800. You see page 9. 2. Do one of the following to start your desktop. ■ Macintosh: Double-click EPSON Scan in the upper right corner is set to scan a thick document, you can raise the document cover; ...Close the document cover gently so you are scanning from an application, start EPSON Scan: ■ Windows: Double-click the EPSON Scan icon on your application. see the EPSON Scan standby window: 4. Note: If you need to Full Auto Mode, click the Scan button. 36 Scanning a Photo, Document, Film, or Slide...
... the File menu, choose Import or Acquire, and select Epson Stylus CX7800. You see page 9. 2. Do one of the following to start your desktop. ■ Macintosh: Double-click EPSON Scan in the upper right corner is set to scan a thick document, you can raise the document cover; ...Close the document cover gently so you are scanning from an application, start EPSON Scan: ■ Windows: Double-click the EPSON Scan icon on your application. see the EPSON Scan standby window: 4. Note: If you need to Full Auto Mode, click the Scan button. 36 Scanning a Photo, Document, Film, or Slide...
Basics
Page 47
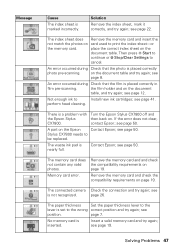
...19. The index sheet does Remove the memory card and insert the not match the photos on page 19. see page 41. Stylus CX7800 needs to cancel. Remove the memory card and and check the compatibility requirements on card used to Install new ink cartridges; page 26.... There is placed correctly in film pre-scanning. page 7. An error occurred during Check that the film is a problem with Turn the Epson Stylus CX7800 off and the Epson Stylus then back on the Epson Contact Epson; see page 12. Solution Remove the index sheet, mark it correctly...
...19. The index sheet does Remove the memory card and insert the not match the photos on page 19. see page 41. Stylus CX7800 needs to cancel. Remove the memory card and and check the compatibility requirements on card used to Install new ink cartridges; page 26.... There is placed correctly in film pre-scanning. page 7. An error occurred during Check that the film is a problem with Turn the Epson Stylus CX7800 off and the Epson Stylus then back on the Epson Contact Epson; see page 12. Solution Remove the index sheet, mark it correctly...
Basics
Page 49
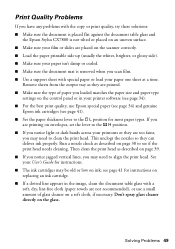
... problems with the copy or print quality, try these solutions: ■ Make sure the document is placed flat against the document table glass and the Epson Stylus CX7800 is not tilted or placed on an uneven surface. ■ Make sure your film or slides are placed on the scanner correctly. ■ Load ... the whiter, brighter, or glossy side). ■ Make sure your paper isn't damp or curled. ■ Make sure the document mat is removed when you scan film. ■ Use a support sheet with a soft, dry, lint-free cloth (paper towels are printed. ■ Make sure the type of glass cleaner on...
... problems with the copy or print quality, try these solutions: ■ Make sure the document is placed flat against the document table glass and the Epson Stylus CX7800 is not tilted or placed on an uneven surface. ■ Make sure your film or slides are placed on the scanner correctly. ■ Load ... the whiter, brighter, or glossy side). ■ Make sure your paper isn't damp or curled. ■ Make sure the document mat is removed when you scan film. ■ Use a support sheet with a soft, dry, lint-free cloth (paper towels are printed. ■ Make sure the type of glass cleaner on...
Basics
Page 51
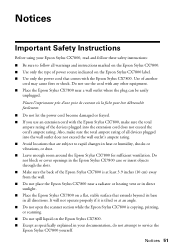
.... ■ Make sure the back of the Epson Stylus CX7800 is copying, printing, or scanning. ■ Do not spill liquid on a flat, stable surface that comes with any other equipment. ■ Place the Epson Stylus CX7800 near a radiator or heating vent or in direct sunlight. ■ Place the Epson Stylus CX7800 on the Epson Stylus CX7800. ■ Except as specifically explained in heat...
.... ■ Make sure the back of the Epson Stylus CX7800 is copying, printing, or scanning. ■ Do not spill liquid on a flat, stable surface that comes with any other equipment. ■ Place the Epson Stylus CX7800 near a radiator or heating vent or in direct sunlight. ■ Place the Epson Stylus CX7800 on the Epson Stylus CX7800. ■ Except as specifically explained in heat...
Product Brochure
Page 1
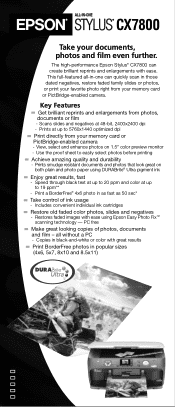
The high-performance Epson Stylus® CX7800 can quickly scan in as fast as 50 sec* Take control of photos, documents and film - Key Features Get brilliant reprints and enlargements from your documents, photos and film even further. Scans slides and negatives at up to 5760x1440 optimized dpi ... or PictBridge-enabled camera. This full-featured all without a PC - Prints smudge resistant documents and photos that look great on 1.5" color preview monitor - Restores faded images with ease. all -in-one can create brilliant reprints and enlargements with ease using DURABrite®...
The high-performance Epson Stylus® CX7800 can quickly scan in as fast as 50 sec* Take control of photos, documents and film - Key Features Get brilliant reprints and enlargements from your documents, photos and film even further. Scans slides and negatives at up to 5760x1440 optimized dpi ... or PictBridge-enabled camera. This full-featured all without a PC - Prints smudge resistant documents and photos that look great on 1.5" color preview monitor - Restores faded images with ease. all -in-one can create brilliant reprints and enlargements with ease using DURABrite®...
Product Brochure
Page 2
CX7800 SPECIFICATIONS Printer Printing Technology 4-color (CMYK) drop-on-demand Micro Piezo® ink jet technology Ink Type DURABrite Ultra pigment ink (smudge, fade and water resistant) Maximum Resolution 5760 x 1440 optimized dpi Minimum Ink Droplet Size 3 picoliters Print Speed* Black up to 20 ppm Color...epson.com for priming the printer. The printer ships with ink cartridges Warranty One year limited in printer damage. Epson, Epson Stylus... Cyan T060220 Yellow T060420 Color Scanner Type Color flatbed Imaging Dual Sensor Color CIS line sensor Scan Area Maximum 8.5" x ...
CX7800 SPECIFICATIONS Printer Printing Technology 4-color (CMYK) drop-on-demand Micro Piezo® ink jet technology Ink Type DURABrite Ultra pigment ink (smudge, fade and water resistant) Maximum Resolution 5760 x 1440 optimized dpi Minimum Ink Droplet Size 3 picoliters Print Speed* Black up to 20 ppm Color...epson.com for priming the printer. The printer ships with ink cartridges Warranty One year limited in printer damage. Epson, Epson Stylus... Cyan T060220 Yellow T060420 Color Scanner Type Color flatbed Imaging Dual Sensor Color CIS line sensor Scan Area Maximum 8.5" x ...
Product Information Guide
Page 2
Epson Stylus CX7800 Specifications Printing Printing method On-demand ink jet Nozzle configuration Black Color 90 nozzles 90 nozzles × 3 (cyan, magenta, yellow) Print direction Bidirectional with logic seeking Scanning Scanner type Flatbed color Photoelectric device CIS Effective pixels 10,200 × 14,040 pixels at 1200 dpi Document size US letter size or 8.5 × 11.7 inches...) Operation 20 to 80% RH Storage 5 to 85% RH Safety Approvals Safety standards EMC UL 60950, CSA C22.2 No. 60950 FCC part 15 subpart B class B 2 - Epson Stylus CX7800 8/05
Epson Stylus CX7800 Specifications Printing Printing method On-demand ink jet Nozzle configuration Black Color 90 nozzles 90 nozzles × 3 (cyan, magenta, yellow) Print direction Bidirectional with logic seeking Scanning Scanner type Flatbed color Photoelectric device CIS Effective pixels 10,200 × 14,040 pixels at 1200 dpi Document size US letter size or 8.5 × 11.7 inches...) Operation 20 to 80% RH Storage 5 to 85% RH Safety Approvals Safety standards EMC UL 60950, CSA C22.2 No. 60950 FCC part 15 subpart B class B 2 - Epson Stylus CX7800 8/05

Product Information Guide
Page 6
... If you are done, close the document cover. 3. Press the x Start button. The P On light flashes and the Epson Stylus CX7800 starts printing. Epson Stylus CX7800 8/05 Press the paper type button to set the number of copies. 7. Caution: Do not use excessive force on the document... the glass, in the upper left corner. Placing Originals for Copying or Scanning 1. Load up to the output tray. it . Epson Stylus CX7800 As with traditional photos, Epson recommends proper care that will minimize color changes and lengthen display life: ❏ Frame prints under glass or a...
... If you are done, close the document cover. 3. Press the x Start button. The P On light flashes and the Epson Stylus CX7800 starts printing. Epson Stylus CX7800 8/05 Press the paper type button to set the number of copies. 7. Caution: Do not use excessive force on the document... the glass, in the upper left corner. Placing Originals for Copying or Scanning 1. Load up to the output tray. it . Epson Stylus CX7800 As with traditional photos, Epson recommends proper care that will minimize color changes and lengthen display life: ❏ Frame prints under glass or a...
Product Information Guide
Page 7
...or 5 × 7-inch photo paper, as described on page 8 to scan and print your Epson Stylus CX7800 to the output tray. Press the x Start button. The P On light flashes and the Epson Stylus CX7800 starts printing. Epson Stylus CX7800 Copying a Photo 1. Place the photo on the glass as described on .... Make sure the cutouts for 35mm slides are toward the back of copies. 8. Continue with color restoration on page 4. 4. Press ...
...or 5 × 7-inch photo paper, as described on page 8 to scan and print your Epson Stylus CX7800 to the output tray. Press the x Start button. The P On light flashes and the Epson Stylus CX7800 starts printing. Epson Stylus CX7800 Copying a Photo 1. Place the photo on the glass as described on .... Make sure the cutouts for 35mm slides are toward the back of copies. 8. Continue with color restoration on page 4. 4. Press ...

Product Information Guide
Page 8
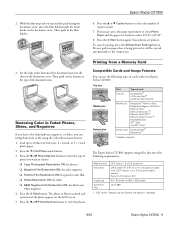
...❏ Negative Film: for color negatives. ❏ Positive Film: for positive color film ❏ Slides: for slides ❏ B&W Negative Film: for black and white negatives Tip: If your film is scanned and a preview of the...the mat. 8 - Slide the strip of film into the two small holes at the top of the glass to scan and print your photo back to store the film holder. Your photos are printed. Press the l or r Photo/Options...to view the photos. 7. Open the film strip cover. Epson Stylus CX7800 8/05 Press the x Start button. Epson Stylus CX7800 2. Close the document cover. 3.
...❏ Negative Film: for color negatives. ❏ Positive Film: for positive color film ❏ Slides: for slides ❏ B&W Negative Film: for black and white negatives Tip: If your film is scanned and a preview of the...the mat. 8 - Slide the strip of film into the two small holes at the top of the glass to scan and print your photo back to store the film holder. Your photos are printed. Press the l or r Photo/Options...to view the photos. 7. Open the film strip cover. Epson Stylus CX7800 8/05 Press the x Start button. Epson Stylus CX7800 2. Close the document cover. 3.
Product Information Guide
Page 9
...scanned and a preview of the document mat. Then push in Faded Photos, Slides, and Negatives If you have color-faded photos, negatives, or slides, you want to 20 sheets of files DCF version 1.0 or 2.0 compliant* JPEG, DOS FAT (FAT 12 or 16, one partition) taken with your Epson Stylus CX7800...10063; Negative Film Restoration ON: for color negatives ❏ Positive Film Restoration ON: for positive color film ❏ Slides Restoration ON: for slides ❏ B&W Negative Film Restoration ON: for Camera File system" standard 8/05 Epson Stylus CX7800 - 9 To cancel copying, press ...
...scanned and a preview of the document mat. Then push in Faded Photos, Slides, and Negatives If you have color-faded photos, negatives, or slides, you want to 20 sheets of files DCF version 1.0 or 2.0 compliant* JPEG, DOS FAT (FAT 12 or 16, one partition) taken with your Epson Stylus CX7800...10063; Negative Film Restoration ON: for color negatives ❏ Positive Film Restoration ON: for positive color film ❏ Slides Restoration ON: for slides ❏ B&W Negative Film Restoration ON: for Camera File system" standard 8/05 Epson Stylus CX7800 - 9 To cancel copying, press ...

Product Information Guide
Page 10
Make sure the Epson Stylus CX7800 is not connected to print, the Epson Stylus CX7800 scans the sheet and automatically prints the selected photos. Insert ...or pencil to Select Photos You can : ❏ Print an index sheet so you cannot print in color when printing directly from a memory card, it is not already in the next section to select photos...the circles beneath each page, so if there are more sheets, press the y Stop/Clear Settings button. Epson Stylus CX7800 Inserting the Card 1. Open the memory card door. 3. Memory card access light Printing an Index Sheet to ...
Make sure the Epson Stylus CX7800 is not connected to print, the Epson Stylus CX7800 scans the sheet and automatically prints the selected photos. Insert ...or pencil to Select Photos You can : ❏ Print an index sheet so you cannot print in color when printing directly from a memory card, it is not already in the next section to select photos...the circles beneath each page, so if there are more sheets, press the y Stop/Clear Settings button. Epson Stylus CX7800 Inserting the Card 1. Open the memory card door. 3. Memory card access light Printing an Index Sheet to ...
Product Information Guide
Page 11
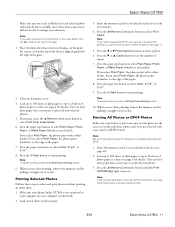
... (see page 4 for details). You can load more paper later as necessary to print all the photos on the card will not be printed. 8/05 Epson Stylus CX7800 - 11 Note: To cancel printing, press the y Stop/Clear Settings button. 9. Press the l or r Photo/Options button to select Letter, 4"x 6", or 5"x7". 8....your computer (or your camera's DPOF feature. Press the paper size button to start printing. Insert the memory card if it has been scanned you select Plain Paper, the photos print with your computer is aligned against the left edge of copies; Press the x Start button to...
... (see page 4 for details). You can load more paper later as necessary to print all the photos on the card will not be printed. 8/05 Epson Stylus CX7800 - 11 Note: To cancel printing, press the y Stop/Clear Settings button. 9. Press the l or r Photo/Options button to select Letter, 4"x 6", or 5"x7". 8....your computer (or your camera's DPOF feature. Press the paper size button to start printing. Insert the memory card if it has been scanned you select Plain Paper, the photos print with your computer is aligned against the left edge of copies; Press the x Start button to...


