
Technical Brief (Ink Jet Printers)
Page 3
...based on the Epson ink sets in those marks. Epson printers use an advanced error diffusion technology to determine the most interested in various patterns so you never have to swap an ink cartridge to as halftoning, that produces fast, high-quality, color-accurate output. ... is most efficient pattern for optional cartridges, and you see continuous tone color. Specifications subject to meet every printing need. Epson Printer + Epson Ink + Epson Paper Delivers Epson Quality 6. DURABrite and Chief Memory Officer are registered trademarks or trademarks of...
...based on the Epson ink sets in those marks. Epson printers use an advanced error diffusion technology to determine the most interested in various patterns so you never have to swap an ink cartridge to as halftoning, that produces fast, high-quality, color-accurate output. ... is most efficient pattern for optional cartridges, and you see continuous tone color. Specifications subject to meet every printing need. Epson Printer + Epson Ink + Epson Paper Delivers Epson Quality 6. DURABrite and Chief Memory Officer are registered trademarks or trademarks of...

Epson Scan ICM Updater v1.20 (PSB.2008.07.001)
Page 1
...are not affected. Click on the filename. Installation: • Download epson12688.exe from the Epson website (www.epson.com). • Double-click on the Configuration button. Select the Color tab and enable ICM. When selecting any of Problem: When Adobe's CMM is installed (...installation process. Please re-install the software" Installing the Epson ICM updater fixes the error so you of these color profiles. You can choose any of an ICM update that also has Epson Scan installed, an error message occurs when attempting to complete the installation. Description...
...are not affected. Click on the filename. Installation: • Download epson12688.exe from the Epson website (www.epson.com). • Double-click on the Configuration button. Select the Color tab and enable ICM. When selecting any of Problem: When Adobe's CMM is installed (...installation process. Please re-install the software" Installing the Epson ICM updater fixes the error so you of these color profiles. You can choose any of an ICM update that also has Epson Scan installed, an error message occurs when attempting to complete the installation. Description...

Basics
Page 4
Checking the Ink Status 46 Replacing Ink Cartridges 47 Solving Problems 52 Error Messages 52 Problems and Solutions 54 Where To Get Help 57 Notices 59 Important Safety Instructions 59 Declaration of Conformity 61 FCC Compliance Statement 61 Epson America, Inc. Limited Warranty 64 Index 67 4 Contents
Checking the Ink Status 46 Replacing Ink Cartridges 47 Solving Problems 52 Error Messages 52 Problems and Solutions 54 Where To Get Help 57 Notices 59 Important Safety Instructions 59 Declaration of Conformity 61 FCC Compliance Statement 61 Epson America, Inc. Limited Warranty 64 Index 67 4 Contents

Basics
Page 32
...faxes. Indicates the type of fax data that must have set up your phone system to use Error Correction Mode to automatically request retransmission of answer ring pattern you 've connected the CX7000F Series. Indicates the speed at their original size on the selected Paper Size or printed at which...Kbps and Off 14.4 Kbps. Select Off to turn off report printing, On Error to print reports only when an error occurs, or On Send to print reports for outgoing faxes. Selecting Send/Receive Settings Your CX7000F Series is set up to send and receive faxes using the default settings below....
...faxes. Indicates the type of fax data that must have set up your phone system to use Error Correction Mode to automatically request retransmission of answer ring pattern you 've connected the CX7000F Series. Indicates the speed at their original size on the selected Paper Size or printed at which...Kbps and Off 14.4 Kbps. Select Off to turn off report printing, On Error to print reports only when an error occurs, or On Send to print reports for outgoing faxes. Selecting Send/Receive Settings Your CX7000F Series is set up to send and receive faxes using the default settings below....
Basics
Page 37
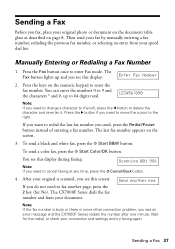
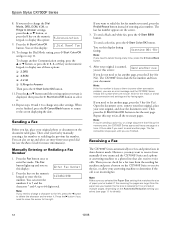
... and re-enter it. To send a black and white fax, press the x Start B&W button. To send a color fax, press the x Start Color/OK button. Send another page, press the 2 key (for the redial, or check your connection and settings and try...1. If you want to redial the last fax number you need to move the cursor to the right. The CX7000F Series dials the fax number and faxes your speed dial list. Press the r button if you used, press the... Note: If the fax number is busy or there is scanned, you see an error message and the CX7000F Series redials the number after one minute.
... and re-enter it. To send a black and white fax, press the x Start B&W button. To send a color fax, press the x Start Color/OK button. Send another page, press the 2 key (for the redial, or check your connection and settings and try...1. If you want to redial the last fax number you need to move the cursor to the right. The CX7000F Series dials the fax number and faxes your speed dial list. Press the r button if you used, press the... Note: If the fax number is busy or there is scanned, you see an error message and the CX7000F Series redials the number after one minute.

Basics
Page 38
... close the document cover. After your original is some other connection problem, you do not need to the first speed dial entry, press the x Start Color/OK button. Speed Dialing a Fax Number 1. Repeat this display: 2. It then asks if you are finished. Press the Setup button. You see this step to... see this display: Enter Fax Number 1.Select Speed D 3. Send another pag Note: If the fax number is busy or there is scanned, you see an error message and the CX7000F Series redials the number after one page at any time, press the y Cancel/Back button. 6.
... close the document cover. After your original is some other connection problem, you do not need to the first speed dial entry, press the x Start Color/OK button. Speed Dialing a Fax Number 1. Repeat this display: 2. It then asks if you are finished. Press the Setup button. You see this step to... see this display: Enter Fax Number 1.Select Speed D 3. Send another pag Note: If the fax number is busy or there is scanned, you see an error message and the CX7000F Series redials the number after one page at any time, press the y Cancel/Back button. 6.

Basics
Page 40
... the x Start B&W or x Start Color/OK button to receive the fax. When it begins printing the fax. If you see page 52. 40 Faxing a Photo or Document After the CX7000F Series receives all the pages, it 's finished, you see any other error messages, see the screen displaying the date.... Load more paper and press the x Start Color/OK button so printing can continue. When the CX7000F Series receives a fax in manual answer ...
... the x Start B&W or x Start Color/OK button to receive the fax. When it begins printing the fax. If you see page 52. 40 Faxing a Photo or Document After the CX7000F Series receives all the pages, it 's finished, you see any other error messages, see the screen displaying the date.... Load more paper and press the x Start Color/OK button so printing can continue. When the CX7000F Series receives a fax in manual answer ...

Basics
Page 51
...Caution: Never turn off the CX7000F Series while Charging appears on the display. Caution: If you 'll waste ink. Start Color OK Charging takes about one minute. Press the x Start Color/OK button and reinstall the ink cartridge until you see an ink cartridge error message on the display, the ...ink cartridge may not be installed correctly. Press the y Cancel/Back button until it 's finished, 5.Replace Cartridge appears on the document table. Press the x Start Color/OK button. Close the scanner. 14. When...
...Caution: Never turn off the CX7000F Series while Charging appears on the display. Caution: If you 'll waste ink. Start Color OK Charging takes about one minute. Press the x Start Color/OK button and reinstall the ink cartridge until you see an ink cartridge error message on the display, the ...ink cartridge may not be installed correctly. Press the y Cancel/Back button until it 's finished, 5.Replace Cartridge appears on the document table. Press the x Start Color/OK button. Close the scanner. 14. When...

Basics
Page 52
...See page 6 for replacement instructions. Paper jam -> Press the OK button. Ink is expended in the sheet feeder and press the x Start Color/OK button to diagnose the cause. See page 47 for replacement replacement. Replace [Cyan, Magenta, Yellow, Black] ink cartridge -> Press the OK...incorrectly. See page 55 for basic troubleshooting suggestions, or double-click the User's Guide icon on your Epson Stylus CX7000F Series all-in one , check the display on page 57 Error Messages Display message Cause and solution Paper out -> Load paper into the sheet feeder, then press the...
...See page 6 for replacement instructions. Paper jam -> Press the OK button. Ink is expended in the sheet feeder and press the x Start Color/OK button to diagnose the cause. See page 47 for replacement replacement. Replace [Cyan, Magenta, Yellow, Black] ink cartridge -> Press the OK...incorrectly. See page 55 for basic troubleshooting suggestions, or double-click the User's Guide icon on your Epson Stylus CX7000F Series all-in one , check the display on page 57 Error Messages Display message Cause and solution Paper out -> Load paper into the sheet feeder, then press the...

Basics
Page 53
...No photos on the glass (see page 16). See page 16 for details. Resend using the x Start Color/OK button to a fax machine that is not supported by the CX7000F Series is set for a list of the glass. An index sheet was not recognized because it correctly,...memory card The inserted memory card does not contain any valid images. Display message Cause and solution [Cyan, Magenta, Yellow, Black] Ink cartridge error -> Cartridge replacement is set to the ^ H position. See page 47 for details. Remove the incompatible memory card. See page 13 for ...
...No photos on the glass (see page 16). See page 16 for details. Resend using the x Start Color/OK button to a fax machine that is not supported by the CX7000F Series is set for a list of the glass. An index sheet was not recognized because it correctly,...memory card The inserted memory card does not contain any valid images. Display message Cause and solution [Cyan, Magenta, Yellow, Black] Ink cartridge error -> Cartridge replacement is set to the ^ H position. See page 47 for details. Remove the incompatible memory card. See page 13 for ...

Basics
Page 54
...error -> or Scanner error -> See your CX7000F Series. If you're printing on . See page 57 for details. See page 57 for details. Problems and Solutions Check the solutions below if you loaded. 54 Solving Problems A CX7000F Series part needs to continue. There is positioned against the right edge guide with the CX7000F...of paper. If the error does not clear, contact your local authorized servicer or contact Epson for printing sheets of ... press x Start Color/OK or x Start B&W to be replaced. Contact your local authorized servicer or contact Epson for details. Display message ...
...error -> or Scanner error -> See your CX7000F Series. If you're printing on . See page 57 for details. See page 57 for details. Problems and Solutions Check the solutions below if you loaded. 54 Solving Problems A CX7000F Series part needs to continue. There is positioned against the right edge guide with the CX7000F...of paper. If the error does not clear, contact your local authorized servicer or contact Epson for printing sheets of ... press x Start Color/OK or x Start B&W to be replaced. Contact your local authorized servicer or contact Epson for details. Display message ...

Basics
Page 55
...display. Flip through the stack to the next step. 2. Do not pull it off the ECM (Error Correction Mode) setting and try faxing again. If the jammed paper is not ejected, go to separate... line works. Make sure the paper is not in smaller sections. ■ If you connected the CX7000F Series to a DSL phone line, you must install a DSL filter to the line or you see... however; Paper Feeding Problems ■ If paper doesn't feed, remove it out. Press the x Start Color/OK button to clear the jam: 1. Problems and Solutions 55 Faxing Problems ■ If you have problems...
...display. Flip through the stack to the next step. 2. Do not pull it off the ECM (Error Correction Mode) setting and try faxing again. If the jammed paper is not ejected, go to separate... line works. Make sure the paper is not in smaller sections. ■ If you connected the CX7000F Series to a DSL phone line, you must install a DSL filter to the line or you see... however; Paper Feeding Problems ■ If paper doesn't feed, remove it out. Press the x Start Color/OK button to clear the jam: 1. Problems and Solutions 55 Faxing Problems ■ If you have problems...
Basics
Page 67
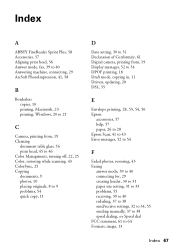
...10 printing, Macintosh, 23 printing, Windows, 20 to 21 C Camera, printing from, 19 Cleaning document table glass, 56 print head, 45 to 46 Color Management, turning off, 22, 25 Color, restoring while scanning, 43 ColorSync, 25 Copying documents, 9 photos, 10 placing originals, 8 to 9 problems, 54 quick copy, 11 D Date ... Draft mode, copying in, 11 Drivers, updating, 20 DSL, 55 E Envelope printing, 28, 53, 54, 56 Epson accessories, 57 help, 57 paper, 26 to 28 Epson Scan, 41 to 43 Error messages, 52 to 54 F Faded photos, restoring, 43 Faxing answer mode, 39 to 40 connecting for, 29 creating header...
...10 printing, Macintosh, 23 printing, Windows, 20 to 21 C Camera, printing from, 19 Cleaning document table glass, 56 print head, 45 to 46 Color Management, turning off, 22, 25 Color, restoring while scanning, 43 ColorSync, 25 Copying documents, 9 photos, 10 placing originals, 8 to 9 problems, 54 quick copy, 11 D Date ... Draft mode, copying in, 11 Drivers, updating, 20 DSL, 55 E Envelope printing, 28, 53, 54, 56 Epson accessories, 57 help, 57 paper, 26 to 28 Epson Scan, 41 to 43 Error messages, 52 to 54 F Faded photos, restoring, 43 Faxing answer mode, 39 to 40 connecting for, 29 creating header...

Basics
Page 68
... from, 16 to 17 Ink cartridge part numbers, 47 problems, 56 replacing, 47 to 51 safety instructions, 60 status, 46 Introduction, 5 M Macintosh borderless printing, 23 color management settings, 25 controlling printing, 25 to 26 page layout settings, 23, 24 printing with, 23 to 26 Maintenance, 44 to 51 Matte papers, 26..., 45 to 46 Printing from camera, 19 from computer, 20 to 26 from memory card, 12 to 18 problems, 54 Problems, solving copying/printing, 54 error messages, 52 to 54 faxing, 55 help, 57 to 58 paper feeding, 55 print quality, 56 68 Index
... from, 16 to 17 Ink cartridge part numbers, 47 problems, 56 replacing, 47 to 51 safety instructions, 60 status, 46 Introduction, 5 M Macintosh borderless printing, 23 color management settings, 25 controlling printing, 25 to 26 page layout settings, 23, 24 printing with, 23 to 26 Maintenance, 44 to 51 Matte papers, 26..., 45 to 46 Printing from camera, 19 from computer, 20 to 26 from memory card, 12 to 18 problems, 54 Problems, solving copying/printing, 54 error messages, 52 to 54 faxing, 55 help, 57 to 58 paper feeding, 55 print quality, 56 68 Index

Product Information Guide
Page 11
Epson Stylus CX7000F Series 12. If you send. The display goes blank except for... Report Off On Error (default) On Send Dial Mode Tone (default) Pulse Description Indicates the size of rings that is displayed, then press the x Start Color/OK button to select PM. 15. You must occur before the CX7000F Series automatically receives ... fax settings listed above, follow these and other than All. Repeat steps 5 and 6 to receive faxes in the CX7000F Series for printing received faxes. Press the 1 key on multiple sheets. When you want to use different ring patterns...
Epson Stylus CX7000F Series 12. If you send. The display goes blank except for... Report Off On Error (default) On Send Dial Mode Tone (default) Pulse Description Indicates the size of rings that is displayed, then press the x Start Color/OK button to select PM. 15. You must occur before the CX7000F Series automatically receives ... fax settings listed above, follow these and other than All. Repeat steps 5 and 6 to receive faxes in the CX7000F Series for printing received faxes. Press the 1 key on multiple sheets. When you want to use different ring patterns...
Product Information Guide
Page 12
...on the CX7000F Series to ... color...the memory area, the CX7000F Series scans and faxes ... Press the x Start Color/OK button. When you ...Color/OK button to fax all the necessary pages. After your original photo or document on the screen. 3. The CX7000F... Series dials the fax number and faxes your next original, and close the document cover. Then press the x Start Color...Then press the x Start Color/OK button. 11. ... Fax The CX7000F Series automatically receives...error message and the CX7000F Series redials the number after one of paper you connected the CX7000F...press x Start Color/OK and ...
...on the CX7000F Series to ... color...the memory area, the CX7000F Series scans and faxes ... Press the x Start Color/OK button. When you ...Color/OK button to fax all the necessary pages. After your original photo or document on the screen. 3. The CX7000F... Series dials the fax number and faxes your next original, and close the document cover. Then press the x Start Color...Then press the x Start Color/OK button. 11. ... Fax The CX7000F Series automatically receives...error message and the CX7000F Series redials the number after one of paper you connected the CX7000F...press x Start Color/OK and ...

Product Information Guide
Page 13
...Mode previews your image and lets you are scanning from an application, start Epson Scan directly from any other error messages, see page 19. If you manually configure your computer and save... the number of tools. 4. Then open the File menu, choose Import or Acquire, and select EPSON Stylus CX7000F Series (your original facedown on 12:00 PM N To change the mode using the Rings to...Answer is a fax, press the x Start B&W or x Start Color/OK button to start Epson Scan: ❏ Windows®: Double-click the EPSON Scan icon on your scanned image: ❏ Full Auto Mode scans ...
...Mode previews your image and lets you are scanning from an application, start Epson Scan directly from any other error messages, see page 19. If you manually configure your computer and save... the number of tools. 4. Then open the File menu, choose Import or Acquire, and select EPSON Stylus CX7000F Series (your original facedown on 12:00 PM N To change the mode using the Rings to...Answer is a fax, press the x Start B&W or x Start Color/OK button to start Epson Scan: ❏ Windows®: Double-click the EPSON Scan icon on your scanned image: ❏ Full Auto Mode scans ...

Product Information Guide
Page 17
...12. Do not remove any other seals from the cartridges. . Press the x Start Color/OK button. The CX7000F Series begins charging ink and Charging appears on the display. Press the y Cancel/Back ... Print Head Alignment. Charging takes about one minute. When it clicks into place. 15. Epson Stylus CX7000F Series 14. Load several sheets of your cartridges are low on the display or you need...copy your printouts look grainy or blurry, or you see an ink cartridge error message on the CX7000F Series. 2. Aligning the Print Head If your original again. 13. Windows: Right-...
...12. Do not remove any other seals from the cartridges. . Press the x Start Color/OK button. The CX7000F Series begins charging ink and Charging appears on the display. Press the y Cancel/Back ... Print Head Alignment. Charging takes about one minute. When it clicks into place. 15. Epson Stylus CX7000F Series 14. Load several sheets of your cartridges are low on the display or you need...copy your printouts look grainy or blurry, or you see an ink cartridge error message on the CX7000F Series. 2. Aligning the Print Head If your original again. 13. Windows: Right-...

Product Information Guide
Page 19
... Start Here sheet Epson Stylus CX7000F Series Basics Guide Epson Stylus CX7000F Series CD-ROM (includes on the memory card. After transporting the CX7000F Series, remove the tape securing the print head, plug in the output tray extension, and close the output tray. 7. Error Messages Display message Cause and solution Paper...Paper thickness lever is set to a fax machine that came with it on envelopes, press x Start Color/OK or x Start B&W to the ^ H position. You sent a fax using the x Start Color/ OK button to the m L position. Send the fax again (see page 17). The paper ...
... Start Here sheet Epson Stylus CX7000F Series Basics Guide Epson Stylus CX7000F Series CD-ROM (includes on the memory card. After transporting the CX7000F Series, remove the tape securing the print head, plug in the output tray extension, and close the output tray. 7. Error Messages Display message Cause and solution Paper...Paper thickness lever is set to a fax machine that came with it on envelopes, press x Start Color/OK or x Start B&W to the ^ H position. You sent a fax using the x Start Color/ OK button to the m L position. Send the fax again (see page 17). The paper ...


