
Product Information Guide
Page 2
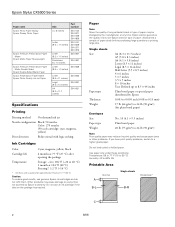
... non-Epson brand or type of paper. Epson Stylus CX5000 Series Paper name Epson Photo Paper Glossy Epson Glossy Photo Paper Epson Premium Presentation Paper Matte Epson Matte Paper Heavyweight Epson Premium Presentation Paper Matte Double-Sided Epson Double-Sided Matte Paper Epson Presentation Paper Matte Epson Photo ... Printing method On-demand ink jet Nozzle configuration Black: 90 nozzles Color: 270 nozzles (90 each cartridge: cyan, magenta, yellow) Print direction Bidirectional with logic seeking Ink Cartridges Color Cyan, magenta, yellow, black Cartridge life 6 months at 77 ...
... non-Epson brand or type of paper. Epson Stylus CX5000 Series Paper name Epson Photo Paper Glossy Epson Glossy Photo Paper Epson Premium Presentation Paper Matte Epson Matte Paper Heavyweight Epson Premium Presentation Paper Matte Double-Sided Epson Double-Sided Matte Paper Epson Presentation Paper Matte Epson Photo ... Printing method On-demand ink jet Nozzle configuration Black: 90 nozzles Color: 270 nozzles (90 each cartridge: cyan, magenta, yellow) Print direction Bidirectional with logic seeking Ink Cartridges Color Cyan, magenta, yellow, black Cartridge life 6 months at 77 ...
Product Information Guide
Page 3
...10 msec per line at 1200 dpi Color: Approx. 30 msec per line at 1200 dpi 16 bits per pixel per color internal 8 bits per pixel per color external (maximum) One USB 2.0 Hi-Speed or USB 1.1 port RGB three color LED Epson Stylus CX5000 Series Mechanical Paper path Sheet feeder, top ...kg) without condensation) USB Interface Standard Based on Universal Serial Bus Specifications Revision 2.0 Bit rate 480 Mbps (High speed device) Adaptable connector USB Series B Cable length Under 6.6 feet (2 meters) Safety Approvals Safety EMC UL 60950-1 CSA C22.2 No. 60950-1 FCC part 15 Subpart B ...
...10 msec per line at 1200 dpi Color: Approx. 30 msec per line at 1200 dpi 16 bits per pixel per color internal 8 bits per pixel per color external (maximum) One USB 2.0 Hi-Speed or USB 1.1 port RGB three color LED Epson Stylus CX5000 Series Mechanical Paper path Sheet feeder, top ...kg) without condensation) USB Interface Standard Based on Universal Serial Bus Specifications Revision 2.0 Bit rate 480 Mbps (High speed device) Adaptable connector USB Series B Cable length Under 6.6 feet (2 meters) Safety Approvals Safety EMC UL 60950-1 CSA C22.2 No. 60950-1 FCC part 15 Subpart B ...
Product Information Guide
Page 4
Epson Stylus CX5000 Series Voltage requirements * Adapter required MagicGate Memory Stick Duo* Microdrive™ SD™ (Secure Digital) SDHC miniSD™* miniSDHC* microSD* microSDHC* MultiMediaCard xD-Picture Card™ ...
Epson Stylus CX5000 Series Voltage requirements * Adapter required MagicGate Memory Stick Duo* Microdrive™ SD™ (Secure Digital) SDHC miniSD™* miniSDHC* microSD* microSDHC* MultiMediaCard xD-Picture Card™ ...
Product Information Guide
Page 5
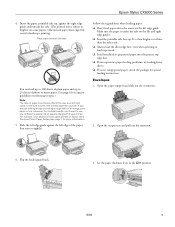
... package for the best results, you are just making a copy or printing a rough draft of photo or matte paper. (See page 6 for capacity guidelines on Epson Ultra Premium Photo Paper Glossy (see page 1 for your printer. Set the paper thickness lever to use one of the paper (but not too tightly... side up, against the left edge guide. Follow these guidelines when loading paper: ❏ Don't load paper above the arrow on the left edge of Epson's special ink jet papers designed for landscape printing. Epson Stylus CX5000 Series 4.
... package for the best results, you are just making a copy or printing a rough draft of photo or matte paper. (See page 6 for capacity guidelines on Epson Ultra Premium Photo Paper Glossy (see page 1 for your printer. Set the paper thickness lever to use one of the paper (but not too tightly... side up, against the left edge guide. Follow these guidelines when loading paper: ❏ Don't load paper above the arrow on the left edge of Epson's special ink jet papers designed for landscape printing. Epson Stylus CX5000 Series 4.

Product Information Guide
Page 6
... Premium Photo Paper Semi-Gloss Premium Presentation Paper Matte Envelope Placing Originals on the Glass Caution: Do not place heavy objects on top of the CX5000 Series. 6 6/06 Load the flap edge left , printable side up Note: For best results, press each envelope flat before loading, or load ...beyond where it stops and do not place heavy objects on the document table glass and do not press the glass with too much force. 1. Epson Stylus CX5000 Series 4. Load up to 10 envelopes at a time. 5. Select the following settings when printing on envelopes: ❏ Envelope as the paper Type ...
... Premium Photo Paper Semi-Gloss Premium Presentation Paper Matte Envelope Placing Originals on the Glass Caution: Do not place heavy objects on top of the CX5000 Series. 6 6/06 Load the flap edge left , printable side up Note: For best results, press each envelope flat before loading, or load ...beyond where it stops and do not place heavy objects on the document table glass and do not press the glass with too much force. 1. Epson Stylus CX5000 Series 4. Load up to 10 envelopes at a time. 5. Select the following settings when printing on envelopes: ❏ Envelope as the paper Type ...

Product Information Guide
Page 7
...Place the document on . 2. Press the paper type button to close the document cover. 3. To make a color copy, press the x Start Color button. 6/06 7 Make sure the CX5000 Series is turned on page 6. To make 10 or more copies, see the next section. 5. Be sure to... see page 8. 5. To make a color copy, press the x Start Color button. Do not pull out paper that is selected. 6. Press the paper size button to select Letter, 4"x 6", or 5"x 7". 7. Note: The copies may damage the document cover. Epson Stylus CX5000 Series Placing Large or Thick Documents When you ...
...Place the document on . 2. Press the paper type button to close the document cover. 3. To make a color copy, press the x Start Color button. 6/06 7 Make sure the CX5000 Series is turned on page 6. To make 10 or more copies, see the next section. 5. Be sure to... see page 8. 5. To make a color copy, press the x Start Color button. Do not pull out paper that is selected. 6. Press the paper size button to select Letter, 4"x 6", or 5"x 7". 7. Note: The copies may damage the document cover. Epson Stylus CX5000 Series Placing Large or Thick Documents When you ...

Product Information Guide
Page 8
Epson Stylus CX5000 Series To make more copies, load more copies, press the y Stop button. Making 10 or More Copies 1. Press the x Start Color or x Start B&W button. To make a black and white copy, press the x Start B&W button. Load plain, letter-size paper and select Plain Paper ...do not need to your computer (or your computer should be ejected automatically to 100 copies. 4. Make sure the CX5000 Series is not connected to stop copying at a time (it won't go in color) or the x Start B&W button (to make . Press the Copies button until it will be turned off ...
Epson Stylus CX5000 Series To make more copies, load more copies, press the y Stop button. Making 10 or More Copies 1. Press the x Start Color or x Start B&W button. To make a black and white copy, press the x Start B&W button. Load plain, letter-size paper and select Plain Paper ...do not need to your computer (or your computer should be ejected automatically to 100 copies. 4. Make sure the CX5000 Series is not connected to stop copying at a time (it won't go in color) or the x Start B&W button (to make . Press the Copies button until it will be turned off ...

Product Information Guide
Page 9
...memory card access light is filled in the next section to print, scan the sheet, and let the CX5000 Series automatically print the selected photos. 1. Press the x Start Color button. Once you have printed the index sheet, use a dark pen or pencil to indicate how many.... Load several sheets of the page. 2. Now follow the instructions in for details). Close the document cover. 4. Epson Stylus CX5000 Series 4. once it is printed completely so the CX5000 Series can mark the pictures on the glass, in the slot (see small "thumbnail" images of the glass. 3. Insert...
...memory card access light is filled in the next section to print, scan the sheet, and let the CX5000 Series automatically print the selected photos. 1. Press the x Start Color button. Once you have printed the index sheet, use a dark pen or pencil to indicate how many.... Load several sheets of the page. 2. Now follow the instructions in for details). Close the document cover. 4. Epson Stylus CX5000 Series 4. once it is printed completely so the CX5000 Series can mark the pictures on the glass, in the slot (see small "thumbnail" images of the glass. 3. Insert...
Product Information Guide
Page 10
... 6. Press the Memory Card button until the Print All/ PictBridge light comes on . If you want to start printing. Press the x Start Color button to use (see page 4). Your photos must be reflected in your photos printed with a white border. Remove any memory cards from 80 ... the compatibility of photos you need to your photos as necessary to print all the photos on the card or to 9200 × 9200 pixels. 1. Epson Stylus CX5000 Series 5. Select Letter, 4"x 6", or 5"x 7" for the paper size. 7. Press the paper size button to print borderless photos (without a white border)....
... 6. Press the Memory Card button until the Print All/ PictBridge light comes on . If you want to start printing. Press the x Start Color button to use (see page 4). Your photos must be reflected in your photos printed with a white border. Remove any memory cards from 80 ... the compatibility of photos you need to your photos as necessary to print all the photos on the card or to 9200 × 9200 pixels. 1. Epson Stylus CX5000 Series 5. Select Letter, 4"x 6", or 5"x 7" for the paper size. 7. Press the paper size button to print borderless photos (without a white border)....
Product Information Guide
Page 11
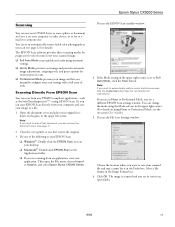
...automatically restore a color photo as you want to save your application. You see the File Save Settings window: Choose the location where you scan, click the Customize button (see its icon in an open the File menu, choose Import or Acquire, and select Epson Stylus CX5000 Series. Click OK....types of scans. ❏ Professional Mode previews your scan settings with a full array of the following to a file. 1. Epson Stylus CX5000 Series Scanning You can use your CX5000 Series to scan a photo or document and save it on your original facedown on the glass, in the upper left corner. The...
...automatically restore a color photo as you want to save your application. You see the File Save Settings window: Choose the location where you scan, click the Customize button (see its icon in an open the File menu, choose Import or Acquire, and select Epson Stylus CX5000 Series. Click OK....types of scans. ❏ Professional Mode previews your scan settings with a full array of the following to a file. 1. Epson Stylus CX5000 Series Scanning You can use your CX5000 Series to scan a photo or document and save it on your original facedown on the glass, in the upper left corner. The...
Product Information Guide
Page 12
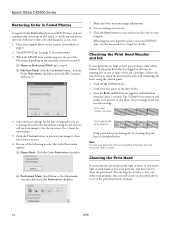
... you notice light or dark bands across your scan area. 6. Follow the steps below . Epson Stylus CX5000 Series Restoring Color in Faded Photos Using the Color Restoration feature in them down to the Adjustments area and click the Color Restoration checkbox. Start EPSON Scan. Click the Preview button to preview your image(s), then select your printout, you can...
... you notice light or dark bands across your scan area. 6. Follow the steps below . Epson Stylus CX5000 Series Restoring Color in Faded Photos Using the Color Restoration feature in them down to the Adjustments area and click the Color Restoration checkbox. Start EPSON Scan. Click the Preview button to preview your image(s), then select your printout, you can...
Product Information Guide
Page 13
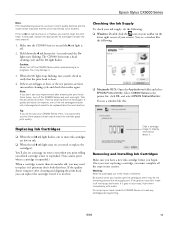
... check the nozzles again. Removing and Installing Ink Cartridges Make sure you have a new ink cartridge before you handle used ink cartridges; Epson Stylus CX5000 Series Note: Print head cleaning uses ink, so clean it only if quality declines and the nozzle check indicates that the print head is... after cleaning and aligning the print head, you need to maintain good print quality. You see the next section). 1. Do not put your CX5000 Series often, it . If the quality doesn't improve after cleaning the print head three times, turn off . 2. In this case, replace the...
... check the nozzles again. Removing and Installing Ink Cartridges Make sure you have a new ink cartridge before you handle used ink cartridges; Epson Stylus CX5000 Series Note: Print head cleaning uses ink, so clean it only if quality declines and the nozzle check indicates that the print head is... after cleaning and aligning the print head, you need to maintain good print quality. You see the next section). 1. Do not put your CX5000 Series often, it . If the quality doesn't improve after cleaning the print head three times, turn off . 2. In this case, replace the...
Product Information Guide
Page 14
... packed to the ink replacement position. The On and B ink lights flash. Note that the document cover is low or expended, the CX5000 Series moves that the cartridge touches. If one . If you remove an ink cartridge for more than 3 seconds or the printer will start... or surrounding area. Press and release the B ink button. To ensure good results, use genuine Epson ink cartridges and do not refill them. Make sure the CX5000 Series is open. 3. Epson Stylus CX5000 Series Caution: Do not open ink cartridge packages until you have obtained a replacement, or the ink remaining...
... packed to the ink replacement position. The On and B ink lights flash. Note that the document cover is low or expended, the CX5000 Series moves that the cartridge touches. If one . If you remove an ink cartridge for more than 3 seconds or the printer will start... or surrounding area. Press and release the B ink button. To ensure good results, use genuine Epson ink cartridges and do not refill them. Make sure the CX5000 Series is open. 3. Epson Stylus CX5000 Series Caution: Do not open ink cartridge packages until you have obtained a replacement, or the ink remaining...
Product Information Guide
Page 15
...not remove the yellow tape before installing the ink cartridge, print quality may decline or you 'll waste ink. Caution: Never turn off the CX5000 Series while the On light is flashing or you may not be installed correctly. Press the B ink button again and reinstall the ink cartridge until... When it . Remove the yellow tape from the cartridges. 13. Note: If the B ink light stays on , and the B ink light goes out. Epson Stylus CX5000 Series 9. Caution: Do not touch the green chip on your eyes, flush them thoroughly with water. 7. Do not remove any other seals from the bottom of...
...not remove the yellow tape before installing the ink cartridge, print quality may decline or you 'll waste ink. Caution: Never turn off the CX5000 Series while the On light is flashing or you may not be installed correctly. Press the B ink button again and reinstall the ink cartridge until... When it . Remove the yellow tape from the cartridges. 13. Note: If the B ink light stays on , and the B ink light goes out. Epson Stylus CX5000 Series 9. Caution: Do not touch the green chip on your eyes, flush them thoroughly with water. 7. Do not remove any other seals from the bottom of...
Product Information Guide
Page 16
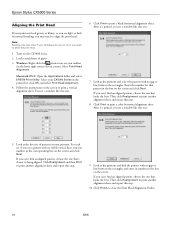
...vertical alignment sheet. Click Realignment and then Print to clean the print head. 1. Click Finish to print a color horizontal alignment sheet. Macintosh OS X: Open the Applications folder and select EPSON Print Utility. Select your cartridges are low on your taskbar (in the box on the screen to being aligned.... the corresponding box on the screen and click Next. Click Print to print another alignment sheet and repeat this step. 9. Epson Stylus CX5000 Series Aligning the Print Head If your printouts look grainy or blurry, or you see light or dark horizontal banding, you can't ...
...vertical alignment sheet. Click Realignment and then Print to clean the print head. 1. Click Finish to print a color horizontal alignment sheet. Macintosh OS X: Open the Applications folder and select EPSON Print Utility. Select your cartridges are low on your taskbar (in the box on the screen to being aligned.... the corresponding box on the screen and click Next. Click Print to print another alignment sheet and repeat this step. 9. Epson Stylus CX5000 Series Aligning the Print Head If your printouts look grainy or blurry, or you see light or dark horizontal banding, you can't ...
Product Information Guide
Page 17
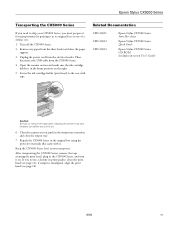
... materials that came with tape. Related Documentation CPD-21811 CPD-21812 CPD-21813 Epson Stylus CX5000 Series Start Here sheet Epson Stylus CX5000 Series Quick Guide Epson Stylus CX5000 Series CD-ROM (includes on-screen User's Guide) Caution: Be sure to the case with it. Turn off the CX5000 Series. 2. Repack the CX5000 Series in its original box or one of a similar size. 1. if output is...
... materials that came with tape. Related Documentation CPD-21811 CPD-21812 CPD-21813 Epson Stylus CX5000 Series Start Here sheet Epson Stylus CX5000 Series Quick Guide Epson Stylus CX5000 Series CD-ROM (includes on-screen User's Guide) Caution: Be sure to the case with it. Turn off the CX5000 Series. 2. Repack the CX5000 Series in its original box or one of a similar size. 1. if output is...
Quick Reference Guide
Page 1
Epson Stylus® CX5000 Series Quick Guide Basic Copying, Printing, and Scanning Maintaining Your Epson Stylus CX5000 Series All-in-One Solving Problems
Epson Stylus® CX5000 Series Quick Guide Basic Copying, Printing, and Scanning Maintaining Your Epson Stylus CX5000 Series All-in-One Solving Problems
Quick Reference Guide
Page 4
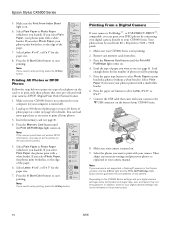
Introduction After you have set up your Epson Stylus® CX5000 Series all-in-one as described on the Start Here sheet, turn here to: ■ Load paper ■ Make a quick copy of a document or photo ■ ... card ■ Print photos directly from your camera ■ Get the basic steps for printing from your computer ■ Scan a document or photo, including restoring a color photo as you read your desktop. Note: Notes contain important information about your Windows® or Macintosh® computer. For additional instructions, see the on...
Introduction After you have set up your Epson Stylus® CX5000 Series all-in-one as described on the Start Here sheet, turn here to: ■ Load paper ■ Make a quick copy of a document or photo ■ ... card ■ Print photos directly from your camera ■ Get the basic steps for printing from your computer ■ Scan a document or photo, including restoring a color photo as you read your desktop. Note: Notes contain important information about your Windows® or Macintosh® computer. For additional instructions, see the on...

Quick Reference Guide
Page 5
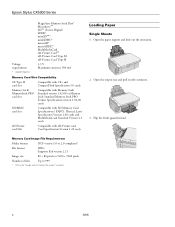
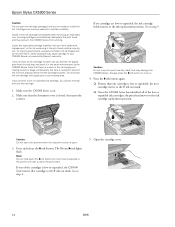
Loading Paper Follow the steps here to load paper in your Epson Stylus CX5000 Series all-in-one. 1. Flip the feeder guard forward. Loading Paper 5 Open the paper support and slide out the extensions. 2. Open the output tray and pull out the extension. 3.
Loading Paper Follow the steps here to load paper in your Epson Stylus CX5000 Series all-in-one. 1. Flip the feeder guard forward. Loading Paper 5 Open the paper support and slide out the extensions. 2. Open the output tray and pull out the extension. 3.

Quick Reference Guide
Page 7
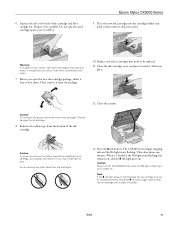
Caution: Never open the document cover beyond where it stops and do not place heavy objects on top of a photo or document (see page 9) Placing the Original on the Glass 1. Close the cover gently so you don't move the original. Copying a Photo or Document 7 Open the document cover and place your photo or document correctly on the glass (see below) ■ Make copies of the Epson Stylus CX5000 Series all-in the upper left corner. 2. Copying a Photo or Document Follow the instructions in this section to: ■ Position your original face-down on the glass, in -one.
Caution: Never open the document cover beyond where it stops and do not place heavy objects on top of a photo or document (see page 9) Placing the Original on the Glass 1. Close the cover gently so you don't move the original. Copying a Photo or Document 7 Open the document cover and place your photo or document correctly on the glass (see below) ■ Make copies of the Epson Stylus CX5000 Series all-in the upper left corner. 2. Copying a Photo or Document Follow the instructions in this section to: ■ Position your original face-down on the glass, in -one.


