

Quick Reference Guide
Page 21
Make sure Epson Stylus CX5000 Series is selected, then click the Preferences or Properties button. (If you 're printing (choose Photo or Best Photo for pictures) Select your paper Type ... next screen.) 5. Open the File menu and select Print. You see a Setup, Printer, or Options button, click it. 3. On the Main tab, select the basic print settings: Select the type of document you see a window like this one: Select EPSON Stylus CX5000 Series Click here to open your document Orientation Click here for borderless...
Make sure Epson Stylus CX5000 Series is selected, then click the Preferences or Properties button. (If you 're printing (choose Photo or Best Photo for pictures) Select your paper Type ... next screen.) 5. Open the File menu and select Print. You see a Setup, Printer, or Options button, click it. 3. On the Main tab, select the basic print settings: Select the type of document you see a window like this one: Select EPSON Stylus CX5000 Series Click here to open your document Orientation Click here for borderless...
Quick Reference Guide
Page 23
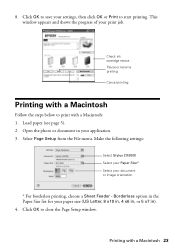
... page 5). 2. Click OK to start printing. This window appears and shows the progress of your settings, then click OK or Print to close the Page Setup window. Make the following settings: Select Stylus CX5000 Select your Paper Size* Select your application. 3. Select Page...
... page 5). 2. Click OK to start printing. This window appears and shows the progress of your settings, then click OK or Print to close the Page Setup window. Make the following settings: Select Stylus CX5000 Select your Paper Size* Select your application. 3. Select Page...


