Network Installation Guide
Page 3
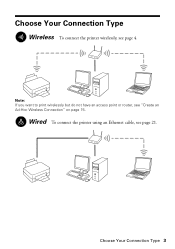
Choose Your Connection Type 3 Wired To connect the printer using an Ethernet cable, see "Create an Ad-Hoc Wireless Connection" on page 15. Note: If you want to print wirelessly but do not have an access point or router, see page 21. Choose Your Connection Type Wireless To connect the printer wirelessly, see page 4.
Choose Your Connection Type 3 Wired To connect the printer using an Ethernet cable, see "Create an Ad-Hoc Wireless Connection" on page 15. Note: If you want to print wirelessly but do not have an access point or router, see page 21. Choose Your Connection Type Wireless To connect the printer wirelessly, see page 4.
Network Installation Guide
Page 15
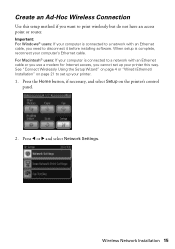
...'s Ethernet cable. Press l or r and select Network Settings. Important: For Windows® users: If your computer is complete, reconnect your printer. 1. Create an Ad-Hoc Wireless Connection Use this way. Press the Home button, if necessary, and select Setup on page 21 to a...want to disconnect it before installing software. See "Connect Wirelessly Using the Setup Wizard" on page 4 or "Wired (Ethernet) Installation" on the printer's control panel. 2. Wireless Network Installation 15 When setup is connected to a network with an Ethernet cable or you use a modem for Internet...
...'s Ethernet cable. Press l or r and select Network Settings. Important: For Windows® users: If your computer is complete, reconnect your printer. 1. Create an Ad-Hoc Wireless Connection Use this way. Press the Home button, if necessary, and select Setup on page 21 to a...want to disconnect it before installing software. See "Connect Wirelessly Using the Setup Wizard" on page 4 or "Wired (Ethernet) Installation" on the printer's control panel. 2. Wireless Network Installation 15 When setup is connected to a network with an Ethernet cable or you use a modem for Internet...
Network Installation Guide
Page 27
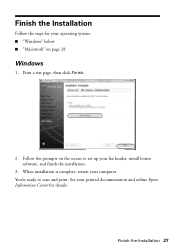
When installation is complete, restart your fax header, install bonus software, and finish the installation. 3. Finish the Installation Follow the steps for details. Print a test page, then click Finish. 2. Finish the Installation 27 You're ready to set up your computer. Follow the prompts on page 28 Windows 1. See your printed documentation and online Epson Information Center for your operating system: ■ "Windows" below ■ "Macintosh" on the screen to scan and print.
When installation is complete, restart your fax header, install bonus software, and finish the installation. 3. Finish the Installation Follow the steps for details. Print a test page, then click Finish. 2. Finish the Installation 27 You're ready to set up your computer. Follow the prompts on page 28 Windows 1. See your printed documentation and online Epson Information Center for your operating system: ■ "Windows" below ■ "Macintosh" on the screen to scan and print.
Network Installation Guide
Page 29
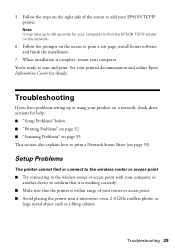
..." on page 32 ■ "Scanning Problems" on the right side of the screen to scan and print. Setup Problems The printer cannot find the EPSON TCPIP printer on the screen to print a Network Status Sheet (see page 33). Troubleshooting 29 Follow the prompts on the network. 6. Troubleshooting If you have problems setting up to 90...
..." on page 32 ■ "Scanning Problems" on the right side of the screen to scan and print. Setup Problems The printer cannot find the EPSON TCPIP printer on the screen to print a Network Status Sheet (see page 33). Troubleshooting 29 Follow the prompts on the network. 6. Troubleshooting If you have problems setting up to 90...
Network Installation Guide
Page 30
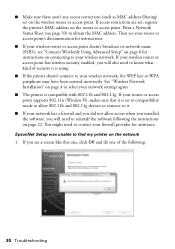
...wireless network, the WEP key or WPA passphrase may have been entered incorrectly. Print a Network Status Sheet (see a screen like this one, click OK and do one of security it is using. ■ If the printer doesn't connect to reinstall the software following : 30 Troubleshooting If your wireless router...will also need to your wireless network. ■ Make sure there aren't any access restrictions (such as MAC address filtering) set , register the printer's MAC address on the router or access point. If your router or access point supports 802.11n (Wireless N), makes sure that it . &#...
...wireless network, the WEP key or WPA passphrase may have been entered incorrectly. Print a Network Status Sheet (see a screen like this one, click OK and do one of security it is using. ■ If the printer doesn't connect to reinstall the software following : 30 Troubleshooting If your wireless router...will also need to your wireless network. ■ Make sure there aren't any access restrictions (such as MAC address filtering) set , register the printer's MAC address on the router or access point. If your router or access point supports 802.11n (Wireless N), makes sure that it . &#...
Network Installation Guide
Page 32
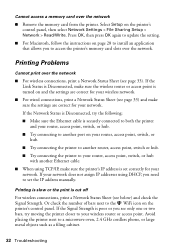
... see only one or two bars, try the following: ■ Make sure the Ethernet cable is set the IP address manually. If the Signal Strength is cut off For wireless connections, print a Network Status Sheet (see below) and check the Signal Strength. Select Setup on the printer's control panel. Printing Problems Cannot print over the...
... see only one or two bars, try the following: ■ Make sure the Ethernet cable is set the IP address manually. If the Signal Strength is cut off For wireless connections, print a Network Status Sheet (see below) and check the Signal Strength. Select Setup on the printer's control panel. Printing Problems Cannot print over the...
Network Installation Guide
Page 33
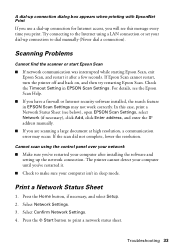
... this message every time you print. Press the Home button, if necessary, and select Setup. 2. Try connecting to make sure your computer after a few seconds. If Epson Scan cannot restart, turn the printer off and back on, and then try restarting Epson Scan. Scanning Problems Cannot find...33 Select Network Settings. 3. A dial-up connection dialog box appears when printing with EpsonNet Print If you use a dial-up connection for Internet access, you will see this case, print a Network Status Sheet (see the Epson Scan Help. ■ If you have a firewall or Internet security ...
... this message every time you print. Press the Home button, if necessary, and select Setup. 2. Try connecting to make sure your computer after a few seconds. If Epson Scan cannot restart, turn the printer off and back on, and then try restarting Epson Scan. Scanning Problems Cannot find...33 Select Network Settings. 3. A dial-up connection dialog box appears when printing with EpsonNet Print If you use a dial-up connection for Internet access, you will see this case, print a Network Status Sheet (see the Epson Scan Help. ■ If you have a firewall or Internet security ...

Network Installation Guide
Page 36
CPD-27516 Printed in XXXXXX
CPD-27516 Printed in XXXXXX
Product Brochure
Page 1
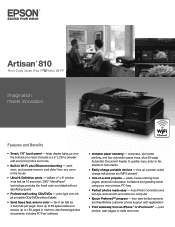
...projects - Auto Photo Correction and red-eye removal with registration4 • Print wirelessly from any room in memory; Artisan® 810 Print | Copy | Scan | Fax | ULTHRDAPhoto | Wi-Fi® Imagination...without a computer • Epson PreferredSM program - also faxes legal-size documents; store up to 60 speed dials and receive up to preview, edit and print photos and more large display... you need; charge cell phones and MP3 players3 • One-of documents • Easily charge portable devices - print photos, web-pages, e-mails and more • Built-in...
...projects - Auto Photo Correction and red-eye removal with registration4 • Print wirelessly from any room in memory; Artisan® 810 Print | Copy | Scan | Fax | ULTHRDAPhoto | Wi-Fi® Imagination...without a computer • Epson PreferredSM program - also faxes legal-size documents; store up to 60 speed dials and receive up to preview, edit and print photos and more large display... you need; charge cell phones and MP3 players3 • One-of documents • Easily charge portable devices - print photos, web-pages, e-mails and more • Built-in...
Product Brochure
Page 2
...Epson disclaims any and all rights in -one is a trademark of prints displayed under glass in indoor display or in the cartridges after first page with text patterns in accordance with ISO/IEC 24734. Artisan 810 Print | Copy | Scan | Fax | ULTHRDAPhoto | Wi-Fi Printing... - For the latest information regarding Snow Leopard, please visit www.epson.com/support/snowleopard Software Included Epson printer driver, Epson Print CD, Web to Page, Epson Scan, ArcSoft® Print Creations™, Epson scanner drivers, Presto® PageManager® Color Management Auto Photo Correction...
...Epson disclaims any and all rights in -one is a trademark of prints displayed under glass in indoor display or in the cartridges after first page with text patterns in accordance with ISO/IEC 24734. Artisan 810 Print | Copy | Scan | Fax | ULTHRDAPhoto | Wi-Fi Printing... - For the latest information regarding Snow Leopard, please visit www.epson.com/support/snowleopard Software Included Epson printer driver, Epson Print CD, Web to Page, Epson Scan, ArcSoft® Print Creations™, Epson scanner drivers, Presto® PageManager® Color Management Auto Photo Correction...
Quick Guide
Page 1
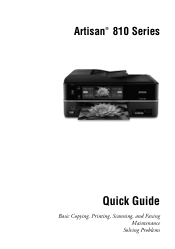
Artisan® 810 Series Quick Guide Basic Copying, Printing, Scanning, and Faxing Maintenance Solving Problems
Artisan® 810 Series Quick Guide Basic Copying, Printing, Scanning, and Faxing Maintenance Solving Problems
Quick Guide
Page 2
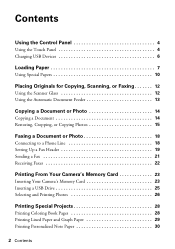
..., or Copying Photos 15 Faxing a Document or Photo 18 Connecting to a Phone Line 18 Setting Up a Fax Header 19 Sending a Fax 21 Receiving Faxes 22 Printing From Your Camera's Memory Card 23 Inserting Your Camera's Memory Card 23 Inserting a USB Drive 25 Selecting and...
..., or Copying Photos 15 Faxing a Document or Photo 18 Connecting to a Phone Line 18 Setting Up a Fax Header 19 Sending a Fax 21 Receiving Faxes 22 Printing From Your Camera's Memory Card 23 Inserting Your Camera's Memory Card 23 Inserting a USB Drive 25 Selecting and...
Quick Guide
Page 3
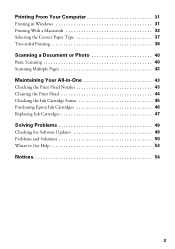
Printing From Your Computer 31 Printing in Windows 31 Printing With a Macintosh 33 Selecting the Correct Paper Type 37 Two-sided Printing 38 Scanning a Document or Photo 40 Basic Scanning 40 Scanning Multiple Pages 42 Maintaining Your All-in-One 43 Checking the Print Head Nozzles 43 Cleaning the Print Head 44 Checking the Ink Cartridge Status 45 Purchasing Epson Ink Cartridges 46 Replacing Ink Cartridges 47 Solving Problems 49 Checking for Software Updates 49 Problems and Solutions 50 Where to Get Help 53 Notices 54 3
Printing From Your Computer 31 Printing in Windows 31 Printing With a Macintosh 33 Selecting the Correct Paper Type 37 Two-sided Printing 38 Scanning a Document or Photo 40 Basic Scanning 40 Scanning Multiple Pages 42 Maintaining Your All-in-One 43 Checking the Print Head Nozzles 43 Cleaning the Print Head 44 Checking the Ink Cartridge Status 45 Purchasing Epson Ink Cartridges 46 Replacing Ink Cartridges 47 Solving Problems 49 Checking for Software Updates 49 Problems and Solutions 50 Where to Get Help 53 Notices 54 3
Quick Guide
Page 5
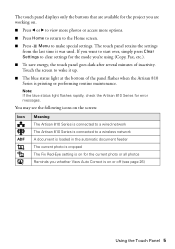
... the screen: Icon ADF Meaning The Artisan 810 Series is connected to a wired network The Artisan 810 Series is connected to a wireless network A document is loaded in the automatic document feeder The current photo is cropped The Fix Red-Eye setting is printing or performing routine maintenance. Touch the ...screen to clear settings for error messages. Note: If the blue status light flashes rapidly, check the Artisan 810 Series for the mode you want to start over, simply press...
... the screen: Icon ADF Meaning The Artisan 810 Series is connected to a wired network The Artisan 810 Series is connected to a wireless network A document is loaded in the automatic document feeder The current photo is cropped The Fix Red-Eye setting is printing or performing routine maintenance. Touch the ...screen to clear settings for error messages. Note: If the blue status light flashes rapidly, check the Artisan 810 Series for the mode you want to start over, simply press...
Quick Guide
Page 7
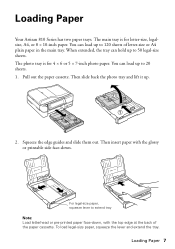
... photo paper. Loading Paper 7 When extended, the tray can load up to 20 sheets. 1. Squeeze the edge guides and slide them out. Loading Paper Your Artisan 810 Series has two paper trays. You can load up . 2. For legal-size paper, squeeze lever to 120 sheets of the paper cassette. Then slide back... the photo tray and lift it up to extend tray Note: Load letterhead or pre-printed paper face-down, with the glossy or printable side face-down. To load legal-size paper, squeeze the lever and extend the tray. The main...
... photo paper. Loading Paper 7 When extended, the tray can load up to 20 sheets. 1. Squeeze the edge guides and slide them out. Loading Paper Your Artisan 810 Series has two paper trays. You can load up . 2. For legal-size paper, squeeze lever to 120 sheets of the paper cassette. Then slide back... the photo tray and lift it up to extend tray Note: Load letterhead or pre-printed paper face-down, with the glossy or printable side face-down. To load legal-size paper, squeeze the lever and extend the tray. The main...
Quick Guide
Page 14
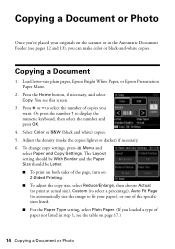
...should be Letter. ■ To print on both sides of the page, turn on 2-Sided Printing. ■ To adjust the copy size, select Reduce/Enlarge, then choose Actual (to print at actual size), Custom (to...if necessary, and select Copy. Copying a Document or Photo Once you've placed your paper), or one of the specific sizes listed. ■ For the Paper Type setting, select Plain Paper. (If you... select the number and press OK. 4. Load letter-size plain paper, Epson Bright White Paper, or Epson Presentation Paper Matte. 2. Press + or - To change copy settings, press x Menu and select Paper...
...should be Letter. ■ To print on both sides of the page, turn on 2-Sided Printing. ■ To adjust the copy size, select Reduce/Enlarge, then choose Actual (to print at actual size), Custom (to...if necessary, and select Copy. Copying a Document or Photo Once you've placed your paper), or one of the specific sizes listed. ■ For the Paper Type setting, select Plain Paper. (If you... select the number and press OK. 4. Load letter-size plain paper, Epson Bright White Paper, or Epson Presentation Paper Matte. 2. Press + or - To change copy settings, press x Menu and select Paper...
Quick Guide
Page 15
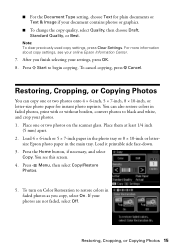
...used copy settings, press Clear Settings. To cancel copying, press y Cancel. You can copy one or two photos on Color Restoration to begin copying. Load 4 × 6-inch or 5 × 7-inch paper in faded photos, print with or without borders, convert photos to black and white, and crop your photos. 1. ... Photos You can also restore colors in the photo tray or 8 × 10-inch or letter- Restoring, Cropping, or Copying Photos 15 size Epson photo paper in faded photos as you finish selecting your photos are not faded, select Off. Load it printable side face-down. 3. For more ...
...used copy settings, press Clear Settings. To cancel copying, press y Cancel. You can copy one or two photos on Color Restoration to begin copying. Load 4 × 6-inch or 5 × 7-inch paper in faded photos, print with or without borders, convert photos to black and white, and crop your photos. 1. ... Photos You can also restore colors in the photo tray or 8 × 10-inch or letter- Restoring, Cropping, or Copying Photos 15 size Epson photo paper in faded photos as you finish selecting your photos are not faded, select Off. Load it printable side face-down. 3. For more ...

Quick Guide
Page 16
... settings, press Clear Settings. ■ To change any of copies, and crop it if desired. 11. to select the number (up to continue. 12. To print more than 1 copy, press + or - 6. When you see a message asking you choose.) 16 Copying a Document or Photo To change the paper size, select Paper ...check the zoomed image, press OK. Press OK again to 99). 9. To crop the photo and enlarge the resulting image area to view the second one, select the number of the settings displayed on the Paper Type setting you to prescan your photos. 7. When you placed two photos on the scanner...
... settings, press Clear Settings. ■ To change any of copies, and crop it if desired. 11. to select the number (up to continue. 12. To print more than 1 copy, press + or - 6. When you see a message asking you choose.) 16 Copying a Document or Photo To change the paper size, select Paper ...check the zoomed image, press OK. Press OK again to 99). 9. To crop the photo and enlarge the resulting image area to view the second one, select the number of the settings displayed on the Paper Type setting you to prescan your photos. 7. When you placed two photos on the scanner...
Quick Guide
Page 17
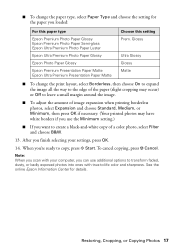
... the paper you loaded: For this paper type Epson Premium Photo Paper Glossy Epson Premium Photo Paper Semi-gloss Epson Ultra Premium Photo Paper Luster Epson Ultra Premium Photo Paper Glossy Epson Photo Paper Glossy Epson Premium Presentation Paper Matte Epson Ultra Premium Presentation Paper Matte Choose this setting Prem...and choose Standard, Medium, or Minimum, then press OK if necessary. (Your printed photos may have white borders if you use additional options to transform faded, dusty, or badly exposed photos into ones with your settings, press OK. 14. Note: When you scan with true-...
... the paper you loaded: For this paper type Epson Premium Photo Paper Glossy Epson Premium Photo Paper Semi-gloss Epson Ultra Premium Photo Paper Luster Epson Ultra Premium Photo Paper Glossy Epson Photo Paper Glossy Epson Premium Presentation Paper Matte Epson Ultra Premium Presentation Paper Matte Choose this setting Prem...and choose Standard, Medium, or Minimum, then press OK if necessary. (Your printed photos may have white borders if you use additional options to transform faded, dusty, or badly exposed photos into ones with your settings, press OK. 14. Note: When you scan with true-...

Quick Guide
Page 21
... the last fax number you don't need to continue. Note: If the recipient's fax machine prints only in black and white even if you need to fax another page, press No. To redial... digits). To set up to use the Epson FAX Utility (Windows only), see page 12). 2. Then press OK. Press x Start to see this screen after one minute. Note: If the fax number is...is scanned. If you are scanning with the Automatic Document Feeder (see a redialing message and the Artisan 810 Series redials after the first page is automatically sent in black and white, your document on the scanner...
... the last fax number you don't need to continue. Note: If the recipient's fax machine prints only in black and white even if you need to fax another page, press No. To redial... digits). To set up to use the Epson FAX Utility (Windows only), see page 12). 2. Then press OK. Press x Start to see this screen after one minute. Note: If the fax number is...is scanned. If you are scanning with the Automatic Document Feeder (see a redialing message and the Artisan 810 Series redials after the first page is automatically sent in black and white, your document on the scanner...


