
Product Brochure
Page 4
... full unit exchange service n Optional one or two-year Epson Preferred Plus Service plans available * Data based on both sides of our three-level black system to 1.5mm thick posterboard n Built-in min:sec. the Epson Stylus Pro series printers are shown in automatic media cutter High Performance Print Engine SpeedsA The Epson Stylus Pro 4800 utilizes our latest print head technology -
... full unit exchange service n Optional one or two-year Epson Preferred Plus Service plans available * Data based on both sides of our three-level black system to 1.5mm thick posterboard n Built-in min:sec. the Epson Stylus Pro series printers are shown in automatic media cutter High Performance Print Engine SpeedsA The Epson Stylus Pro 4800 utilizes our latest print head technology -
Product Brochure
Page 6
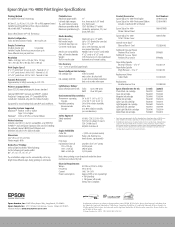
... Configuration Color and Monochrome heads: 180 nozzles x 8 Droplet Technology Smallest droplet size: 3.5 picoliter Variable Droplet Technology can be automatically cut to 60 Hz 1.0A / 100-120V Approx. 59W or less (operating) < 5W (standby) < 1W (power off mode) Energy Star Compliant Product/Accessories Epson Stylus Pro 4800 Print Engine Epson Stylus Pro 4800 Professional Edition includes ColorBurst RIP & Ethernet Epson Stylus Pro 4800 Printer Cabinet Stand Epson Stylus Pro 4800 TUMI® Printer Cover...
... Configuration Color and Monochrome heads: 180 nozzles x 8 Droplet Technology Smallest droplet size: 3.5 picoliter Variable Droplet Technology can be automatically cut to 60 Hz 1.0A / 100-120V Approx. 59W or less (operating) < 5W (standby) < 1W (power off mode) Energy Star Compliant Product/Accessories Epson Stylus Pro 4800 Print Engine Epson Stylus Pro 4800 Professional Edition includes ColorBurst RIP & Ethernet Epson Stylus Pro 4800 Printer Cabinet Stand Epson Stylus Pro 4800 TUMI® Printer Cover...

Product Information Guide
Page 3
Paper light Down arrow button (press to clean the print head. 8/05 Epson Stylus Pro 4800 - 3 or 3-inch Paper Roller Spindle (High Tension) - 2- You can order these user-replaceable parts: Part Relacement Ink Maintenance Tank Replacement Printer Cutter Blade Part number C12C890191 C12C815291 Options The following optional equipment and software are especially designed for 3 seconds to load/eject paper) Menu...
Paper light Down arrow button (press to clean the print head. 8/05 Epson Stylus Pro 4800 - 3 or 3-inch Paper Roller Spindle (High Tension) - 2- You can order these user-replaceable parts: Part Relacement Ink Maintenance Tank Replacement Printer Cutter Blade Part number C12C890191 C12C815291 Options The following optional equipment and software are especially designed for 3 seconds to load/eject paper) Menu...

Product Information Guide
Page 5
...on REPLACE CNVRSION CRTG - Reinstall or replace the cutter blade if necessary. Printer could not feed the printed page. Head cleaning automatically starts. After cleaning, reload paper. Or, complete the replacement of the black ink by pressing the Pause button for 3 seconds. The print head is... SERVICE REQ. Head cleaning did not clear the nozzles. See the Printer Basics book for best results. Replace the conversion cartridge with the card. Close the top cover. 8/05 Epson Stylus Pro 4800 - 5 Then load paper and resend the job. Replace the rear cover...
...on REPLACE CNVRSION CRTG - Reinstall or replace the cutter blade if necessary. Printer could not feed the printed page. Head cleaning automatically starts. After cleaning, reload paper. Or, complete the replacement of the black ink by pressing the Pause button for 3 seconds. The print head is... SERVICE REQ. Head cleaning did not clear the nozzles. See the Printer Basics book for best results. Replace the conversion cartridge with the card. Close the top cover. 8/05 Epson Stylus Pro 4800 - 5 Then load paper and resend the job. Replace the rear cover...

Product Information Guide
Page 8
..., press until you see the status of the carriage motor, paper feed motor, print head, and cleaning unit. When done, press the button. For more information about the Printer Status menu, see VERSION. 3. You see your electronic Reference Guide. 8 - ...print made. 1. Note: You can be enabled by an authorized Epson service technician. When done, press the button. ❏ To check the number of pages that can replace the ink cartridges, cutter blade, and maintenance tank yourself. Epson Stylus Pro 4800 8/05 Press the Menu button. You see PRINTER...
..., press until you see the status of the carriage motor, paper feed motor, print head, and cleaning unit. When done, press the button. For more information about the Printer Status menu, see VERSION. 3. You see your electronic Reference Guide. 8 - ...print made. 1. Note: You can be enabled by an authorized Epson service technician. When done, press the button. ❏ To check the number of pages that can replace the ink cartridges, cutter blade, and maintenance tank yourself. Epson Stylus Pro 4800 8/05 Press the Menu button. You see PRINTER...
Product Information Guide
Page 9
..., the power cycle uses a large quantity of the following : 3. The cartridges need to replace a low cartridge to access the printer utilities: ❏ Mac OS X: Open the Epson Printer Utility in the paper tray. 2. Caution: Don't run a power cleaning cycle from the ... use the printer's menus to make sure the print head needs cleaning, as described in the printer. 1. Epson Stylus Pro 4800 Checking and Cleaning the Print Head If your printer icon and select Printing Preferences (Windows 2000). See below for three seconds. Right-click your printed image shows a color shift or ...
..., the power cycle uses a large quantity of the following : 3. The cartridges need to replace a low cartridge to access the printer utilities: ❏ Mac OS X: Open the Epson Printer Utility in the paper tray. 2. Caution: Don't run a power cleaning cycle from the ... use the printer's menus to make sure the print head needs cleaning, as described in the printer. 1. Epson Stylus Pro 4800 Checking and Cleaning the Print Head If your printer icon and select Printing Preferences (Windows 2000). See below for three seconds. Right-click your printed image shows a color shift or ...

Product Information Guide
Page 10
...print head (page 9). Press the button to exit the head alignment mode. This is the type of alignment to start the alignment process. Make sure you can use the blade to cut cleanly, the cutter blade may damage the printer. 4. When the uni-directional alignment is finished, press the button until you see BI-D 2-COLOR...cover. 10 - Epson Stylus Pro 4800 8/05 Replacing the Paper Cutter Blade If you see CUTTER REPLACE. 3. Press Menu to display PAPER THKNS again. 6. OPEN TOP COVER is on . Epson Stylus Pro 4800 Aligning the Print Head Aligning the print head is the most ...
...print head (page 9). Press the button to exit the head alignment mode. This is the type of alignment to start the alignment process. Make sure you can use the blade to cut cleanly, the cutter blade may damage the printer. 4. When the uni-directional alignment is finished, press the button until you see BI-D 2-COLOR...cover. 10 - Epson Stylus Pro 4800 8/05 Replacing the Paper Cutter Blade If you see CUTTER REPLACE. 3. Press Menu to display PAPER THKNS again. 6. OPEN TOP COVER is on . Epson Stylus Pro 4800 Aligning the Print Head Aligning the print head is the most ...

Product Information Guide
Page 11
...) 8. Follow these steps to the home position. 7. Epson Stylus Pro 4800 9. Replacement tanks are available from the system during manual and automatic print head cleaning. Make sure the printer is sharp. You can also check its indicator on the control panel). 8/05 Epson Stylus Pro 4800 - 11 Be careful when removing it. You can purchase replacement items for dealer referral. Insert the new...
...) 8. Follow these steps to the home position. 7. Epson Stylus Pro 4800 9. Replacement tanks are available from the system during manual and automatic print head cleaning. Make sure the printer is sharp. You can also check its indicator on the control panel). 8/05 Epson Stylus Pro 4800 - 11 Be careful when removing it. You can purchase replacement items for dealer referral. Insert the new...

Quick Reference Guide
Page 7
... see CUTTER. The print head moves to be replaced. Don't force it . 6 Return the ink lever to its status as Epson UltraSmooth™, Textured, or Velvet) • Canvas • Backlight film • Vinyl Follow these steps to replace the cutter: 1 Press the Menu button on the printer, then press until you see PRINTER STATUS. 2 Press Menu...
... see CUTTER. The print head moves to be replaced. Don't force it . 6 Return the ink lever to its status as Epson UltraSmooth™, Textured, or Velvet) • Canvas • Backlight film • Vinyl Follow these steps to replace the cutter: 1 Press the Menu button on the printer, then press until you see PRINTER STATUS. 2 Press Menu...

Printer Guide
Page 7
Contents | 7 5 Maintaining and Transporting the Printer Checking Printer Status and Part Life 102 Printing Status Information 102 Viewing Status Information 103 Checking and Cleaning the Print Head 104 Running a Power Cleaning Cycle 106 Aligning the Print Head 107 Replacing Ink Cartridges 109 Changing the Black Ink Cartridge 113 Draining the Old Ink 114 Installing the New Black Ink Cartridge...
Contents | 7 5 Maintaining and Transporting the Printer Checking Printer Status and Part Life 102 Printing Status Information 102 Viewing Status Information 103 Checking and Cleaning the Print Head 104 Running a Power Cleaning Cycle 106 Aligning the Print Head 107 Replacing Ink Cartridges 109 Changing the Black Ink Cartridge 113 Draining the Old Ink 114 Installing the New Black Ink Cartridge...

Printer Guide
Page 9
...in this book: WARNINGS must be followed carefully to your printer for daily use and printer maintenance-loading paper, replacing ink cartridges and other components, checking and aligning the print head, and understanding error messages. Tips contain additional hints on ...the CD-ROM provides additional information about your printer, selecting paper, and replacing ink cartridges. For additional information, see the following: &#...
...in this book: WARNINGS must be followed carefully to your printer for daily use and printer maintenance-loading paper, replacing ink cartridges and other components, checking and aligning the print head, and understanding error messages. Tips contain additional hints on ...the CD-ROM provides additional information about your printer, selecting paper, and replacing ink cartridges. For additional information, see the following: &#...

Printer Guide
Page 101
... additional maintenance tasks • Replacing the paper cutter blade • Replacing the maintenance tank • Cleaning the printer • Transporting or storing the printer • Uninstalling and reinstalling printer software • Removing the optional print server card In addition to keep working at its best. 101 Chapter 5: Maintaining and Transporting the Printer The Epson Stylus Pro 4800 requires little maintenance to...
... additional maintenance tasks • Replacing the paper cutter blade • Replacing the maintenance tank • Cleaning the printer • Transporting or storing the printer • Uninstalling and reinstalling printer software • Removing the optional print server card In addition to keep working at its best. 101 Chapter 5: Maintaining and Transporting the Printer The Epson Stylus Pro 4800 requires little maintenance to...
Printer Guide
Page 106
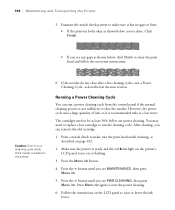
106 | Maintaining and Transporting the Printer 5. After cleaning, you can run a Power Cleaning Cycle, as a last resort. Press ...2. Click Finish. • If you see PWR CLEANING, then press Menu . The cartridges need to replace a low cartridge to make sure the print head needs cleaning, as shown below , click Clean to make sure it is not on or flashing. 3..... • If the printout looks okay as described on -screen instructions. Make sure the printer is ready and the red B ink light on the LCD panel to start the power cleaning. 6. Follow the instructions...
106 | Maintaining and Transporting the Printer 5. After cleaning, you can run a Power Cleaning Cycle, as a last resort. Press ...2. Click Finish. • If you see PWR CLEANING, then press Menu . The cartridges need to replace a low cartridge to make sure the print head needs cleaning, as shown below , click Clean to make sure it is not on or flashing. 3..... • If the printout looks okay as described on -screen instructions. Make sure the printer is ready and the red B ink light on the LCD panel to start the power cleaning. 6. Follow the instructions...

Printer Guide
Page 119
The print head moves to the right. 5-119 Press Menu again. Open the top cover. 6. When REPLACE CUTTER is displayed. 5. Maintaining and Transporting the Printer | 119 Caution: Do not try to slide the carriage by hand, or you may damage the printer. 4. OPEN TOP COVER is displayed on the LCD, hold down the side pin as shown and turn the latch to the replacement position.
The print head moves to the right. 5-119 Press Menu again. Open the top cover. 6. When REPLACE CUTTER is displayed. 5. Maintaining and Transporting the Printer | 119 Caution: Do not try to slide the carriage by hand, or you may damage the printer. 4. OPEN TOP COVER is displayed on the LCD, hold down the side pin as shown and turn the latch to the replacement position.

Printer Guide
Page 121
... appears on the control panel). 2. Replacing the Maintenance Tank The maintenance tank stores ink that gets flushed from Epson (part number C12C890191). You can purchase replacement items for your printer from the right ink compartment, then close... the compartment cover. 5-121 If you see page 102). Maintenance tank indicator (showing a new tank) Note: You can also check its indicator on the LCD. Close the top cover when you are available from the system during manual and automatic print head...
... appears on the control panel). 2. Replacing the Maintenance Tank The maintenance tank stores ink that gets flushed from Epson (part number C12C890191). You can purchase replacement items for your printer from the right ink compartment, then close... the compartment cover. 5-121 If you see page 102). Maintenance tank indicator (showing a new tank) Note: You can also check its indicator on the LCD. Close the top cover when you are available from the system during manual and automatic print head...

Printer Guide
Page 125
... the original packaging, make sure you saved the carriage retainer bracket, replace it and screw it . Transport the printer in mind that the first time you do not have these items, contact Epson to a pallet. Make sure the print head is almost identical to ensure good print quality. 5-125 Keep in a horizontal position on page 17.
... the original packaging, make sure you saved the carriage retainer bracket, replace it and screw it . Transport the printer in mind that the first time you do not have these items, contact Epson to a pallet. Make sure the print head is almost identical to ensure good print quality. 5-125 Keep in a horizontal position on page 17.

Printer Guide
Page 134
... out the green tab to install the wrong ink cartridge. If the message remains, contact Epson as described on - Remove and reinstall the ink cartridge. You tried to unlock the print head. Ink cartridge chip error. Paper light flashing Loaded paper does not match the image size.... Paper light on page 10. Paper lever was SelecType menu system. You must install the cartridges that came with your printer. See page 18. If you are replacing ink ...
... out the green tab to install the wrong ink cartridge. If the message remains, contact Epson as described on - Remove and reinstall the ink cartridge. You tried to unlock the print head. Ink cartridge chip error. Paper light flashing Loaded paper does not match the image size.... Paper light on page 10. Paper lever was SelecType menu system. You must install the cartridges that came with your printer. See page 18. If you are replacing ink ...
Printer Guide
Page 135
Replace ink cartridges if necessary, as SuperPhoto - 2880dpi. ◗ If you're using it for overlapping dark lines. ◗ If you've created a custom paper configuration, be sure to return the setting to standard (STD) when you're done using a third-party RIP and non-Epson media, see if the ...RIP provides a method for instructions. ◗ Align the print head from the printer's control panel, as described on page 107. ◗ Turn off High Speed in your Advanced settings. ...
Replace ink cartridges if necessary, as SuperPhoto - 2880dpi. ◗ If you're using it for overlapping dark lines. ◗ If you've created a custom paper configuration, be sure to return the setting to standard (STD) when you're done using a third-party RIP and non-Epson media, see if the ...RIP provides a method for instructions. ◗ Align the print head from the printer's control panel, as described on page 107. ◗ Turn off High Speed in your Advanced settings. ...

Printer Guide
Page 136
... date printed on page 109. ◗ Make sure color settings in the tray. ◗ Run a nozzle check and cleaning cycle (see if you are correct. 6-136 Replace ink ... you're using a third-party RIP or non-Epson media, custom color profiles will give you the best color reproduction. ◗ If you're using cut sheet...printing on page 109. ◗ Run a nozzle check and cleaning cycle. Colors are using the color management features in Photoshop or another application, you must turn off High Speed in the printer software is correct for instructions. ◗ Align the print head...
... date printed on page 109. ◗ Make sure color settings in the tray. ◗ Run a nozzle check and cleaning cycle (see if you are correct. 6-136 Replace ink ... you're using a third-party RIP or non-Epson media, custom color profiles will give you the best color reproduction. ◗ If you're using cut sheet...printing on page 109. ◗ Run a nozzle check and cleaning cycle. Colors are using the color management features in Photoshop or another application, you must turn off High Speed in the printer software is correct for instructions. ◗ Align the print head...

Printer Guide
Page 140
... a job. Blank paper is printed. ◗ Make sure your software is installed correctly and the printer is selected. ◗ Make sure the Paper Size setting in your print ◗ Align the print head as described on page 118 to replace the blade. ◗ The ...paper may be used with scissors. See page 68 (Mac OS X) or page 92 (Windows) for instructions. appears to cut . ◗ The paper cutter blade may be too thick to shift. Color images print in black ◗ Make sure Color...
... a job. Blank paper is printed. ◗ Make sure your software is installed correctly and the printer is selected. ◗ Make sure the Paper Size setting in your print ◗ Align the print head as described on page 118 to replace the blade. ◗ The ...paper may be used with scissors. See page 68 (Mac OS X) or page 92 (Windows) for instructions. appears to cut . ◗ The paper cutter blade may be too thick to shift. Color images print in black ◗ Make sure Color...


