Operation Guide - EasyMP Network Updater
Page 16
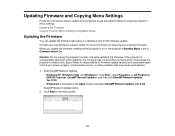
... Mode is unexpectedly shut down while updating, the firmware may cause such failures. 1. Epson takes no responsibility for firmware update failures and associated repair costs due to power outages, communication errors, or other problems that may not be written correctly which could cause...projector to malfunction. Caution: Do not unplug the projector's power cord while updating the firmware. Start EasyMP Network Updater. • Windows XP, Windows Vista, and Windows 7: Click Start, select Programs (or All Programs), EPSON Projector, EasyMP Network Updater, and then click EasyMP Network ...
... Mode is unexpectedly shut down while updating, the firmware may cause such failures. 1. Epson takes no responsibility for firmware update failures and associated repair costs due to power outages, communication errors, or other problems that may not be written correctly which could cause...projector to malfunction. Caution: Do not unplug the projector's power cord while updating the firmware. Start EasyMP Network Updater. • Windows XP, Windows Vista, and Windows 7: Click Start, select Programs (or All Programs), EPSON Projector, EasyMP Network Updater, and then click EasyMP Network ...

Operation Guide - EasyMP Network Updater
Page 19
...Do not register any information that may not be written correctly which could cause the projector to malfunction. Caution: Do not unplug the projector's power cord while copying the menu settings. You can copy the menu settings from the Info menu Note: Perform the batch setup operation before performing ... batch setup feature. If you choose to close the application, make sure the projector is on or the projector's Standby Mode is displayed. Epson takes no responsibility for the Mail menu and the Others menu) • Lamp Hours and Status from one projector to one projector to another...
...Do not register any information that may not be written correctly which could cause the projector to malfunction. Caution: Do not unplug the projector's power cord while copying the menu settings. You can copy the menu settings from the Info menu Note: Perform the batch setup operation before performing ... batch setup feature. If you choose to close the application, make sure the projector is on or the projector's Standby Mode is displayed. Epson takes no responsibility for the Mail menu and the Others menu) • Lamp Hours and Status from one projector to one projector to another...

Operation Guide - EasyMP Multi PC Projection v2.10
Page 89
If it on. Go to Extended > Whiteboard Settings > Internal Storage. Restart the projector. 89 When the internal storage is deleted correctly, plugin the power cord for the projector and turn it is not deleted correctly, contact Epson as described in the Whiteboard function. Parent topic: Solving Problems Remedy Perform Delete All Internal Data. Event ID 0B01 Cause The built-in storage could not be detected correctly. 0BFF An error has occurred in your projector User's Guide.
If it on. Go to Extended > Whiteboard Settings > Internal Storage. Restart the projector. 89 When the internal storage is deleted correctly, plugin the power cord for the projector and turn it is not deleted correctly, contact Epson as described in the Whiteboard function. Parent topic: Solving Problems Remedy Perform Delete All Internal Data. Event ID 0B01 Cause The built-in storage could not be detected correctly. 0BFF An error has occurred in your projector User's Guide.

Users Guide
Page 8
... When the Image Brightness or Colors are Incorrect 200 Solutions to Sound Problems ...201 Solving Projector or Remote Control Operation Problems 202 Solutions to Projector Power or Shut-Off Problems 202 Solutions to Problems with the Remote Control 203 Solutions to Password Problems 204 Solutions When Using HDMI Link 204 Solving...
... When the Image Brightness or Colors are Incorrect 200 Solutions to Sound Problems ...201 Solving Projector or Remote Control Operation Problems 202 Solutions to Projector Power or Shut-Off Problems 202 Solutions to Problems with the Remote Control 203 Solutions to Password Problems 204 Solutions When Using HDMI Link 204 Solving...
Users Guide
Page 13
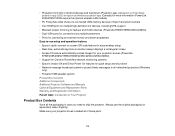
.... Make sure your projection screen (PowerLite 975W/2055/2065/2155W/2165W/2245U/2250U/2255U/2265U) • Support for Crestron RoomView network monitoring systems • Epson's Instant Off and Direct Power On features for quick setup and shut down • Network message broadcast ...system to project timely messages to all networked projectors (Windows only) • Powerful 16W speaker system Product Box Contents Additional ...
.... Make sure your projection screen (PowerLite 975W/2055/2065/2155W/2165W/2245U/2250U/2255U/2265U) • Support for Crestron RoomView network monitoring systems • Epson's Instant Off and Direct Power On features for quick setup and shut down • Network message broadcast ...system to project timely messages to all networked projectors (Windows only) • Powerful 16W speaker system Product Box Contents Additional ...

Users Guide
Page 14
1 Projector 2 Remote control 3 Remote control batteries (two AA alkaline) 4 Wireless LAN module (PowerLite 975W/2055/2065/2155W/2165W/2245U/2255U/2265U) 5 Power cord 6 VGA computer cable (not included with PowerLite 975W) 7 Password Protected sticker 8 Projector documentation CD 9 Projector software CD Parent topic: Projector Features Related concepts Projector Connections 14
1 Projector 2 Remote control 3 Remote control batteries (two AA alkaline) 4 Wireless LAN module (PowerLite 975W/2055/2065/2155W/2165W/2245U/2255U/2265U) 5 Power cord 6 VGA computer cable (not included with PowerLite 975W) 7 Password Protected sticker 8 Projector documentation CD 9 Projector software CD Parent topic: Projector Features Related concepts Projector Connections 14

Users Guide
Page 26
Projector Parts - Control Panel 1 Power button 2 Home button 3 Source Search button (searches for connected video sources) 4 Enter button (selects options) 5 Vertical keystone adjustment buttons (displays the adjustment screen and adjusts screen shape) and arrow buttons 6 Esc button (cancels/exits functions) 7 Volume buttons (adjusts speaker volume), horizontal keystone adjustment buttons, and arrow buttons 8 Menu button (accesses projector menu system) Parent topic: Projector Part Locations Related references Projector Light Status Related tasks Using the Projector Help Displays 26
Projector Parts - Control Panel 1 Power button 2 Home button 3 Source Search button (searches for connected video sources) 4 Enter button (selects options) 5 Vertical keystone adjustment buttons (displays the adjustment screen and adjusts screen shape) and arrow buttons 6 Esc button (cancels/exits functions) 7 Volume buttons (adjusts speaker volume), horizontal keystone adjustment buttons, and arrow buttons 8 Menu button (accesses projector menu system) Parent topic: Projector Part Locations Related references Projector Light Status Related tasks Using the Projector Help Displays 26

Users Guide
Page 46
... may not be able to display images correctly. 1. If you want to output audio from your presentation, you can connect the projector to external self-powered speakers. You can also connect the projector to your projector's Monitor Out port. You can control the volume using the projector's remote control.
... may not be able to display images correctly. 1. If you want to output audio from your presentation, you can connect the projector to external self-powered speakers. You can also connect the projector to your projector's Monitor Out port. You can control the volume using the projector's remote control.

Users Guide
Page 48
... and use it to project images and other content without using a computer or video device by their own AC power supplies (bus-powered hard drives are supported) • Formatted in FAT or FAT32 • Self-powered by connecting any of these devices to the Projector You can connect your USB device came with... a power adapter, plug the device into an electrical outlet. 48 USB Device Projection You can project slide shows from image files on a connected USB device. Parent ...
... and use it to project images and other content without using a computer or video device by their own AC power supplies (bus-powered hard drives are supported) • Formatted in FAT or FAT32 • Self-powered by connecting any of these devices to the Projector You can connect your USB device came with... a power adapter, plug the device into an electrical outlet. 48 USB Device Projection You can project slide shows from image files on a connected USB device. Parent ...

Users Guide
Page 49
... or Camera From the Projector When you finish presenting with a connected USB device or camera, you connected to the USB-A port. 1. If the device has a power button, turn off and unplug the device. 2. Parent topic: Connecting to the projector's USB-A port. Connect the USB cable (or USB flash drive or USB...
... or Camera From the Projector When you finish presenting with a connected USB device or camera, you connected to the USB-A port. 1. If the device has a power button, turn off and unplug the device. 2. Parent topic: Connecting to the projector's USB-A port. Connect the USB cable (or USB flash drive or USB...
Users Guide
Page 58
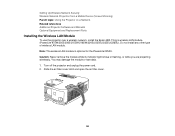
...air filter cover latch and open the air filter cover. 58 Caution: Never remove the module while its indicator light is optional for the PowerLite 2250U. You may damage the module or lose data. 1. Note: The wireless LAN module is blue or flashing, or while you are projecting wirelessly... and Replacement Parts Installing the Wireless LAN Module To use the projector over a wireless network, install the Epson 802.11b/g/n wireless LAN module (PowerLite 975W/2055/2065/2155W/2165W/2245U/2250U/2255U/2265U). Do not install any other type of wireless LAN module. Turn off the projector and unplug...
...air filter cover latch and open the air filter cover. 58 Caution: Never remove the module while its indicator light is optional for the PowerLite 2250U. You may damage the module or lose data. 1. Note: The wireless LAN module is blue or flashing, or while you are projecting wirelessly... and Replacement Parts Installing the Wireless LAN Module To use the projector over a wireless network, install the Epson 802.11b/g/n wireless LAN module (PowerLite 975W/2055/2065/2155W/2165W/2245U/2250U/2255U/2265U). Do not install any other type of wireless LAN module. Turn off the projector and unplug...

Users Guide
Page 66
Press the Menu button. 3. Turn on the projector. 2. Select Network Configuration and press Enter. 66 Select the Network menu and press Enter. 4. Make sure the Wireless LAN Power setting is set to On. 5. Parent topic: Wireless Network Projection Selecting Wireless Network Settings Manually Before you can project from your wireless network, you must select the network settings for the projector using its menu system. 1.
Press the Menu button. 3. Turn on the projector. 2. Select Network Configuration and press Enter. 66 Select the Network menu and press Enter. 4. Make sure the Wireless LAN Power setting is set to On. 5. Parent topic: Wireless Network Projection Selecting Wireless Network Settings Manually Before you can project from your wireless network, you must select the network settings for the projector using its menu system. 1.

Users Guide
Page 75
...Devices > Project > Add a wireless display. 4. Select your projector's Display Name from your computer or mobile device. Do not disconnect the projector's power cord while it is a problem with the projector. 1. Select the Screen Mirroring settings on the mobile device, you may cause your device. You ...list. 5. Note: It may take some time to establish the connection. Press the Menu button. 2. Do not disconnect the projector's power cord while it is connecting to your projector as necessary. 2. Doing so may cause your device. Select Network Configuration and press Enter. ...
...Devices > Project > Add a wireless display. 4. Select your projector's Display Name from your computer or mobile device. Do not disconnect the projector's power cord while it is a problem with the projector. 1. Select the Screen Mirroring settings on the mobile device, you may cause your device. You ...list. 5. Note: It may take some time to establish the connection. Press the Menu button. 2. Do not disconnect the projector's power cord while it is connecting to your projector as necessary. 2. Doing so may cause your device. Select Network Configuration and press Enter. ...

Users Guide
Page 80
To control projection remotely, select the Basic Control option. Note: If you see a screen like this: 1 Power button control 80 Note: You may need to log in window, enter your user name and password. (The default user name is EPSONREMOTE and the ...
To control projection remotely, select the Basic Control option. Note: If you see a screen like this: 1 Power button control 80 Note: You may need to log in window, enter your user name and password. (The default user name is EPSONREMOTE and the ...

Users Guide
Page 86
...Once the projector is on the projector. This can damage your eyes and is receiving power. 4. 2. Connect the power cord to turn on . This indicates that the projector is especially dangerous for children. Press the power button on as soon as the projector warms up , the Status light stops flashing ...and turns blue. Plug the power cord into the projector lens when the lamp is warmed up . Warning: Never ...
...Once the projector is on the projector. This can damage your eyes and is receiving power. 4. 2. Connect the power cord to turn on . This indicates that the projector is especially dangerous for children. Press the power button on as soon as the projector warms up , the Status light stops flashing ...and turns blue. Plug the power cord into the projector lens when the lamp is warmed up . Warning: Never ...

Users Guide
Page 88
Extended Menu Turning Off the Projector Before turning off this product when not in the Extended menu. 3. Brightness decreases over time. Press the power button on . Note: Turn off the projector, shut down any computer connected to it so you want to project 2 Display the QR code 3 Display the ...
Extended Menu Turning Off the Projector Before turning off this product when not in the Extended menu. 3. Brightness decreases over time. Press the power button on . Note: Turn off the projector, shut down any computer connected to it so you want to project 2 Display the QR code 3 Display the ...

Users Guide
Page 89
Press the power button again. (To leave it on, press any other button.) The projector beeps twice, the lamp turns off, and the Status light turns off , then unplug the power cord. 89 To transport or store the projector, make sure the Status light is no cool-down period so you can pack up the projector for transport right away (if necessary). 3. Note: With Epson's Instant Off technology, there is off . The projector displays a shutdown confirmation screen. 2.
Press the power button again. (To leave it on, press any other button.) The projector beeps twice, the lamp turns off, and the Status light turns off , then unplug the power cord. 89 To transport or store the projector, make sure the Status light is no cool-down period so you can pack up the projector for transport right away (if necessary). 3. Note: With Epson's Instant Off technology, there is off . The projector displays a shutdown confirmation screen. 2.

Users Guide
Page 90
Press the Menu button. 90 Parent topic: Using Basic Projector Features Related references Projector Light Status Selecting the Language for the Projector Menus If you want to view the projector's menus and messages in another language, you can change the Language setting. 1. Turn on or flashing. 4. Close the projector's lens cover. Caution: To avoid damaging the projector or lamp, never unplug the power cord when the Status light is on the projector. 2.
Press the Menu button. 90 Parent topic: Using Basic Projector Features Related references Projector Light Status Selecting the Language for the Projector Menus If you want to view the projector's menus and messages in another language, you can change the Language setting. 1. Turn on or flashing. 4. Close the projector's lens cover. Caution: To avoid damaging the projector or lamp, never unplug the power cord when the Status light is on the projector. 2.

Users Guide
Page 123
... and Sound Temporarily Stopping Video Action Temporarily Zooming Into and Out of Images Projector Security Features Projector Identification System for more than 30 minutes, the power automatically turns off using the projector's menus. Any sound or video action continues to temporarily stop projection and mute any sound. 2. Press the A/V Mute button...
... and Sound Temporarily Stopping Video Action Temporarily Zooming Into and Out of Images Projector Security Features Projector Identification System for more than 30 minutes, the power automatically turns off using the projector's menus. Any sound or video action continues to temporarily stop projection and mute any sound. 2. Press the A/V Mute button...

Users Guide
Page 126
... , and prevent changes to the startup screen and other settings. • Button lock security to block operation of password security using one shared password: • Power On Protection password prevents anyone from changing the custom screen the projector can set a password. 126 Password Security Types Locking the Projector's Buttons Installing a Security... the control panel. • Security cabling to prevent the projector from changing the projector's time or schedule settings (PowerLite 975W/2055/2065/2155W/2165W/2245U/2250U/2255U/2265U). • Screen Mirroring Protec.
... , and prevent changes to the startup screen and other settings. • Button lock security to block operation of password security using one shared password: • Power On Protection password prevents anyone from changing the custom screen the projector can set a password. 126 Password Security Types Locking the Projector's Buttons Installing a Security... the control panel. • Security cabling to prevent the projector from changing the projector's time or schedule settings (PowerLite 975W/2055/2065/2155W/2165W/2245U/2250U/2255U/2265U). • Screen Mirroring Protec.


