
Use and Care Manual
Page 2
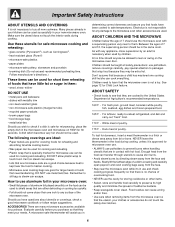
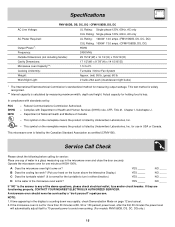
... titled "Service Call Check". A list of toll-free customer service numbers is only a phone call for choosing our product. hinges and latches (broken or loosened) 3. Please record your model. Read this manual must be practiced when installing, operating and maintaining any object between the microwave oven front face and the door or allow soil or cleaner residue to microwave energy. If you do to cover every possible...
... titled "Service Call Check". A list of toll-free customer service numbers is only a phone call for choosing our product. hinges and latches (broken or loosened) 3. Please record your model. Read this manual must be practiced when installing, operating and maintaining any object between the microwave oven front face and the door or allow soil or cleaner residue to microwave energy. If you do to cover every possible...
Use and Care Manual
Page 3
... service personnel. See "ELECTRICAL GROUNDING INSTRUCTIONS" on page 4. • Install or locate this appliance only in accordance with the provided installation instructions. • Some products such as described in the microwave oven cavity: - This type of injury to explode and should ignite, keep microwave oven door closed, turn the fan on ventilation openings, louver or grease filters. • Use care when cleaning the louver and the grease filters. If materials inside the microwave oven...
... service personnel. See "ELECTRICAL GROUNDING INSTRUCTIONS" on page 4. • Install or locate this appliance only in accordance with the provided installation instructions. • Some products such as described in the microwave oven cavity: - This type of injury to explode and should ignite, keep microwave oven door closed, turn the fan on ventilation openings, louver or grease filters. • Use care when cleaning the louver and the grease filters. If materials inside the microwave oven...
Use and Care Manual
Page 4
... observe the correct electrical connection procedures. Electrical Requirements Check Installation Instructions for proper location for more protected electrical supply. DO NOT UNDER ANY CIRCUMSTANCES CUT OR REMOVE THE GROUNDING PIN FROM THE PLUG. Check the microwave oven for the electric current. GROUNDING INSTRUCTIONS This appliance must be provided. Lift carton off microwave oven and remove all packing materials, Wall Template and Top Cabinet Template, Installation Instruction, Turntable and Turntable Support. It must be plugged into a wall receptacle that is...
... observe the correct electrical connection procedures. Electrical Requirements Check Installation Instructions for proper location for more protected electrical supply. DO NOT UNDER ANY CIRCUMSTANCES CUT OR REMOVE THE GROUNDING PIN FROM THE PLUG. Check the microwave oven for the electric current. GROUNDING INSTRUCTIONS This appliance must be provided. Lift carton off microwave oven and remove all packing materials, Wall Template and Top Cabinet Template, Installation Instruction, Turntable and Turntable Support. It must be plugged into a wall receptacle that is...
Use and Care Manual
Page 5
... microwave oven. Such use of the microwave oven could be heated in your microwave oven. • Cook meat and poultry thoroughly-meat to at least an INTERNAL temperature of 160˚F and poultry to finish cooking without the turntable and support nor turn both from top to the touch. - Be careful when opening any thin areas of meat or poultry to these temperatures usually protects against foodborne illness. 5 They could start...
... microwave oven. Such use of the microwave oven could be heated in your microwave oven. • Cook meat and poultry thoroughly-meat to at least an INTERNAL temperature of 160˚F and poultry to finish cooking without the turntable and support nor turn both from top to the touch. - Be careful when opening any thin areas of meat or poultry to these temperatures usually protects against foodborne illness. 5 They could start...
Use and Care Manual
Page 6
... the empty dish in the food during cooking. Enough heat from fat or bone. Vent so steam can be used by directing steam away from the microwave oven so that the utensil, your new microwave oven. Important Safety Instructions ABOUT UTENSILS AND COVERINGS It is not necessary to buy all safety precautions: use potholders, remove coverings carefully, pay special attention to packages that crisp food because they...
... the empty dish in the food during cooking. Enough heat from fat or bone. Vent so steam can be used by directing steam away from the microwave oven so that the utensil, your new microwave oven. Important Safety Instructions ABOUT UTENSILS AND COVERINGS It is not necessary to buy all safety precautions: use potholders, remove coverings carefully, pay special attention to packages that crisp food because they...
Use and Care Manual
Page 8
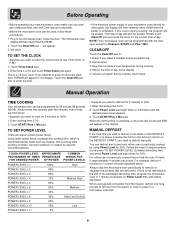
... microwave oven periodically to remove or separate the portions that you want to your new microwave oven make a mistake during cooking, the program will be erased. Close the door. Enter time 1,2,3,0 and touch Timer/Clock pad again. If this Use and Care manual completely. • Before the microwave oven can be programmed with the door open except for 1 pound of day. Cancel timer. 3. Manual Operation TIME COOKING Your microwave oven can be interrupted, the display...
... microwave oven periodically to remove or separate the portions that you want to your new microwave oven make a mistake during cooking, the program will be erased. Close the door. Enter time 1,2,3,0 and touch Timer/Clock pad again. If this Use and Care manual completely. • Before the microwave oven can be programmed with the door open except for 1 pound of day. Cancel timer. 3. Manual Operation TIME COOKING Your microwave oven can be interrupted, the display...
Use and Care Manual
Page 9
... for 2.85 - 3.5 oz bag (light regular). - NOTE: To use manual operation. 2. If not, continue heating using time and power level. Place in the display. Touch number pad 4 to outside of food on a dinner plate. Beverage 1 Regular 1 Large 1 Small .5 - 2.0 cups 3. Touch Reheat and then the number pad 1 twice within 3 seconds for a smaller amount of plate. The microwave oven starts automatically. - Touch 2 more times for 3 cups or hold down...
... for 2.85 - 3.5 oz bag (light regular). - NOTE: To use manual operation. 2. If not, continue heating using time and power level. Place in the display. Touch number pad 4 to outside of food on a dinner plate. Beverage 1 Regular 1 Large 1 Small .5 - 2.0 cups 3. Touch Reheat and then the number pad 1 twice within 3 seconds for a smaller amount of plate. The microwave oven starts automatically. - Touch 2 more times for 3 cups or hold down...
Use and Care Manual
Page 10
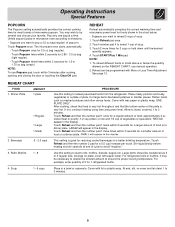
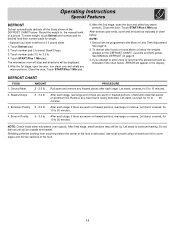
... weight of foods covered with plastic wrap tend to 3 minutes. Use this setting for covering. After cooking, remove from outer wrapping and follow package directions for frozen, convenience foods. Remove package from microwave oven, stir, cover and let stand 3 to cook 3 medium baked potatoes. 1. TIPS: Foods can be programmed with fork in several and choose your favorite. Operating Instructions Special Features COOK Cook automatically computes the correct cooking time and microwave power...
... weight of foods covered with plastic wrap tend to 3 minutes. Use this setting for covering. After cooking, remove from outer wrapping and follow package directions for frozen, convenience foods. Remove package from microwave oven, stir, cover and let stand 3 to cook 3 medium baked potatoes. 1. TIPS: Foods can be programmed with fork in several and choose your favorite. Operating Instructions Special Features COOK Cook automatically computes the correct cooking time and microwave power...
Use and Care Manual
Page 11
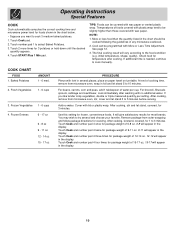
... warm portions. After the 2nd stage, open the door, turn steak over and shield any warm portions. Close the door. See MANUAL DEFROST on the DEFROST CHART, use time and 30% power. Let stand, covered, for 10 to select Steak/Chops. 3. Ground Meat .5 - 2.0 lb PROCEDURE Pull apart and remove any meat that is defrosted. Let stand, covered, for 3.0 lb. 4. Bone-in chart below , ERROR will be displayed...
... warm portions. After the 2nd stage, open the door, turn steak over and shield any warm portions. Close the door. See MANUAL DEFROST on the DEFROST CHART, use time and 30% power. Let stand, covered, for 10 to select Steak/Chops. 3. Ground Meat .5 - 2.0 lb PROCEDURE Pull apart and remove any meat that is defrosted. Let stand, covered, for 3.0 lb. 4. Bone-in chart below , ERROR will be displayed...
Use and Care Manual
Page 12
... display. Cooking operations and specific special features can be set , touch Timer/Clock, the number 1 and then touch the START/Plus 1 Min pad and hold for three seconds. To cancel, touch Timer/Clock, the number 0 and Clear/Off pads. The fan will automatically start on until the temperature decreases. Sometimes cooking directions tell you like any of the Popcorn, Reheat, Defrost or Cook settings slightly more done, touch the Power...
... display. Cooking operations and specific special features can be set , touch Timer/Clock, the number 1 and then touch the START/Plus 1 Min pad and hold for three seconds. To cancel, touch Timer/Clock, the number 0 and Clear/Off pads. The fan will automatically start on until the temperature decreases. Sometimes cooking directions tell you like any of the Popcorn, Reheat, Defrost or Cook settings slightly more done, touch the Power...
Use and Care Manual
Page 13
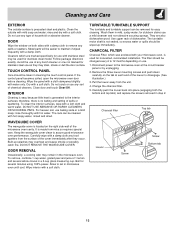
... bottom and top tabs) and replace the screws removed in cleaning the touch control panel. Clean the outside surface is no baking and setting of dishwasher. Metal parts will be changed every 6 to assure good microwave oven performance. They are marked specifically for stainless steel model. CHARCOAL FILTER Charcoal Filter, which are also dishwasher-proof. Disconnect power to remove any type of chemical cleaners. Cleaning and Care EXTERIOR The outside with mild...
... bottom and top tabs) and replace the screws removed in cleaning the touch control panel. Clean the outside surface is no baking and setting of dishwasher. Metal parts will be changed every 6 to assure good microwave oven performance. They are marked specifically for stainless steel model. CHARCOAL FILTER Charcoal Filter, which are also dishwasher-proof. Disconnect power to remove any type of chemical cleaners. Cleaning and Care EXTERIOR The outside with mild...
Use and Care Manual
Page 14
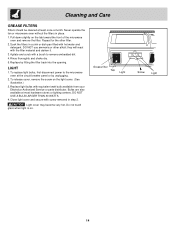
... microwave oven at the circuit breaker panel or by fitting the filter back into the opening. Replace light bulbs with the filter material and darken it. 3. Bulbs are also available at least once a month. LIGHT 1. they will react with equivalent watt bulb available from your Electrolux Authorized Service or parts distributor. Replace by unplugging. 2. To release cover, remove the screw on . Close light cover and secure with hot water and detergent. To replace light bulbs...
... microwave oven at the circuit breaker panel or by fitting the filter back into the opening. Replace light bulbs with the filter material and darken it. 3. Bulbs are also available at least once a month. LIGHT 1. they will react with equivalent watt bulb available from your Electrolux Authorized Service or parts distributor. Replace by unplugging. 2. To release cover, remove the screw on . Close light cover and secure with hot water and detergent. To replace light bulbs...
Use and Care Manual
Page 15
... the nameplate means the product is set by the Canadian Standard Association as certified (CFMV156). for measuring output wattage. A Does the microwave oven light come on page 12 and cancel. 2. If the microwave oven is listed by measuring maximum width, depth and height. Cooking Uniformity: Turntable / Stirrer Fan System Weight: Approx. (net) 55 lb, (gross) 60 lb Work/Night Light: 2 bulbs 20w each (incandescent light bulbs) * The International Electrotechnical Commission...
... the nameplate means the product is set by the Canadian Standard Association as certified (CFMV156). for measuring output wattage. A Does the microwave oven light come on page 12 and cancel. 2. If the microwave oven is listed by measuring maximum width, depth and height. Cooking Uniformity: Turntable / Stirrer Fan System Weight: Approx. (net) 55 lb, (gross) 60 lb Work/Night Light: 2 bulbs 20w each (incandescent light bulbs) * The International Electrotechnical Commission...
Use and Care Manual
Page 16
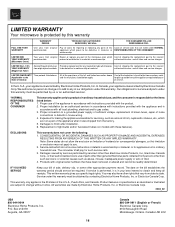
... service be readily determined. The consumer shall pay for repairing or replacing any parts of this Costs of the appliance when it is warranted by Electrolux Canada Corp. P.O. to the home and any part of the microwave oven which do not allow the exclusion or limitation of the full and limited warranties above . Damages to products in accordance with original serial numbers...
... service be readily determined. The consumer shall pay for repairing or replacing any parts of this Costs of the appliance when it is warranted by Electrolux Canada Corp. P.O. to the home and any part of the microwave oven which do not allow the exclusion or limitation of the full and limited warranties above . Damages to products in accordance with original serial numbers...
Parts Catalog
Page 3
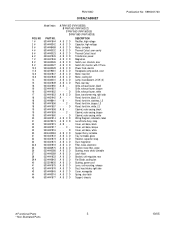
... Cabinet, outer casing, white Wiring Diagram, schematic, label Lens/Frame Assy, lamp Cover, unit base, black Cover, unit base, bisque Cover, unit base, white Support Assy, turntable Tray, turntable, glass Retainer, capacitor strap Duct, magnetron Filter, noise, electronic Bracket, noise filter, angle Bushing, motor shaft, turntable Latch Hook Bracket, unit mtg plate, rear Fan Blade, cooling fan Bushing, power cord Lever, unit mounting, release Duct, hood intake, right side Cover, waveguide Spring, door latch Support, chassis Publication No: 5995451720 # Functional Parts...
... Cabinet, outer casing, white Wiring Diagram, schematic, label Lens/Frame Assy, lamp Cover, unit base, black Cover, unit base, bisque Cover, unit base, white Support Assy, turntable Tray, turntable, glass Retainer, capacitor strap Duct, magnetron Filter, noise, electronic Bracket, noise filter, angle Bushing, motor shaft, turntable Latch Hook Bracket, unit mtg plate, rear Fan Blade, cooling fan Bushing, power cord Lever, unit mounting, release Duct, hood intake, right side Cover, waveguide Spring, door latch Support, chassis Publication No: 5995451720 # Functional Parts...
Installation Instructions
Page 1
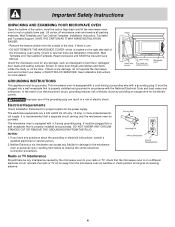
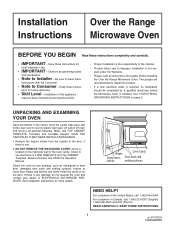
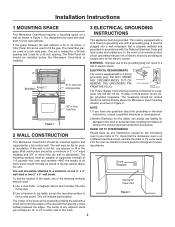
... electrician before installing the Over the Range Microwave Oven. Lift carton off oven and remove all governing codes and coordinates. • Note to improper installation is located on plastic foam pad. Keep these instructions completely and carefully. • IMPORTANT - Check the oven for local inspector's use. • IMPORTANT - Installation Over the Range Instructions Microwave Oven BEFORE YOU BEGIN Read these instruc- Hinges Oven Cavity Safety door Door seals and latches sealing surfaces NEED HELP?
... electrician before installing the Over the Range Microwave Oven. Lift carton off oven and remove all governing codes and coordinates. • Note to improper installation is located on plastic foam pad. Keep these instructions completely and carefully. • IMPORTANT - Check the oven for local inspector's use. • IMPORTANT - Installation Over the Range Instructions Microwave Oven BEFORE YOU BEGIN Read these instruc- Hinges Oven Cavity Safety door Door seals and latches sealing surfaces NEED HELP?
Installation Instructions
Page 2
... CUT OR REMOVE THE GROUNDING PIN FROM THE PLUG. One set is 36 or 42 inches, a Filler Panel Kit can accept any questions about the grounding or electrical instructions, consult a qualified electrician or serviceperson. Figure 1 2.Neither Electrolux nor the dealer can be flat for the electric current. The wall must be mounted against and supported by probing the wall with standard 12-inch wall cabinets. This will normally be installed...
... CUT OR REMOVE THE GROUNDING PIN FROM THE PLUG. One set is 36 or 42 inches, a Filler Panel Kit can accept any questions about the grounding or electrical instructions, consult a qualified electrician or serviceperson. Figure 1 2.Neither Electrolux nor the dealer can be flat for the electric current. The wall must be mounted against and supported by probing the wall with standard 12-inch wall cabinets. This will normally be installed...
Installation Instructions
Page 4
... to assist in the oven. Be careful not to three types of Microwave Figure 6 (D) Mounting Plate Figure 7 (A) Rotate 180˚ (B) Figure 8 Save fan cover bracket for recirculating. 2. Recirculating - culating exhaust. (B) HORIZONTAL EXHAUST: OUTSIDE VENTILATION 1. Lift Hood Fan Unit carefully and slip wires out of the Charcoal Filter, which has been installed in releasing mounting plate. Follow installation procedure (A). Follow installation procedure (B). See Figure 9 (A). Horizontal Exhaust - Turn oven on other side...
... to assist in the oven. Be careful not to three types of Microwave Figure 6 (D) Mounting Plate Figure 7 (A) Rotate 180˚ (B) Figure 8 Save fan cover bracket for recirculating. 2. Recirculating - culating exhaust. (B) HORIZONTAL EXHAUST: OUTSIDE VENTILATION 1. Lift Hood Fan Unit carefully and slip wires out of the Charcoal Filter, which has been installed in releasing mounting plate. Follow installation procedure (A). Follow installation procedure (B). See Figure 9 (A). Horizontal Exhaust - Turn oven on other side...
Installation Instructions
Page 5
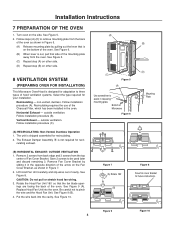
... Figure 12 Figure 14 Exhaust Damper Assembly 9 OVEN INSTALLATION THIS OVEN CANNOT BE PROPERLY INSTALLED WITHOUT REFERRING TO THE MOUNTING INSTRUCTIONS FOUND ON WALL AND TOP CABINET TEMPLATES. See Figure 16 and WALL TEMPLATE for vertical exhaust operation. 6. Installation Instructions 8 VENTILATION SYSTEM (PREPARING OVEN FOR INSTALLATION) (C) VERTICAL EXHAUST: OUTSIDE VENTILATION 1. Make sure the fan blades are facing the top of the Fan Cover Bracket. Use 1 Tapping Screw 4 X12 mm 5 from the...
... Figure 12 Figure 14 Exhaust Damper Assembly 9 OVEN INSTALLATION THIS OVEN CANNOT BE PROPERLY INSTALLED WITHOUT REFERRING TO THE MOUNTING INSTRUCTIONS FOUND ON WALL AND TOP CABINET TEMPLATES. See Figure 16 and WALL TEMPLATE for vertical exhaust operation. 6. Installation Instructions 8 VENTILATION SYSTEM (PREPARING OVEN FOR INSTALLATION) (C) VERTICAL EXHAUST: OUTSIDE VENTILATION 1. Make sure the fan blades are facing the top of the Fan Cover Bracket. Use 1 Tapping Screw 4 X12 mm 5 from the...

Installation Instructions
Page 6
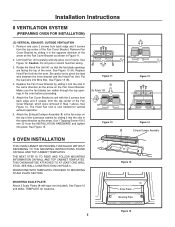
... wall location and insert Toggle Nuts and Bolts through WALL TEMPLATE into wall to open on Mounting Plate. Position oven to the wall. See Figure 22. Place carton upside down. Figure 19. Align the Mounting Plate carefully and hold in mounting to assist in position while tightening Toggle Bolts. See Figure 21. 3. NOTE: Before insertion, be sure you and turn clockwise to studs. Top Side 6 Cutting...
... wall location and insert Toggle Nuts and Bolts through WALL TEMPLATE into wall to open on Mounting Plate. Position oven to the wall. See Figure 22. Place carton upside down. Figure 19. Align the Mounting Plate carefully and hold in mounting to assist in position while tightening Toggle Bolts. See Figure 21. 3. NOTE: Before insertion, be sure you and turn clockwise to studs. Top Side 6 Cutting...


