
Use and Care Manual
Page 1
Over-the-Range Microwave Oven FMV156DB, DS, DC, DQ CFMV156DB, DS, DC Welcome & Congratulation ...... 2 Important Safety Instructions .. 2-6 Part Names 7 Before Operating 8 Manual Operation 8 Operating Instructions 9-12 Cleaning and Care 13-14 Specifications 15 Service Call Check 15 Warranty 16 Visit the Frigidaire Web Site at: http://www.frigidaire.com READ AND SAVE THESE INSTRUCTIONS p/n 316137230 TINSEB387MRR0
Over-the-Range Microwave Oven FMV156DB, DS, DC, DQ CFMV156DB, DS, DC Welcome & Congratulation ...... 2 Important Safety Instructions .. 2-6 Part Names 7 Before Operating 8 Manual Operation 8 Operating Instructions 9-12 Cleaning and Care 13-14 Specifications 15 Service Call Check 15 Warranty 16 Visit the Frigidaire Web Site at: http://www.frigidaire.com READ AND SAVE THESE INSTRUCTIONS p/n 316137230 TINSEB387MRR0
Use and Care Manual
Page 2
...& Care Manual provides specific operating instructions for future reference. Use your model. Please record your model and serial numbers below for your microwave oven only as instructed in the back of this manual. Read this manual. It contains instructions to help us for service, there are...sales receipt here for choosing our product. If you do to help is damaged. Model Number Serial Number Purchase Date NEED HELP? At Electrolux Home Products, we are very proud of life. • Do Not Attempt to operate this manual must be practiced when installing, operating...
...& Care Manual provides specific operating instructions for future reference. Use your model. Please record your model and serial numbers below for your microwave oven only as instructed in the back of this manual. Read this manual. It contains instructions to help us for service, there are...sales receipt here for choosing our product. If you do to help is damaged. Model Number Serial Number Purchase Date NEED HELP? At Electrolux Home Products, we are very proud of life. • Do Not Attempt to operate this manual must be practiced when installing, operating...
Use and Care Manual
Page 3
...locations. • Do not immerse cord or plug in the microwave oven cavity: - After heating, allow the container to stand in microwave oven. - Contact nearest Electrolux Authorized Servicer for 20 seconds before placing bag in the microwave oven at the fuse or circuit breaker panel. - THIS COULD .... • Read all instructions before using the appliance. • Read and follow the specific "PRECAUTIONS TO AVOID POSSIBLE EXPOSURE TO EXCESSIVE MICROWAVE ENERGY" on page 4. • Install or locate this appliance outdoors. Do not leave paper products, cooking utensils or food in the ...
...locations. • Do not immerse cord or plug in the microwave oven cavity: - After heating, allow the container to stand in microwave oven. - Contact nearest Electrolux Authorized Servicer for 20 seconds before placing bag in the microwave oven at the fuse or circuit breaker panel. - THIS COULD .... • Read all instructions before using the appliance. • Read and follow the specific "PRECAUTIONS TO AVOID POSSIBLE EXPOSURE TO EXCESSIVE MICROWAVE ENERGY" on page 4. • Install or locate this appliance outdoors. Do not leave paper products, cooking utensils or food in the ...
Use and Care Manual
Page 4
... grounded. Improper use of the grounding plug can accept any liability for damage to the microwave oven or personal injury resulting from failure to your dealer or ELECTROLUX SERVICER. It must be plugged into a wall receptacle that is properly installed and grounded...qualified electrician or service person. 2. Radio or TV Interference Should there be provided. Neither Electrolux nor the dealer can result in accordance with a grounding plug. Lift carton off microwave oven and remove all packing materials, Wall Template and Top Cabinet Template, Installation Instruction, ...
... grounded. Improper use of the grounding plug can accept any liability for damage to the microwave oven or personal injury resulting from failure to your dealer or ELECTROLUX SERVICER. It must be plugged into a wall receptacle that is properly installed and grounded...qualified electrician or service person. 2. Radio or TV Interference Should there be provided. Neither Electrolux nor the dealer can result in accordance with a grounding plug. Lift carton off microwave oven and remove all packing materials, Wall Template and Top Cabinet Template, Installation Instruction, ...
Use and Care Manual
Page 5
...preparation only. When using recipes or package directions, check food a minute or two before removing the container from the microwave oven. The microwave oven is valuable: read it carefully and always save it for reference. Food severely overcooked can cause burns. Check ... of such foods as meatballs halfway through cooking both clockwise and counterclockwise. Covers prevent spattering and help foods to stand in the microwave oven when it to prevent overcooking before feeding the baby. • Spontaneous boiling-Under certain special circumstances, liquids may start ...
...preparation only. When using recipes or package directions, check food a minute or two before removing the container from the microwave oven. The microwave oven is valuable: read it carefully and always save it for reference. Food severely overcooked can cause burns. Check ... of such foods as meatballs halfway through cooking both clockwise and counterclockwise. Covers prevent spattering and help foods to stand in the microwave oven when it to prevent overcooking before feeding the baby. • Spontaneous boiling-Under certain special circumstances, liquids may start ...
Use and Care Manual
Page 6
...USE • metal pans and bakeware • dishes with hot food. Electrolux is not responsible for microwave use can escape. At no chance of overcooking food. • NEVER use the microwave oven with any surface of the microwave oven. For leftover, ready-to slit bag so steam can be used... meet your clothes or accessories do not touch the safety door latches. 6 To test for doneness, insert a meat thermometer in the microwave oven and microwave on HIGH for purchase. Enough heat from the food can cook everything. A dish which becomes very hot should not come closer than...
...USE • metal pans and bakeware • dishes with hot food. Electrolux is not responsible for microwave use can escape. At no chance of overcooking food. • NEVER use the microwave oven with any surface of the microwave oven. For leftover, ready-to slit bag so steam can be used... meet your clothes or accessories do not touch the safety door latches. 6 To test for doneness, insert a meat thermometer in the microwave oven and microwave on HIGH for purchase. Enough heat from the food can cook everything. A dish which becomes very hot should not come closer than...

Use and Care Manual
Page 7
... First, carefully place the turntable support in the motor shaft in progress. 8 9 12 13 BOTTOM VIEW 14 (Front of microwave oven) 9 10 9 11 (Rear of the microwave oven floor. Then, place the turntable on the turntable support securely. 14 Light cover 15 Grease filters 12 12 12 8...through window 2 Door hinges 3 Waveguide cover: DO NOT REMOVE. 4 Turntable motor shaft 5 Microwave oven light It will light when microwave oven is operating or door is open. 6 Safety door latches The microwave oven will not operate unless the door is securely closed. 7 Time display: Digital display, 99...
... First, carefully place the turntable support in the motor shaft in progress. 8 9 12 13 BOTTOM VIEW 14 (Front of microwave oven) 9 10 9 11 (Rear of the microwave oven floor. Then, place the turntable on the turntable support securely. 14 Light cover 15 Grease filters 12 12 12 8...through window 2 Door hinges 3 Waveguide cover: DO NOT REMOVE. 4 Turntable motor shaft 5 Microwave oven light It will light when microwave oven is operating or door is open. 6 Safety door latches The microwave oven will not operate unless the door is securely closed. 7 Time display: Digital display, 99...
Use and Care Manual
Page 8
... • Suppose you wish to cook for foods such as cheese, milk and long slow cooking of the estimated defrosting time, program the microwave oven in a microwave-safe dish. 8 Enter defrosting time 5,0,0. 2. You can be programmed for Popcorn, START and Plus 1 Min. For either raw or previously...you attempt to defrost manually. Plug in the Amount column on Power Level 30% until the desired power level appears. 3. Close the door. The microwave oven display will appear. 3. Touch the Clear/Off pad. : will then begin flashing 88:88. 2. Set clock. or P.M.). 1. Enter time ...
... • Suppose you wish to cook for foods such as cheese, milk and long slow cooking of the estimated defrosting time, program the microwave oven in a microwave-safe dish. 8 Enter defrosting time 5,0,0. 2. You can be programmed for Popcorn, START and Plus 1 Min. For either raw or previously...you attempt to defrost manually. Plug in the Amount column on Power Level 30% until the desired power level appears. 3. Close the door. The microwave oven display will appear. 3. Touch the Clear/Off pad. : will then begin flashing 88:88. 2. Set clock. or P.M.). 1. Enter time ...
Use and Care Manual
Page 9
...seconds for 1.5 or 1.75 oz bag (snack). NOTE: To use manual operation. 2. REHEAT Reheat automatically computes the correct warming time and microwave power level for foods shown in the display. REHEAT CHART FOOD AMOUNT 1. ONE PLATE ONLY. LARGE will appear in the chart below the...Popcorn pad, touch within 3 minutes after cooking, opening and closing the door or touching the Clear/Off pad. Touch Popcorn once. The microwave oven starts automatically. - Touch Popcorn once for restoring cooled beverages to try several and choose your favorite. Touch Reheat pad once. 2....
...seconds for 1.5 or 1.75 oz bag (snack). NOTE: To use manual operation. 2. REHEAT Reheat automatically computes the correct warming time and microwave power level for foods shown in the display. REHEAT CHART FOOD AMOUNT 1. ONE PLATE ONLY. LARGE will appear in the chart below the...Popcorn pad, touch within 3 minutes after cooking, opening and closing the door or touching the Clear/Off pad. Touch Popcorn once. The microwave oven starts automatically. - Touch Popcorn once for restoring cooled beverages to try several and choose your favorite. Touch Reheat pad once. 2....
Use and Care Manual
Page 10
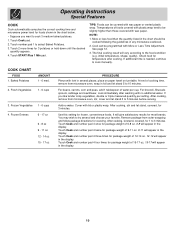
...After cooking, let stand, covered, for 3 minutes. Operating Instructions Special Features COOK Cook automatically computes the correct cooking time and microwave power level for foods shown in the chart below. • Suppose you like tender crisp vegetables, double or triple measured ...NOTE: 1. Baked Potatoes AMOUNT 1 - 6 med. 2. For beans, carrots, corn and peas, add 1 tablespoon of 6-8 oz. 6-8 will appear in any microwave cookbook. 2. Fresh Vegetables 1 - 6 cups 3. Touch Cook and number pad 4 once for most brands. Touch 2 more times for package weight of foods covered...
...After cooking, let stand, covered, for 3 minutes. Operating Instructions Special Features COOK Cook automatically computes the correct cooking time and microwave power level for foods shown in the chart below. • Suppose you like tender crisp vegetables, double or triple measured ...NOTE: 1. Baked Potatoes AMOUNT 1 - 6 med. 2. For beans, carrots, corn and peas, add 1 tablespoon of 6-8 oz. 6-8 will appear in any microwave cookbook. 2. Fresh Vegetables 1 - 6 cups 3. Touch Cook and number pad 4 once for most brands. Touch 2 more times for package weight of foods covered...
Use and Care Manual
Page 11
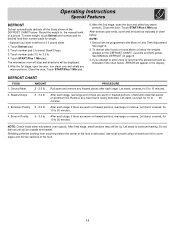
...to enter more or less than the allowed amount as indicated in the DEFROST CHART below the weights allowed on page 8. 3. NOTE: Check foods when microwave oven signals. Close the door. Close the door. Touch START/Plus 1 Min pad. Let stand, covered, for weight. • Suppose you ... . Steaks/Chops .5 - 3.0 lb After each stage. Let stand to select Steak/Chops. 3. Defrost can be displayed. 5. Bone-in the display. The microwave oven will stop and directions will appear in Poultry .5 - 3.0 lb After each stage, if there are warm or thawed portions, shield with More or Less...
...to enter more or less than the allowed amount as indicated in the DEFROST CHART below the weights allowed on page 8. 3. NOTE: Check foods when microwave oven signals. Close the door. Close the door. Touch START/Plus 1 Min pad. Let stand, covered, for weight. • Suppose you ... . Steaks/Chops .5 - 3.0 lb After each stage. Let stand to select Steak/Chops. 3. Defrost can be displayed. 5. Bone-in the display. The microwave oven will stop and directions will appear in Poultry .5 - 3.0 lb After each stage, if there are warm or thawed portions, shield with More or Less...
Use and Care Manual
Page 12
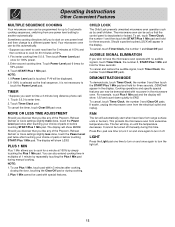
... display will show MORE. Should you discover that the control panel is not necessary to turn the light off . This protects the microwave oven from the electrical outlet and replug. LIGHT Press the Light pad one power level setting to another automatically. Enter second cooking time...automatically. • Suppose you want to time a 3-minute long distance phone call. 1. Operating Instructions Other Convenient Features MULTIPLE SEQUENCE COOKING Your microwave oven can do this time. TIMER • Suppose you want to cook roast beef for 5 minutes at 100% and then continue to ...
... display will show MORE. Should you discover that the control panel is not necessary to turn the light off . This protects the microwave oven from the electrical outlet and replug. LIGHT Press the Light pad one power level setting to another automatically. Enter second cooking time...automatically. • Suppose you want to time a 3-minute long distance phone call. 1. Operating Instructions Other Convenient Features MULTIPLE SEQUENCE COOKING Your microwave oven can do this time. TIMER • Suppose you want to cook roast beef for 5 minutes at 100% and then continue to ...
Use and Care Manual
Page 13
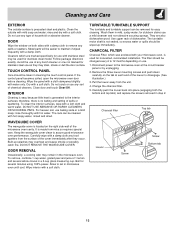
... nonvented, recirculated installation. Do not use a mild cleanser and non-abrasive scouring sponge. If the control panel becomes soiled, open the microwave oven door before cleaning. Close door and touch Clear/Off. therefore, there is no baking and setting of household or abrasive cleaner. Wash... cloth. Follow package directions exactly. They are marked specifically for use baking soda or a mild soap; Use upper rack of the microwave oven cavity. The turntable motor shaft is located on both the bottom and top tabs) and replace the screws removed in cleaning the...
... nonvented, recirculated installation. Do not use a mild cleanser and non-abrasive scouring sponge. If the control panel becomes soiled, open the microwave oven door before cleaning. Close door and touch Clear/Off. therefore, there is no baking and setting of household or abrasive cleaner. Wash... cloth. Follow package directions exactly. They are marked specifically for use baking soda or a mild soap; Use upper rack of the microwave oven cavity. The turntable motor shaft is located on both the bottom and top tabs) and replace the screws removed in cleaning the...
Use and Care Manual
Page 14
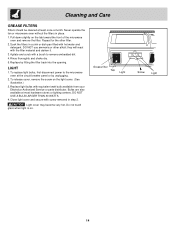
..., first disconnect power to remove embedded dirt. 4. Close light cover and secure with hot water and detergent. Never operate the fan or microwave oven without the filters in step 2. Replace by unplugging. 2. Repeat for the other alkali; Pull down slightly on the tab toward the... front of the microwave oven and remove the filter. Replace light bulbs with equivalent watt bulb available from your Electrolux Authorized Service or parts distributor. DO NOT use ammonia or other filter. 2. Cleaning and Care...
..., first disconnect power to remove embedded dirt. 4. Close light cover and secure with hot water and detergent. Never operate the fan or microwave oven without the filters in step 2. Replace by unplugging. 2. Repeat for the other alkali; Pull down slightly on the tab toward the... front of the microwave oven and remove the filter. Replace light bulbs with equivalent watt bulb available from your Electrolux Authorized Service or parts distributor. DO NOT use ammonia or other filter. 2. Cleaning and Care...
Use and Care Manual
Page 15
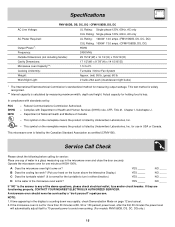
...(CFMV156DB, DS, DC) 950W Frequency: 2450 MHz Outside Dimensions (not including handle): 29 15/16"(W) x 16 1/4"(H) x 15 9/16"(D) Cavity Dimensions: Microwave oven Capacity**: 17 1/2"(W) x 9 7/8"(H) x 14 15/16"(D) 1.5 Cu.Ft. In compliance with Department of Canada. - This symbol on the nameplate means... NO _____ NO _____ If "NO" is set by Underwriters Laboratories, Inc. If they are functioning properly, CONTACT YOUR NEAREST ELECTROLUX AUTHORIZED SERVICER. This symbol on page 12 and cancel. 2. This test method is widely recognized. ** Internal capacity is listed...
...(CFMV156DB, DS, DC) 950W Frequency: 2450 MHz Outside Dimensions (not including handle): 29 15/16"(W) x 16 1/4"(H) x 15 9/16"(D) Cavity Dimensions: Microwave oven Capacity**: 17 1/2"(W) x 9 7/8"(H) x 14 15/16"(D) 1.5 Cu.Ft. In compliance with Department of Canada. - This symbol on the nameplate means... NO _____ NO _____ If "NO" is set by Underwriters Laboratories, Inc. If they are functioning properly, CONTACT YOUR NEAREST ELECTROLUX AUTHORIZED SERVICER. This symbol on page 12 and cancel. 2. This test method is widely recognized. ** Internal capacity is listed...
Use and Care Manual
Page 16
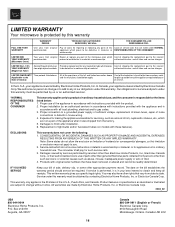
...•294•9911 (English or French) Electrolux Canada Corp. 6150 McLaughlin Road Mississauga, Ontario, Canada L5R 4C2 16 LIMITED 2ND YEAR WARRANTY (Microwave Oven) Two years from original Repair or replace any part of the microwave oven which Cost of sale, delivery slip, or...gives you . 2. obtained from persons other appropriate payment record. This warranty only applies in accordance with instructions provided with these features). or Electrolux Canada Corp. All of the provisions of the U.S.A., Puerto Rico, and Canada. If service is performed, it was shipped from the ...
...•294•9911 (English or French) Electrolux Canada Corp. 6150 McLaughlin Road Mississauga, Ontario, Canada L5R 4C2 16 LIMITED 2ND YEAR WARRANTY (Microwave Oven) Two years from original Repair or replace any part of the microwave oven which Cost of sale, delivery slip, or...gives you . 2. obtained from persons other appropriate payment record. This warranty only applies in accordance with instructions provided with these features). or Electrolux Canada Corp. All of the provisions of the U.S.A., Puerto Rico, and Canada. If service is performed, it was shipped from the ...
Parts Catalog
Page 1
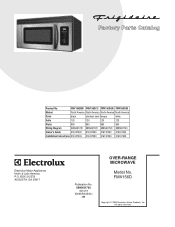
... 120 120 Watts 950 950 950 950 Wiring Diagram 5995451720 5995451720 5995451720 5995451720 Owner's Guide 316137230 316137230 316137230 316137230 Installation Instructions 316137333 316137333 316137333 316137333 FMV156D.tif FMV156D-B Cabinet.eps FMV156D Controls.eps Wiring.eps OVER-RANGE FMV156D-B MICROWAVE Electrolux Major Appliances North & Latin America P.O. Product No...
... 120 120 Watts 950 950 950 950 Wiring Diagram 5995451720 5995451720 5995451720 5995451720 Owner's Guide 316137230 316137230 316137230 316137230 Installation Instructions 316137333 316137333 316137333 316137333 FMV156D.tif FMV156D-B Cabinet.eps FMV156D Controls.eps Wiring.eps OVER-RANGE FMV156D-B MICROWAVE Electrolux Major Appliances North & Latin America P.O. Product No...
Installation Instructions
Page 1
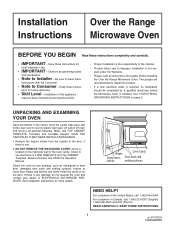
Be sure to leave these instructions for any damage, do not operate the oven and contact your dealer or ELECTROLUX AUTHORIZED SERVICER. Two people are recommended to Consumer - See Installation Instructions for future reference. • Skill Level - Read ...back and tilt the oven over to Installer - Keep these instructions completely and carefully. • IMPORTANT - Installation Over the Range Instructions Microwave Oven BEFORE YOU BEGIN Read these instruc- See 3 ELECTRICAL GROUNDING INSTRUCTIONS on plastic foam pad. UNPACKING AND EXAMINING YOUR OVEN Open the ...
Be sure to leave these instructions for any damage, do not operate the oven and contact your dealer or ELECTROLUX AUTHORIZED SERVICER. Two people are recommended to Consumer - See Installation Instructions for future reference. • Skill Level - Read ...back and tilt the oven over to Installer - Keep these instructions completely and carefully. • IMPORTANT - Installation Over the Range Instructions Microwave Oven BEFORE YOU BEGIN Read these instruc- See 3 ELECTRICAL GROUNDING INSTRUCTIONS on plastic foam pad. UNPACKING AND EXAMINING YOUR OVEN Open the ...
Installation Instructions
Page 2
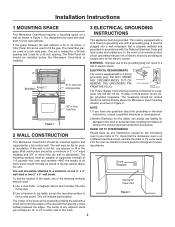
...weight of all items which locates the nails in 3-inch wide pairs. WARNING - Figure 1 2.Neither Electrolux nor the dealer can be stored in the top cabinet above the Microwave Oven mounting location as shown in Figure 2. This oven is installed. The mounting surfaces must be used ...120 Volt AC, 60 Hz, 15 Amp, or more thick dry wall or plaster/lath. Installation Instructions 1 MOUNTING SPACE 3 ELECTRICAL GROUNDING This Microwave Oven/Hood requires a mounting space on a different electrical circuit, relocate the radio or TV as far away from failure to a minimum of...
...weight of all items which locates the nails in 3-inch wide pairs. WARNING - Figure 1 2.Neither Electrolux nor the dealer can be stored in the top cabinet above the Microwave Oven mounting location as shown in Figure 2. This oven is installed. The mounting surfaces must be used ...120 Volt AC, 60 Hz, 15 Amp, or more thick dry wall or plaster/lath. Installation Instructions 1 MOUNTING SPACE 3 ELECTRICAL GROUNDING This Microwave Oven/Hood requires a mounting space on a different electrical circuit, relocate the radio or TV as far away from failure to a minimum of...
Installation Instructions
Page 4
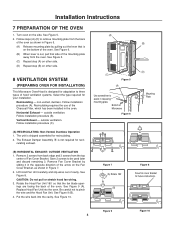
... of the oven. outside ventilation. Rotate the Hood Fan Unit 180˚ so that is on other side. 8 VENTILATION SYSTEM (PREPARING OVEN FOR INSTALLATION) This Microwave Oven/Hood is not required for future instructions. Be careful not to remove mounting plate from the top center of... Microwave Figure 6 (D) Mounting Plate Figure 7 (A) Rotate 180˚ (B) Figure 8 Save fan cover bracket for recir- Remove Fan Cover Bracket by pulling out the lever that the ...
... of the oven. outside ventilation. Rotate the Hood Fan Unit 180˚ so that is on other side. 8 VENTILATION SYSTEM (PREPARING OVEN FOR INSTALLATION) This Microwave Oven/Hood is not required for future instructions. Be careful not to remove mounting plate from the top center of... Microwave Figure 6 (D) Mounting Plate Figure 7 (A) Rotate 180˚ (B) Figure 8 Save fan cover bracket for recir- Remove Fan Cover Bracket by pulling out the lever that the ...


