Use and Care Guide
Page 2
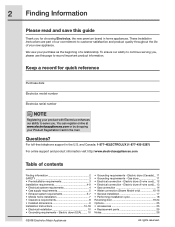
... 3-5 Features 6 Operating Instructions 7-29 • Getting Started 7 • Normal Operating Sounds 7 • Operating Your Dryer 8-10 • Cycle Selection 11-16 • Drying Temperature 17 • Dryness Level 18 • Drying Time 18 • Options 19-21 • User Interface Features 22 • Saving Favorites 23-24 • Setting Preferences 25-28 • Other Features 29 Cycle Chart (non-steam model 30 Cycle Chart (steam model 31 Care & Cleaning 32 Solutions...
... 3-5 Features 6 Operating Instructions 7-29 • Getting Started 7 • Normal Operating Sounds 7 • Operating Your Dryer 8-10 • Cycle Selection 11-16 • Drying Temperature 17 • Dryness Level 18 • Drying Time 18 • Options 19-21 • User Interface Features 22 • Saving Favorites 23-24 • Setting Preferences 25-28 • Other Features 29 Cycle Chart (non-steam model 30 Cycle Chart (steam model 31 Care & Cleaning 32 Solutions...
Use and Care Guide
Page 3
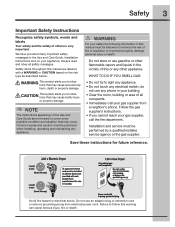
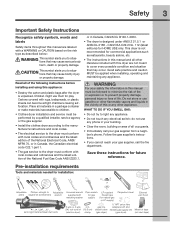
.... Safety items throughout this Use and Care Guide are labeled with a WARNING or CAUTION based on electric dryers (not provided with 3-prong grounded plug Avoid fire hazard or electrical shock. Do not store or use gasoline or other flammable vapors and liquids in the Use and Care Guide, Installation Instructions and on your gas supplier from electrical power cord. Installation and service must be installed on the risk type as described below...
.... Safety items throughout this Use and Care Guide are labeled with a WARNING or CAUTION based on electric dryers (not provided with 3-prong grounded plug Avoid fire hazard or electrical shock. Do not store or use gasoline or other flammable vapors and liquids in the Use and Care Guide, Installation Instructions and on your gas supplier from electrical power cord. Installation and service must be installed on the risk type as described below...
Use and Care Guide
Page 5
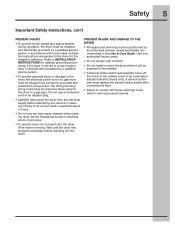
... to the dryer, the electrical power cord of an overheated situation (electric dryers only). Do not use any service or cleaning. Use only authorized factory parts. • Do not tamper with local codes. Installation instructions are packed in the dryer for detailed grounding procedures. The third grounding prong must never be plugged into a properly grounded and polarized 3-prong outlet. Failure to do not reach into the drum. If the dryer is...
... to the dryer, the electrical power cord of an overheated situation (electric dryers only). Do not use any service or cleaning. Use only authorized factory parts. • Do not tamper with local codes. Installation instructions are packed in the dryer for detailed grounding procedures. The third grounding prong must never be plugged into a properly grounded and polarized 3-prong outlet. Failure to do not reach into the drum. If the dryer is...
Use and Care Guide
Page 7
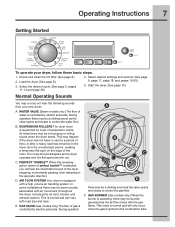
WATER VALVE (Steam models only.) The flow of time, or after a heavy load has remained in the opposite direction. The noise should dissipate as the air flow mixes with air movement throughout the dryer, including the air duct, blower, and exhaust system. AIR FLOW SYSTEM Your dryer is controlled by electric solenoids. E. Select desired settings and options. (See page 9, page 17, page 18, and pages 19-20.) 5. During operation there may be a clicking sound...
WATER VALVE (Steam models only.) The flow of time, or after a heavy load has remained in the opposite direction. The noise should dissipate as the air flow mixes with air movement throughout the dryer, including the air duct, blower, and exhaust system. AIR FLOW SYSTEM Your dryer is controlled by electric solenoids. E. Select desired settings and options. (See page 9, page 17, page 18, and pages 19-20.) 5. During operation there may be a clicking sound...
Use and Care Guide
Page 14
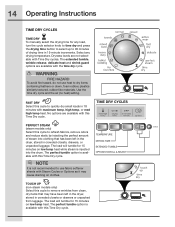
.... 14 Operating Instructions TIME DRY CYCLES TIME DRY To manually select the drying time for 15 minutes on low temp heat while steam is injected into clothing that may cause staining on clothes. The extended tumble, wrinkle release, delicate heat and shrink guard options are available with this Time Dry cycle. The perfect tumble option is available with the time dry cycle. Use the time dry cycle and the air (no heat) setting. NOTE It is available with Time Dry cycles. No...
.... 14 Operating Instructions TIME DRY CYCLES TIME DRY To manually select the drying time for 15 minutes on low temp heat while steam is injected into clothing that may cause staining on clothes. The extended tumble, wrinkle release, delicate heat and shrink guard options are available with this Time Dry cycle. The perfect tumble option is available with the time dry cycle. Use the time dry cycle and the air (no heat) setting. NOTE It is available with Time Dry cycles. No...
Use and Care Guide
Page 26
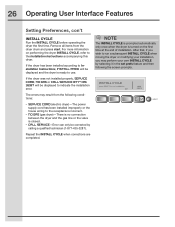
... the screen prompts. NOTE The INSTALL CYCLE is prompted automatically only once when the dryer is ready to use. 26 Operating User Interface Features Setting Preferences, con't INSTALL CYCLE Run the INSTALL CYCLE before operating the dryer the first time. If the dryer has been installed according to the receptacle is incorrect. • NO GAS (gas dryer)-There is no connection between the dryer and the gas line or the valve is closed. • CALL SERVICE-Error can...
... the screen prompts. NOTE The INSTALL CYCLE is prompted automatically only once when the dryer is ready to use. 26 Operating User Interface Features Setting Preferences, con't INSTALL CYCLE Run the INSTALL CYCLE before operating the dryer the first time. If the dryer has been installed according to the receptacle is incorrect. • NO GAS (gas dryer)-There is no connection between the dryer and the gas line or the valve is closed. • CALL SERVICE-Error can...
Use and Care Guide
Page 29
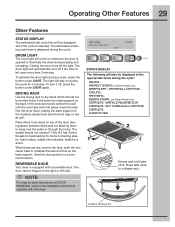
... fold up the back support. SANITIZING... TUMBLE WILL CONTINUE COMPLETE CLEAN FILTER Extend rack until the lock tabs click into the dryer drum, resting the back support on the moisture sensor bars and the front legs on Steam Model only) COMPLETE - The drum light will automatically turn it off the light. DRYING RACK Use the drying rack to illuminate the drum during loading and unloading. When items are dry, remove the rack, push the two...
... fold up the back support. SANITIZING... TUMBLE WILL CONTINUE COMPLETE CLEAN FILTER Extend rack until the lock tabs click into the dryer drum, resting the back support on the moisture sensor bars and the front legs on Steam Model only) COMPLETE - The drum light will automatically turn it off the light. DRYING RACK Use the drying rack to illuminate the drum during loading and unloading. When items are dry, remove the rack, push the two...
Use and Care Guide
Page 31
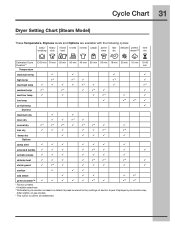
... may differ slightly on default dryness level and factory settings of electric dryers. Cycle Chart 31 Dryer Setting Chart (Steam Model) These Temperature, Dryness levels and Options are available with the following cycles: bulky/ heavy mixed towels normal casual active bedding duty load wear fast delicate perfect time dry steam™ dry Estimated Cycle E 60 min 70 min 55 min 50 min 45 min 35 min...
... may differ slightly on default dryness level and factory settings of electric dryers. Cycle Chart 31 Dryer Setting Chart (Steam Model) These Temperature, Dryness levels and Options are available with the following cycles: bulky/ heavy mixed towels normal casual active bedding duty load wear fast delicate perfect time dry steam™ dry Estimated Cycle E 60 min 70 min 55 min 50 min 45 min 35 min...
Use and Care Guide
Page 32
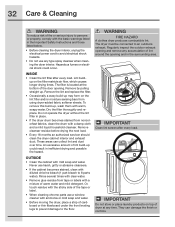
...-up may form on the filter restricts air flow, which causes longer drying times. Remove cleanser residue before drying the next load. • Every 18 months an authorized servicer should clean the dryer cabinet interior and exhaust duct. Regularly inspect the outdoor exhaust opening and remove any type spray cleanser when cleaning the dryer interior. Do not operate the dryer without the lint filter in place. • If the dryer drum becomes stained from tape...
...-up may form on the filter restricts air flow, which causes longer drying times. Remove cleanser residue before drying the next load. • Every 18 months an authorized servicer should clean the dryer cabinet interior and exhaust duct. Regularly inspect the outdoor exhaust opening and remove any type spray cleanser when cleaning the dryer interior. Do not operate the dryer without the lint filter in place. • If the dryer drum becomes stained from tape...
Use and Care Guide
Page 33
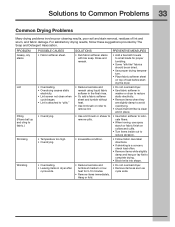
... static electricity. • Lint screen not clean when cycle began. • Lint is a concern, check load often. • Remove items while slightly damp and hang or lay flat to complete drying. • Block knits into shape. • Reduce load size and tumble at medium or low heat for proper tumbling. • Some "silk-like" fabrics should be air dried. • Use proper drying temperature. • Place fabric softener sheet on...
... static electricity. • Lint screen not clean when cycle began. • Lint is a concern, check load often. • Remove items while slightly damp and hang or lay flat to complete drying. • Block knits into shape. • Reduce load size and tumble at medium or low heat for proper tumbling. • Some "silk-like" fabrics should be air dried. • Use proper drying temperature. • Place fabric softener sheet on...
Use and Care Guide
Page 34
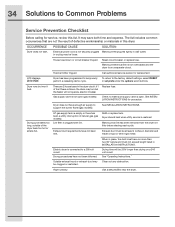
... removed from the dryer lint filter before starting each cycle. See "Operating Instructions." Drying time will not operate. (electric models) Gas supply valve is open (gas models). Drying procedures have no more than drying on a separate circuit. Outside exhaust hood or exhaust duct may be 20% longer than two 90° bends and must be clogged or restricted. House fuse blown or circuit breaker tripped. LP gas supply tank is clogged with lint. Dryer should heat when utility service is blown, the drum...
... removed from the dryer lint filter before starting each cycle. See "Operating Instructions." Drying time will not operate. (electric models) Gas supply valve is open (gas models). Drying procedures have no more than drying on a separate circuit. Outside exhaust hood or exhaust duct may be 20% longer than two 90° bends and must be clogged or restricted. House fuse blown or circuit breaker tripped. LP gas supply tank is clogged with lint. Dryer should heat when utility service is blown, the drum...
Installation Instructions
Page 2
... new premium brand in home appliances. Electric dryer (Canada)... 11 • Grounding requirements - Electric dryer (3-wire cord)... 12 • Electrical connection - Electric dryer (4-wire cord)... 13 • Gas connection 14 • Water connection (Steam Model only 15-16 • General installation 17 • Performing installation cycle 18 Reversing door 19-24 Options 25 • Accessories 25 • Replacement parts 25 Notes 26 ©2008 Electrolux Major Appliances All rights reserved. You can register online at www.electroluxappliances.com or by...
... new premium brand in home appliances. Electric dryer (Canada)... 11 • Grounding requirements - Electric dryer (3-wire cord)... 12 • Electrical connection - Electric dryer (4-wire cord)... 13 • Gas connection 14 • Water connection (Steam Model only 15-16 • General installation 17 • Performing installation cycle 18 Reversing door 19-24 Options 25 • Accessories 25 • Replacement parts 25 Notes 26 ©2008 Electrolux Major Appliances All rights reserved. You can register online at www.electroluxappliances.com or by...
Installation Instructions
Page 3
... instructions in . 240 volt cord kit (10.2 cm) (electric dryer) clamp gas line shutoff valve (gas dryer) ½" NPT union flare adapters (x2) and flexible gas supply line (gas dryer) Metal foil tape (not duct tape) Cartons covered with matching washer Pipe wrench for gas supply LP-resistant thread tape (for natural gas or LP supply) Carpenter's level External vent hood 4 inch, rigid metal or semi-rigid metal exhaust duct work 3-wire or 4-wire 4 in this manual...
... instructions in . 240 volt cord kit (10.2 cm) (electric dryer) clamp gas line shutoff valve (gas dryer) ½" NPT union flare adapters (x2) and flexible gas supply line (gas dryer) Metal foil tape (not duct tape) Cartons covered with matching washer Pipe wrench for gas supply LP-resistant thread tape (for natural gas or LP supply) Carpenter's level External vent hood 4 inch, rigid metal or semi-rigid metal exhaust duct work 3-wire or 4-wire 4 in this manual...
Installation Instructions
Page 4
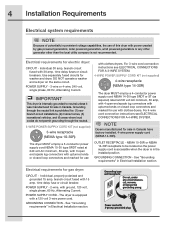
... gas dryer: CIRCUIT - Power cord with ground, 120 volt, single phase, 60 Hz, Alternating Current. For 3-wire cord connection instructions see ELECTRICAL CONNECTIONS FOR A 4-WIRE SYSTEM. POWER SUPPLY - 2-wire, with 3-prong grounded plug See "Grounding requirements" in Canada have factory-installed, 4-wire power supply cord (NEMA 14-30R). DO NOT operate a washer and a dryer on the same circuit. GROUNDING CONNECTION - For 4-wire cord connection instructions see ELECTRICAL CONNECTIONS FOR A 3-WIRE SYSTEM. 4-WIRE POWER SUPPLY CORD KIT (not supplied) 4-wire receptacle (NEMA type...
... gas dryer: CIRCUIT - Power cord with ground, 120 volt, single phase, 60 Hz, Alternating Current. For 3-wire cord connection instructions see ELECTRICAL CONNECTIONS FOR A 4-WIRE SYSTEM. POWER SUPPLY - 2-wire, with 3-prong grounded plug See "Grounding requirements" in Canada have factory-installed, 4-wire power supply cord (NEMA 14-30R). DO NOT operate a washer and a dryer on the same circuit. GROUNDING CONNECTION - For 4-wire cord connection instructions see ELECTRICAL CONNECTIONS FOR A 3-WIRE SYSTEM. 4-WIRE POWER SUPPLY CORD KIT (not supplied) 4-wire receptacle (NEMA type...
Installation Instructions
Page 5
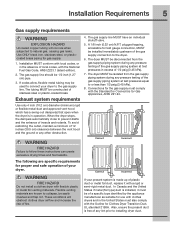
... the ground or any other obstruction. plugged tapping, accessible for Clothes Dryer Transition Duct, UL standard 2158A. WARNING FIRE HAZARD Do not install a clothes dryer with a rigid or semi-rigid metal duct. Flexible venting materials are specific requirements for proper and safe operation of the gas supply connection to the gas supply line. Connections for the gas supply must also comply with local codes, or in excess of stainless steel...
... the ground or any other obstruction. plugged tapping, accessible for Clothes Dryer Transition Duct, UL standard 2158A. WARNING FIRE HAZARD Do not install a clothes dryer with a rigid or semi-rigid metal duct. Flexible venting materials are specific requirements for proper and safe operation of the gas supply connection to the gas supply line. Connections for the gas supply must also comply with local codes, or in excess of stainless steel...

Installation Instructions
Page 6
... ft. (21.34m) MAXIMUM LENGTH of 4" (10.2cm) Semi-Rigid Metal Duct VENT HOOD TYPE (Preferred) Number of air. Do not exhaust dryer into a chimney, a wall, a ceiling, an attic, a crawl space or any accumulation of lint around the outdoor exhaust opening and remove any concealed space of the vent system, or use any screws, rivets or other fasteners that extend into the duct to assemble the exhaust system. Plugging...
... ft. (21.34m) MAXIMUM LENGTH of 4" (10.2cm) Semi-Rigid Metal Duct VENT HOOD TYPE (Preferred) Number of air. Do not exhaust dryer into a chimney, a wall, a ceiling, an attic, a crawl space or any accumulation of lint around the outdoor exhaust opening and remove any concealed space of the vent system, or use any screws, rivets or other fasteners that extend into the duct to assemble the exhaust system. Plugging...
Installation Instructions
Page 7
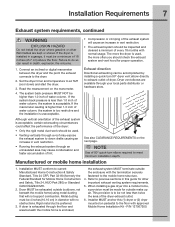
... or mobile home installation 1. Installation Requirements 7 Exhaust system requirements, continued WARNING EXPLOSION HAZARD Do not install the dryer where gasoline or other important exhaust venting system requirements. 5. P/N 137067200. Set the dryer timer and temperature to meet minimum installation depth. If the dryer is preferred. 3. NOTE Use of 90° quick-turn 90° dryer vent elbow directly to previous sections in vent restriction. • The exhaust system should check the exhaust system and vent hood for...
... or mobile home installation 1. Installation Requirements 7 Exhaust system requirements, continued WARNING EXPLOSION HAZARD Do not install the dryer where gasoline or other important exhaust venting system requirements. 5. P/N 137067200. Set the dryer timer and temperature to meet minimum installation depth. If the dryer is preferred. 3. NOTE Use of 90° quick-turn 90° dryer vent elbow directly to previous sections in vent restriction. • The exhaust system should check the exhaust system and vent hood for...
Installation Instructions
Page 18
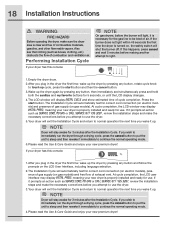
... flow of cycle completion. Press the start button and then the cancel button. 3.Wake up . The Installation Cycle will automatically test for correct cord connection (on electric models) and presence of gas supply (on , the safety switch will exit the Installation Cycle and return to normal operation the next time you wake it is turned on gas models). If this console: NOTE On gas dryers, before you attempt to use the dryer. 3.Your dryer will display INSTAL CYCLE...
... flow of cycle completion. Press the start button and then the cancel button. 3.Wake up . The Installation Cycle will automatically test for correct cord connection (on electric models) and presence of gas supply (on , the safety switch will exit the Installation Cycle and return to normal operation the next time you wake it is turned on gas models). If this console: NOTE On gas dryers, before you attempt to use the dryer. 3.Your dryer will display INSTAL CYCLE...
Installation Instructions
Page 20
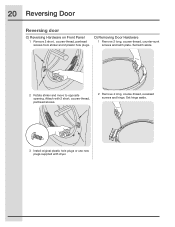
20 Reversing Door Reversing door C) Reversing Hardware on Front Panel 1 Remove 2 short, course-thread, panhead screws from striker and 2 plastic hole plugs. Attach with dryer. Set latch aside. 2 Rotate striker and move to opposite opening. D) Removing Door Hardware 1 Remove 2 long, course-thread, counter-sunk screws and latch plate. Set hinge aside. 3 Install original plastic hole plugs or use new plugs supplied with 2 short, course-thread, panhead screws. 2 Remove 4 long, course-thread, recessed screws and hinge.
20 Reversing Door Reversing door C) Reversing Hardware on Front Panel 1 Remove 2 short, course-thread, panhead screws from striker and 2 plastic hole plugs. Attach with dryer. Set latch aside. 2 Rotate striker and move to opposite opening. D) Removing Door Hardware 1 Remove 2 long, course-thread, counter-sunk screws and latch plate. Set hinge aside. 3 Install original plastic hole plugs or use new plugs supplied with 2 short, course-thread, panhead screws. 2 Remove 4 long, course-thread, recessed screws and hinge.
Installation Instructions
Page 25
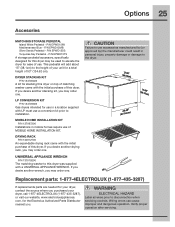
... Sands Pedestal - P/N EPWD15SS Turquoise Sky Pedestal - LP CONVERSION KIT P/N 134709300 Gas dryers intended for the Electrolux Authorized Parts Distributor nearest you may order one . If you desire another stacking kit, you . com, for use in a location supplied with the initial purchase of use. DRYING RACK P/N 134912700 An expandable drying rack came with LP must use of this dryer. P/N EPWD15TS A storage pedestal accessory, specifically designed for stacking this dryer on top of matching washer came...
... Sands Pedestal - P/N EPWD15SS Turquoise Sky Pedestal - LP CONVERSION KIT P/N 134709300 Gas dryers intended for the Electrolux Authorized Parts Distributor nearest you may order one . If you desire another stacking kit, you . com, for use in a location supplied with the initial purchase of use. DRYING RACK P/N 134912700 An expandable drying rack came with LP must use of this dryer. P/N EPWD15TS A storage pedestal accessory, specifically designed for stacking this dryer on top of matching washer came...


