

Use and Care Guide
Page 3
... CeramicGlass CooktopSurface 3..0. BrownStreaksand Speckson Ceramic GlassCooktopSurface 3..1 Areasof Discolorationon Ceramic GlassCooktopSurface 3..1 Warranty information 3..2 ImportantSafety Instructions 4.. Cooktop Features 8..-9 Before Using the Cooktop 1. 0-17 Aboutthe CeramicGlassCooktop 10 Locationsof the SurfaceElements 10 LED Messagesor Light Indicators Displayedby MainControl 1. 1 Light IndicatorsDisplayedby CookingElement Controls 1..1. General Care & Cleaning 2.5-27 Care& CleaningTable 2..5 CooktopCleaningand Maintenance 2. 6 CleaningRecommendationsfor...
... CeramicGlass CooktopSurface 3..0. BrownStreaksand Speckson Ceramic GlassCooktopSurface 3..1 Areasof Discolorationon Ceramic GlassCooktopSurface 3..1 Warranty information 3..2 ImportantSafety Instructions 4.. Cooktop Features 8..-9 Before Using the Cooktop 1. 0-17 Aboutthe CeramicGlassCooktop 10 Locationsof the SurfaceElements 10 LED Messagesor Light Indicators Displayedby MainControl 1. 1 Light IndicatorsDisplayedby CookingElement Controls 1..1. General Care & Cleaning 2.5-27 Care& CleaningTable 2..5 CooktopCleaningand Maintenance 2. 6 CleaningRecommendationsfor...
Use and Care Guide
Page 5
...cooktop. • Wear Proper Apparel. Do not repair or replace any part of the appliance. . Loose-fitting or hanging garments should never be done only by a qualified technician to reduce the risk of personal injury and damage to cause burns. Ask your dealer to the appliance at the circuit breaker or fuse box...as removal of panels, wire covers or any part of the appliance unless specifically recommended in fire or property damage. , Do not leave children alone. Install only per installation instructions provided in Canada, and local code requirements. During and after use ....
...cooktop. • Wear Proper Apparel. Do not repair or replace any part of the appliance. . Loose-fitting or hanging garments should never be done only by a qualified technician to reduce the risk of personal injury and damage to cause burns. Ask your dealer to the appliance at the circuit breaker or fuse box...as removal of panels, wire covers or any part of the appliance unless specifically recommended in fire or property damage. , Do not leave children alone. Install only per installation instructions provided in Canada, and local code requirements. During and after use ....

Use and Care Guide
Page 6
... the hood, turn off and the power resumes, the cooktop will not operate and an error message will be cleaned frequently, so the grease from steam. This appliance is not turned off the cooktop. Glazed Cooking Utensils. Only certain types of glass, glass/ceramic, ceramic, earthenware, or other glazed utensils are suitable for cooktop use aluminum foil to line any part of grease that has boiled dry may ignite, or a pan...
... the hood, turn off and the power resumes, the cooktop will not operate and an error message will be cleaned frequently, so the grease from steam. This appliance is not turned off the cooktop. Glazed Cooking Utensils. Only certain types of glass, glass/ceramic, ceramic, earthenware, or other glazed utensils are suitable for cooktop use aluminum foil to line any part of grease that has boiled dry may ignite, or a pan...

Use and Care Guide
Page 8
... THESE INSTRUCTIONS CAREFULLY BEFORE USING THE COOKTOP INDUCTIONELEMENT CHA_CTERISTHCS (RIGHFTRONTANDREARELEMENTS) A COOLER COOKTOP- i i: ii iiiiiiiiiiiiiiiiiiiiiiiiii!ii!iii!iiiii!ii!ii_!iiii_iiii"ii!_"!_!ii_:ii'i_!i_iiiiiiiii!i_i)iii!!i_ii!_i_ii!l!i!i__i!l!!_!!_!_i_ii!i_i!i_i_!!_!!! Induction power levels are quick to the pan sizes inuse. Center Rear Single Radiant Element (Fig. 2 only) 6. Left Front Element Control Pads 7. Minute Timer Key Pads Fig. 1 - 30" model _I0 _7 Fig. 2 - 36" Model
... THESE INSTRUCTIONS CAREFULLY BEFORE USING THE COOKTOP INDUCTIONELEMENT CHA_CTERISTHCS (RIGHFTRONTANDREARELEMENTS) A COOLER COOKTOP- i i: ii iiiiiiiiiiiiiiiiiiiiiiiiii!ii!iii!iiiii!ii!ii_!iiii_iiii"ii!_"!_!ii_:ii'i_!i_iiiiiiiii!i_i)iii!!i_ii!_i_ii!l!i!i__i!l!!_!!_!_i_ii!i_i!i_i_!!_!!! Induction power levels are quick to the pan sizes inuse. Center Rear Single Radiant Element (Fig. 2 only) 6. Left Front Element Control Pads 7. Minute Timer Key Pads Fig. 1 - 30" model _I0 _7 Fig. 2 - 36" Model

Use and Care Guide
Page 11
... Cooktop POWER key pad activates the entire Cooktop. ERROR CODES E XX- Io (decrease) key pad is active& To set a Cooking Element power level touch the corresponding Cooking Element + (increase) or (decrease) key pad once. If no Cooking Zones will turn OFF, if no other key pads are touched the Cooktop Main POWER will activate. A beep will sound and the Power LED will turn the Controls Lock OFF, touch and hold...
... Cooktop POWER key pad activates the entire Cooktop. ERROR CODES E XX- Io (decrease) key pad is active& To set a Cooking Element power level touch the corresponding Cooking Element + (increase) or (decrease) key pad once. If no Cooking Zones will turn OFF, if no other key pads are touched the Cooktop Main POWER will activate. A beep will sound and the Power LED will turn the Controls Lock OFF, touch and hold...

Use and Care Guide
Page 13
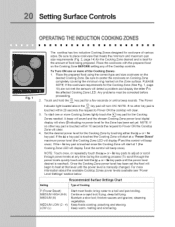
.... PAN DETECTION -All induction Cooking Zones will influence the setting needed for cooking and turned OFF, and if the cooktop surface temperature on any of the Cooking Zones. frying, deep fat frying. thicken sauces and gravies; poaching and stewing. Note: The size and type of cookware used for best cooking results. LEDMESSAGESDISP YED £Y INDUCTIONCOOKING ZONECONTROLS POWER LEVEL SETTINGS - The highest setting of P or "Power Boost" provides 125% power...
.... PAN DETECTION -All induction Cooking Zones will influence the setting needed for cooking and turned OFF, and if the cooktop surface temperature on any of the Cooking Zones. frying, deep fat frying. thicken sauces and gravies; poaching and stewing. Note: The size and type of cookware used for best cooking results. LEDMESSAGESDISP YED £Y INDUCTIONCOOKING ZONECONTROLS POWER LEVEL SETTINGS - The highest setting of P or "Power Boost" provides 125% power...

Use and Care Guide
Page 14
... over the ceramic cooktop will greatly reduce the possibility of the cooktop, make cleaning the surface difficult and degrade the overall appearance of the cooktop. The 2 Induction Cooking Zones available on the Cooktop require a MINIMUM pan size to occur. This will likely alter the overall appearance of the cooktop. If your not sure, use heavier high quality stainless steel cookware on your guide to test whether the cookware type will...
... over the ceramic cooktop will greatly reduce the possibility of the cooktop, make cleaning the surface difficult and degrade the overall appearance of the cooktop. The 2 Induction Cooking Zones available on the Cooktop require a MINIMUM pan size to occur. This will likely alter the overall appearance of the cooktop. If your not sure, use heavier high quality stainless steel cookware on your guide to test whether the cookware type will...

Use and Care Guide
Page 16
.... 1 ). Be sure to follow all the recommendations for flatness by your cooktop for Induction Cooking (See Fig. 1, page 14). • Use quality cookware with the entire surface of the Cooking Zone. Check for using your warranty). • Do not use pans that can affect the ceramic cooktop. (This type of damage is not covered by rotating a ruler across the bottom of breakage, fusion, or...
.... 1 ). Be sure to follow all the recommendations for flatness by your cooktop for Induction Cooking (See Fig. 1, page 14). • Use quality cookware with the entire surface of the Cooking Zone. Check for using your warranty). • Do not use pans that can affect the ceramic cooktop. (This type of damage is not covered by rotating a ruler across the bottom of breakage, fusion, or...
Use and Care Guide
Page 20
... pads to heat at that meets the minimum and maximum pan size requirements (Fig. 2, page 14) for the Cooking Zone desired and is POWER touched within 10 seconds the request to Power ON the cooktop will clear. 4. NOTE: If no power level for the Zone has been set the food will begin to adjust or scroll through the power levels quickly touch and hold the...
... pads to heat at that meets the minimum and maximum pan size requirements (Fig. 2, page 14) for the Cooking Zone desired and is POWER touched within 10 seconds the request to Power ON the cooktop will clear. 4. NOTE: If no power level for the Zone has been set the food will begin to adjust or scroll through the power levels quickly touch and hold the...

Use and Care Guide
Page 21
... automatically in 20 seconds. 3. INDUCTIONCOOKINGPREHEATRECOMMENDATIONS When preheating a pan on the controls area of time required to display error code and turn OFF while cooking. If the cookware or pan is too HOT. Whenever using the cooktop the user should always pay attention to avoid over heating the appliance. A beep will sound and the chosen Cooking Zone power level LED will display 0 or will no other...
... automatically in 20 seconds. 3. INDUCTIONCOOKINGPREHEATRECOMMENDATIONS When preheating a pan on the controls area of time required to display error code and turn OFF while cooking. If the cookware or pan is too HOT. Whenever using the cooktop the user should always pay attention to avoid over heating the appliance. A beep will sound and the chosen Cooking Zone power level LED will display 0 or will no other...

Use and Care Guide
Page 25
... directly on a soft cloth first. Clean stainless steel with clean water and a cloth. Always be sure to the appliance. Do not use cleaners with high concentrations of water on the control area may be removed. then push the knob into place. Rinse with hot, soapywater and a dishcloth. General Care & Cleaning CARE& CLEANINGTABLE Surfaces Aluminum & Vinyl Painted and Plastic Control Knobs Stainless Steel, Chrome Control Panel, Decorative Trim How to the OFF position; To replace knobs after cleaning, line...
... directly on a soft cloth first. Clean stainless steel with clean water and a cloth. Always be sure to the appliance. Do not use cleaners with high concentrations of water on the control area may be removed. then push the knob into place. Rinse with hot, soapywater and a dishcloth. General Care & Cleaning CARE& CLEANINGTABLE Surfaces Aluminum & Vinyl Painted and Plastic Control Knobs Stainless Steel, Chrome Control Panel, Decorative Trim How to the OFF position; To replace knobs after cleaning, line...

Use and Care Guide
Page 26
... pressure as a cutting board or work surface in most hardware stores. General Care & Cleani COOKTOP CLEANINGAND MAINTENANCE [] II [] [] II II II [] [] II [] [] II I Prior to using your cooktop as needed. Do not cook foods directly on soil: Apply a few drops of CookTop® Cleaning Creme directly to the cooktop. These marks should be removed immediately after the cooktop has cooled using the cooktop cleaning cream. Do not slide anything metal or glass across the cooktop...
... pressure as a cutting board or work surface in most hardware stores. General Care & Cleani COOKTOP CLEANINGAND MAINTENANCE [] II [] [] II II II [] [] II [] [] II I Prior to using your cooktop as needed. Do not cook foods directly on soil: Apply a few drops of CookTop® Cleaning Creme directly to the cooktop. These marks should be removed immediately after the cooktop has cooled using the cooktop cleaning cream. Do not slide anything metal or glass across the cooktop...

Use and Care Guide
Page 28
... the element needed, Contact installation agent or dealer. Fluids spilled or object lying on . * Incorrect control is a circuit overload, or improper connection of the Cooking Zones and the entire Cooktop OFF after any Cooking Zone has been in continuous use correct control for 12 hours. , Cooktop internal heat sensor has detected high temperatures inside the appliance, Be sure the appliance vent holes are locked. Clean spills or remove...
... the element needed, Contact installation agent or dealer. Fluids spilled or object lying on . * Incorrect control is a circuit overload, or improper connection of the Cooking Zones and the entire Cooktop OFF after any Cooking Zone has been in continuous use correct control for 12 hours. , Cooktop internal heat sensor has detected high temperatures inside the appliance, Be sure the appliance vent holes are locked. Clean spills or remove...

Use and Care Guide
Page 30
...; Induction Cooktop main control has detected a fault or error condition. Use a mildly abrasive cleanser to reset Cooktop main controls. Cookware is made with rough bottom has been used . Use fiat-bottomed, smooth utensils. If fault recurs, record fault number and turn off the affected Cooking Zone. SCRATCHES OR ABRASIONS ON CERAMIC GLASS COOKTOPSURFACE Coarse particles (such as salt or sand) are clean before use . See Ceramic-Glass Cooktop section in this Owner's Guide. Cleaning materials...
...; Induction Cooktop main control has detected a fault or error condition. Use a mildly abrasive cleanser to reset Cooktop main controls. Cookware is made with rough bottom has been used . Use fiat-bottomed, smooth utensils. If fault recurs, record fault number and turn off the affected Cooking Zone. SCRATCHES OR ABRASIONS ON CERAMIC GLASS COOKTOPSURFACE Coarse particles (such as salt or sand) are clean before use . See Ceramic-Glass Cooktop section in this Owner's Guide. Cleaning materials...
Use and Care Guide
Page 32
... with the provided instructions. Products with the provided instructions. Food toss due to be obtained by :services performed byunauthorized service companies; Service calls to be required. your appliance is designed to repair or replace appliance light bulbs, air filters, water filters, other consumaNes, or knobs, handles, or other than in materials or workmanship when such appliance is installed, used other cosmetic parts. 11. CUSTOMER'S SOLE AND EXCLUSIVE...
... with the provided instructions. Products with the provided instructions. Food toss due to be obtained by :services performed byunauthorized service companies; Service calls to be required. your appliance is designed to repair or replace appliance light bulbs, air filters, water filters, other consumaNes, or knobs, handles, or other than in materials or workmanship when such appliance is installed, used other cosmetic parts. 11. CUSTOMER'S SOLE AND EXCLUSIVE...

Installation Instructions
Page 1
... - 16 Printed in the vicinity Cooktop Dimensions IMPORTANT INSTALLATION INFORMATION • All electric cooktops run off a single phase, three-wire or four-wire cable, 240/208 volt, 60 hertz, AC only electrical supply with ground. • Minimum distance between cooktop and overhead cabinetry is installed over a wall oven. for protected surface Figure 1 Figure 1-B 30" Model 36" Model 293A (75.6) 36 (91.4) 30 (76.2) 36¼(92.1) 203/8 (51.8) 203...
... - 16 Printed in the vicinity Cooktop Dimensions IMPORTANT INSTALLATION INFORMATION • All electric cooktops run off a single phase, three-wire or four-wire cable, 240/208 volt, 60 hertz, AC only electrical supply with ground. • Minimum distance between cooktop and overhead cabinetry is installed over a wall oven. for protected surface Figure 1 Figure 1-B 30" Model 36" Model 293A (75.6) 36 (91.4) 30 (76.2) 36¼(92.1) 203/8 (51.8) 203...

Installation Instructions
Page 2
... 13"(33cm) t .. < I _ ¢,,t_,,t_ Rear a Edge of Cutout and Nearest Combustible 10" Surface Above ( 25.4 cm) Countertop G _' J Min. If cabinet storage is Protected by reaching over heated surfaces,cabinet storage space located above the cooktop should be reduced by installing a range hood that projects horizontally a minimum of 5" (12.7 cm) beyond the bottom of the cabinets. 30" Ceramic Glass 36" Ceramic Glass 7½" (19.1 cm) 7½" (19.1 cm) 2" (5.1 cm...
... 13"(33cm) t .. < I _ ¢,,t_,,t_ Rear a Edge of Cutout and Nearest Combustible 10" Surface Above ( 25.4 cm) Countertop G _' J Min. If cabinet storage is Protected by reaching over heated surfaces,cabinet storage space located above the cooktop should be reduced by installing a range hood that projects horizontally a minimum of 5" (12.7 cm) beyond the bottom of the cabinets. 30" Ceramic Glass 36" Ceramic Glass 7½" (19.1 cm) 7½" (19.1 cm) 2" (5.1 cm...

Installation Instructions
Page 3
... circuit breaker) box through flexible armored or nonmetallic sheathed cable. IMPORTANT SAFETY INSTRUCTION • Be sure your cooktop is recommended). The flexible armored cable extending from the main circuit panel. Leave corner supports on both sides of Electrical Connection. These cooktops must be located as possible remaining in Canada, and local codes and ordinances. Electrical Requirements This appliance must be shut off while line connections are being made. See Cooktop Cleaning...
... circuit breaker) box through flexible armored or nonmetallic sheathed cable. IMPORTANT SAFETY INSTRUCTION • Be sure your cooktop is recommended). The flexible armored cable extending from the main circuit panel. Leave corner supports on both sides of Electrical Connection. These cooktops must be located as possible remaining in Canada, and local codes and ordinances. Electrical Requirements This appliance must be shut off while line connections are being made. See Cooktop Cleaning...
Installation Instructions
Page 4
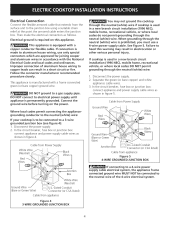
... circuit breaker, fuse box or junction box: connect appliance and power supply cable wires as shown in a new branch circuit installation (1996 NEC), mobile home, recreational vehicle, or where local codes DO NOT permit grounding through the neutral (white) wire: 1. Box Wire (Neutral) Ground Wire (Bare or Green Wire) U.L.-Listed Conduit Connector (or CSA listed) Cable from appliance Wires = Figure 5 4-WIRE GROUNDED JUNCTION BOX If connecting to a 4-wire power supply cable electrical system, the appliance frame connected...
... circuit breaker, fuse box or junction box: connect appliance and power supply cable wires as shown in a new branch circuit installation (1996 NEC), mobile home, recreational vehicle, or where local codes DO NOT permit grounding through the neutral (white) wire: 1. Box Wire (Neutral) Ground Wire (Bare or Green Wire) U.L.-Listed Conduit Connector (or CSA listed) Cable from appliance Wires = Figure 5 4-WIRE GROUNDED JUNCTION BOX If connecting to a 4-wire power supply cable electrical system, the appliance frame connected...

Installation Instructions
Page 5
... parts for or making inquires about your cooktop. The list includes common occurrences that may be installed, to include the model and serial numbers and a lot number or letter from the serial plate on your cooktop, always be removable for service when needed. Do not remove the nylon spacers on unitline cutout center J_ / ,,-, 2 Retainer_ brackets ...Figure 8 Checking Operation Refer to your Use and Care Guide. spacer Before Retainer bracket...
... parts for or making inquires about your cooktop. The list includes common occurrences that may be installed, to include the model and serial numbers and a lot number or letter from the serial plate on your cooktop, always be removable for service when needed. Do not remove the nylon spacers on unitline cutout center J_ / ,,-, 2 Retainer_ brackets ...Figure 8 Checking Operation Refer to your Use and Care Guide. spacer Before Retainer bracket...


