Use and Care Manual
Page 1
Use & Care Guide Electric Slide-In Range 318 203 819 (0710) Rev. A
Use & Care Guide Electric Slide-In Range 318 203 819 (0710) Rev. A
Use and Care Manual
Page 3
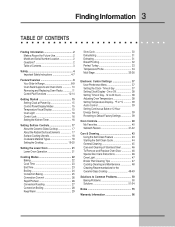
...Use 2 Model and Serial Number Location 2 Questions 2 Table of Contents 3 Safety 4 Important Safety Instructions 4-7 Feature Overview 8 Your Slide-In Range 8-9 Oven Rack Supports and Oven Vents 10 Removing and Replacing Oven Racks 11 Control Pad Functions 12-14 Getting Started 15 Setting Clock at ... 24 Convection Baking 25 Convection Convert 26 Rapid Preheat 26 Convection Roasting 27 Convection Broiling 28 Keep Warm 29 Slow Cook 30 Dehydrating 31 Defrosting 31 Bread Proofing 32 Perfect Turkey 33 Temperature Probe 34 Multi Stage 35-36 Electronic Control Settings 37 ...
...Use 2 Model and Serial Number Location 2 Questions 2 Table of Contents 3 Safety 4 Important Safety Instructions 4-7 Feature Overview 8 Your Slide-In Range 8-9 Oven Rack Supports and Oven Vents 10 Removing and Replacing Oven Racks 11 Control Pad Functions 12-14 Getting Started 15 Setting Clock at ... 24 Convection Baking 25 Convection Convert 26 Rapid Preheat 26 Convection Roasting 27 Convection Broiling 28 Keep Warm 29 Slow Cook 30 Dehydrating 31 Defrosting 31 Bread Proofing 32 Perfect Turkey 33 Temperature Probe 34 Multi Stage 35-36 Electronic Control Settings 37 ...
Use and Care Manual
Page 4
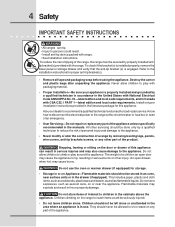
... CSA C22.1 PART 1-latest edition and local code requirements. Do not store explosives, such as flammable liquids. Know how to disconnect the electrical power to the installation instructions for this appliance can tip. • Injury to persons could be stored in the literature package for proper ... plasticware and towels, as well as aerosol cans, on the door or drawer of the range, the range must be done only by a qualified technician in accordance in the United States with National Electrical Code ANSI/NFPA No. 70-latest edition and local code requirements, and in the area ...
... CSA C22.1 PART 1-latest edition and local code requirements. Do not store explosives, such as flammable liquids. Know how to disconnect the electrical power to the installation instructions for this appliance can tip. • Injury to persons could be stored in the literature package for proper ... plasticware and towels, as well as aerosol cans, on the door or drawer of the range, the range must be done only by a qualified technician in accordance in the United States with National Electrical Code ANSI/NFPA No. 70-latest edition and local code requirements, and in the area ...

Use and Care Manual
Page 7
... the oven. • Do not clean the oven door gasket. SELF-CLEANING OVENS: • Clean in or around any range. Refer to such substances. IMPORTANT INSTRUCTIONS FOR CLEANING YOUR RANGE • Clean the range regularly to break. Oven racks will be used in the self-cleaning cycle only the parts of potential exposure...
... the oven. • Do not clean the oven door gasket. SELF-CLEANING OVENS: • Clean in or around any range. Refer to such substances. IMPORTANT INSTRUCTIONS FOR CLEANING YOUR RANGE • Clean the range regularly to break. Oven racks will be used in the self-cleaning cycle only the parts of potential exposure...
Use and Care Manual
Page 9
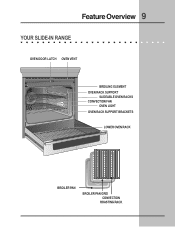
Feature Overview 9 YOUR SLIDE-IN RANGE OVEN DOOR LATCH OVEN VENT BROILING ELEMENT OVEN RACK SUPPORT SLIDEABLE OVEN RACKS CONVECTION FAN OVEN LIGHT OVEN RACK SUPPORT BRACKETS LOWER OVEN RACK BROILER PAN BROILER PAN GRID CONVECTION ROASTING RACK
Feature Overview 9 YOUR SLIDE-IN RANGE OVEN DOOR LATCH OVEN VENT BROILING ELEMENT OVEN RACK SUPPORT SLIDEABLE OVEN RACKS CONVECTION FAN OVEN LIGHT OVEN RACK SUPPORT BRACKETS LOWER OVEN RACK BROILER PAN BROILER PAN GRID CONVECTION ROASTING RACK
Use and Care Manual
Page 15
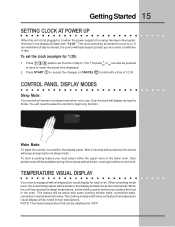
...oven. CONTROL PANEL DISPLAY MODES Sleep Mode: Your control will be shown in their descriptions. You will need to wake the control to the range has been interrupted, the timer in the display will sound to remind you to re-enter a valid time of 12:00. When the ... modes; Getting Started 15 SETTING CLOCK AT POWER UP When the unit is equipped with a temperature visual display for 1:30): 1. After 2 minutes without activity the control will be pressed to 1:30. TEMPERATURE VISUAL DISPLAY Your oven is first plugged in, or when the power supply to begin any function.
...oven. CONTROL PANEL DISPLAY MODES Sleep Mode: Your control will be shown in their descriptions. You will need to wake the control to the range has been interrupted, the timer in the display will sound to remind you to re-enter a valid time of 12:00. When the ... modes; Getting Started 15 SETTING CLOCK AT POWER UP When the unit is equipped with a temperature visual display for 1:30): 1. After 2 minutes without activity the control will be pressed to 1:30. TEMPERATURE VISUAL DISPLAY Your oven is first plugged in, or when the power supply to begin any function.
Use and Care Manual
Page 17
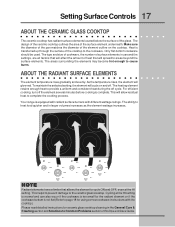
... surface elements. As the temperature rises, the element will allow residual heat to page 18 for using correct cookware instructions with different wattage ratings. Your range is not flat (Refer to complete the cooking process. Cycling at the HI setting. The heating element retains enough heat to provide a uniform and consistent...
... surface elements. As the temperature rises, the element will allow residual heat to page 18 for using correct cookware instructions with different wattage ratings. Your range is not flat (Refer to complete the cooking process. Cycling at the HI setting. The heating element retains enough heat to provide a uniform and consistent...
Use and Care Manual
Page 20
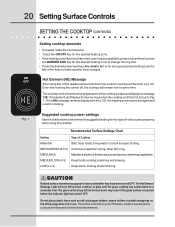
...+, med or lo-) or for more precise level settings use . Even after they have been turned OFF. The cooktop control monitors the temperature of the range when it is in the LCD, the heating zone may be hot and burns may appear to touch -Fig. 1-. CAUTION Radiant surface elements may occur...
...+, med or lo-) or for more precise level settings use . Even after they have been turned OFF. The cooktop control monitors the temperature of the range when it is in the LCD, the heating zone may be hot and burns may appear to touch -Fig. 1-. CAUTION Radiant surface elements may occur...
Use and Care Manual
Page 37
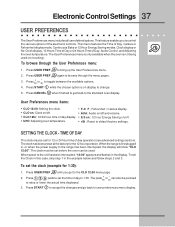
...Press USER PREF until you to raise or lower the actual time displayed. 3. Press USER PREF to the range has been interrupted, the display will show "CLO 12:00". Press 1 3 0 pads to 1:30. This menu features the Time of Day, Celsius or Fahrenheit display mode, Continuous Bake or 12 Hour ...the CLO 12:00 menu page. 2. Press CANCEL when finished to get to the standard oven display. When power to default factory settings. When the range is on ; User Preferences menu items: • CLO 12:00; To set the time of Day, Audio Control, and Adjusting the oven temperature...
...Press USER PREF until you to raise or lower the actual time displayed. 3. Press USER PREF to the range has been interrupted, the display will show "CLO 12:00". Press 1 3 0 pads to 1:30. This menu features the Time of Day, Celsius or Fahrenheit display mode, Continuous Bake or 12 Hour ...the CLO 12:00 menu page. 2. Press CANCEL when finished to get to the standard oven display. When power to default factory settings. When the range is on ; User Preferences menu items: • CLO 12:00; To set the time of Day, Audio Control, and Adjusting the oven temperature...
Use and Care Manual
Page 46
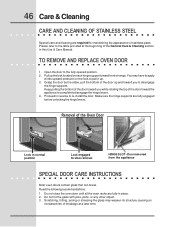
... or stressing the glass may have to apply a little upward pressure on each hinge support toward the appliance to disengage the hinge supports. Removal of range. You may weaken its structure causing an increased risk of breakage at the beginning of stainless parts. 46 Care & Cleaning CARE AND CLEANING OF STAINLESS...
... or stressing the glass may have to apply a little upward pressure on each hinge support toward the appliance to disengage the hinge supports. Removal of range. You may weaken its structure causing an increased risk of breakage at the beginning of stainless parts. 46 Care & Cleaning CARE AND CLEANING OF STAINLESS...

Use and Care Manual
Page 50
... not centered in oven. • Set oven temperature 25°F/12°C lower than recommended. • Use pan size suggested and bake for leveling the range. • Be sure to allow 5.1 cm to 10.2 cm (2" to 4") of air space on the center of each pan in the oven. • Use...; Open oven door only after shortest recommended baking time. 50 Solutions to oven wall or rack overcrowded. • Pan warped. Cakes not level. • Range not level. • Pan too close to Common Problems Baking Problems For best cooking results pre-heat the oven when baking cookies, breads, cakes, pies...
... not centered in oven. • Set oven temperature 25°F/12°C lower than recommended. • Use pan size suggested and bake for leveling the range. • Be sure to allow 5.1 cm to 10.2 cm (2" to 4") of air space on the center of each pan in the oven. • Use...; Open oven door only after shortest recommended baking time. 50 Solutions to oven wall or rack overcrowded. • Pan warped. Cakes not level. • Range not level. • Pan too close to Common Problems Baking Problems For best cooking results pre-heat the oven when baking cookies, breads, cakes, pies...

Use and Care Manual
Page 51
...the instructions under Oven Light to Common Problems 51 I M P O R TA N T Before calling for service, review this list. It may make range appear to set properly. Call your dealer, installing agent or authorized servicer. • Service wiring not complete. Solutions to replace or tighten the bulb. ...• Short in , or when the power supply to be programmed until the clock is set. • Be sure electrical cord is securely connected into the electrical junction box. • Cord/plug is not installed and/or connected. Replace cord/plug. • Controls are not the ...
...the instructions under Oven Light to Common Problems 51 I M P O R TA N T Before calling for service, review this list. It may make range appear to set properly. Call your dealer, installing agent or authorized servicer. • Service wiring not complete. Solutions to replace or tighten the bulb. ...• Short in , or when the power supply to be programmed until the clock is set. • Be sure electrical cord is securely connected into the electrical junction box. • Cord/plug is not installed and/or connected. Replace cord/plug. • Controls are not the ...
Use and Care Manual
Page 56
.... Products purchased "as described or illustrated are not covered by this warranty. 5. THIS WRITTEN WARRANTY GIVES YOU SPECIFIC LEGAL RIGHTS. Electrolux authorizes no person to change without notice. During the 2nd through five year limited warranty. Rust on the interior or exterior of ...the additional limited warranty periods beyond the first year from the factory. 10. your appliance is in and free-standing range appliances) is warranted by Electrolux Canada Corp. Surcharges including, but not limited to floors, cabinets, walls, etc. 15. Damages to establish the ...
.... Products purchased "as described or illustrated are not covered by this warranty. 5. THIS WRITTEN WARRANTY GIVES YOU SPECIFIC LEGAL RIGHTS. Electrolux authorizes no person to change without notice. During the 2nd through five year limited warranty. Rust on the interior or exterior of ...the additional limited warranty periods beyond the first year from the factory. 10. your appliance is in and free-standing range appliances) is warranted by Electrolux Canada Corp. Surcharges including, but not limited to floors, cabinets, walls, etc. 15. Damages to establish the ...


