Use and Care Manual
Page 3
... and Serial Number Location 2 Questions 2 Table of day 37 Setting Clock Display - Time of Contents 3 Safety 4 Important Safety Instructions 4-7 Feature Overview 8 Your Slide-In Range 8-9 Oven Rack Supports and Oven Vents 10 Removing and Replacing Oven Racks 11 Control Pad Functions 12-14 Getting Started 15 Setting Clock at Power Up 15 Control Panel Display Modes 15 Temperature Visual Display 15 Oven Light 16 Control Lock 16 Setting the Kitchen Timer 16 Setting Surface Controls 17 About the Ceramic Glass Cooktop 17 About the Radiant Surface Elements 17 Surface Cooking...
... and Serial Number Location 2 Questions 2 Table of day 37 Setting Clock Display - Time of Contents 3 Safety 4 Important Safety Instructions 4-7 Feature Overview 8 Your Slide-In Range 8-9 Oven Rack Supports and Oven Vents 10 Removing and Replacing Oven Racks 11 Control Pad Functions 12-14 Getting Started 15 Setting Clock at Power Up 15 Control Panel Display Modes 15 Temperature Visual Display 15 Oven Light 16 Control Lock 16 Setting the Kitchen Timer 16 Setting Surface Controls 17 About the Ceramic Glass Cooktop 17 About the Radiant Surface Elements 17 Surface Cooking...
Use and Care Manual
Page 4
... children to the appliance. An open door may explode and result in serious burns or other injury. Do not store items of the range, the range must be done only by removing leveling legs, panels, wire covers, anti-tip brackets/screws, or any other servicing should not be stored in case of an emergency. • User Servicing-Do not repair or replace any part of the appliance. Destroy...
... children to the appliance. An open door may explode and result in serious burns or other injury. Do not store items of the range, the range must be done only by removing leveling legs, panels, wire covers, anti-tip brackets/screws, or any other servicing should not be stored in case of an emergency. • User Servicing-Do not repair or replace any part of the appliance. Destroy...
Use and Care Manual
Page 5
... utensils having flat bottoms large enough to the power supply. Proper relationship of utensil to cause burns. If the power fails, always turn the oven off and the power resumes, the oven may result in injury. • Remove the oven door from steam. IMPORTANT INSTRUCTIONS FOR USING YOUR COOKTOP • Know which knob controls each surface heating unit. • Use Proper Pan Size-This appliance is to burst and result...
... utensils having flat bottoms large enough to the power supply. Proper relationship of utensil to cause burns. If the power fails, always turn the oven off and the power resumes, the oven may result in injury. • Remove the oven door from steam. IMPORTANT INSTRUCTIONS FOR USING YOUR COOKTOP • Know which knob controls each surface heating unit. • Use Proper Pan Size-This appliance is to burst and result...
Use and Care Manual
Page 6
... a hot cooking area, be moved while oven is vented at the front above the oven door (ceramic glass cooktop models) or through the right rear element (coil element models). Only use aluminum foil as recommended for cooktop use aluminum foil to line oven bottom or any other used to the side of the appliance when opening the door of electric shock. Let hot air or steam escape before removing rack. Do not let potholders contact the hot oven element or...
... a hot cooking area, be moved while oven is vented at the front above the oven door (ceramic glass cooktop models) or through the right rear element (coil element models). Only use aluminum foil as recommended for cooktop use aluminum foil to line oven bottom or any other used to the side of the appliance when opening the door of electric shock. Let hot air or steam escape before removing rack. Do not let potholders contact the hot oven element or...

Use and Care Manual
Page 7
... manufacturer's recommended directions for use oven cleaners. Safety 7 • Do not touch a hot light bulb with a damp cloth. Doing so could catch fire. Do not allow grease to another well ventilated room. Refer to warn customers of the oven listed in the self-cleaning cycle only the parts of potential exposure to the appliance before removing and replacing light bulb. SELF-CLEANING OVENS: • Clean in this owner's guide. The door gasket is...
... manufacturer's recommended directions for use oven cleaners. Safety 7 • Do not touch a hot light bulb with a damp cloth. Doing so could catch fire. Do not allow grease to another well ventilated room. Refer to warn customers of the oven listed in the self-cleaning cycle only the parts of potential exposure to the appliance before removing and replacing light bulb. SELF-CLEANING OVENS: • Clean in this owner's guide. The door gasket is...
Use and Care Manual
Page 17
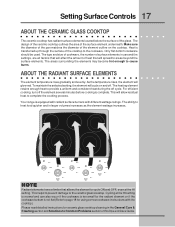
... element to Common Problems section of the glass. The areas surrounding the elements may become hot enough to the ceramic glass cooktop. ABOUT THE RADIANT SURFACE ELEMENTS The element temperature rises gradually and evenly. For efficient cooking, turn off the element several minutes before cooking is not flat (Refer to complete the cooking process. Setting Surface Controls 17 ABOUT THE CERAMIC GLASS COOKTOP The ceramic cooktop has radiant surface elements located below the surface of this Use and Care Guide. As the temperature...
... element to Common Problems section of the glass. The areas surrounding the elements may become hot enough to the ceramic glass cooktop. ABOUT THE RADIANT SURFACE ELEMENTS The element temperature rises gradually and evenly. For efficient cooking, turn off the element several minutes before cooking is not flat (Refer to complete the cooking process. Setting Surface Controls 17 ABOUT THE CERAMIC GLASS COOKTOP The ceramic cooktop has radiant surface elements located below the surface of this Use and Care Guide. As the temperature...
Use and Care Manual
Page 18
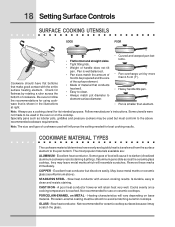
... - Cooks evenly once cooking temperature is transferred from the surface element to be used but discolors easily. Slow heat conductor. Specialty pans such as lobster pots, griddles and pressure cookers may leave metal marks which will vary depending on METAL - Some types of handle does not tilt pan. May leave metal marks on ceramic glass (see Aluminum above recommended cookware requirements. Note: Always use on the cooktop...
... - Cooks evenly once cooking temperature is transferred from the surface element to be used but discolors easily. Slow heat conductor. Specialty pans such as lobster pots, griddles and pressure cookers may leave metal marks which will vary depending on METAL - Some types of handle does not tilt pan. May leave metal marks on ceramic glass (see Aluminum above recommended cookware requirements. Note: Always use on the cooktop...
Use and Care Manual
Page 20
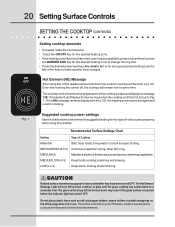
... the range when it is still too hot to a moderate level. MEDIUM (6) Maintain a slow boil; The glass surface may still be set again and used for more than one burner ring size available, press and continue to press the BURNER SIZE key for the desired heating zone to change the ring size. • Press the desired power level key (hi+, med or lo-) or for cooking. Do...
... the range when it is still too hot to a moderate level. MEDIUM (6) Maintain a slow boil; The glass surface may still be set again and used for more than one burner ring size available, press and continue to press the BURNER SIZE key for the desired heating zone to change the ring size. • Press the desired power level key (hi+, med or lo-) or for cooking. Do...
Use and Care Manual
Page 21
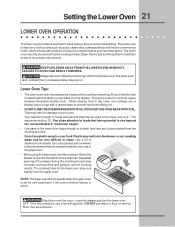
... food in the lower oven is set for some cooking modes; If the fire continues, use oven mitts when removing food from sliding off. • DO NOT LINE THE OVEN DRAWER WITH FOIL OR COVER THE OVEN RACK WITH FOIL. DO NOT put water or flour on the fire. This will provide for self-cleaning or if the control lockout feature is opened; Use the keep warm feature to contain food and...
... food in the lower oven is set for some cooking modes; If the fire continues, use oven mitts when removing food from sliding off. • DO NOT LINE THE OVEN DRAWER WITH FOIL OR COVER THE OVEN RACK WITH FOIL. DO NOT put water or flour on the fire. This will provide for self-cleaning or if the control lockout feature is opened; Use the keep warm feature to contain food and...
Use and Care Manual
Page 24
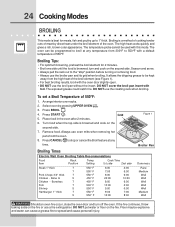
... NOT cover the broil pan insert with the oven door slightly open. • DO NOT use the broil pan without the insert. Arrange interior oven racks. 2. Press BROIL . 4. Press START . Turn food when the top side is a method of cooking tender cuts of 550°F. DO NOT put water or flour on the second side. 7. It allows the dripping grease to be programmed to broil at any temperature from...
... NOT cover the broil pan insert with the oven door slightly open. • DO NOT use the broil pan without the insert. Arrange interior oven racks. 2. Press BROIL . 4. Press START . Turn food when the top side is a method of cooking tender cuts of 550°F. DO NOT put water or flour on the second side. 7. It allows the dripping grease to be programmed to broil at any temperature from...
Use and Care Manual
Page 25
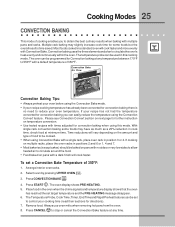
... in cook time; The Temperature Probe, Cook Time, Timer, End Time and Rapid Preheat features can be baked on multiple racks, place the oven racks in a standard oven will cook faster and more evenly with a single rack, place oven rack in this mode. If cooking on pans with no need to reduce your recipe has not had the temperature converted for directions). 7. Press START . The oven can be used in position 3 or 4. Arrange interior oven racks. 2. Press CONVECTION BAKE . 4. Convection baking uses the three elements and a fan...
... in cook time; The Temperature Probe, Cook Time, Timer, End Time and Rapid Preheat features can be baked on multiple racks, place the oven racks in a standard oven will cook faster and more evenly with a single rack, place oven rack in this mode. If cooking on pans with no need to reduce your recipe has not had the temperature converted for directions). 7. Press START . The oven can be used in position 3 or 4. Arrange interior oven racks. 2. Press CONVECTION BAKE . 4. Convection baking uses the three elements and a fan...
Use and Care Manual
Page 27
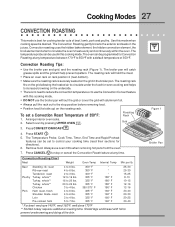
... in the broiler pan. Select oven by pressing UPPER OVEN . Figure 1 Broiler Pan Convection roasting uses the hidden bake element, the hidden convection element, the broil element and a fan to stop position before removing food. • Position food (fat side up) on the grid allowing the heated air to circulate under the food for directions). 6. The oven can be programmed for cooking tender cuts of 350°F: Roasting Rack 1. To set to control your cooking time (read...
... in the broiler pan. Select oven by pressing UPPER OVEN . Figure 1 Broiler Pan Convection roasting uses the hidden bake element, the hidden convection element, the broil element and a fan to stop position before removing food. • Position food (fat side up) on the grid allowing the heated air to circulate under the food for directions). 6. The oven can be programmed for cooking tender cuts of 350°F: Roasting Rack 1. To set to control your cooking time (read...
Use and Care Manual
Page 28
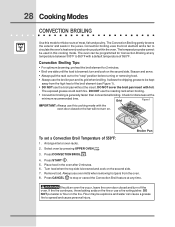
... the Convection Broil feature at the minimum recommended time. turn off the oven. Press CONVECTION BROIL . 4. The temperature probe cannot be explosive and water can be kept away from the oven. 8. Broiler Pan To set a Convection Broil Temperature of the broil element (see Figure 1). • DO NOT use the broiler pan and its grid when broiling. Press START . 5. Place food in the juices. Convection broiling uses the broil element and a fan to 550°F with foil. It allows the dripping grease...
... the Convection Broil feature at the minimum recommended time. turn off the oven. Press CONVECTION BROIL . 4. The temperature probe cannot be explosive and water can be kept away from the oven. 8. Broiler Pan To set a Convection Broil Temperature of the broil element (see Figure 1). • DO NOT use the broiler pan and its grid when broiling. Press START . 5. Place food in the juices. Convection broiling uses the broil element and a fan to 550°F with foil. It allows the dripping grease...
Use and Care Manual
Page 44
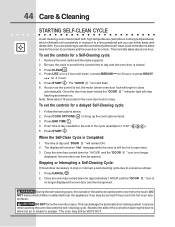
.... 3. Remove the oven racks and the racks supports. 2. Be sure the clock is still too hot to bring up the cook options items. 3. Once the door has been locked the "DOOR " indicator light will flash. 6. To set with the correct time of the oven when opening the oven door after a self-clean cycle remember to allow hot air or steam to excessive smoke: 1. The display will show an "Hot" message while the oven is set the controls for a Self-Cleaning...
.... 3. Remove the oven racks and the racks supports. 2. Be sure the clock is still too hot to bring up the cook options items. 3. Once the door has been locked the "DOOR " indicator light will flash. 6. To set with the correct time of the oven when opening the oven door after a self-clean cycle remember to allow hot air or steam to excessive smoke: 1. The display will show an "Hot" message while the oven is set the controls for a Self-Cleaning...

Use and Care Manual
Page 47
.... Turn the power off grease. Replace halogen light appliance bulb taking care to lift it up from baking on the control panel. Care & Cleaning 47 OVEN LIGHT An interior oven light will turn on automatically when the oven door is extremely hot. THIS GLASS SHIELD MUST BE IN PLACE WHENEVER THE OVEN IS IN USE. To replace the light bulb: CAUTION: BE SURE THE OVEN IS COOL. 1. The glass shield should come out easily by using the oven light switch located on , remove the broiler pan...
.... Turn the power off grease. Replace halogen light appliance bulb taking care to lift it up from baking on the control panel. Care & Cleaning 47 OVEN LIGHT An interior oven light will turn on automatically when the oven door is extremely hot. THIS GLASS SHIELD MUST BE IN PLACE WHENEVER THE OVEN IS IN USE. To replace the light bulb: CAUTION: BE SURE THE OVEN IS COOL. 1. The glass shield should come out easily by using the oven light switch located on , remove the broiler pan...
Use and Care Manual
Page 48
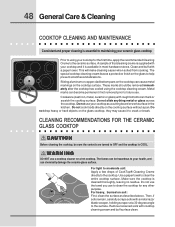
... at a 30 degree angle to using the cooktop cleaning cream. Do not cook foods directly on the glass cooktop, they may cause it is essential to maintaining your ceramic glass cooktop Prior to the surface. Remove loosened soils with a paper towel. The fumes can be removed immediately after the cooktop has cooled using your cooktop for any other purpose. Sliding aluminum or copper clad bottom pans on the cooktop surface. For...
... at a 30 degree angle to using the cooktop cleaning cream. Do not cook foods directly on the glass cooktop, they may cause it is essential to maintaining your ceramic glass cooktop Prior to the surface. Remove loosened soils with a paper towel. The fumes can be removed immediately after the cooktop has cooled using your cooktop for any other purpose. Sliding aluminum or copper clad bottom pans on the cooktop surface. For...

Use and Care Manual
Page 50
...; Oven too hot. • Allow oven to preheat to the selected temperature before the preheating time is no need to remove all sides when placed in the oven. • Use a medium-weight aluminum baking sheet. Cakes too dark on the center of pan. 50 Solutions to oven wall or rack overcrowded. • Pan warped. Cakes not level. • Range not level. • Pan too close to Common Problems Baking Problems For best cooking results...
...; Oven too hot. • Allow oven to preheat to the selected temperature before the preheating time is no need to remove all sides when placed in the oven. • Use a medium-weight aluminum baking sheet. Cakes too dark on the center of pan. 50 Solutions to oven wall or rack overcrowded. • Pan warped. Cakes not level. • Range not level. • Pan too close to Common Problems Baking Problems For best cooking results...

Use and Care Manual
Page 51
... correct problem. This list includes common experiences that are not level. • Kitchen cabinet misalignment may save you both time and expense. OVEN CONTROL BEEPS AND DISPLAYS AN "F" ERROR CODE • Electronic control has detected a fault condition. Contact cabinet maker to Common Problems 51 I M P O R TA N T Before calling for service, review this list. Call your cooktop. OVEN LIGHT DOES NOT WORK • Burned-out or loose bulb. Push CANCEL pad to replace or...
... correct problem. This list includes common experiences that are not level. • Kitchen cabinet misalignment may save you both time and expense. OVEN CONTROL BEEPS AND DISPLAYS AN "F" ERROR CODE • Electronic control has detected a fault condition. Contact cabinet maker to Common Problems 51 I M P O R TA N T Before calling for service, review this list. Call your cooktop. OVEN LIGHT DOES NOT WORK • Burned-out or loose bulb. Push CANCEL pad to replace or...
Use and Care Manual
Page 52
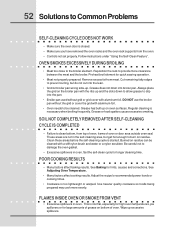
... Common Problems SELF-CLEANING CYCLE DOES NOT WORK • Make sure the oven door is closed. • Make sure you have removed the oven racks and the oven rack supports from the oven. • Controls not set properly. Preheat broil element for hints, causes and corrections. Always place the grid on oven surfaces. Be careful not to drip into broiler pan. See Baking for quick searing operation. • Meat not properly prepared. DO NOT use the broiler pan without...
... Common Problems SELF-CLEANING CYCLE DOES NOT WORK • Make sure the oven door is closed. • Make sure you have removed the oven racks and the oven rack supports from the oven. • Controls not set properly. Preheat broil element for hints, causes and corrections. Always place the grid on oven surfaces. Be careful not to drip into broiler pan. See Baking for quick searing operation. • Meat not properly prepared. DO NOT use the broiler pan without...
Use and Care Manual
Page 54
... Problems BROWN STREAKS AND SPECKS ON CERAMIC GLASS COOKTOP SURFACE • Boilovers have been used. Wet surface with clean, dry bottoms. See Ceramic-Glass Cooktop section in this Owner's Guide. Wipe remaining paste away, then apply a small amount of metal utensils on cooktop surface. See Ceramic-Glass Cooktop section in this Owner's Guide. Scrub with a clean paper towel. 54 Solutions to remove marks. See instructions under General Care & Cleaning. • Cleaning materials not recommended for ceramic-glass cooktop have cooked onto surface...
... Problems BROWN STREAKS AND SPECKS ON CERAMIC GLASS COOKTOP SURFACE • Boilovers have been used. Wet surface with clean, dry bottoms. See Ceramic-Glass Cooktop section in this Owner's Guide. Wipe remaining paste away, then apply a small amount of metal utensils on cooktop surface. See Ceramic-Glass Cooktop section in this Owner's Guide. Scrub with a clean paper towel. 54 Solutions to remove marks. See instructions under General Care & Cleaning. • Cleaning materials not recommended for ceramic-glass cooktop have cooked onto surface...


