Electrolux E48DF76EPS Support Question
Electrolux E48DF76EPS Support Question
Find answers below for this question about Electrolux E48DF76EPS - 48" Pro-Style Dual-Fuel Range.Need a Electrolux E48DF76EPS manual? We have 4 online manuals for this item!
Question posted by super712001 on July 26th, 2014
My 48 Inch Range Is Flashing All The Lights And Sounding A Alarm,
this range is only used once a year at xmas in a vacation home ,,the range is flashing all lights at once and a loud alarm is sounding,,,turned breaker off and waited 1 hour and turned it back on ,,,still the same problem..
Current Answers
Answer #1: Posted by OnlineOutreachSpecialist on July 29th, 2014 11:58 AM
OnlineOutreachSpecialist

Member since:
March 30th, 2011 Points: 2,848,320

Member since:
March 30th, 2011 Points: 2,848,320
Hey super712001, I appreciate your post!
From my understanding your Electrolux range is flashing all the lights and sounding an alarm. I see you have reset your appliance as well and you are still seeing the same issue. It sounds like it could be a miscommunication within the control of your appliance. I would suggest contacting a professional to come out and properly diagnose and repair your range. I hope this is helpful. –Chris
Online Outreach Specialist
Related Electrolux E48DF76EPS Manual Pages
Specification sheet - Page 1

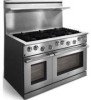
...at electroluxicon.com. Dual-Fuel Freestanding Range
E48DF76EPS professional series
Smooth-Glide™ Oven Racks Fully extending oven racks with Door Lock Halogen Oven Light Heavy-Duty Oven ...to perfection has never been easier.
48" DUAL-FUEL FREESTANDING RANGE
CONTROL PANEL FEATURES
Electronic Oven Control
Yes
Professional-Style Stainless Steel Console
Yes
Large Professional Skirted...
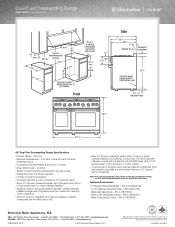
Specification sheet - Page 2
... 3E4 • 1-800-265-8352 • electroluxicon.ca
E48DF76EPS 03/10
© 2010 Electrolux Home Products, Inc. Dual-Fuel Freestanding Range
E48DF76EPS professional series
48" min. 30" min. surface
48 1/8"
25"
8"
12"
24" Opening to improve our... To reduce risk of fire when using overhead cabinetry, install vent hood that projects horizontally a recommended minimum of 5" beyond bottom of cabinets....
Owners Guide - Page 6
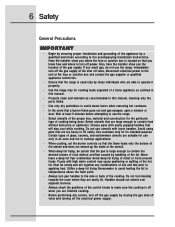
...use the range. Wait at the fuse or junction...use utensils with high water content may cause spattering or spilling of moist or frost-covered foods. Certain types of glass, ceramic, and earthenware utensils are suitable for cooking tasks expected of a home...flash point. • Always turn handles towards the room where they are easily hit. Heat fat slowly and stir together any service, turn...
Owners Guide - Page 10
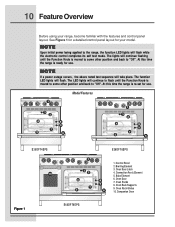
At this time the range is re-set for use . Oven Door Latch
4. Oven Door 7. Companion Oven
Figure 1
E48DF76EPS See Figure 1 for a detailed control panel layout for use . At this time the range is ready for your range, become familiar with the features and control panel layout.
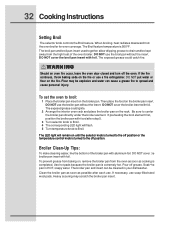
Broiling Element
3. Bake Element
8
6.
The function LED lights will take place...
Owners Guide - Page 17
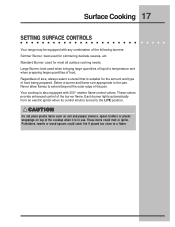
...lights automatically from an electric ignitor when its control knob is also equipped with any combination of the following burners: Simmer Burner: best used for most all surface cooking needs. Surface Cooking 17
SETTING SURFACE CONTROLS
Your range... that is in use. Regardless of food being prepared. Your cooktop is turned to temperature and when preparing larger quantities of the burner...
Owners Guide - Page 26
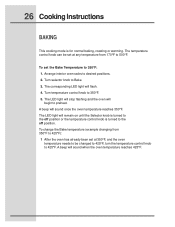
The corresponding LED light will sound once the oven temperature reaches 350°F. A beep will flash. 4. A beep will remain on until the Selector knob is turned to the off position. Arrange interior oven racks to Bake. 3. Turn selector knob to desired positions. 2. The LED light will stop flashing and the oven will
begin to 500°F. The temperature...
Owners Guide - Page 28
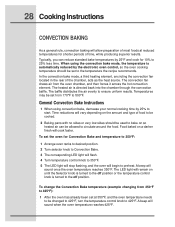
...Turn selector knob to Convection Bake. 3 The corresponding LED light will flash. 4 Turn temperature control knob to 350°F. 5 The LED light will stop flashing, and the oven will allow preparation of time, while producing superior results. A beep will
sound...the food. General Convection Bake Instructions
1 When using the convection bake mode, the temperature is automatically reduced by the ...
Owners Guide - Page 30
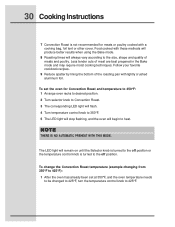
...will produce better results when using the Bake mode.
8 Roasting times will begin to heat. The LED light will remain on until the Selector knob is turned to the off position. ...racks to desired position. 2 Turn selector knob to Convection Roast. 3 The corresponding LED light will flash. 4 Turn temperature control knob to 350°F. 5 The LED light will stop flashing, and the oven will always...
Owners Guide - Page 32
...broil pan insert with foil. Pour off position. The broil pan and broil pan insert used together allow dripping grease to the off grease. The broiler pan and insert can be ...completed. Then place the food on until the selector knob is turned to spread and cause personal injury. The LED light will flash. 5 Turn temperature knob to center the broiler pan directly under the broiler...
Owners Guide - Page 33

...even after cleaning.
2. To clean, use aluminum foil to line the oven bottom. Clean any range.
These areas heat sufficiently during the...Wait until the oven is turned off during a self-clean to high temperatures.
Move birds to rub, damage or move the gasket. DO NOT use... and convection filter. Racks" LED will begin to flash indicating that you must be taken not to another well...
Owners Guide - Page 34
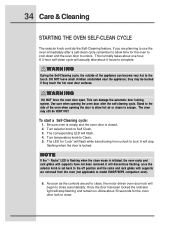
... and the racks and rack glides with supports have not been removed. Turn temperature knob to Self Clean. 3.
WARNING
During the Self-Cleaning cycle,...light will actually take about 4 hours to model E48DF76EPS companion oven).
6. A 3-hour self-clean cycle will stop
flashing when the door is initiated, the oven racks and rack glides with supports are removed from unlock to use...
Owners Guide - Page 41
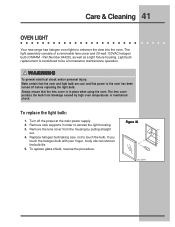
...the oven and light bulb are cool and that the lens cover is considered to the oven has been turned off the power at the main power supply. 2. To replace the light bulb:
1....when using the oven.
Part Number 64428), as well as a light fixture housing. Always ensure that power to be a homeowner maintenance operation. Care & Cleaning 41
OVEN LIGHT
Your new range has halogen oven lights ...
Installation Instructions - Page 1
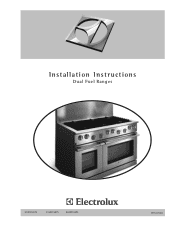
Installation Instructions
Dual Fuel Ranges
E30DF74EPS
E36DF76EPS
E48DF76EPS
5995447082
Installation Instructions - Page 22
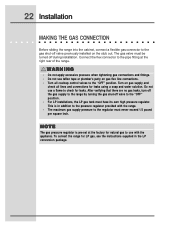
... gas connector to the gas shut-off during installation. Do not use with the range. • The maximum gas supply pressure to the regulator must never exceed 1/2 pound per square inch. NOTE
The gas pressure regulator is in the LP conversion package.
Turn on the stub out. After verifying that there are no gas...
Installation Instructions - Page 26
...
4
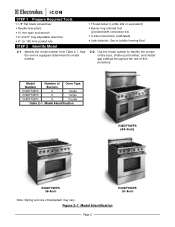
Single
E36DF76EPS
6
Single
E48DF76EPS
6
Double
Table 2-1 Model Identification
E48DF76EPS (48-Inch)
E36DF76EPS 36-Inch
E30DF76EPS 30-Inch
Note: Styling and size of this procedure. Thread-locker (Loctite 242 or equivalent) Burner ring removal tool (provided with conversion kit) U-tube manometer (calibrated) Leak detector: Gas or bubble forming fluid
2-2 Use the model number to...
Installation Instructions - Page 27
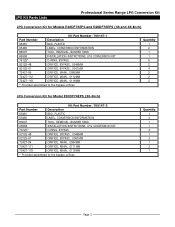
... Parts Lists
Professional Series Range LPG Conversion Kit
LPG Conversion Kit for Models E36DF76EPS and E48DF76EPS (36 and 48-Inch)
Kit Part Number: 700147-1
Part Number
Description
65481
BAG, PLASTIC
65480
LABEL, CONVERSION INFORMATION
86007
TOOL, REMOVAL, BUNRER RING
65558
INSTALLATION INSTRCTIONS, LPG CONVERSION KIT
76125*
O-RING, BYPASS
92125-48
ORIFICE, BYPASS, .0048MM
92125...
Installation Instructions - Page 30
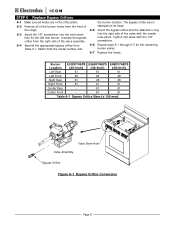
... appropriate bypass orifice from the right side of the range.
6-3 Insert the 1/8" screwdriver into the valve stem hole for the remaining burner valves.
6-7 Replace the knobs. Burner E30DF74EPS E36DF76EPS E48DF76EPS
Location
(30-Inch)
(36-Inch)
(48-Inch)
Left Rear
61
61
61
Left Front
48
48
48
Right Rear
61
48
48
Right Front
61
61
61
Center Rear
-
61
61...
Installation Instructions - Page 31
Professional Series Range LPG Conversion Kit
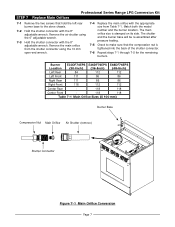
STEP 7 Replace Main Orifices
7-1 Remove the two screws that the compression nut is stamped on its side. Match both the model number and the burner location.
Burner E30DF74EPS E36DF76EPS E48DF76EPS
Location
(30-Inch)
(36-Inch)
(48-Inch)
Left Rear
84
112
112
Left Front
111
86
86
Right Rear
111
86...
Installation Instructions - Page 33
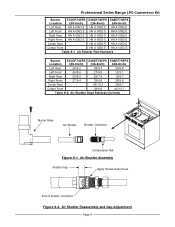
...Center Front
- Professional Series Range LPG Conversion Kit
Burner E30DF74EPS E36DF76EPS E48DF76EPS
Location
(30-Inch)
(36-Inch)
(48-Inch)
Left Rear HN A-0053-E...Rear
- HN A-0053-E HN A-0053-E
Table 9-1 Air Shutter Part Numbers
Burner E30DF74EPS E36DF76EPS E48DF76EPS
Location
(30-Inch)
(36-Inch)
(48-Inch)
Left Rear
.36/9.2
.38/9.7
.39/9.8
Left Front
.34/8.6
.27/6.9
.12/3.1
...
Installation Instructions - Page 36

...range to determine the orifice sizes, shutter gaps, and the air shutter part numbers.
Use the chart below to natural gas service, repeat all of the steps in this procedure using...
72
133
HN A-0052-E
81
184
HN A-0053-E
81
196
HN A-0053-E
81
196
HN A-0053-E
Model E48DF76EPS (48-Inch)
Air Shutter Gap
.38/9.6 .35/8.8 .30/7.7 .39/9.9 .38/9.7 .37/9.5
The Electrolux Group
USA • ...
Similar Questions

What Gauge Wire For Electrolux Dual Fuel Range
(Posted by MALEAmend 9 years ago)

Electrolux Dual Fuel Oven Door Locked After Cleaning Cycle
I ran the clean cycle on my E48DF76EPS Electrolux oven this morning. The cycle finished and the oven...
I ran the clean cycle on my E48DF76EPS Electrolux oven this morning. The cycle finished and the oven...
(Posted by kntrykoi 10 years ago)

After A Power Failure How Do You Turn Off The Alarm On The Electrolux Dual Fuel
After a power failure how do you turn off the alarm on the electrolux dual fuel range???????
After a power failure how do you turn off the alarm on the electrolux dual fuel range???????
(Posted by acvom 11 years ago)

Electrolux Slide In Range, The Lower Oven Door Will Not Open. It Opens Partially
(Posted by Anonymous-70600 11 years ago)

Exterior Fan Won't Turn Off.
I used the broiler on the bigger oven of my E48DF76EPS gas/electric range & the outside fan that...
I used the broiler on the bigger oven of my E48DF76EPS gas/electric range & the outside fan that...
(Posted by lori18137 12 years ago)