Complete Owner's Guide (English)
Page 2
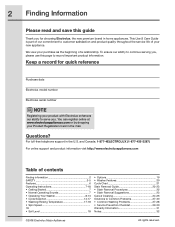
...com or by dropping your product with Electrolux enhances our ability to serve you for quick reference Purchase date Electrolux model number Electrolux serial number NOTE Registering your Product Registration... 7-18 • Getting Started 7 • Normal Operating Sounds 7 • Operating Your Washer 8-13 • Cycle Selection 14-17 • Washing/Rinsing Temperature 17-18 • Spin Speed...to Common Problems 27-30 • Common Washing Problems 27-28 • Service Prevention Checklist 29-30 Warranty Information 31 Notes 32 ©2008 Electrolux Major Aplliances All ...
...com or by dropping your product with Electrolux enhances our ability to serve you for quick reference Purchase date Electrolux model number Electrolux serial number NOTE Registering your Product Registration... 7-18 • Getting Started 7 • Normal Operating Sounds 7 • Operating Your Washer 8-13 • Cycle Selection 14-17 • Washing/Rinsing Temperature 17-18 • Spin Speed...to Common Problems 27-30 • Common Washing Problems 27-28 • Service Prevention Checklist 29-30 Warranty Information 31 Notes 32 ©2008 Electrolux Major Aplliances All ...
Product Specifications Sheet (English)
Page 2
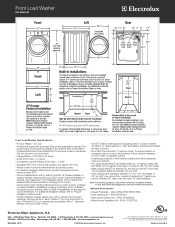
...with 1" maximum slope. Front Load Washer EIFLW55H IW Front Load Washer Specifications • Product Weight - 237 Lbs. • An electrical supply with standpipe diameter of 1-1/4" min. in the U.S.A. Do NOT install on web.) • Can be solid with matching Electrolux Dryer in . For ... or other flammables, including automobiles, are constantly working to change specifications or discontinue models without optional 15" drawer pedestal, or stacked beneath matching Electrolux Dryer, which requires installation of optional dryer stacking kit. (For installation details, ...
...with 1" maximum slope. Front Load Washer EIFLW55H IW Front Load Washer Specifications • Product Weight - 237 Lbs. • An electrical supply with standpipe diameter of 1-1/4" min. in the U.S.A. Do NOT install on web.) • Can be solid with matching Electrolux Dryer in . For ... or other flammables, including automobiles, are constantly working to change specifications or discontinue models without optional 15" drawer pedestal, or stacked beneath matching Electrolux Dryer, which requires installation of optional dryer stacking kit. (For installation details, ...
Installation Instructions (All Languages)
Page 6
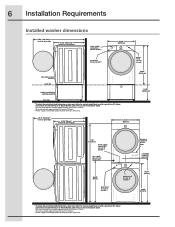
... clear open door 31.50" (80cm)* to front of closed door water supply connection on rear of unit ¹ drain hose on rear of unit ² 27.00" (68.58cm) power cord on rear of unit ³ freestand washer on floor floor line washer mounted on Steam Models adds 3/4 in . (2 cm) to installation ...length approximately 59 inches (150cm). ³ Power supply cord length approximately 60 inches (152.5cm). Connection of water inlet hose on Steam Models adds 3/4 in . (2 cm) to front of closed door 27.00" (68.5cm) 38.00" (96.52cm) 53.00" (134.62cm) 75.75" (192.5cm) water supply connection ...
... clear open door 31.50" (80cm)* to front of closed door water supply connection on rear of unit ¹ drain hose on rear of unit ² 27.00" (68.58cm) power cord on rear of unit ³ freestand washer on floor floor line washer mounted on Steam Models adds 3/4 in . (2 cm) to installation ...length approximately 59 inches (150cm). ³ Power supply cord length approximately 60 inches (152.5cm). Connection of water inlet hose on Steam Models adds 3/4 in . (2 cm) to front of closed door 27.00" (68.5cm) 38.00" (96.52cm) 53.00" (134.62cm) 75.75" (192.5cm) water supply connection ...
Installation Instructions (All Languages)
Page 18
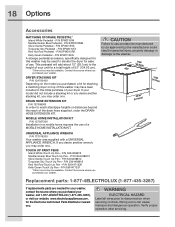
... reach of use accessories manufactured by (or approved by) the manufacturer could result in personal injury, property damage or damage to the washer. 27.00" (68.58cm) (3185.1.000cm" ) (672.61.64c4m" ) Replacement parts: 1-877-4ELECTROLUX (1-877-435-3287) If replacements parts are... for stacking a matching dryer on the model you may be available. DRAIN HOSE EXTENSION KIT P/N 137098000 In order to the height of your washer, call 1-877-4ELECTROLUX (1-877-435-3287), or visit our website, www.electroluxappliances.com, for the Electrolux Authorized Parts Distributor nearest you may be available...
... reach of use accessories manufactured by (or approved by) the manufacturer could result in personal injury, property damage or damage to the washer. 27.00" (68.58cm) (3185.1.000cm" ) (672.61.64c4m" ) Replacement parts: 1-877-4ELECTROLUX (1-877-435-3287) If replacements parts are... for stacking a matching dryer on the model you may be available. DRAIN HOSE EXTENSION KIT P/N 137098000 In order to the height of your washer, call 1-877-4ELECTROLUX (1-877-435-3287), or visit our website, www.electroluxappliances.com, for the Electrolux Authorized Parts Distributor nearest you may be available...
Wiring Diagram (All Languages)
Page 1
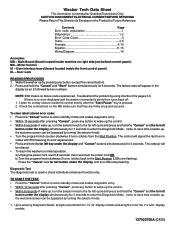
... the last 5 error codes with E00 meaning no failure code experienced. The code(s) will appear in the Product for 1¼"x2" display models and all lights should flash for Future Reference Contents Page Error code explanation 1 Diagnostics 1-2 Error Code Chart 3 Tests 4-5 Français ... the far left button under the display simultaneously for a relay closure inside the front control panel) DL - If there is used to the Start Position (LEDs are firmly snug and secured. Wake the washer up by turning the selector knob). 1. Upon entering Diagnostic Mode, all lights...
... the last 5 error codes with E00 meaning no failure code experienced. The code(s) will appear in the Product for 1¼"x2" display models and all lights should flash for Future Reference Contents Page Error code explanation 1 Diagnostics 1-2 Error Code Chart 3 Tests 4-5 Français ... the far left button under the display simultaneously for a relay closure inside the front control panel) DL - If there is used to the Start Position (LEDs are firmly snug and secured. Wake the washer up by turning the selector knob). 1. Upon entering Diagnostic Mode, all lights...
Wiring Diagram (All Languages)
Page 2
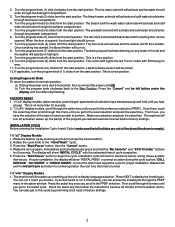
...(11) clicks from the start position. Once tumbling has started, the Boost Heater will deactivate and the loading door can be shown. 12. This is turned. 1¼"x4¾" Display Models 1. The control will turn on . 8. This is opened . The machine will signal the last .... Press the "Cancel" and far left button under the display until you choose. Turn the program knob (8) clicks from the washer drum). INSTALLATION CYCLE Before entering the Installation Cycle (Install Cycle) make sure that all articles from the start position. At cycle completion...
...(11) clicks from the start position. Once tumbling has started, the Boost Heater will deactivate and the loading door can be shown. 12. This is turned. 1¼"x4¾" Display Models 1. The control will turn on . 8. This is opened . The machine will signal the last .... Press the "Cancel" and far left button under the display until you choose. Turn the program knob (8) clicks from the washer drum). INSTALLATION CYCLE Before entering the Installation Cycle (Install Cycle) make sure that all articles from the start position. At cycle completion...


