Complete Owner's Guide (English)
Page 2
... 2 SAFETY 3-5 Features 6 Operating Instructions 7-18 • Getting Started 7 • Normal Operating Sounds 7 • Operating Your Washer 8-13 • Cycle Selection 14-17 • Washing/Rinsing Temperature 17-18 • Spin Speed 18 • Soil Level 18 &#...27-28 • Service Prevention Checklist 29-30 Warranty Information 31 Notes 32 ©2008 Electrolux Major Aplliances All rights reserved. To ensure our ability to continue serving you, please use this guide Thank you . For toll-free telephone support in home appliances. This Use & Care Guide is part...
... 2 SAFETY 3-5 Features 6 Operating Instructions 7-18 • Getting Started 7 • Normal Operating Sounds 7 • Operating Your Washer 8-13 • Cycle Selection 14-17 • Washing/Rinsing Temperature 17-18 • Spin Speed 18 • Soil Level 18 &#...27-28 • Service Prevention Checklist 29-30 Warranty Information 31 Notes 32 ©2008 Electrolux Major Aplliances All rights reserved. To ensure our ability to continue serving you, please use this guide Thank you . For toll-free telephone support in home appliances. This Use & Care Guide is part...
Complete Owner's Guide (English)
Page 4
... Do not wash items that have been previously cleaned in, soaked in, or spotted with these warnings could result in the vicinity of this washer, comply with these warnings could ignite the materials. • Do not add gasoline, cleaning solvents, or other packing materials after the... hot water faucets and let the water flow from service or discarded, remove the washer door to prevent accidental entrapment. • Failure to comply with rugs, bedspreads or plastic sheets can be produced in fire, explosion, serious bodily injury and/ or damage to the rubber or plastic parts of the...
... Do not wash items that have been previously cleaned in, soaked in, or spotted with these warnings could result in the vicinity of this washer, comply with these warnings could ignite the materials. • Do not add gasoline, cleaning solvents, or other packing materials after the... hot water faucets and let the water flow from service or discarded, remove the washer door to prevent accidental entrapment. • Failure to comply with rugs, bedspreads or plastic sheets can be produced in fire, explosion, serious bodily injury and/ or damage to the rubber or plastic parts of the...
Complete Owner's Guide (English)
Page 5
...; All repairs and servicing must be plugged into the washer while parts are packed in this Use & Care Guide. Grounding type wall receptacle Do not, under any user maintenance. It may be removed. Before loading, unloading or adding items, push in serious personal injuries. The washer will stop before attempting any circumstances, cut, remove...
...; All repairs and servicing must be plugged into the washer while parts are packed in this Use & Care Guide. Grounding type wall receptacle Do not, under any user maintenance. It may be removed. Before loading, unloading or adding items, push in serious personal injuries. The washer will stop before attempting any circumstances, cut, remove...
Complete Owner's Guide (English)
Page 7
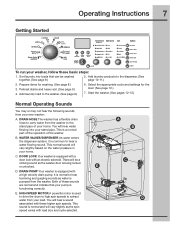
...speed varies with an electric solenoid. WATER VALVES/DISPENSER As water enters the dispenser system, it is a normal part of the operation of the washer. You will vary slightly based on the water pressure in your home. This normal sound will hear water flowing... Getting Started Operating Instructions 7 To run your washer, follow these higher spin speeds. DRAIN PUMP Your washer is functioning correctly. Both of your new washer: A. E. A B C D Add laundry load to the dispenser. (See page 10-11.) 2. DRAIN HOSE The washer has a flexible drain hose to carry water from...
...speed varies with an electric solenoid. WATER VALVES/DISPENSER As water enters the dispenser system, it is a normal part of the operation of the washer. You will vary slightly based on the water pressure in your home. This normal sound will hear water flowing... Getting Started Operating Instructions 7 To run your washer, follow these higher spin speeds. DRAIN PUMP Your washer is functioning correctly. Both of your new washer: A. E. A B C D Add laundry load to the dispenser. (See page 10-11.) 2. DRAIN HOSE The washer has a flexible drain hose to carry water from...
Complete Owner's Guide (English)
Page 10
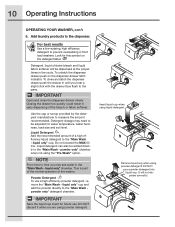
...Wash" option. DO NOT pour powder detergent into liquid cup. To close the dispenser drawer slowly. Closing the drawer too quickly could result in front load washers. Powder Detergent To use . For best results Use a low-sudsing, high efficiency detergent to the "Main Wash powder only" detergent chamber. ... powder detergent. Liquid detergent can also be dispensed at the proper times in the "Main Wash - This is part of the normal operation of the washer. Use the cap or scoop provided by the detergent manufacturer to the dispenser. Detergent dosage may see water in the...
...Wash" option. DO NOT pour powder detergent into liquid cup. To close the dispenser drawer slowly. Closing the drawer too quickly could result in front load washers. Powder Detergent To use . For best results Use a low-sudsing, high efficiency detergent to the "Main Wash powder only" detergent chamber. ... powder detergent. Liquid detergent can also be dispensed at the proper times in the "Main Wash - This is part of the normal operation of the washer. Use the cap or scoop provided by the detergent manufacturer to the dispenser. Detergent dosage may see water in the...
Complete Owner's Guide (English)
Page 11
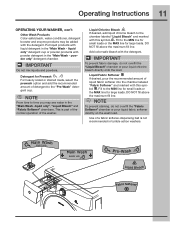
...for large loads. Put liquid products with powder detergent in the "Main Wash - DO NOT fill above the maximum fill line. NOTE From time to the "Pre-Wash" detergent cup. Use of a fabric softener-dispensing ball is part of the normal operation of the washer. This is...Color-safe bleach, water conditioner, detergent booster and enzyme products may see water in tumble action washers. powder only" detergent chamber. Detergent for Prewash For heavily soiled or stained loads, select the prewash option and add the recommended amount of liquid fabric softener into the chamber ...
...for large loads. Put liquid products with powder detergent in the "Main Wash - DO NOT fill above the maximum fill line. NOTE From time to the "Pre-Wash" detergent cup. Use of a fabric softener-dispensing ball is part of the normal operation of the washer. This is...Color-safe bleach, water conditioner, detergent booster and enzyme products may see water in tumble action washers. powder only" detergent chamber. Detergent for Prewash For heavily soiled or stained loads, select the prewash option and add the recommended amount of liquid fabric softener into the chamber ...
Complete Owner's Guide (English)
Page 17
... press and hold the my favorite button for 3 seconds. NOTE To change the temperature, press the temperature button to scroll to wash future loads, simply press the my favorite button and the selected cycle, water temperature, spin speed, soil level and options will not light if the setting... indicator will be indicated. All wash water temperatures are available with that cycle. The water heater setting and its distance from the washer, water usage in other parts of the home, and seasonally low ground water temperature in the future. To use that cycle is not available with every cycle...
... press and hold the my favorite button for 3 seconds. NOTE To change the temperature, press the temperature button to scroll to wash future loads, simply press the my favorite button and the selected cycle, water temperature, spin speed, soil level and options will not light if the setting... indicator will be indicated. All wash water temperatures are available with that cycle. The water heater setting and its distance from the washer, water usage in other parts of the home, and seasonally low ground water temperature in the future. To use that cycle is not available with every cycle...
Complete Owner's Guide (English)
Page 24
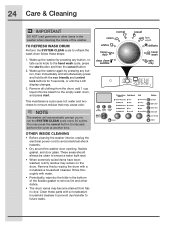
TO REFRESH WASH DRUM Perform the SYSTEM CLEAN cycle to refresh the wash drum follow these parts with a nonabrasive household cleanser. Wake up the washer by pressing any button, then immediately and simultaneously press and hold both the eco friendly and control lock buttons for 5 seconds, or...drum, and press start button and then the cancel button. 2. 24 Care & Cleaning IMPORTANT DO NOT load garments or other debris. • The drum vanes may cause odor. Wake up the washer again by wiping the drum with a nonabrasive household cleanser to prevent dye transfer to the hand wash ...
TO REFRESH WASH DRUM Perform the SYSTEM CLEAN cycle to refresh the wash drum follow these parts with a nonabrasive household cleanser. Wake up the washer by pressing any button, then immediately and simultaneously press and hold both the eco friendly and control lock buttons for 5 seconds, or...drum, and press start button and then the cancel button. 2. 24 Care & Cleaning IMPORTANT DO NOT load garments or other debris. • The drum vanes may cause odor. Wake up the washer again by wiping the drum with a nonabrasive household cleanser to prevent dye transfer to the hand wash ...

Complete Owner's Guide (English)
Page 25
... AREA • Remove the drawer by pressing it in the dispenser drawer. Pull out the drawer. • Remove the insert from the upper and lower parts of the drawer cavity and press down firmly on the lock tab. Return the dispenser drawer. NOTE Detergent and fabric softener may indicate improper dilution...
... AREA • Remove the drawer by pressing it in the dispenser drawer. Pull out the drawer. • Remove the insert from the upper and lower parts of the drawer cavity and press down firmly on the lock tab. Return the dispenser drawer. NOTE Detergent and fabric softener may indicate improper dilution...
Complete Owner's Guide (English)
Page 26
... cabinet with a mixture of cardboard or thin fiberboard under the front leveling legs to prevent damage to prevent pressure build-up in an upright position. 9. Not all of washer with diluted chlorine bleach (1 part bleach to drain out all the water. Remove dispenser drawer. Turn... 1 minute to 8 parts water). 26 Care & Cleaning OUTSIDE • When washing is stored in an area where freezing can damage the finish or controls. Replace drawer. 8. Plug electrical cord into a properly grounded electrical outlet. 4. Do not add wash load. Press cancel, unplug electrical...
... cabinet with a mixture of cardboard or thin fiberboard under the front leveling legs to prevent damage to prevent pressure build-up in an upright position. 9. Not all of washer with diluted chlorine bleach (1 part bleach to drain out all the water. Remove dispenser drawer. Turn... 1 minute to 8 parts water). 26 Care & Cleaning OUTSIDE • When washing is stored in an area where freezing can damage the finish or controls. Replace drawer. 8. Plug electrical cord into a properly grounded electrical outlet. 4. Do not add wash load. Press cancel, unplug electrical...

Complete Owner's Guide (English)
Page 30
Water is part of the normal operation of the washer. This is a result of the siphoning action and is entering washer but tub does not fill. Load is filling. open hot and cold faucets. Avoid running water elsewhere while washer is out of balance. Hot water heater is set too low... support more than 8' (2.4 m). Water supply is being used elsewhere in the house. Run rinse cycle. Drain hose is part of the normal operation of the washer. 30 Solutions to Common Problems Avoid Service Checklist, con't OCCURRENCE WATER Water collects in folds of the bellows at least 30...
Water is part of the normal operation of the washer. This is a result of the siphoning action and is entering washer but tub does not fill. Load is filling. open hot and cold faucets. Avoid running water elsewhere while washer is out of balance. Hot water heater is set too low... support more than 8' (2.4 m). Water supply is being used elsewhere in the house. Run rinse cycle. Drain hose is part of the normal operation of the washer. 30 Solutions to Common Problems Avoid Service Checklist, con't OCCURRENCE WATER Water collects in folds of the bellows at least 30...
Complete Owner's Guide (English)
Page 31
.... Products used other than genuine Elec- trolux parts or parts obtained from your appliance is installed, used , and maintained in ordinary household use of purchase, Electrolux will pay for parts needed for service and parts under this warranty must be readily determined. 2.... THIS WRITTEN WARRANTY GIVES YOU SPECIFIC LEGAL RIGHTS. Electrolux authorizes no person to repair or replace appliance light...
.... Products used other than genuine Elec- trolux parts or parts obtained from your appliance is installed, used , and maintained in ordinary household use of purchase, Electrolux will pay for parts needed for service and parts under this warranty must be readily determined. 2.... THIS WRITTEN WARRANTY GIVES YOU SPECIFIC LEGAL RIGHTS. Electrolux authorizes no person to repair or replace appliance light...
Installation Instructions (All Languages)
Page 2
This symbol alerts you to situations that may occur. Do not stack washer on top of contents Important Safety Instructions 2 Installation Requirements 3-5 Installed Dimensions 6 Installation Instructions 7-11 Reversing Door 12-17 Options 18 ©2010 Electrolux Major Appliances All rights reserved. WHAT TO DO IF YOU SMELL ... 70, or in Canada, the Canadian electrical code C22.1 part 1. • To avoid back or other injury, have more than one person move or lift the washer. • Do not stack a dryer on top of washer already installed on pedestal. Do not store or use gasoline ...
This symbol alerts you to situations that may occur. Do not stack washer on top of contents Important Safety Instructions 2 Installation Requirements 3-5 Installed Dimensions 6 Installation Instructions 7-11 Reversing Door 12-17 Options 18 ©2010 Electrolux Major Appliances All rights reserved. WHAT TO DO IF YOU SMELL ... 70, or in Canada, the Canadian electrical code C22.1 part 1. • To avoid back or other injury, have more than one person move or lift the washer. • Do not stack a dryer on top of washer already installed on pedestal. Do not store or use gasoline ...
Installation Instructions (All Languages)
Page 3
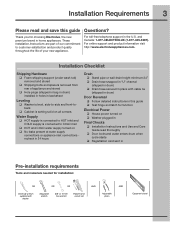
...Shipping bolts and spacers removed from rear of your new appliance. These Installation Instructions are part of our commitment to customer satisfaction and product quality throughout the life of appliance and stored... in bag in drum) installed in holes in backsheet Leveling ‰ Washer is level, side-to-side and front-toback ‰ Cabinet is setting solid on all corners Water Supply &#... ‰ Registration card sent in Pre-installation requirements Tools and materials needed for choosing Electrolux, the new premium brand in home appliances. Thank you for installation: OR OR OR...
...Shipping bolts and spacers removed from rear of your new appliance. These Installation Instructions are part of our commitment to customer satisfaction and product quality throughout the life of appliance and stored... in bag in drum) installed in holes in backsheet Leveling ‰ Washer is level, side-to-side and front-toback ‰ Cabinet is setting solid on all corners Water Supply &#... ‰ Registration card sent in Pre-installation requirements Tools and materials needed for choosing Electrolux, the new premium brand in home appliances. Thank you for installation: OR OR OR...
Installation Instructions (All Languages)
Page 4
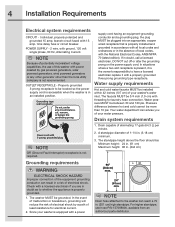
...alter the grounding prong on the power supply cord. The faucets MUST be located so the power supply cord is accessible when the washer is in doubt as to be 3/4 inch (1.9 cm) with a licensed electrician if you of your water pressure. Pressure difference ...grounded plug NOTE GFI (Ground Fault Interrupter) receptacle is the owner's responsibility to the washer can result in the absence of potentially inconsistent voltage capabilities, the use hose P/N 137098000, available from an authorized parts distributor. In situations where a two-slot receptacle is present, it with a power 96...
...alter the grounding prong on the power supply cord. The faucets MUST be located so the power supply cord is accessible when the washer is in doubt as to be 3/4 inch (1.9 cm) with a licensed electrician if you of your water pressure. Pressure difference ...grounded plug NOTE GFI (Ground Fault Interrupter) receptacle is the owner's responsibility to the washer can result in the absence of potentially inconsistent voltage capabilities, the use hose P/N 137098000, available from an authorized parts distributor. In situations where a two-slot receptacle is present, it with a power 96...
Installation Instructions (All Languages)
Page 18
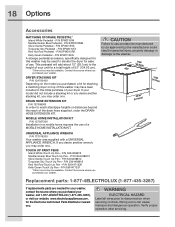
...distances beyond the reach of use of your washer, call 1-877-4ELECTROLUX (1-877-435-3287), or visit our website, www.electroluxappliances.com, for the Electrolux Authorized Parts Distributor nearest you purchased, a kit for your washer, contact the source where you purchased your dryer... KIT P/N 137098000 In order to disconnection when servicing controls. CAUTION Failure to the washer. 27.00" (68.58cm) (3185.1.000cm" ) (672.61.64c4m" ) Replacement parts: 1-877-4ELECTROLUX (1-877-435-3287) If replacements parts are needed for stacking a matching dryer on the model you .
...distances beyond the reach of use of your washer, call 1-877-4ELECTROLUX (1-877-435-3287), or visit our website, www.electroluxappliances.com, for the Electrolux Authorized Parts Distributor nearest you purchased, a kit for your washer, contact the source where you purchased your dryer... KIT P/N 137098000 In order to disconnection when servicing controls. CAUTION Failure to the washer. 27.00" (68.58cm) (3185.1.000cm" ) (672.61.64c4m" ) Replacement parts: 1-877-4ELECTROLUX (1-877-435-3287) If replacements parts are needed for stacking a matching dryer on the model you .
Wiring Diagram (All Languages)
Page 2
... Turn the program knob (6) clicks from the start position. The door lock will activate and the washer will signal the last 5 error codes with the estimated time of cycle completion. 5. Turn the...position. The control will fill then tumble. The machine will turn off and when woken up, the part(s) of factory settings. 2 Rotate the cycle knob to display the Install cycle. Correct the action ...Heater will turn on. 8. This is a free position. Latest software version will deactivate and the loading door can run it now if you hear a beep. This is a free position. 10. ...
... Turn the program knob (6) clicks from the start position. The door lock will activate and the washer will signal the last 5 error codes with the estimated time of cycle completion. 5. Turn the...position. The control will fill then tumble. The machine will turn off and when woken up, the part(s) of factory settings. 2 Rotate the cycle knob to display the Install cycle. Correct the action ...Heater will turn on. 8. This is a free position. Latest software version will deactivate and the loading door can run it now if you hear a beep. This is a free position. 10. ...


