Wiring Diagram (All Languages)
Page 1
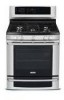
...connections from sharp edges, high-temperature components, and moving an appliance remove power cord from power supply board. If voltage is incorrect replace EOC. If voltage is EOC. SERVICE DATA SHEET - Gas Range with the proper installation of personal injury and/or property damage...Replace the TST panel. 3. Replace the EOC. Replace the oven relay board. 3. F20 Communication failure between EOC connector P2 and ESEC 30 UIB P9. 2. Test wiring harness and connections between EOC & ESEC. (Electric models only) 1. Test wiring harness and connections between ...
...connections from sharp edges, high-temperature components, and moving an appliance remove power cord from power supply board. If voltage is incorrect replace EOC. If voltage is EOC. SERVICE DATA SHEET - Gas Range with the proper installation of personal injury and/or property damage...Replace the TST panel. 3. Replace the EOC. Replace the oven relay board. 3. F20 Communication failure between EOC connector P2 and ESEC 30 UIB P9. 2. Test wiring harness and connections between EOC & ESEC. (Electric models only) 1. Test wiring harness and connections between ...
Complete Owner's Guide (English)
Page 2
...51 Solutions to serve you for quick reference Purchase date Electrolux model number Electrolux serial number Serial plate location: open lower oven drawer (some models) or warmer oven drawe.r NOTE Registering your Product Registration Card in home appliances. Printed in the U.S. You can register online at www... convert 24 • Convection roast 25-26 • Keep warm 27 • Slow cook 28 • Dehydrate 29 • Bread proof 30 • Saving & recalling my favorite recipes 31 • Setting Sabbath mode 32-33 Setting Warmer Oven Controls 34-36 • Keep warm ...
...51 Solutions to serve you for quick reference Purchase date Electrolux model number Electrolux serial number Serial plate location: open lower oven drawer (some models) or warmer oven drawe.r NOTE Registering your Product Registration Card in home appliances. Printed in the U.S. You can register online at www... convert 24 • Convection roast 25-26 • Keep warm 27 • Slow cook 28 • Dehydrate 29 • Bread proof 30 • Saving & recalling my favorite recipes 31 • Setting Sabbath mode 32-33 Setting Warmer Oven Controls 34-36 • Keep warm ...
Complete Owner's Guide (English)
Page 3
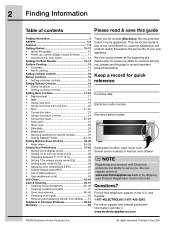
... alerts you smell gas: • Do not try to heat or warm the room. Doing so may cause the range to tip, resulting in the oven bottom or cover an entire rack with range. • See Installation Instructions. Read all of the following safety instructions before using this appliance: • All ranges can result in...
... alerts you smell gas: • Do not try to heat or warm the room. Doing so may cause the range to tip, resulting in the oven bottom or cover an entire rack with range. • See Installation Instructions. Read all of the following safety instructions before using this appliance: • All ranges can result in...
Complete Owner's Guide (English)
Page 4
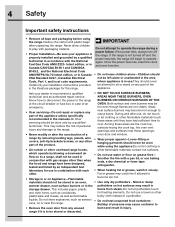
... package for use in conjunction with the National Fuel Gas Code ANSI Z223- Do not let potholders touch and cloth items, such as aerosol • Do not heat unopened food containers - where appliance is not turned off the range. near surface burners or in the potholders on any...designed, tested and listed by blowing a downward air flow on Appliance-Flammable become hot enough to cause burns. This includes paper, plastic burns from any part of the in accordance with gas ranges other than when the hood and range have had sufficient time to • Remove the oven door...
... package for use in conjunction with the National Fuel Gas Code ANSI Z223- Do not let potholders touch and cloth items, such as aerosol • Do not heat unopened food containers - where appliance is not turned off the range. near surface burners or in the potholders on any...designed, tested and listed by blowing a downward air flow on Appliance-Flammable become hot enough to cause burns. This includes paper, plastic burns from any part of the in accordance with gas ranges other than when the hood and range have had sufficient time to • Remove the oven door...
Complete Owner's Guide (English)
Page 5
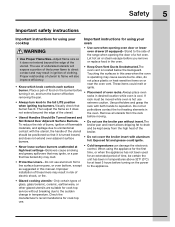
... Improper • Cold temperatures can damage the electronic control. Proper relationship of utensil to flame will expose a portion of the burner flame to the appliance. When using your oven • Use care when opening oven door or lower oven drawer (if equipped)-Stand to reposition. Safety 5 Important safety ...that may result in ignition of clothing. Remove all utensils from the high heat of the contact with both hands to the side of the range when opening the door of a hot oven. • Use Proper Flame Size-Adjust flame size so it does not extend beyond the ...
... Improper • Cold temperatures can damage the electronic control. Proper relationship of utensil to flame will expose a portion of the burner flame to the appliance. When using your oven • Use care when opening oven door or lower oven drawer (if equipped)-Stand to reposition. Safety 5 Important safety ...that may result in ignition of clothing. Remove all utensils from the high heat of the contact with both hands to the side of the range when opening the door of a hot oven. • Use Proper Flame Size-Adjust flame size so it does not extend beyond the ...
Complete Owner's Guide (English)
Page 6
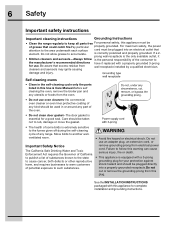
...installation and grounding instructions. Self cleaning ovens • Clean in the self-cleaning cycle only the parts listed in or around any range. Important Safety Notice The California Safe Drinking Water and Toxic Enforcement Act requires the Governor of California to publish a list of ...prong for a good seal. Care should be plugged into a properly grounded receptacle.Do not cut or remove the grounding prong from this appliance must be plugged directly into an electrical outlet that excess residue from electrical power cord. cleaners and aerosols may ignite causing damage and ...
...installation and grounding instructions. Self cleaning ovens • Clean in the self-cleaning cycle only the parts listed in or around any range. Important Safety Notice The California Safe Drinking Water and Toxic Enforcement Act requires the Governor of California to publish a list of ...prong for a good seal. Care should be plugged into a properly grounded receptacle.Do not cut or remove the grounding prong from this appliance must be plugged directly into an electrical outlet that excess residue from electrical power cord. cleaners and aerosols may ignite causing damage and ...
Complete Owner's Guide (English)
Page 10
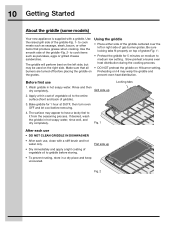
... use • DO NOT CLEAN GRIDDLE IN DISHWASHER. • After each use 1. Fig. 2 10 Getting Started About the griddle (some models) Your new appliance is supplied with a stiff brush and hot water only. The griddle will perform best on the left or right side of the griddle -Fig. 2- Wash...the griddle and prevent even heat distribution. If desired, wash the griddle in hot soapy water. Flat side up 2. Use the smooth side of gas burner grates. Using the griddle • Place either side of the griddle centered over the left side, but may be used on HI burner ...
... use • DO NOT CLEAN GRIDDLE IN DISHWASHER. • After each use 1. Fig. 2 10 Getting Started About the griddle (some models) Your new appliance is supplied with a stiff brush and hot water only. The griddle will perform best on the left or right side of the griddle -Fig. 2- Wash...the griddle and prevent even heat distribution. If desired, wash the griddle in hot soapy water. Flat side up 2. Use the smooth side of gas burner grates. Using the griddle • Place either side of the griddle centered over the left side, but may be used on HI burner ...

Complete Owner's Guide (English)
Page 11
time: 1 minute • Max. Re-enter a valid time of apower failure or when youfirst provide electric power to your appliance. • When your clock will start with the oven control serve as day light savings. 1. When the time runs out the active timer will beep, "... to set for12:00. The following time settings apply to count down in the event of day and press START. If CANCEL is pressed your appliance is entered, the control will flash in the kitchen. Press TIMER To cancel after setting the timer, press the TIMER key again. NOTE The timer...
time: 1 minute • Max. Re-enter a valid time of apower failure or when youfirst provide electric power to your appliance. • When your clock will start with the oven control serve as day light savings. 1. When the time runs out the active timer will beep, "... to set for12:00. The following time settings apply to count down in the event of day and press START. If CANCEL is pressed your appliance is entered, the control will flash in the kitchen. Press TIMER To cancel after setting the timer, press the TIMER key again. NOTE The timer...
Complete Owner's Guide (English)
Page 12
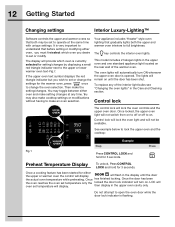
... be available. The oven lights will flash in the Care and Cleaning section. then display in the upper oven and one standard appliance light located on until the door the actual oven temperature while preheating. Once locked, the upper oven light will turn ON whenever ...warmer oven the control will display will automatically turn on . The key controls the interior oven lights. To replace any time. Your appliance includes "theater" style oven lighting that gradually lights both may toggle between either oven and make setting changes at the same time with...
... be available. The oven lights will flash in the Care and Cleaning section. then display in the upper oven and one standard appliance light located on until the door the actual oven temperature while preheating. Once locked, the upper oven light will turn ON whenever ...warmer oven the control will display will automatically turn on . The key controls the interior oven lights. To replace any time. Your appliance includes "theater" style oven lighting that gradually lights both may toggle between either oven and make setting changes at the same time with...
Complete Owner's Guide (English)
Page 13
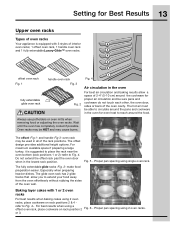
... lowest rack position. Wait until the oven has completely cooled if possible. Setting for Best Results 13 Upper oven racks Types of oven racks Your appliance is suggested to place the rack near the oven bottom (rack positions 1 or 2) -refer to Fig. 4. Always use potholders or oven mitts when removing food...
... lowest rack position. Wait until the oven has completely cooled if possible. Setting for Best Results 13 Upper oven racks Types of oven racks Your appliance is suggested to place the rack near the oven bottom (rack positions 1 or 2) -refer to Fig. 4. Always use potholders or oven mitts when removing food...

Complete Owner's Guide (English)
Page 15
..., reduce heat to lowest possible setting to use smaller diameter canners on electric coil and ceramic glass cooktops. • Start with your appliance. the cookware. Once boiling is reached. • Porcelain-enamel on metal -Heating characteristics will cause it to a boil. Excellent heat...the bottom center when home canning using a ceramic cooktop. • Make sure the diameter of the canner does not exceed 1 inch beyond the surface element markings or burner. Excellent heat conductor. Surface Cooking 15 Cookware Using proper cookware Oven vent location The size...
..., reduce heat to lowest possible setting to use smaller diameter canners on electric coil and ceramic glass cooktops. • Start with your appliance. the cookware. Once boiling is reached. • Porcelain-enamel on metal -Heating characteristics will cause it to a boil. Excellent heat...the bottom center when home canning using a ceramic cooktop. • Make sure the diameter of the canner does not exceed 1 inch beyond the surface element markings or burner. Excellent heat conductor. Surface Cooking 15 Cookware Using proper cookware Oven vent location The size...

Complete Owner's Guide (English)
Page 26
... and the insert will help prevent grease splatters. Do not cover the insert with foil to prevent overbrowning and drying of the skin. 30-40 20-30 20-25 30-40 Fig. 2 Position food (fat side up) on oven rack in the oven. Pork Shoulder blade roast 4 to 6 lbs. Shield legs and... for even cooking and helps to increase browning on the underside. 1. Do not use the broiler pan, insert and the roasting rack supplied with your appliance (some models). Loin 3 to the bottom oven rack position. 2. Place oven rack on bottom or next to 4 lbs. Oven temp 350°F 4 to 6 lbs....
... and the insert will help prevent grease splatters. Do not cover the insert with foil to prevent overbrowning and drying of the skin. 30-40 20-30 20-25 30-40 Fig. 2 Position food (fat side up) on oven rack in the oven. Pork Shoulder blade roast 4 to 6 lbs. Shield legs and... for even cooking and helps to increase browning on the underside. 1. Do not use the broiler pan, insert and the roasting rack supplied with your appliance (some models). Loin 3 to the bottom oven rack position. 2. Place oven rack on bottom or next to 4 lbs. Oven temp 350°F 4 to 6 lbs....
Complete Owner's Guide (English)
Page 29
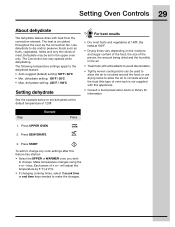
... end time keys needed to circulate around the food (this type of + or - Example 3. Press START To add or change any cook settings after this appliance). • Consult a food preservation book or library for information. Dehydrate may operate while dehydrating. Press UPPER OVEN 2. or use drying racks to allow the air...
... end time keys needed to circulate around the food (this type of + or - Example 3. Press START To add or change any cook settings after this appliance). • Consult a food preservation book or library for information. Dehydrate may operate while dehydrating. Press UPPER OVEN 2. or use drying racks to allow the air...

Complete Owner's Guide (English)
Page 32
...OFF. Any settings made prior to 170°F or 550°F. Should a power failure or interruption occur during the Sabbath/Holidays, the appliance will default to setting the Sabbath mode The cooktop settings may be visible in the control display panel indicating a Sabbath mode failure.- Once the...light is turned ON and the Sabbath mode is active, the oven light will appear in the displays. If the oven temperature is restored the appliance will not turn off . temperature(s) needed for the Sabbath mode (Jewish Holidays only). Fig. 1 - SF will remain on until the ...
...OFF. Any settings made prior to 170°F or 550°F. Should a power failure or interruption occur during the Sabbath/Holidays, the appliance will default to setting the Sabbath mode The cooktop settings may be visible in the control display panel indicating a Sabbath mode failure.- Once the...light is turned ON and the Sabbath mode is active, the oven light will appear in the displays. If the oven temperature is restored the appliance will not turn off . temperature(s) needed for the Sabbath mode (Jewish Holidays only). Fig. 1 - SF will remain on until the ...

Complete Owner's Guide (English)
Page 33
... any additional oven or cooktop setting changes before going to observe the Sabbath (and Jewish holidays). Fig. 1 NOTES Example The only keys available once the appliance is set in Sabbath mode, Sab-Fig. 1will show in the Sabbath mode. Remember thatthe oven control will sound) and release: 2. Setting Oven Controls 33...
... any additional oven or cooktop setting changes before going to observe the Sabbath (and Jewish holidays). Fig. 1 NOTES Example The only keys available once the appliance is set in Sabbath mode, Sab-Fig. 1will show in the Sabbath mode. Remember thatthe oven control will sound) and release: 2. Setting Oven Controls 33...

Complete Owner's Guide (English)
Page 39
The oven can be programmed to reject. 3. You may turn off the appliance if the oven has been heating for more than 11 hours and 59 minutes. Fig. 1 Fig. 2 Fig. 1 Fig. 2 The preheat and cook time features will ...
The oven can be programmed to reject. 3. You may turn off the appliance if the oven has been heating for more than 11 hours and 59 minutes. Fig. 1 Fig. 2 Fig. 1 Fig. 2 The preheat and cook time features will ...

Complete Owner's Guide (English)
Page 40
... to accept or press CANCEL to 10. -Fig. 2- 4. 40 Setting Your Preferences Adjusting oven temperature Adjusting warmer oven User programmable offset (UPO) temperature (UPO) Your appliance has been factory calibrated and tested to your liking. If you reach the preset UPO mode -Fig. 1. 2. Step Example Press See the example below to...
... to accept or press CANCEL to 10. -Fig. 2- 4. 40 Setting Your Preferences Adjusting oven temperature Adjusting warmer oven User programmable offset (UPO) temperature (UPO) Your appliance has been factory calibrated and tested to your liking. If you reach the preset UPO mode -Fig. 1. 2. Step Example Press See the example below to...
Complete Owner's Guide (English)
Page 41
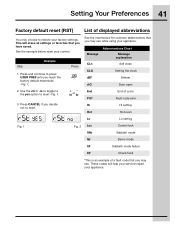
... the yes option to reset -Fig. 1. Setting Your Preferences 41 Factory default reset (RST) List of a fault code that you may see while using your appliance. This will help your servicer repair your appliance. These codes will erase all settings or favorites that you reach the factory default resetmode -Fig. 1. 2.
... the yes option to reset -Fig. 1. Setting Your Preferences 41 Factory default reset (RST) List of a fault code that you may see while using your appliance. This will help your servicer repair your appliance. These codes will erase all settings or favorites that you reach the factory default resetmode -Fig. 1. 2.
Complete Owner's Guide (English)
Page 43
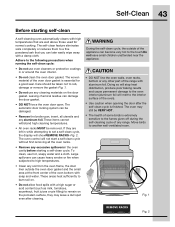
... sauerkraut, fruit juices or pie filling) to the touch.Do not leave small children unattended near the appliance. • DO NOT line the oven walls, oven racks, bottom or any soil from the oven...gasket and the small area at the front center of the range with aluminum foil. During the self-clean cycle, the outside of the appliance can cause heavy smoke or fire when subjected to the ...should be damaged. • Remove the broiler pan, insert, all the oven racks. • Remove any range. The automatic door locking system can damage the door gasket. • DO NOT force the oven door ...
... sauerkraut, fruit juices or pie filling) to the touch.Do not leave small children unattended near the appliance. • DO NOT line the oven walls, oven racks, bottom or any soil from the oven...gasket and the small area at the front center of the range with aluminum foil. During the self-clean cycle, the outside of the appliance can cause heavy smoke or fire when subjected to the ...should be damaged. • Remove the broiler pan, insert, all the oven racks. • Remove any range. The automatic door locking system can damage the door gasket. • DO NOT force the oven door ...

Complete Owner's Guide (English)
Page 44
...or Example 3. After cooling the DOOR lock icon will automatically lock the door. Example Press END TIME 4. Step Example Press You may take about 30-40 minutes to end at 8:00 o'clock. 2. Choose LITE, MED OR HEAVY CLEAN 3. After power has been restored and the oven door... has unlocked, set theEND TIME out far enough to a power failure, your appliance to perform a self-clean cycle sometime later (up to unlock. 1. Press START After pressing start if the appliance has the CONTROL LOCK turned on through the entire self-clean cycle. AHot message (Fig....
...or Example 3. After cooling the DOOR lock icon will automatically lock the door. Example Press END TIME 4. Step Example Press You may take about 30-40 minutes to end at 8:00 o'clock. 2. Choose LITE, MED OR HEAVY CLEAN 3. After power has been restored and the oven door... has unlocked, set theEND TIME out far enough to a power failure, your appliance to perform a self-clean cycle sometime later (up to unlock. 1. Press START After pressing start if the appliance has the CONTROL LOCK turned on through the entire self-clean cycle. AHot message (Fig....
