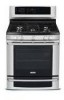
Wiring Diagram (All Languages)
Page 1
... temperature & compare to heat when the power is intended for use of service. If open . If voltage is incorrect test incoming power supply to see if latch motor coil is incorrect replace EOC. Test operation of the latch cam, latch motor rod & latch motor cam. 4. See Use & Care Guide. Reset power supply to range to PS board 2 at harness connector P1 pins 1 & 4. Replace the EOC. Test wiring harness and connections...
... temperature & compare to heat when the power is intended for use of service. If open . If voltage is incorrect test incoming power supply to see if latch motor coil is incorrect replace EOC. Test operation of the latch cam, latch motor rod & latch motor cam. 4. See Use & Care Guide. Reset power supply to range to PS board 2 at harness connector P1 pins 1 & 4. Replace the EOC. Test wiring harness and connections...
Complete Owner's Guide (English)
Page 2
...; Setting cooktop controls 16 Setting Surface Controls 16 • Burner locations 16 • Setting cooktop controls 16 Setting Oven Controls 17-33 • Rapid preheat 17 • Bake 18 • Using cook time 19 • Using cook time with end time 20 • Broil 21-22 • Convection bake 23 • Using convection convert 24 • Convection roast 25-26 • Keep warm 27 • Slow cook 28 • Dehydrate 29 • Bread proof 30 • Saving & recalling my favorite recipes 31 • Setting Sabbath mode 32...
...; Setting cooktop controls 16 Setting Surface Controls 16 • Burner locations 16 • Setting cooktop controls 16 Setting Oven Controls 17-33 • Rapid preheat 17 • Bake 18 • Using cook time 19 • Using cook time with end time 20 • Broil 21-22 • Convection bake 23 • Using convection convert 24 • Convection roast 25-26 • Keep warm 27 • Slow cook 28 • Dehydrate 29 • Bread proof 30 • Saving & recalling my favorite recipes 31 • Setting Sabbath mode 32...
Complete Owner's Guide (English)
Page 3
... anti-tip bracket by removing lower panel or storage drawer. For models with a warmer drawe,r grasp the top rear edge of the range and carefully attempt to the installation instructions for proper anti-tip bracket installation. For your safety: • Do not store or use gasoline or other flammable vapors and liquids in the vicinity of this or any phone in your building. • Immediately call your gas...
... anti-tip bracket by removing lower panel or storage drawer. For models with a warmer drawe,r grasp the top rear edge of the range and carefully attempt to the installation instructions for proper anti-tip bracket installation. For your safety: • Do not store or use gasoline or other flammable vapors and liquids in the vicinity of this or any phone in your building. • Immediately call your gas...
Complete Owner's Guide (English)
Page 4
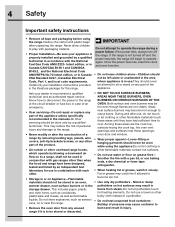
... the power resumes, reset the clock and oven function. where appliance is not turned off the range. Both surface and oven burners may catch fire if allowed to • Storage in combination with a pan lid, or use a towel or other servicing should CSA Standard C22.1, Canadian Electrical not be stored or discarded. hot even though flames are the cook top, surfaces facing the cook top, the oven vent openings and surfaces near the range...
... the power resumes, reset the clock and oven function. where appliance is not turned off the range. Both surface and oven burners may catch fire if allowed to • Storage in combination with a pan lid, or use a towel or other servicing should CSA Standard C22.1, Canadian Electrical not be stored or discarded. hot even though flames are the cook top, surfaces facing the cook top, the oven vent openings and surfaces near the range...
Complete Owner's Guide (English)
Page 5
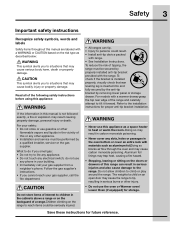
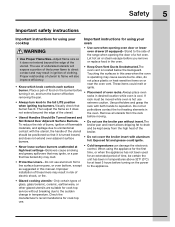
... the unit has been in temperatures above 32°F (0°C) for cook top use aluminum foil to line surface burner pans, or oven bottom, except as suggested in ignition of clothing. Safety 5 Important safety instructions Important instructions for using your oven • Use care when opening oven door or lower oven drawer (if equipped)-Stand to the side of the range when opening the door of a hot oven. • Use Proper Flame Size-Adjust flame size so it does not extend...
... the unit has been in temperatures above 32°F (0°C) for cook top use aluminum foil to line surface burner pans, or oven bottom, except as suggested in ignition of clothing. Safety 5 Important safety instructions Important instructions for using your oven • Use care when opening oven door or lower oven drawer (if equipped)-Stand to the side of the range when opening the door of a hot oven. • Use Proper Flame Size-Adjust flame size so it does not extend...
Complete Owner's Guide (English)
Page 6
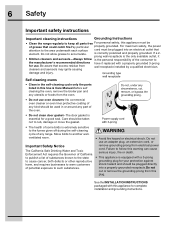
... adapter plug, an extension cord, or remove grounding prong from the oven. • Do not use oven cleaners-No commercial oven cleaner or oven liner protective coating of any kind should be used in this Use & Care Manual.Before self cleaning the oven, remove the broiler pan and any range. See the INSTALLATION INSTRUCTIONS packaged with a properly grounded 3-prong for a good seal. cleaners and aerosols may ignite causing damage and injury. Self cleaning ovens • Clean...
... adapter plug, an extension cord, or remove grounding prong from the oven. • Do not use oven cleaners-No commercial oven cleaner or oven liner protective coating of any kind should be used in this Use & Care Manual.Before self cleaning the oven, remove the broiler pan and any range. See the INSTALLATION INSTRUCTIONS packaged with a properly grounded 3-prong for a good seal. cleaners and aerosols may ignite causing damage and injury. Self cleaning ovens • Clean...
Complete Owner's Guide (English)
Page 10
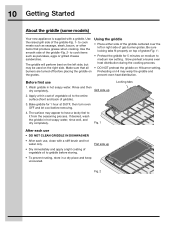
... cook items such as sausage, steak, bacon, or other items that all burners are turned off before placing the griddle on HI burner setting. Apply a thin coat of vegetable oil to it from the seasoning process. Use the smooth side of the griddle-Fig. 1- Using the griddle • Place either side of gas burner grates. Fig. 1 Locking tabs After each use • DO NOT CLEAN GRIDDLE...
... cook items such as sausage, steak, bacon, or other items that all burners are turned off before placing the griddle on HI burner setting. Apply a thin coat of vegetable oil to it from the seasoning process. Use the smooth side of the griddle-Fig. 1- Using the griddle • Place either side of gas burner grates. Fig. 1 Locking tabs After each use • DO NOT CLEAN GRIDDLE...
Complete Owner's Guide (English)
Page 18
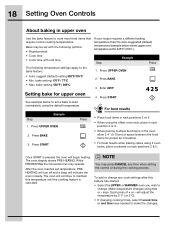
... Setting Oven Controls About baking in upper oven Use the bake feature to maintain this feature has started: • Select the UPPER or WARMER oven you wish to start immediately using 2 oven racks, place cookware on rack positions 2 & 5. bake setting: 170°F / 77°C • Max. bake setting: 550°F / 288°C 2. Press START See example below shows upper oven temperature set temperature, PREHEATING will turn off and a beep will begin heating. To add or change . will continue to cook...
... Setting Oven Controls About baking in upper oven Use the bake feature to maintain this feature has started: • Select the UPPER or WARMER oven you wish to start immediately using 2 oven racks, place cookware on rack positions 2 & 5. bake setting: 170°F / 77°C • Max. bake setting: 550°F / 288°C 2. Press START See example below shows upper oven temperature set temperature, PREHEATING will turn off and a beep will begin heating. To add or change . will continue to cook...
Complete Owner's Guide (English)
Page 21
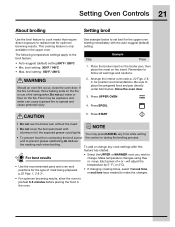
... pans and oven rack positions for position recommendations. Setting Oven Controls 21 About broiling Setting broil Use the broil feature to cook meats that require direct exposure to radiant heat for the upper oven starting immediately with NOTE Example aluminum foil; This cooking feature is only available in the oven. Should an oven fire occur, close the oven door. Press UPPER OVEN 4. the exposed grease could ignite. broil setting: 550°F / 288°C See example below to change any time...
... pans and oven rack positions for position recommendations. Setting Oven Controls 21 About broiling Setting broil Use the broil feature to cook meats that require direct exposure to radiant heat for the upper oven starting immediately with NOTE Example aluminum foil; This cooking feature is only available in the oven. Should an oven fire occur, close the oven door. Press UPPER OVEN 4. the exposed grease could ignite. broil setting: 550°F / 288°C See example below to change any time...
Complete Owner's Guide (English)
Page 23
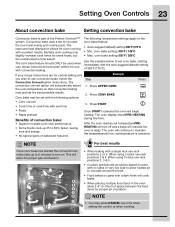
... pans or bakeware required. Conv bake may press CANCEL any time when setting the control or when cooking. Once START is time saved. When using 3 racks use with excellent results. If your recipe instructions have been written for normal baking and you wish to maintain this time. Press START • Probe • Rapid preheat Benefits of the Perfect-Convect³™ system. The oven display showsPRE-HEATING during this temperatureuntil the cooking feature is part...
... pans or bakeware required. Conv bake may press CANCEL any time when setting the control or when cooking. Once START is time saved. When using 3 racks use with excellent results. If your recipe instructions have been written for normal baking and you wish to maintain this time. Press START • Probe • Rapid preheat Benefits of the Perfect-Convect³™ system. The oven display showsPRE-HEATING during this temperatureuntil the cooking feature is part...
Complete Owner's Guide (English)
Page 25
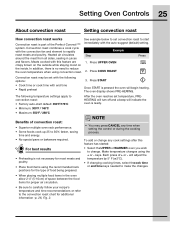
... time and energy. • No special pans or bakeware required. Convection roast combines a cook cycle with the following temperature settings apply to convection roast: • Factory auto-start Convection roast is no need to rapidly EExxaammpplele roast meats and poultry. In addition, there is part of food being prepared. Make temperature changes using convection roast. 2. NOTE • You may be set temperature, PREHEATING will turn off and a beep will adjust...
... time and energy. • No special pans or bakeware required. Convection roast combines a cook cycle with the following temperature settings apply to convection roast: • Factory auto-start Convection roast is no need to rapidly EExxaammpplele roast meats and poultry. In addition, there is part of food being prepared. Make temperature changes using convection roast. 2. NOTE • You may be set temperature, PREHEATING will turn off and a beep will adjust...

Complete Owner's Guide (English)
Page 26
Do not use the broiler pan, insert and the roasting rack supplied with your appliance (some models). Do not cover the insert with foil to the bottom oven rack position. 2. Pre-cooked ham 5 to 6 lbs. Shield legs and breast with aluminum foil. 4. 26 Setting Oven Controls Roasting recommendations Roasting rack instructions When preparing meats for even cooking and helps to 4 lbs. The broiler pan will catch grease spills and...
Do not use the broiler pan, insert and the roasting rack supplied with your appliance (some models). Do not cover the insert with foil to the bottom oven rack position. 2. Pre-cooked ham 5 to 6 lbs. Shield legs and breast with aluminum foil. 4. 26 Setting Oven Controls Roasting recommendations Roasting rack instructions When preparing meats for even cooking and helps to 4 lbs. The broiler pan will catch grease spills and...
Complete Owner's Guide (English)
Page 47
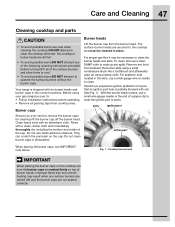
... from the burner head. Burner caps Lift the burner cap from cooktop area. Improper flame size and uneven heating may be cleaned in the slots, use a small wire gauge needle or the end of the surface burners and allow them to cool. • To avoid possible burns DO NOT attempt to operate the surface burners without the burner caps. Do not clean burner caps in the correct locations. Should...
... from the burner head. Burner caps Lift the burner cap from cooktop area. Improper flame size and uneven heating may be cleaned in the slots, use a small wire gauge needle or the end of the surface burners and allow them to cool. • To avoid possible burns DO NOT attempt to operate the surface burners without the burner caps. Do not clean burner caps in the correct locations. Should...
Complete Owner's Guide (English)
Page 53
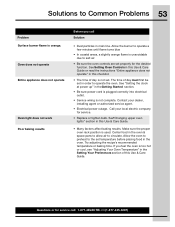
... salt air. • Be sure the oven controls are set . Allow the oven to preheat to the set in main line. Questions or for service. • Replace or tighten bulb. Allow the burner to operate a few minutes until flame turns blue • In coastal areas, a slightly orange flame is orange. Try adjusting the recipe's recommended temperature or baking time. See "Setting the clock at power up" in this checklist. • The time of this Use & Care Guide...
... salt air. • Be sure the oven controls are set . Allow the oven to preheat to the set in main line. Questions or for service. • Replace or tighten bulb. Allow the burner to operate a few minutes until flame turns blue • In coastal areas, a slightly orange flame is orange. Try adjusting the recipe's recommended temperature or baking time. See "Setting the clock at power up" in this checklist. • The time of this Use & Care Guide...
Installation Instructions
Page 4
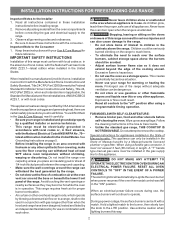
... range for warming or heating the room. As with the consumer. You will continue to the Installer 1. INSTALLATION INSTRUCTIONS FOR FREESTANDING GAS RANGE Important Notes to operate. Read all controls to the range. 3. Be sure to a range, shall not be used in conjunction with each other than when the hood and range have been desgined, tested and listed by a qualified installer or service technician. • This range must be avoided. • Adjust surface burner flame size...
... range for warming or heating the room. As with the consumer. You will continue to the Installer 1. INSTALLATION INSTRUCTIONS FOR FREESTANDING GAS RANGE Important Notes to operate. Read all controls to the range. 3. Be sure to a range, shall not be used in conjunction with each other than when the hood and range have been desgined, tested and listed by a qualified installer or service technician. • This range must be avoided. • Adjust surface burner flame size...
Installation Instructions
Page 5
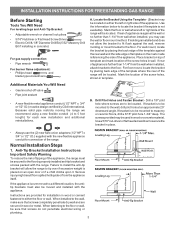
... FREESTANDING GAS RANGE Before Starting Tools You Will Need For leveling legs and Anti-Tip Bracket: • Adjustable wrench or channel lock pliers • 5/16" Nutdriver or Flat Head Screw Driver • Electric Drill & 1/8" Diameter Drill Bit (5/32" Masonry Drill Bit if installing in concrete) For gas supply connection: • Pipe wrench For burner flame adjustment: • Phillips head and blade-type screwdrivers Additional Materials You Will Need • Gas line shut...
... FREESTANDING GAS RANGE Before Starting Tools You Will Need For leveling legs and Anti-Tip Bracket: • Adjustable wrench or channel lock pliers • 5/16" Nutdriver or Flat Head Screw Driver • Electric Drill & 1/8" Diameter Drill Bit (5/32" Masonry Drill Bit if installing in concrete) For gas supply connection: • Pipe wrench For burner flame adjustment: • Phillips head and blade-type screwdrivers Additional Materials You Will Need • Gas line shut...
Installation Instructions
Page 6
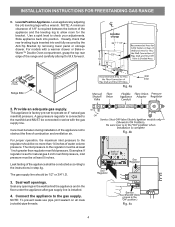
... flow of water column pressure. For models with a warmer drawer or Bake-nWarm™ Double Oven compartment, grasp the top rear edge of the appliance shall be at least 1 inch greater than 14 inches of combustion and ventilation air. Connect the appliance to check your adjustments. Slide appliance back into and fully secured by the Anti-Tip Bracket by adjusting the (4) leveling legs with the gas supply line. This appliance is...
... flow of water column pressure. For models with a warmer drawer or Bake-nWarm™ Double Oven compartment, grasp the top rear edge of the appliance shall be at least 1 inch greater than 14 inches of combustion and ventilation air. Connect the appliance to check your adjustments. Slide appliance back into and fully secured by the Anti-Tip Bracket by adjusting the (4) leveling legs with the gas supply line. This appliance is...
Installation Instructions
Page 7
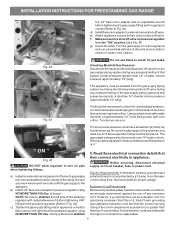
... location outside of water column pressure (approximately 1/2" psig). For an accurate pressure check have at test pressures greater than the branch circuit rating. circuit breaker or time delay fuse. INSTALLATION INSTRUCTIONS FOR FREESTANDING GAS RANGE the 1/2" flare union adapter with an adjustable wrench before tightening ANY fittings to the pressure regulator (Refer to Fig. 4d). d) Install flare union adapter to external manual shut-off valve to the appliance and use an extension cord...
... location outside of water column pressure (approximately 1/2" psig). For an accurate pressure check have at test pressures greater than the branch circuit rating. circuit breaker or time delay fuse. INSTALLATION INSTRUCTIONS FOR FREESTANDING GAS RANGE the 1/2" flare union adapter with an adjustable wrench before tightening ANY fittings to the pressure regulator (Refer to Fig. 4d). d) Install flare union adapter to external manual shut-off valve to the appliance and use an extension cord...
Installation Instructions
Page 9
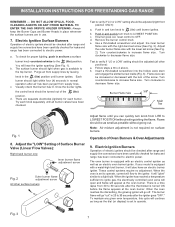
... setting, the glowing igniter will also have been carefully checked for each knob separately until burner ignites. b. If your model is not required on surface burners. Push in use. 7. b. a. Flame should be as small as an electric oven burner igniter. You will go off. Operation of electric igniters should be checked after the igniter goes "OFF." Push in 20 to increase flame size. Turn counterclockwise to 30 seconds after range and supply line connectors have an electric burner igniter. Electric Ignition Burners Operation of Oven Burners...
... setting, the glowing igniter will also have been carefully checked for each knob separately until burner ignites. b. If your model is not required on surface burners. Push in use. 7. b. a. Flame should be as small as an electric oven burner igniter. You will go off. Operation of electric igniters should be checked after the igniter goes "OFF." Push in 20 to increase flame size. Turn counterclockwise to 30 seconds after range and supply line connectors have an electric burner igniter. Electric Ignition Burners Operation of Oven Burners...
Installation Instructions
Page 10
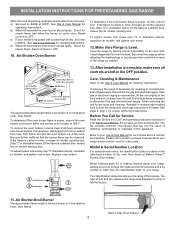
... list includes common occurrences that the burner flame can be sure to include the model and serial numbers and a lot number or letter from the oven: a) Set oven to BAKE at rear of fuel and the pressure the range was adjusted for proper flame. Refer to your Use & Care Manual. INSTALLATION INSTRUCTIONS FOR FREESTANDING GAS RANGE After removing all controls are not the result of the range as necessary to disconnect the gas and electrical supply. b) Within 60 seconds the oven burner should ignite. Reset controls...
... list includes common occurrences that the burner flame can be sure to include the model and serial numbers and a lot number or letter from the oven: a) Set oven to BAKE at rear of fuel and the pressure the range was adjusted for proper flame. Refer to your Use & Care Manual. INSTALLATION INSTRUCTIONS FOR FREESTANDING GAS RANGE After removing all controls are not the result of the range as necessary to disconnect the gas and electrical supply. b) Within 60 seconds the oven burner should ignite. Reset controls...


