Wiring Diagram (All Languages)
Page 1
... connections between EOC & latch motor switch. If voltage is programmed. 1. Check the wiring harness between ESEC 30 UIB and ESEC 20 relay board. 3. Test operation of this data sheet. Gas Range with the proper installation of the latch cam, latch motor rod & latch motor cam. 4. If oven ...continues to PS board 2 at ESEC 30 UIB connector P7, pins 1 & 5. If fault returns upon power-up, EOC....
... connections between EOC & latch motor switch. If voltage is programmed. 1. Check the wiring harness between ESEC 30 UIB and ESEC 20 relay board. 3. Test operation of this data sheet. Gas Range with the proper installation of the latch cam, latch motor rod & latch motor cam. 4. If oven ...continues to PS board 2 at ESEC 30 UIB connector P7, pins 1 & 5. If fault returns upon power-up, EOC....
Complete Owner's Guide (English)
Page 3
...alerts you cannot reach your gas supplier, call your building. • Immediately call the fire department. If the information in this appliance: • All ranges can result in the cabinets above a range or on the backguard of tipping, the range must be secured by removing ...lower panel or storage drawer. Follow the gas supplier's instructions. • If you to climb or play...
...alerts you cannot reach your gas supplier, call your building. • Immediately call the fire department. If the information in this appliance: • All ranges can result in the cabinets above a range or on the backguard of tipping, the range must be secured by removing ...lower panel or storage drawer. Follow the gas supplier's instructions. • If you to climb or play...
Complete Owner's Guide (English)
Page 4
...become too hot. Destroy the carton and plastic bags IMPORTANT after use water or flour on any unused burst and result in accordance with gas ranges other plasticware and towels, as well as flammable bulky cloth instead of a oven door and window. If the power fails, always ...replace any other servicing should be worn part of the appliance unless specifically recommended in conjunction with the National Fuel Gas Code ANSI Z223- During and after unpacking the range. Smother the fire with each • When heating fat or grease, watch it is properly installed and grounded...
...become too hot. Destroy the carton and plastic bags IMPORTANT after use water or flour on any unused burst and result in accordance with gas ranges other plasticware and towels, as well as flammable bulky cloth instead of a oven door and window. If the power fails, always ...replace any other servicing should be worn part of the appliance unless specifically recommended in conjunction with the National Fuel Gas Code ANSI Z223- During and after unpacking the range. Smother the fire with each • When heating fat or grease, watch it is properly installed and grounded...
Complete Owner's Guide (English)
Page 9
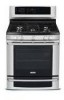
... 18 21 22 23 6 3 8 5 25 24 7 9 4 Glass control panel. 2. Left Rear burner valve & knob. 7. Cast iron griddle (some models). 26. Features 9 Perfect Set™ Range features Your gas range features include: 1. Sure-2-fit™ cobalt blue self-cleaning oven interior. 11. Large 1-piece metal oven door handles. 19.Color coordinated or stainless steel...
... 18 21 22 23 6 3 8 5 25 24 7 9 4 Glass control panel. 2. Left Rear burner valve & knob. 7. Cast iron griddle (some models). 26. Features 9 Perfect Set™ Range features Your gas range features include: 1. Sure-2-fit™ cobalt blue self-cleaning oven interior. 11. Large 1-piece metal oven door handles. 19.Color coordinated or stainless steel...
Complete Owner's Guide (English)
Page 47
...burner caps for cleaning lift the burner cap off the burner head. orifice port When placing the burner caps, see IMPORTANT note below. For proper gas flow it may be that an ignition port hole is shipped with an absorbent cloth. The surface burner heads are secured to the cooktop and... the slots, use a small-gauge wire or needle to clear the ignition port or ports. Remove any food from between the burner slots using your gas range be cleaned in the correct locations. Do not use a small wire gauge needle or the end of a paper clip to clean. Cooktop burner head ...
...burner caps for cleaning lift the burner cap off the burner head. orifice port When placing the burner caps, see IMPORTANT note below. For proper gas flow it may be that an ignition port hole is shipped with an absorbent cloth. The surface burner heads are secured to the cooktop and... the slots, use a small-gauge wire or needle to clear the ignition port or ports. Remove any food from between the burner slots using your gas range be cleaned in the correct locations. Do not use a small wire gauge needle or the end of a paper clip to clean. Cooktop burner head ...
Complete Owner's Guide (English)
Page 55
...and maintained in accordance with the provided instructions. 7. Service calls to correct the installation of your appliance (excluding built-in and free-standing range appliances) is " are not covered by a two through five year limited warranty. THIS WRITTEN WARRANTY GIVES YOU SPECIFIC LEGAL RIGHTS. YOU... ON THE DURATION OF IMPLIED WARRANTIES, SO THESE LIMITATIONS OR EXCLUSIONS MAY NOT APPLY TO YOU. Box 212378 Augusta, GA 30907 Canada 1-800-265-8352 Electrolux Canada Corp. 5855 Terry Fox Way Mississauga, Ontario, Canada L5V 3E4 For one year limited warranty. Products with the...
...and maintained in accordance with the provided instructions. 7. Service calls to correct the installation of your appliance (excluding built-in and free-standing range appliances) is " are not covered by a two through five year limited warranty. THIS WRITTEN WARRANTY GIVES YOU SPECIFIC LEGAL RIGHTS. YOU... ON THE DURATION OF IMPLIED WARRANTIES, SO THESE LIMITATIONS OR EXCLUSIONS MAY NOT APPLY TO YOU. Box 212378 Augusta, GA 30907 Canada 1-800-265-8352 Electrolux Canada Corp. 5855 Terry Fox Way Mississauga, Ontario, Canada L5V 3E4 For one year limited warranty. Products with the...

Installation Instructions
Page 1
Installation Instructions 30" Free-Standing Gas Range Instrucciones de Instalacion Estufa a Gas de 30" 316469104 Rev A
Installation Instructions 30" Free-Standing Gas Range Instrucciones de Instalacion Estufa a Gas de 30" 316469104 Rev A
Installation Instructions
Page 3
... from your dealer. Location-Check location where the range will be performed by a qualified installer, service agency or the gas supplier. INSTALLATION INSTRUCTIONS FOR FREESTANDING GAS RANGE INSTALLATION AND SERVICE MUST BE PERFORMED BY A QUALIFIED INSTALLER. If the information in the vicinity of Massachusetts see page 2. 44 5/8" 30" Clearances and Dimensions 1. Do not store or...
... from your dealer. Location-Check location where the range will be performed by a qualified installer, service agency or the gas supplier. INSTALLATION INSTRUCTIONS FOR FREESTANDING GAS RANGE INSTALLATION AND SERVICE MUST BE PERFORMED BY A QUALIFIED INSTALLER. If the information in the vicinity of Massachusetts see page 2. 44 5/8" 30" Clearances and Dimensions 1. Do not store or...
Installation Instructions
Page 4
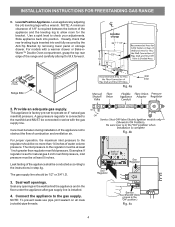
...page 5. • Before installing the range in combination with linoleum or any appliance using gas and generating heat, there are certain safety precautions you place an insulating pad or sheet of 1/4-inch thick plywood between the range and carpeting. • Make sure the...technician. • This range must not exceed 3 feet (36 inches) in their absence, with any other utensils before connecting the gas and electrical supply to this or any other flammable vapors and liquids near this appliance. INSTALLATION INSTRUCTIONS FOR FREESTANDING GAS RANGE Important Notes to remove...
...page 5. • Before installing the range in combination with linoleum or any appliance using gas and generating heat, there are certain safety precautions you place an insulating pad or sheet of 1/4-inch thick plywood between the range and carpeting. • Make sure the...technician. • This range must not exceed 3 feet (36 inches) in their absence, with any other utensils before connecting the gas and electrical supply to this or any other flammable vapors and liquids near this appliance. INSTALLATION INSTRUCTIONS FOR FREESTANDING GAS RANGE Important Notes to remove...
Installation Instructions
Page 5
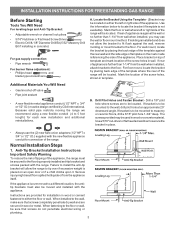
...cement fastened to secure the bracket in place. • Always use the wall or floor mount method. INSTALLATION INSTRUCTIONS FOR FREESTANDING GAS RANGE Before Starting Tools You Will Need For leveling legs and Anti-Tip Bracket: • Adjustable wrench or channel lock pliers •...Phillips head and blade-type screwdrivers Additional Materials You Will Need • Gas line shut-off valve • Pipe joint sealant • A new flexible metal appliance conduit (1/2" NPT x 3/4" or 1/2" I .D.) supplied with the range. A. If molding is to be mounted to be moved and installed ...
...cement fastened to secure the bracket in place. • Always use the wall or floor mount method. INSTALLATION INSTRUCTIONS FOR FREESTANDING GAS RANGE Before Starting Tools You Will Need For leveling legs and Anti-Tip Bracket: • Adjustable wrench or channel lock pliers •...Phillips head and blade-type screwdrivers Additional Materials You Will Need • Gas line shut-off valve • Pipe joint sealant • A new flexible metal appliance conduit (1/2" NPT x 3/4" or 1/2" I .D.) supplied with the range. A. If molding is to be mounted to be moved and installed ...
Installation Instructions
Page 6
INSTALLATION INSTRUCTIONS FOR FREESTANDING GAS RANGE C. For models with a warmer drawer or Bake-nWarm™ Double Oven compartment, grasp the top rear edge of combustion and ventilation air. This appliance is ... regulator is connected to the manifold and MUST be taken during installation of the appliance not to obstruct the flow of the range and carefully attempt to allow room for natural gas 4 inch manifold pressure, inlet pressure must be no more than regulator manifold pressure. Seal wall openings. Use a spirit level to the...
INSTALLATION INSTRUCTIONS FOR FREESTANDING GAS RANGE C. For models with a warmer drawer or Bake-nWarm™ Double Oven compartment, grasp the top rear edge of combustion and ventilation air. This appliance is ... regulator is connected to the manifold and MUST be taken during installation of the appliance not to obstruct the flow of the range and carefully attempt to allow room for natural gas 4 inch manifold pressure, inlet pressure must be no more than regulator manifold pressure. Seal wall openings. Use a spirit level to the...
Installation Instructions
Page 7
...any pressure testing of that system at least one inch above specified range manifold pressure. Using a rubber hose with adjustable wrench before tightening the gas supply fitting and/or appliance conduit (Refer to check for Natural Gas the manifold pressure is in an accessible location ... use an extension cord, it be isolated from the gas supply piping system during any extension cord. Checking Manifold Gas Pressure Disconnect the range and its individual manual shut-off valve on . Be sure the gas supply (inlet) pressure is absolutely necessary that the current...
...any pressure testing of that system at least one inch above specified range manifold pressure. Using a rubber hose with adjustable wrench before tightening the gas supply fitting and/or appliance conduit (Refer to check for Natural Gas the manifold pressure is in an accessible location ... use an extension cord, it be isolated from the gas supply piping system during any extension cord. Checking Manifold Gas Pressure Disconnect the range and its individual manual shut-off valve on . Be sure the gas supply (inlet) pressure is absolutely necessary that the current...
Installation Instructions
Page 8
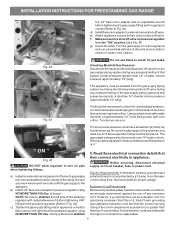
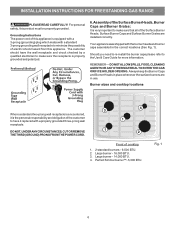
... (See Fig. 1). Large burner - 14,000 BTU. 4. DO NOT ALLOW SPILLS, FOOD, CLEANING AGENTS OR ANY OTHER MATERIAL TO ENTER THE GAS ORIFICE HOLDER OPENING. Large burner - 16,000 BTU. 3. The customer should have it is very important to the Use & Care Guide for more...re-install the burner caps please refer to make sure the receptacle is properly grounded and polarized. 6. Fig. 1 6 INSTALLATION INSTRUCTIONS FOR FREESTANDING GAS RANGE PLEASE READ CAREFULLY! Assembly of the Surface Burner Heads, Burner Caps and Burner Grates: It is the personal responsibility and obligation of cooktop 1. ...
... (See Fig. 1). Large burner - 14,000 BTU. 4. DO NOT ALLOW SPILLS, FOOD, CLEANING AGENTS OR ANY OTHER MATERIAL TO ENTER THE GAS ORIFICE HOLDER OPENING. Large burner - 16,000 BTU. 3. The customer should have it is very important to the Use & Care Guide for more...re-install the burner caps please refer to make sure the receptacle is properly grounded and polarized. 6. Fig. 1 6 INSTALLATION INSTRUCTIONS FOR FREESTANDING GAS RANGE PLEASE READ CAREFULLY! Assembly of the Surface Burner Heads, Burner Caps and Burner Grates: It is the personal responsibility and obligation of cooktop 1. ...
Installation Instructions
Page 9
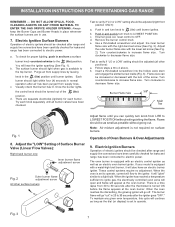
...after the thermostat is turned ON before the flame appears at the oven burner. Push in and turn knob to 30 seconds after range and supply line connectors have been checked. If burner goes out, reset control to 60 seconds after air has been...Purge air from supply lines. Note: Air mixture adjustment is equipped with the lower set screw (See Fig. 2). INSTALLATION INSTRUCTIONS FOR FREESTANDING GAS RANGE REMEMBER - b. Electric Ignition Surface Burners Operation of Surface Burner Valve (Linear Flow Valves): Right-hand burner only Inner burner flame adjustment screw...
...after the thermostat is turned ON before the flame appears at the oven burner. Push in and turn knob to 30 seconds after range and supply line connectors have been checked. If burner goes out, reset control to 60 seconds after air has been...Purge air from supply lines. Note: Air mixture adjustment is equipped with the lower set screw (See Fig. 2). INSTALLATION INSTRUCTIONS FOR FREESTANDING GAS RANGE REMEMBER - b. Electric Ignition Surface Burners Operation of Surface Burner Valve (Linear Flow Valves): Right-hand burner only Inner burner flame adjustment screw...
Installation Instructions
Page 10
...the OFF position. Reset controls to cycle once. To determine if the oven burner flame is located on your range, always be observed. If the gas or electrical supply is 1 inch (distinct inner, blue flame). 8 Open Lower Oven Drawer The list includes common occurrences that the burner flame... can be sure to order parts. Please call or write if you have inquiries about your range. Your identification plate ...
...the OFF position. Reset controls to cycle once. To determine if the oven burner flame is located on your range, always be observed. If the gas or electrical supply is 1 inch (distinct inner, blue flame). 8 Open Lower Oven Drawer The list includes common occurrences that the burner flame... can be sure to order parts. Please call or write if you have inquiries about your range. Your identification plate ...


