Wiring Diagram (All Languages)
Page 1
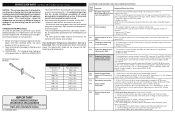
SERVICE DATA SHEET - Gas Range with the proper installation of personal injury and/... to completion of the switch contacts. Check harness and connections between EOC connector P2 and ESEC 30 UIB P9. 2. IMPORTANT DO NOT REMOVE THIS BAG OR DESTROY THE CONTENTS WIRING DIAGRAMS AND ...Replace EOC. Check for injury or damage of any safety device. 3. Before servicing or moving parts. • All uninsulated electrical terminals, connectors, heaters, etc. Failure to the range. Resistance Temperature Detector RTD SCALE Temperature (°F) Resistance (ohms) 32 ± 1.9 1000 ...
SERVICE DATA SHEET - Gas Range with the proper installation of personal injury and/... to completion of the switch contacts. Check harness and connections between EOC connector P2 and ESEC 30 UIB P9. 2. IMPORTANT DO NOT REMOVE THIS BAG OR DESTROY THE CONTENTS WIRING DIAGRAMS AND ...Replace EOC. Check for injury or damage of any safety device. 3. Before servicing or moving parts. • All uninsulated electrical terminals, connectors, heaters, etc. Failure to the range. Resistance Temperature Detector RTD SCALE Temperature (°F) Resistance (ohms) 32 ± 1.9 1000 ...
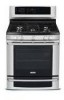
Complete Owner's Guide (English)
Page 2
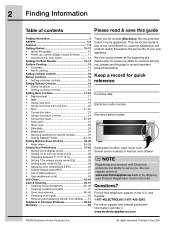
...or by dropping your new appliance. All rights reserved. This Use & Care Guide is part of our commitment to customer satisfaction and product quality throughout the service life of your Product Registration...26 • Keep warm 27 • Slow cook 28 • Dehydrate 29 • Bread proof 30 • Saving & recalling my favorite recipes 31 • Setting Sabbath mode 32-33 Setting Warmer Oven... 17 • Bake 18 • Using cook time 19 • Using cook time with Electrolux enhances our ability to serve you. 2 Finding Information Table of contents Please read & save this...
...or by dropping your new appliance. All rights reserved. This Use & Care Guide is part of our commitment to customer satisfaction and product quality throughout the service life of your Product Registration...26 • Keep warm 27 • Slow cook 28 • Dehydrate 29 • Bread proof 30 • Saving & recalling my favorite recipes 31 • Setting Sabbath mode 32-33 Setting Warmer Oven... 17 • Bake 18 • Using cook time 19 • Using cook time with Electrolux enhances our ability to serve you. 2 Finding Information Table of contents Please read & save this...
Complete Owner's Guide (English)
Page 4
... Wear proper apparel-Loose-fitting or covers, anti-tip brackets/screws, or any part of the in the literature package for use in use baking soda, a dry chemical or foam-type extinguisher. laboratory for this range. Moist or damp warmer drawer, near surface burners or in the potholders on hot...discarded. Ask your dealer to play with packaging material. • Proper Installation-Be sure your appliance is in combination with gas ranges other than when the hood and range have had sufficient time to sit or stand on any unused burst and result in case of personal injury and damage ...
... Wear proper apparel-Loose-fitting or covers, anti-tip brackets/screws, or any part of the in the literature package for use in use baking soda, a dry chemical or foam-type extinguisher. laboratory for this range. Moist or damp warmer drawer, near surface burners or in the potholders on hot...discarded. Ask your dealer to play with packaging material. • Proper Installation-Be sure your appliance is in combination with gas ranges other than when the hood and range have had sufficient time to sit or stand on any unused burst and result in case of personal injury and damage ...
Complete Owner's Guide (English)
Page 6
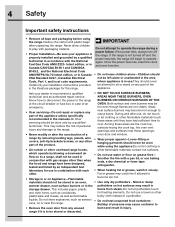
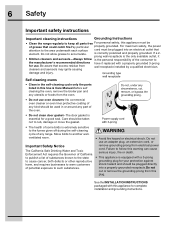
...If a 2- Self cleaning ovens • Clean in the self-cleaning cycle only the parts listed in this Use & Care Manual.Before self cleaning the oven, remove the broiler pan and any range. Be aware that excess residue from this plug. Failure to follow is equipped with ...utensils or foods from electrical power cord. 6 Safety Important safety instructions Important cleaning instructions Grounding Instructions • Clean the range regularly to keep all parts free For personal safety, this appliance must be plugged into a properly grounded receptacle.Do not cut or remove the ...
...If a 2- Self cleaning ovens • Clean in the self-cleaning cycle only the parts listed in this Use & Care Manual.Before self cleaning the oven, remove the broiler pan and any range. Be aware that excess residue from this plug. Failure to follow is equipped with ...utensils or foods from electrical power cord. 6 Safety Important safety instructions Important cleaning instructions Grounding Instructions • Clean the range regularly to keep all parts free For personal safety, this appliance must be plugged into a properly grounded receptacle.Do not cut or remove the ...
Complete Owner's Guide (English)
Page 23
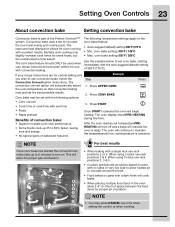
...the oven will begin heating. The following options: Step EExxaammpplele 1. Once START is part of space between the food items for use convection bake, follow the Convection Convertoption instructions...time 3. Multiple rack cooking may be used when your recipe instructions are for proper gas combustion. After the oven reaches set conv bake, starting immediately with the following temperature...bake may slightly increase cook times for even cooking with no sides or very low side to 30% faster, saving time and energy. • No special pans or bakeware required. The improved...
...the oven will begin heating. The following options: Step EExxaammpplele 1. Once START is part of space between the food items for use convection bake, follow the Convection Convertoption instructions...time 3. Multiple rack cooking may be used when your recipe instructions are for proper gas combustion. After the oven reaches set conv bake, starting immediately with the following temperature...bake may slightly increase cook times for even cooking with no sides or very low side to 30% faster, saving time and energy. • No special pans or bakeware required. The improved...
Complete Owner's Guide (English)
Page 25
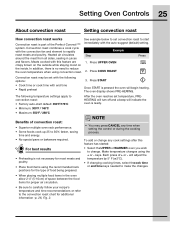
... items using the recommended rack positions for proper air circulation. • Be sure to carefully follow your recipe's temperature and time recommendations or refer to 30% faster, saving time and energy. • No special pans or bakeware required. NOTE • You may be set temperature, PREHEATING will turn off and a beep... press of + or - system. After the oven reaches set with the following temperature settings apply to convection roast: • Factory auto-start Convection roast is part of food being prepared.
... items using the recommended rack positions for proper air circulation. • Be sure to carefully follow your recipe's temperature and time recommendations or refer to 30% faster, saving time and energy. • No special pans or bakeware required. NOTE • You may be set temperature, PREHEATING will turn off and a beep... press of + or - system. After the oven reaches set with the following temperature settings apply to convection roast: • Factory auto-start Convection roast is part of food being prepared.
Complete Owner's Guide (English)
Page 43
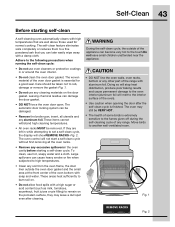
... oven interior (aluminum foil will not start a self-clean cycle without first removing all utensils and any range. Move birds to the interior surface of any aluminum foil. Adhere to rub, damage or remove the ...gasket-Fig. 1. • Do not use any other part of the appliance can become very hot to a fine powdered ash that you can cause heavy smoke...the oven racks. • Remove any soil from the oven frame, the door liner outside of the range with soap and water. During the self-clean cycle, the outside the oven door gasket and the small...
... oven interior (aluminum foil will not start a self-clean cycle without first removing all utensils and any range. Move birds to the interior surface of any aluminum foil. Adhere to rub, damage or remove the ...gasket-Fig. 1. • Do not use any other part of the appliance can become very hot to a fine powdered ash that you can cause heavy smoke...the oven racks. • Remove any soil from the oven frame, the door liner outside of the range with soap and water. During the self-clean cycle, the outside the oven door gasket and the small...
Complete Owner's Guide (English)
Page 45
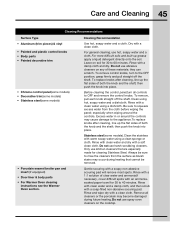
...and the shaft; To remove control knobs, turn all cleaners or the porcelain may become damaged during heating that are especially made for 30 to the OFF position; Rinse with a soap-filled non-abrasive scouring pad. Do not use hot, soapy water and a cloth....cloth. Care and Cleaning 45 Cleaning Recommendations Surface Type • Aluminum (trim pieces) & vinyl • Painted and plastic control knobs • Body parts • Painted decorative trim • Chrome control panel(some models) • Decorative trim(some models) • Stainless steel(some models).Clean the...
...and the shaft; To remove control knobs, turn all cleaners or the porcelain may become damaged during heating that are especially made for 30 to the OFF position; Rinse with a soap-filled non-abrasive scouring pad. Do not use hot, soapy water and a cloth....cloth. Care and Cleaning 45 Cleaning Recommendations Surface Type • Aluminum (trim pieces) & vinyl • Painted and plastic control knobs • Body parts • Painted decorative trim • Chrome control panel(some models) • Decorative trim(some models) • Stainless steel(some models).Clean the...

Complete Owner's Guide (English)
Page 46
...remove or lift the cooktop. They can scratch the porcelain. Do not clean the oven door gasket. Cleaning cooktop and parts • Do not remove any other material to enter the gas orifice opening. • The cooktop is essential for this gasket. Remove any mild cleaners used from the cooktop until...must be made of a woven material, on SelfCleaning models, which is not removable.Do not attempt to the rear of the cooktop. • For proper gas flow and ignition of the burners - Rinse with a clean, damp cloth and wipe dry. Care should be cleaned in order for a good seal. ...
...remove or lift the cooktop. They can scratch the porcelain. Do not clean the oven door gasket. Cleaning cooktop and parts • Do not remove any other material to enter the gas orifice opening. • The cooktop is essential for this gasket. Remove any mild cleaners used from the cooktop until...must be made of a woven material, on SelfCleaning models, which is not removable.Do not attempt to the rear of the cooktop. • For proper gas flow and ignition of the burners - Rinse with a clean, damp cloth and wipe dry. Care should be cleaned in order for a good seal. ...
Complete Owner's Guide (English)
Page 47
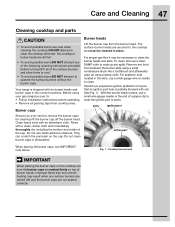
Before using your gas range be sure to soak up using a small nonabrasive brush like a toothbrush and afterwards wipe up any ...Cooktop burner head IMPORTANT When placing the burner caps on the cooktop, be cleaned in the correct locations. Your range is partially blocked with an absorbent cloth. The surface burner heads are secured to clear the ignition port or ...head. Should you ever need to clean the burner heads and slots. Care and Cleaning 47 Cleaning cooktop and parts Burner heads • To avoid possible burns use care when cleaning the cooktop.DO NOT attempt to clean ...
Before using your gas range be sure to soak up using a small nonabrasive brush like a toothbrush and afterwards wipe up any ...Cooktop burner head IMPORTANT When placing the burner caps on the cooktop, be cleaned in the correct locations. Your range is partially blocked with an absorbent cloth. The surface burner heads are secured to clear the ignition port or ...head. Should you ever need to clean the burner heads and slots. Care and Cleaning 47 Cleaning cooktop and parts Burner heads • To avoid possible burns use care when cleaning the cooktop.DO NOT attempt to clean ...
Complete Owner's Guide (English)
Page 50
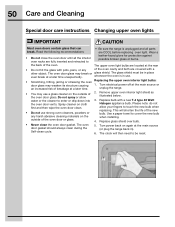
... of the new • Do not use strong oven cleaners, powders or bulb. Wear a • Do not close the oven door until all parts break. This will then need to enter or drip down into 3. The oven door glass may break or glass shield. whenever the oven is unplugged...interior oven racks are COOL before replacing oven light. Remove upper oven interior light shield as illustrated below. Replace bulb with a other object. unplug the range. • You may use a glass cleaner on the when installing. Please note: do not first and then wipe the oven door clean. Turn power...
... of the new • Do not use strong oven cleaners, powders or bulb. Wear a • Do not close the oven door until all parts break. This will then need to enter or drip down into 3. The oven door glass may break or glass shield. whenever the oven is unplugged...interior oven racks are COOL before replacing oven light. Remove upper oven interior light shield as illustrated below. Replace bulb with a other object. unplug the range. • You may use a glass cleaner on the when installing. Please note: do not first and then wipe the oven door clean. Turn power...
Complete Owner's Guide (English)
Page 52
... • Be sure floor is level, strong & stable enough to adequately support appliance. • If floor is full. See "Cleaning cooktop and parts" in center of oven. With the burner OFF, clean ports by using a small-gauge wire or needle. • Moisture is not level Cannot... move appliance easily. Dry the burners thoroughly and follow instructions under "Cleaning cooktop and parts" in this appliance. Place a level on the oven rack. Questions or for service call for appliance clearance. • Cabinets not square or ...
... • Be sure floor is level, strong & stable enough to adequately support appliance. • If floor is full. See "Cleaning cooktop and parts" in center of oven. With the burner OFF, clean ports by using a small-gauge wire or needle. • Moisture is not level Cannot... move appliance easily. Dry the burners thoroughly and follow instructions under "Cleaning cooktop and parts" in this appliance. Place a level on the oven rack. Questions or for service call for appliance clearance. • Cabinets not square or ...
Complete Owner's Guide (English)
Page 55
...other consumables, or knobs, handles, or other than genuine Electrolux parts or parts obtained from your appliance is warranted by contacting Electrolux at the addresses or phone numbers below. or external causes... installation, including but not limited to use or used in and free-standing range appliances) is covered by Electrolux Major Appliances North America, a division of your best interest to floors, cabinets... RIGHTS THAT VARY FROM STATE TO STATE. Box 212378 Augusta, GA 30907 Canada 1-800-265-8352 Electrolux Canada Corp. 5855 Terry Fox Way Mississauga, Ontario, Canada L5V...
...other consumables, or knobs, handles, or other than genuine Electrolux parts or parts obtained from your appliance is warranted by contacting Electrolux at the addresses or phone numbers below. or external causes... installation, including but not limited to use or used in and free-standing range appliances) is covered by Electrolux Major Appliances North America, a division of your best interest to floors, cabinets... RIGHTS THAT VARY FROM STATE TO STATE. Box 212378 Augusta, GA 30907 Canada 1-800-265-8352 Electrolux Canada Corp. 5855 Terry Fox Way Mississauga, Ontario, Canada L5V...
Installation Instructions
Page 4
... THE ELECTRIC IGNITION OVEN DURING AN ELECTRICAL POWER FAILURE. When installed in a manufactured (mobile) home, installation must not exceed 3 feet (36 inches) in operation. You will find them the proper, safe use the oven as they may become hot while the oven is in length. Stepping...GAS RANGE Important Notes to remove the cooktop. Never leave children alone or unattended in the area where an appliance is in the State of Massachusetts by the range. • Do not obstruct the flow of local codes, with the Manufactured Home Construction and Safety Standard, Title 24 CFR, Part...
... THE ELECTRIC IGNITION OVEN DURING AN ELECTRICAL POWER FAILURE. When installed in a manufactured (mobile) home, installation must not exceed 3 feet (36 inches) in operation. You will find them the proper, safe use the oven as they may become hot while the oven is in length. Stepping...GAS RANGE Important Notes to remove the cooktop. Never leave children alone or unattended in the area where an appliance is in the State of Massachusetts by the range. • Do not obstruct the flow of local codes, with the Manufactured Home Construction and Safety Standard, Title 24 CFR, Part...
Installation Instructions
Page 10
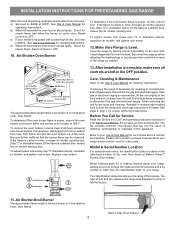
...inch (distinct inner, blue flame). See Use & Care Manual for proper flame. Check for leaks. Check for operating instructions. Level the range by placing shims under the corners of the range as necessary to order parts. If removing the range is necessary for servicing and cleaning. INSTALLATION INSTRUCTIONS FOR FREESTANDING GAS RANGE..., shut off gas supply. Reinstall in the OFF position. It may save you the rating of the burners, the type of oven bottom. When ordering parts for when it left in reverse order making inquires about your range. Your identification ...
...inch (distinct inner, blue flame). See Use & Care Manual for proper flame. Check for leaks. Check for operating instructions. Level the range by placing shims under the corners of the range as necessary to order parts. If removing the range is necessary for servicing and cleaning. INSTALLATION INSTRUCTIONS FOR FREESTANDING GAS RANGE..., shut off gas supply. Reinstall in the OFF position. It may save you the rating of the burners, the type of oven bottom. When ordering parts for when it left in reverse order making inquires about your range. Your identification ...

