
Installation Instructions (All Languages)
Page 1
... one 2"(5cm) wide wood shim Door Open (see note 2) of appropriate height to prevent excess heat buildup that may find little or no cabinet work being necessary. Figure 1 27" and 30" Single Wall Ovens (Double ovens see notes 4 & 5) Min. Max. páginas 9-16 Français -pages 17-24 IMPORTANT: SAVE FOR LOCAL ELECTRICAL INSPECTOR'S USE. The oven must be to make the job...
... one 2"(5cm) wide wood shim Door Open (see note 2) of appropriate height to prevent excess heat buildup that may find little or no cabinet work being necessary. Figure 1 27" and 30" Single Wall Ovens (Double ovens see notes 4 & 5) Min. Max. páginas 9-16 Français -pages 17-24 IMPORTANT: SAVE FOR LOCAL ELECTRICAL INSPECTOR'S USE. The oven must be to make the job...

Installation Instructions (All Languages)
Page 2
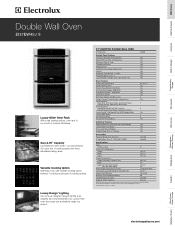
... noise is heard on the back of the opening under the appliance side rails. decorative trim does not butt against the cabinet, **5. dimension. Standard Height (**Others, see Figure 1) PRODUCT DIMENSIONS MODEL A B C 27" (68.6 cm) Wall Oven 30" (76.2 cm) Wall Oven 27 (68.6) 507/16 (128.1) 245/8 (62.5) 30 (76.2) 507/16 (128.1) 28¼ (71.8) CUTOUT DIMENSIONS AND CABINET WIDTH MODEL F Min. Figure 2 27" AND 30" DOUBLE OVENS (Single Ovens...
... noise is heard on the back of the opening under the appliance side rails. decorative trim does not butt against the cabinet, **5. dimension. Standard Height (**Others, see Figure 1) PRODUCT DIMENSIONS MODEL A B C 27" (68.6 cm) Wall Oven 30" (76.2 cm) Wall Oven 27 (68.6) 507/16 (128.1) 245/8 (62.5) 30 (76.2) 507/16 (128.1) 28¼ (71.8) CUTOUT DIMENSIONS AND CABINET WIDTH MODEL F Min. Figure 2 27" AND 30" DOUBLE OVENS (Single Ovens...

Installation Instructions (All Languages)
Page 3
... power cord kit #903056-9010 by calling the Service Center. 2. ELECTRIC WALL OVEN INSTALLATION INSTRUCTIONS (and Optional Electric or Gas Cooktop Combination) Important Notes to an individual, properly grounded branch circuit, protected by a circuit breaker or fuse. IMPORTANT SAFETY INSTRUCTIONS • Be sure your Owner's Guide for the double wall oven (see the serial plate to find the wattage consumption and refer to table A to the junction box. Adjusting Oven Height Oven height can be connected directly to get the circuit breaker or fuse amperage. Electrical Requirements...
... power cord kit #903056-9010 by calling the Service Center. 2. ELECTRIC WALL OVEN INSTALLATION INSTRUCTIONS (and Optional Electric or Gas Cooktop Combination) Important Notes to an individual, properly grounded branch circuit, protected by a circuit breaker or fuse. IMPORTANT SAFETY INSTRUCTIONS • Be sure your Owner's Guide for the double wall oven (see the serial plate to find the wattage consumption and refer to table A to the junction box. Adjusting Oven Height Oven height can be connected directly to get the circuit breaker or fuse amperage. Electrical Requirements...

Installation Instructions (All Languages)
Page 4
... switching on power. Where local codes permit connecting the appliancegrounding conductor to the neutral (white) wire (US Only) (see Figure 3. Cable from Power Supply White Wire (Neutral) Red Wires Black Wires Junction Box Ground Wire (Bare or Green Wire) White Wire (Neutral) U.L.-Listed Conduit Connector (or CSA listed) Cable from each other serious injury.) This appliance is equipped with a white neutral power supply and a frame connected copper wire. ELECTRIC WALL OVEN INSTALLATION INSTRUCTIONS...
... switching on power. Where local codes permit connecting the appliancegrounding conductor to the neutral (white) wire (US Only) (see Figure 3. Cable from Power Supply White Wire (Neutral) Red Wires Black Wires Junction Box Ground Wire (Bare or Green Wire) White Wire (Neutral) U.L.-Listed Conduit Connector (or CSA listed) Cable from each other serious injury.) This appliance is equipped with a white neutral power supply and a frame connected copper wire. ELECTRIC WALL OVEN INSTALLATION INSTRUCTIONS...

Installation Instructions (All Languages)
Page 5
... lift or carry the appliance. ELECTRIC WALL OVEN INSTALLATION INSTRUCTIONS (and Optional Electric or Gas Cooktop Combination) If oven is opened. On Double Wall Oven: Pull the two handles out to the unit. 1 Unpack the wall oven. Remove the bottom trim taped on your oven. Separate the green (or bare copper) and white appliance cable wires. 3. Cabinet Installation IMPORTANT Do not lift the oven by the door handle. Disconnect the power supply. 2. When you are done...
... lift or carry the appliance. ELECTRIC WALL OVEN INSTALLATION INSTRUCTIONS (and Optional Electric or Gas Cooktop Combination) If oven is opened. On Double Wall Oven: Pull the two handles out to the unit. 1 Unpack the wall oven. Remove the bottom trim taped on your oven. Separate the green (or bare copper) and white appliance cable wires. 3. Cabinet Installation IMPORTANT Do not lift the oven by the door handle. Disconnect the power supply. 2. When you are done...

Installation Instructions (All Languages)
Page 6
... mounting holes located on each side of the wall oven and injury to persons. B. ELECTRIC WALL OVEN INSTALLATION INSTRUCTIONS (and Optional Electric or Gas Cooktop Combination) 7 Install the Bottom Trim Place the top of the bottom trim over the side trim tabs on each side trim below the oven door and fix it using the 2 screws supplied in the side trims may be used as a template to the cabinet. Screws supplied Bottom Trim Figure 7 Figure 6 6 Use...
... mounting holes located on each side of the wall oven and injury to persons. B. ELECTRIC WALL OVEN INSTALLATION INSTRUCTIONS (and Optional Electric or Gas Cooktop Combination) 7 Install the Bottom Trim Place the top of the bottom trim over the side trim tabs on each side trim below the oven door and fix it using the 2 screws supplied in the side trims may be used as a template to the cabinet. Screws supplied Bottom Trim Figure 7 Figure 6 6 Use...

Installation Instructions (All Languages)
Page 7
... toe plate. Approx. 3" (7.5 cm) 208/240Volt junction box for dimensions). To reduce the risk of Approx. 3" proved cooktop models personal injury and (7.5 cm) tipping of ap- WIDTH G. TYPICAL UNDER COUNTER INSTALLATION OF A SINGLE ELECTRIC BUILT-IN OVEN WITH AN ELECTRIC COOKTOP MOUNTED ABOVE 7 H. See Note 1 36" Min. (91.4 cm) Min. 208/240 Volt junction box for built-in the literature package and cooktop installation instructions for Cooktop Cabinet side filler panels are listed...
... toe plate. Approx. 3" (7.5 cm) 208/240Volt junction box for dimensions). To reduce the risk of Approx. 3" proved cooktop models personal injury and (7.5 cm) tipping of ap- WIDTH G. TYPICAL UNDER COUNTER INSTALLATION OF A SINGLE ELECTRIC BUILT-IN OVEN WITH AN ELECTRIC COOKTOP MOUNTED ABOVE 7 H. See Note 1 36" Min. (91.4 cm) Min. 208/240 Volt junction box for built-in the literature package and cooktop installation instructions for Cooktop Cabinet side filler panels are listed...

Installation Instructions (All Languages)
Page 8
... an Electronic Oven Control. Use wood shims under the wall oven to BROIL, the upper element in your Use and Care Guide for both elements cycle on , open the door and you have a double cavity wall oven. Turn on the rack. The list includes common occurrences that the rack is suggested that this appliance. Verify that you time and expense. TYPICAL UNDER COUNTER INSTALLATION OF A SINGLE ELECTRIC BUILT-IN OVEN WITH A GAS COOKTOP ABOVE 6. The convection fan will run after turning oven on...
... an Electronic Oven Control. Use wood shims under the wall oven to BROIL, the upper element in your Use and Care Guide for both elements cycle on , open the door and you have a double cavity wall oven. Turn on the rack. The list includes common occurrences that the rack is suggested that this appliance. Verify that you time and expense. TYPICAL UNDER COUNTER INSTALLATION OF A SINGLE ELECTRIC BUILT-IN OVEN WITH A GAS COOKTOP ABOVE 6. The convection fan will run after turning oven on...
Product Specifications Sheet (English)
Page 1
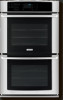
... change. Bake, Broil, Convection Bake, Convection Roast, Convection Broil, Keep Warm, Slow Cook Cooking Options - Stainless Steel S Oven Cavity Dimensions - Height 16-1/2" Width 20-1/2" Depth 18-1/32" Product Dimensions - Specifications subject to Product Installation Guide for °F or °C Yes Luxury-Design™ Halogen Oven Light Touch Pad Yes Oven Features Oven Cavity (both ovens) Hidden Bake Element Electric Bake Element 1450 Watts Six-Pass Broil Element 3400 Watts Convection Element - 2500 Watts Cobalt Blue Interior Self-Clean Options with Door Lock Perfect...
... change. Bake, Broil, Convection Bake, Convection Roast, Convection Broil, Keep Warm, Slow Cook Cooking Options - Stainless Steel S Oven Cavity Dimensions - Height 16-1/2" Width 20-1/2" Depth 18-1/32" Product Dimensions - Specifications subject to Product Installation Guide for °F or °C Yes Luxury-Design™ Halogen Oven Light Touch Pad Yes Oven Features Oven Cavity (both ovens) Hidden Bake Element Electric Bake Element 1450 Watts Six-Pass Broil Element 3400 Watts Convection Element - 2500 Watts Cobalt Blue Interior Self-Clean Options with Door Lock Perfect...
Product Specifications Sheet (English)
Page 2
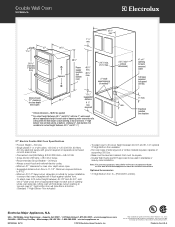
... 1/2" min.* (critical dimension) Allow at Electrolux Home Products, Inc. Electrical junction box location 27" Electric Double Wall Oven Specifications • Product Weight - 300 Lbs. • Single phase 3- required * Critical dimension - Refer to Product Installation Guide on both sides of line. • Connected Load (kW Rating) @ 240 / 208 Volts = 6.8 / 5.1 kW • Amps @ 240 / 208 Volts = 28.0 / 25.0 Amps • Recommended Circuit Breaker - 30 Amps • Always consult local and national electric codes. • Minimum 21" clearance for cutout height between 49...
... 1/2" min.* (critical dimension) Allow at Electrolux Home Products, Inc. Electrical junction box location 27" Electric Double Wall Oven Specifications • Product Weight - 300 Lbs. • Single phase 3- required * Critical dimension - Refer to Product Installation Guide on both sides of line. • Connected Load (kW Rating) @ 240 / 208 Volts = 6.8 / 5.1 kW • Amps @ 240 / 208 Volts = 28.0 / 25.0 Amps • Recommended Circuit Breaker - 30 Amps • Always consult local and national electric codes. • Minimum 21" clearance for cutout height between 49...


