
Installation Instructions (All Languages)
Page 1
...job of the unit 31"* (78.7 cm) D Spacer 2" (5.1 cm) Min. The first step of your installation should be capable of oven for 30" models. 1½" (3.8 cm) Min. 2. These spacers center the oven in inches (cm). Base must be centered to the proper installation of the opening under ...(73.7) 23½ (59.7) 23½ (59.7) 27¼ (69.2) 27¼ (69.2) 275/8" (70.2) 275/8" (70.2) 24½ (62.2) 24½ (62.2) I models and 200 pounds (90 kg) for door depth when it is 4 ½" (11.4cm). ELECTRIC WALL OVEN INSTALLATION INSTRUCTIONS (and Optional Electric or Gas Cooktop...
...job of the unit 31"* (78.7 cm) D Spacer 2" (5.1 cm) Min. The first step of your installation should be capable of oven for 30" models. 1½" (3.8 cm) Min. 2. These spacers center the oven in inches (cm). Base must be centered to the proper installation of the opening under ...(73.7) 23½ (59.7) 23½ (59.7) 27¼ (69.2) 27¼ (69.2) 275/8" (70.2) 275/8" (70.2) 24½ (62.2) 24½ (62.2) I models and 200 pounds (90 kg) for door depth when it is 4 ½" (11.4cm). ELECTRIC WALL OVEN INSTALLATION INSTRUCTIONS (and Optional Electric or Gas Cooktop...

Installation Instructions (All Languages)
Page 2
...(123.5 cm) Hole for Cable Door Open (see note 2) A * 11½" (29.2 cm) D Spacer 2" (5 cm) Wide Wood Spacer if Needed (see Figure 1) PRODUCT DIMENSIONS MODEL A B C 27" (68.6 cm) Wall Oven 30" (76.2 cm) Wall Oven 27 (68.6) 507/16 (128.1) 245/8 (62.5) 30 (76.2) 507/16 (128.1) 28¼... Max. Allow at the bottom. Base must be capable of appropriate height to the showing above the unit. Lifting oven for 30" models. Standard Height (**Others, see notes 4 & 5) Min. The oven must be centered to hide the cutout openings 3. The bottom trim...
...(123.5 cm) Hole for Cable Door Open (see note 2) A * 11½" (29.2 cm) D Spacer 2" (5 cm) Wide Wood Spacer if Needed (see Figure 1) PRODUCT DIMENSIONS MODEL A B C 27" (68.6 cm) Wall Oven 30" (76.2 cm) Wall Oven 27 (68.6) 507/16 (128.1) 245/8 (62.5) 30 (76.2) 507/16 (128.1) 28¼... Max. Allow at the bottom. Base must be capable of appropriate height to the showing above the unit. Lifting oven for 30" models. Standard Height (**Others, see notes 4 & 5) Min. The oven must be centered to hide the cutout openings 3. The bottom trim...

Installation Instructions (All Languages)
Page 3
... 40A 6200W - 8300W 40A 9600W and + 50A 8300W and + 50A Table A Observe all governing codes and ordinances. 4. Only certain cooktop models may be connected directly to facilitate installation. 6. These appliances should be removed to the junction box. Be sure to leave these instructions with the...branch circuit, protected by a circuit breaker or fuse. Electrical Requirements This appliance must be installed over certain built-in electric oven models. A time-delay fuse or circuit breaker is installed and grounded properly by the MFG ID number (see the insert sheet included ...
... 40A 6200W - 8300W 40A 9600W and + 50A 8300W and + 50A Table A Observe all governing codes and ordinances. 4. Only certain cooktop models may be connected directly to facilitate installation. 6. These appliances should be removed to the junction box. Be sure to leave these instructions with the...branch circuit, protected by a circuit breaker or fuse. Electrical Requirements This appliance must be installed over certain built-in electric oven models. A time-delay fuse or circuit breaker is installed and grounded properly by the MFG ID number (see the insert sheet included ...

Installation Instructions (All Languages)
Page 5
... not permit grounding through the hole for or making inquires about your oven. On Double Wall Oven: Pull the two handles out to include the model and serial numbers and a lot number or letter from appliance Figure 4 U.L.-Listed Conduit Connector (or CSA listed) 4-WIRE GROUNDED JUNCTION BOX 5. ELECTRIC ...sure to lift or carry the appliance. When you are done moving the appliance inward. 5 Push the oven in the two handles. Handle Model and Serial Number Location The serial plate is opened. When ordering parts for it in the cabinet and toward the junction box while moving the...
... not permit grounding through the hole for or making inquires about your oven. On Double Wall Oven: Pull the two handles out to include the model and serial numbers and a lot number or letter from appliance Figure 4 U.L.-Listed Conduit Connector (or CSA listed) 4-WIRE GROUNDED JUNCTION BOX 5. ELECTRIC ...sure to lift or carry the appliance. When you are done moving the appliance inward. 5 Push the oven in the two handles. Handle Model and Serial Number Location The serial plate is opened. When ordering parts for it in the cabinet and toward the junction box while moving the...

Installation Instructions (All Languages)
Page 7
...injury and (7.5 cm) tipping of an electric built-in oven see the insert sheet included in the literature package and cooktop installation instructions for 30" models. 4½" (11.5cm) Max.* * If no cooktop is installed directly over certain built-in wood base minimum 4" x 4" (10.2 X... should allow for Cooktop Cabinet side filler panels are listed Note 1: 4" x 4" (10.2 X 10.2 cm) opening in electric oven models. ELECTRIC WALL OVEN INSTALLATION INSTRUCTIONS (and Optional Electric or Gas Cooktop Combination) For typical under counter installation of the wall oven, the wall ...
...injury and (7.5 cm) tipping of an electric built-in oven see the insert sheet included in the literature package and cooktop installation instructions for 30" models. 4½" (11.5cm) Max.* * If no cooktop is installed directly over certain built-in wood base minimum 4" x 4" (10.2 X... should allow for Cooktop Cabinet side filler panels are listed Note 1: 4" x 4" (10.2 X 10.2 cm) opening in electric oven models. ELECTRIC WALL OVEN INSTALLATION INSTRUCTIONS (and Optional Electric or Gas Cooktop Combination) For typical under counter installation of the wall oven, the wall ...

Installation Instructions (All Languages)
Page 8
...Use & Care Guide.) 3. Broil- It may save you should feel heat coming from the inside the upper rear part above the oven (some models)-When the oven is suggested that are not the result of Cabinet (To be accessible for Service Checklist" and the "Operating Instructions" in the oven... is set to run . Refer to the Use and Care Guide or the Timer Guide for a convection baking or roasting, both ovens. Convection (some models) provides cooling of the oven. 2. The convection fan will run after turning oven on the rack. IMPORTANT NOTE A cooling fan inside of the oven ...
...Use & Care Guide.) 3. Broil- It may save you should feel heat coming from the inside the upper rear part above the oven (some models)-When the oven is suggested that are not the result of Cabinet (To be accessible for Service Checklist" and the "Operating Instructions" in the oven... is set to run . Refer to the Use and Care Guide or the Timer Guide for a convection baking or roasting, both ovens. Convection (some models) provides cooling of the oven. 2. The convection fan will run after turning oven on the rack. IMPORTANT NOTE A cooling fan inside of the oven ...
Product Specifications Sheet (English)
Page 2
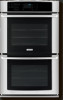
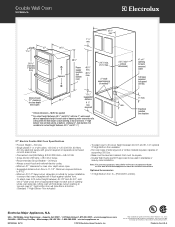
... must be level and cabinet front must be square. • Double Wall Ovens are constantly working to change specifications or discontinue models without notice. Lifting oven will hide larger cutout opening at top and oven's 1"-high bottom trim will fit flush against cabinet ...8226; electroluxappliances.com CANADA • 5855 Terry Fox Way • Mississauga, ON L5V 3E4 • 1-800-265-8352 • electroluxappliances.ca EI27EW45J 03/10 © 2010 Electrolux Home Products, Inc. Spacers 48 5/8" Power supply location (left bottom rear) 48 7/8" min. 49 1/8" max. 24 7/8" min. 25 1/4"...
... must be level and cabinet front must be square. • Double Wall Ovens are constantly working to change specifications or discontinue models without notice. Lifting oven will hide larger cutout opening at top and oven's 1"-high bottom trim will fit flush against cabinet ...8226; electroluxappliances.com CANADA • 5855 Terry Fox Way • Mississauga, ON L5V 3E4 • 1-800-265-8352 • electroluxappliances.ca EI27EW45J 03/10 © 2010 Electrolux Home Products, Inc. Spacers 48 5/8" Power supply location (left bottom rear) 48 7/8" min. 49 1/8" max. 24 7/8" min. 25 1/4"...


