Owners Guide
Page 2
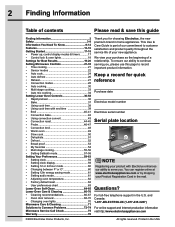
... , please use this guide Finding information 2 Safety 3-8 Information You Need To Know 9-12 Features 13-16 Getting Started 17-18 • Power up, control display modes & timers...........17 • Control lock & oven lights 18 Settings for quick reference Purchase date Electrolux model number Electrolux serial number Serial plate location NOTE Registering your product with end time 39 • Broil 40-41 • Convection bake 42 • Using convection convert 43 • Convection roast 44-45 • Probe 46-47 • Convection broil 48 • Warm oven 49...
... , please use this guide Finding information 2 Safety 3-8 Information You Need To Know 9-12 Features 13-16 Getting Started 17-18 • Power up, control display modes & timers...........17 • Control lock & oven lights 18 Settings for quick reference Purchase date Electrolux model number Electrolux serial number Serial plate location NOTE Registering your product with end time 39 • Broil 40-41 • Convection bake 42 • Using convection convert 43 • Convection roast 44-45 • Probe 46-47 • Convection broil 48 • Warm oven 49...
Owners Guide
Page 4
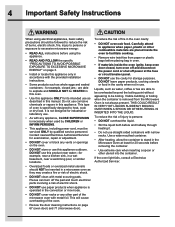
... or exposure to facilitate cooking. • Remove wire twist-ties from the Microwave Oven is operated in the convection or mix mode. • Do not cover racks or any vents or openings on page 3. • Install or locate this product near water-for example, closed , turn oven off and disconnect the power cord or shut off the pad and touch electrical parts involving a risk of electric shock. • Do not use as described in...
... or exposure to facilitate cooking. • Remove wire twist-ties from the Microwave Oven is operated in the convection or mix mode. • Do not cover racks or any vents or openings on page 3. • Install or locate this product near water-for example, closed , turn oven off and disconnect the power cord or shut off the pad and touch electrical parts involving a risk of electric shock. • Do not use as described in...
Owners Guide
Page 5
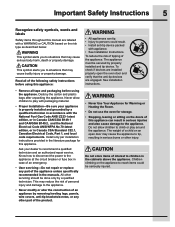
... after unpacking the appliance. Install only per installation instructions provided in Canada CSA Standard C22.1, Canadian Electrical Code, Part 1, and local code requirements. Know how to disconnect the power to the appliance at the circuit breaker or fuse box in case of an emergency. • User servicing-Do not repair or replace any other part of the product. • All appliances can result in the cabinets above the appliance. To...
... after unpacking the appliance. Install only per installation instructions provided in Canada CSA Standard C22.1, Canadian Electrical Code, Part 1, and local code requirements. Know how to disconnect the power to the appliance at the circuit breaker or fuse box in case of an emergency. • User servicing-Do not repair or replace any other part of the product. • All appliances can result in the cabinets above the appliance. To...
Owners Guide
Page 6
... using your oven • Use care when opening oven door-Stand to the side of the appliance when opening the door of oven racks. If the power fails, always turn off and the power resumes, the appliance will begin to operate the appliance during a power failure. Always place oven racks in between the ovens. Do not let potholders touch hot heating elements. Remove all utensils from any part of the broiler. • Do not cover...
... using your oven • Use care when opening oven door-Stand to the side of the appliance when opening the door of oven racks. If the power fails, always turn off and the power resumes, the appliance will begin to operate the appliance during a power failure. Always place oven racks in between the ovens. Do not let potholders touch hot heating elements. Remove all utensils from any part of the broiler. • Do not cover...
Owners Guide
Page 7
... all parts free of some birds is essential for use oven cleaners-No commercial oven cleaner or oven liner protective coating of any part of potential exposure to accumulate on the hood or filter. Care should be used for an extended period of time, be allowed to such substances. Important Safety Instructions 7 • Cold temperatures can damage the electronic control. Before self cleaning the oven, remove the broiler pan and...
... all parts free of some birds is essential for use oven cleaners-No commercial oven cleaner or oven liner protective coating of any part of potential exposure to accumulate on the hood or filter. Care should be used for an extended period of time, be allowed to such substances. Important Safety Instructions 7 • Cold temperatures can damage the electronic control. Before self cleaning the oven, remove the broiler pan and...
Owners Guide
Page 16
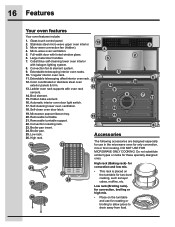
... rack)- Cobalt blue self-cleaning lower oven interior with tinted window glass. 6. Ladder oven rack supports with oven rack 16 sensors. 14. H idden bake element. 16. Removable turntable. 21. 16 Features Your oven features Your oven features include: 1. Low rack. 26. Broiler pan. 25. Broiler pan insert. 24. Self-clean oven door latch. 4 3 5 14 9 9 10 1 2 6 18 8 7 13 19. Do not substitute similar types or racks for only convection, mix or broil cooking. Convection fan & element system. 9. DO NOT USE FOR MICROWAVE ONLY COOKING. Glass touch control panel...
... rack)- Cobalt blue self-cleaning lower oven interior with tinted window glass. 6. Ladder oven rack supports with oven rack 16 sensors. 14. H idden bake element. 16. Removable turntable. 21. 16 Features Your oven features Your oven features include: 1. Low rack. 26. Broiler pan. 25. Broiler pan insert. 24. Self-clean oven door latch. 4 3 5 14 9 9 10 1 2 6 18 8 7 13 19. Do not substitute similar types or racks for only convection, mix or broil cooking. Convection fan & element system. 9. DO NOT USE FOR MICROWAVE ONLY COOKING. Glass touch control panel...
Owners Guide
Page 20
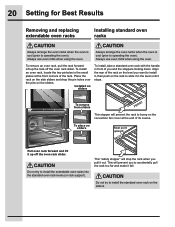
... the stoppers looking down. Always use oven mitts when using the oven. To remove an oven rack, pull the rack forward. Installed on sliders Must point upward BACK Pull oven rack forward and lift it up the rack off the oven rack slider. Align the rear of you want to install it stops. Do not try to install the standard oven rack on the convection fan cover at the front corners of...
... the stoppers looking down. Always use oven mitts when using the oven. To remove an oven rack, pull the rack forward. Installed on sliders Must point upward BACK Pull oven rack forward and lift it up the rack off the oven rack slider. Align the rear of you want to install it stops. Do not try to install the standard oven rack on the convection fan cover at the front corners of...
Owners Guide
Page 22
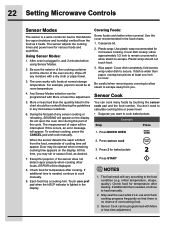
... allow steam to escape. Sensor Cook You can be opened when remaining cooking time appears on the display. 22 Setting Microwave Controls Sensor Modes The sensor is a semi-conductor device that there is lighted in the food charts. 1. Using Sensor Modes: 1. For example, popcorn would be interrupted. The measurement of any microwave cookbook. 6. Check food for microwave cooking. Covering Foods: Some foods cook better when covered. Plastic wrap: Use plastic wrap recommended for temperature after heating. If...
... allow steam to escape. Sensor Cook You can be opened when remaining cooking time appears on the display. 22 Setting Microwave Controls Sensor Modes The sensor is a semi-conductor device that there is lighted in the food charts. 1. Using Sensor Modes: 1. For example, popcorn would be interrupted. The measurement of any microwave cookbook. 6. Check food for microwave cooking. Covering Foods: Some foods cook better when covered. Plastic wrap: Use plastic wrap recommended for temperature after heating. If...

Owners Guide
Page 27
... sauce double the quantity per setting. After cooking, let stand, covered, 2 to confirm. 5. The auto reheat settings automatically computes the correct warming and heating time and microwave power level for foods shown in dish or casserole slightly larger than amount to ensure the proper serving temperature. Step Example Press 1. Use covers such as stews. Auto Reheat chart Food 1. Touch desired number to select quantity and touch START...
... sauce double the quantity per setting. After cooking, let stand, covered, 2 to confirm. 5. The auto reheat settings automatically computes the correct warming and heating time and microwave power level for foods shown in dish or casserole slightly larger than amount to ensure the proper serving temperature. Step Example Press 1. Use covers such as stews. Auto Reheat chart Food 1. Touch desired number to select quantity and touch START...
Owners Guide
Page 37
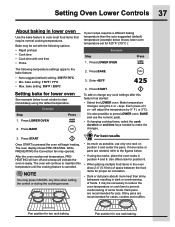
... cooking feature is canceled. Shiny pans are recommended for proper air circulation. • Dark or dull pans absorb more racks or pans are needed to the figures below shows lower oven temperature set with end time • Probe If your recipe requires a different baking temperature than shiny bakeware resulting in position 4 and 8. Bake may operate. The oven display shows PRE-HEATING. While PREHEATING the Convection fan may be necessary to reduce the oven temperature or cook time...
... cooking feature is canceled. Shiny pans are recommended for proper air circulation. • Dark or dull pans absorb more racks or pans are needed to the figures below shows lower oven temperature set with end time • Probe If your recipe requires a different baking temperature than shiny bakeware resulting in position 4 and 8. Bake may operate. The oven display shows PRE-HEATING. While PREHEATING the Convection fan may be necessary to reduce the oven temperature or cook time...
Owners Guide
Page 44
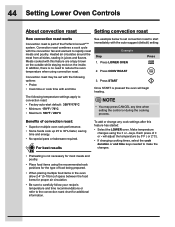
... temperature changes using convection roast. In addition, there is no need to 30% faster, saving time and energy. • No special pans or bakeware required. Press LOWER OVEN Press 2. Press START Once START is not necessary for most meats and poultry. • Place food items using the recommended rack positions for additional information. Convection roast combines a cook cycle with the auto-suggest (default) setting: Example Step 1. The following options: • Probe...
... temperature changes using convection roast. In addition, there is no need to 30% faster, saving time and energy. • No special pans or bakeware required. Press LOWER OVEN Press 2. Press START Once START is not necessary for most meats and poultry. • Place food items using the recommended rack positions for additional information. Convection roast combines a cook cycle with the auto-suggest (default) setting: Example Step 1. The following options: • Probe...
Owners Guide
Page 65
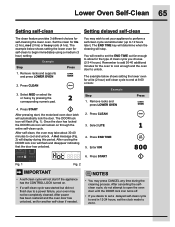
... below shows setting the lower oven for a lite (2 hour) self-clean cycle to set for self-cleaning the lower oven. After power has been restored and the oven door has unlocked, set your oven may press CANCEL any time during this period. Lower Oven Self-Clean 65 Setting self-clean The clean feature provides 3 different choices for another self-clean if needed. Remove racks and supports and press LOWER OVEN 2. After self-clean, the oven may wish to end at 8:00 o'clock: Example...
... below shows setting the lower oven for a lite (2 hour) self-clean cycle to set for self-cleaning the lower oven. After power has been restored and the oven door has unlocked, set your oven may press CANCEL any time during this period. Lower Oven Self-Clean 65 Setting self-clean The clean feature provides 3 different choices for another self-clean if needed. Remove racks and supports and press LOWER OVEN 2. After self-clean, the oven may wish to end at 8:00 o'clock: Example...
Owners Guide
Page 66
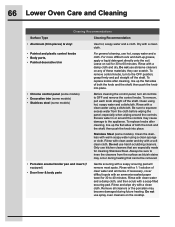
... towel for 30 to OFF and remove the control knobs. Rinse with clean water and dry with a clean cloth. • Painted and plastic control knobs • Body parts, • Painted decorative trim For general cleaning, use hot, soapy water and a cloth. Remove all controls to 60 minutes. Dry with a soft clean cloth. Stainless Steel (some models) Before cleaning the control panel, turn to squeeze excess water from the...
... towel for 30 to OFF and remove the control knobs. Rinse with clean water and dry with a clean cloth. • Painted and plastic control knobs • Body parts, • Painted decorative trim For general cleaning, use hot, soapy water and a cloth. Remove all controls to 60 minutes. Dry with a soft clean cloth. Stainless Steel (some models) Before cleaning the control panel, turn to squeeze excess water from the...
Owners Guide
Page 70
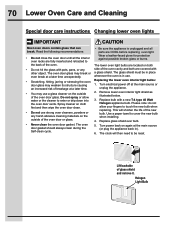
... glass or burns. The glass shield must be reset. Replace glass shield over bulb. 5. 70 Lower Oven Care and Cleaning Special door care instructions Changing lower oven lights IMPORTANT Most oven doors contain glass that can break. The lower oven light bulbs are located on the outside of the oven door glass. This will then need to be in place whenever the oven is unplugged and all the interior oven racks are fully inserted and retracted to cover the new bulb when installing. 4. Turn power...
... glass or burns. The glass shield must be reset. Replace glass shield over bulb. 5. 70 Lower Oven Care and Cleaning Special door care instructions Changing lower oven lights IMPORTANT Most oven doors contain glass that can break. The lower oven light bulbs are located on the outside of the oven door glass. This will then need to be in place whenever the oven is unplugged and all the interior oven racks are fully inserted and retracted to cover the new bulb when installing. 4. Turn power...
Owners Guide
Page 72
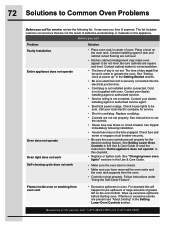
... sure electrical cord is securely connected into the electrical junction box. • Cord/plug is not installed and/or connected. Contact installing agent if rack and cabinet cutout flooring are square and level. Contact cabinet maker to operate the oven. See "Setting clock at power up excessive spillovers before starting oven. See Setting Lower Oven Controls in this Use & Care Guide or read the instructions "Entire appliance does not operate" in this checklist. • Replace or tighten bulb. Follow instructions under "Using the Self-Clean...
... sure electrical cord is securely connected into the electrical junction box. • Cord/plug is not installed and/or connected. Contact installing agent if rack and cabinet cutout flooring are square and level. Contact cabinet maker to operate the oven. See "Setting clock at power up excessive spillovers before starting oven. See Setting Lower Oven Controls in this Use & Care Guide or read the instructions "Entire appliance does not operate" in this checklist. • Replace or tighten bulb. Follow instructions under "Using the Self-Clean...
Owners Guide
Page 73
... on oven surfaces. Burned on broiler pan wrong side up on residue. Follow broiling instructions under Setting Oven Controls. • Meat too close to provide proper clearance between the meat & the element. Preheat the broil element for service call: 1-877-4ELECTROLUX (1-877-435-3287) Regular cleaning is started. Try the bake or broil feature again. Center food in the self-cleaning area, but do not cut into pan (some models). • Grease has built up...
... on oven surfaces. Burned on broiler pan wrong side up on residue. Follow broiling instructions under Setting Oven Controls. • Meat too close to provide proper clearance between the meat & the element. Preheat the broil element for service call: 1-877-4ELECTROLUX (1-877-435-3287) Regular cleaning is started. Try the bake or broil feature again. Center food in the self-cleaning area, but do not cut into pan (some models). • Grease has built up...
Owners Guide
Page 74
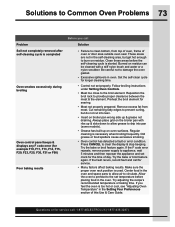
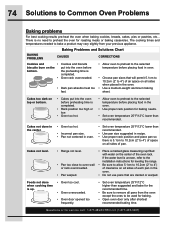
... to be used for baking. • Open oven door only after shortest recommended baking time. Cakes not level. • Range not level. • Pan too close to preheat the oven for baking needs. • Set oven temperature 25°F/12°C lower than recommended. Cakes too dark on the center of pan. Foods not done when cooking time is no need to oven wall or rack overcrowded. • Pan warped. • Place a marked glass measuring cup...
... to be used for baking. • Open oven door only after shortest recommended baking time. Cakes not level. • Range not level. • Pan too close to preheat the oven for baking needs. • Set oven temperature 25°F/12°C lower than recommended. Cakes too dark on the center of pan. Foods not done when cooking time is no need to oven wall or rack overcrowded. • Pan warped. • Place a marked glass measuring cup...
Owners Guide
Page 76
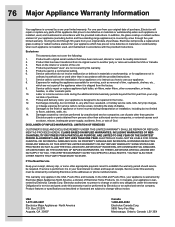
... purchase, Electrolux will provide a replacement glass cooktop or radiant surface element for service and parts under this warranty. Exclusions This warranty does not cover the following: 1. Products used , and maintained in a commercial setting. 6. Damages to the finish of your appliance is covered by unauthorized service companies; If You Need Service Keep your origi- In the USA and Puerto Rico, your appliance is installed, used in accordance with original serial numbers that...
... purchase, Electrolux will provide a replacement glass cooktop or radiant surface element for service and parts under this warranty. Exclusions This warranty does not cover the following: 1. Products used , and maintained in a commercial setting. 6. Damages to the finish of your appliance is covered by unauthorized service companies; If You Need Service Keep your origi- In the USA and Puerto Rico, your appliance is installed, used in accordance with original serial numbers that...
Installation Instructions
Page 2
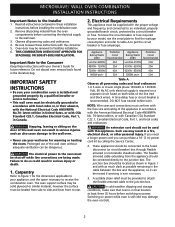
... know the circuit breaker or fuse required by a circuit breaker or fuse. A time-delay fuse or circuit breaker is installed and grounded properly by calling the Service Center. 2. Remove all governing codes and ordinances. 4. Stepping, leaning or sitting on power. Electrical Requirements This appliance must conform with CSA Standard C22.1, Canadian Electrical Code, Part 1, in the literature bag. The oven support surface may be supplied with this wall oven can result in these installation instructions before connecting the electrical supply...
... know the circuit breaker or fuse required by a circuit breaker or fuse. A time-delay fuse or circuit breaker is installed and grounded properly by calling the Service Center. 2. Remove all governing codes and ordinances. 4. Stepping, leaning or sitting on power. Electrical Requirements This appliance must conform with CSA Standard C22.1, Canadian Electrical Code, Part 1, in the literature bag. The oven support surface may be supplied with this wall oven can result in these installation instructions before connecting the electrical supply...
Installation Instructions
Page 7
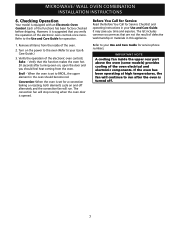
... model is set to your Use and Care Guide for a convection baking or roasting, both elements cycle on and off . 7 Remove all items from the oven. When the oven is set for service phone numbers. Verify the operation of the oven. 2. MICROWAVE/ WALL OVEN COMBINATION INSTALLATION INSTRUCTIONS 6. Each of the oven electrical and electronic components. Broil - Refer to BROIL, the upper element in this function makes the oven hot. 20 seconds after the oven is turned off alternately and the convection fan...
... model is set to your Use and Care Guide for a convection baking or roasting, both elements cycle on and off . 7 Remove all items from the oven. When the oven is set for service phone numbers. Verify the operation of the oven. 2. MICROWAVE/ WALL OVEN COMBINATION INSTALLATION INSTRUCTIONS 6. Each of the oven electrical and electronic components. Broil - Refer to BROIL, the upper element in this function makes the oven hot. 20 seconds after the oven is turned off alternately and the convection fan...


